一、Android 应用开发特色
1. 四大组件
活动(Activity):门面,应用中看的到的东西均放在活动中。
服务(Service):在后台默默运行,即使退出应用,仍可继续运行。
广播接收器(Broadcast Receiver):接收或发送各处广播消息。
内容提供器(Content Provider):为应用程序之间共享数据。
2. 丰富的系统控件
3. SQLite数据库
轻量级、运算速度极快、嵌入式关系型数据库。支持标准SQL语法,可通过Android封装好的API进行操作。
4. 强大的多媒体
5. 地理位置定位
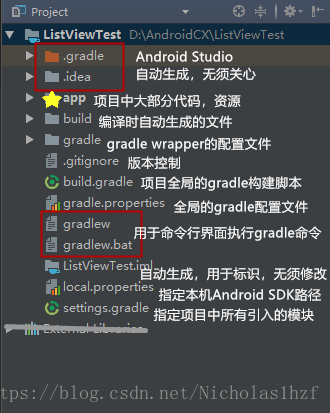
二、 目录结构
1. 项目结构
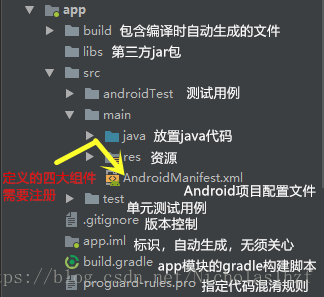
2. app目录结构
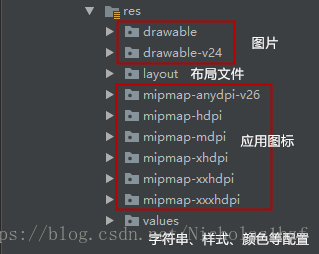
3. res目录结构
三、详解build.gradle文件
1. Android Studio 采用Gradle构建项目。这是一种基于Groovy的领域特定语言DSL来声明项目设置,摒弃传统基于XML的各种繁琐配置的项目构建工具。
2. 外层目录的build.gradle
buildscript {
    repositories {
        jcenter() //jcenter是一个代码托管仓库
                  //声明此配置后
                  //可在项目上轻松引用任何jcenter上的开源项目
    }
    dependencies {
        classpath 'com.android.tools.build:gradle:3.0.1' //声明一个Gradle插件
    }
}
allprojects {
    repositories {
        jcenter()
    }
}
3. app目录下的build.gradle
apply plugin: 'com.android.application' //应用了一个插件,一般两个值可选:
                                        // 1. com.android.application
                                        //    应用程序模块 可以直接运行
                                        // 2. com.android.library
                                        //    库模块 只能作为代码库依附于别的应用程序模块来运行
android {
    compileSdkVersion 26 //指定项目的编译版本
    // buildToolsVersion "24.0.2" 指定项目构建工具的版本
    defaultConfig {
        applicationId "com.example.thinkpad.listviewtest" //指定项目包名
        minSdkVersion 15 //指定项目最低兼容的Android系统版本
        targetSdkVersion 26 //指定在该目标版本上做过充分测试,系统会为你启用一些最新的功能和特性
        versionCode 1 //指定项目的版本号
        versionName "1.0" //指定项目的版本名
        testInstrumentationRunner "android.support.test.runner.AndroidJUnitRunner"
    }
    buildTypes { //用于指定生成安装文件的相关配置,一般只有两个子闭包:debug&release
                 // debug 指定生成测试版安装文件的配置 可忽略不写
                 // release 指定生成正式版安装文件的配置
        release {
            minifyEnabled false //指定是否对项目的代码进行混淆 true混淆 false不混淆
            proguardFiles getDefaultProguardFile('proguard-android.txt'), 'proguard-rules.pro'
                //指定混淆时使用的规则文件
                // proguard-android.txt Android SDK目录下 所有项目通用
                // proguard-rules.pro 当前项目根目录下 当前项目特有的混淆规则
        }
    }
}
dependencies { //指定当前项目所有的依赖关系:
               //1. 本地依赖 对本地jar包或目录添加依赖关系
               //2. 库依赖 对项目中的库模块添加依赖关系
               //3. 远程依赖 对jcenter库上的开源项目添加依赖关系
    implementation fileTree(dir: 'libs', include: ['*.jar']) //本地依赖
    implementation 'com.android.support:appcompat-v7:26.1.0' //远程依赖 域名 组名 版本号
    implementation 'com.android.support.constraint:constraint-layout:1.1.2'
    testImplementation 'junit:junit:4.12'//声明测试用例库
    androidTestImplementation 'com.android.support.test:runner:1.0.2'
    androidTestImplementation 'com.android.support.test.espresso:espresso-core:3.0.2'
}
四、Hello World 运行原理浅析
1. 在AndroidManifest.xml文件中
<!--对主活动进行注册,活动都需要注册-->
<activity android:name=".HelloWorldActivity">
    <intent-filter>
        <action android:name="android.intent.action.MAIN" />
        <category android:name="android.intent.category.LAUNCHER" />
    </intent-filter>
    <!--主活动,即点击应用图标首先启动的活动-->
</activity>
2. HelloWorldActivity.java中
//项目中所有活动必须继承Activity或者它的子类才能拥有活动的特性
public class HelloWorldActivity extends AppCompatActivity {
    @Override
    //这个方法是一个活动被创建时必定要执行的方法
    protected void onCreate(Bundle savedInstanceState) {
        super.onCreate(savedInstanceState);
        setContentView(R.layout.hello_world_layout);
        //给当前活动引入一个hello_world_layout布局
    }
}
3. hello_world_layout.xml中
<?xml version="1.0" encoding="utf-8"?>
<LinearLayout xmlns:android="http://schemas.android.com/apk/res/android"
    xmlns:app="http://schemas.android.com/apk/res-auto"
    xmlns:tools="http://schemas.android.com/tools"
    android:layout_width="match_parent"
    android:layout_height="match_parent"
    tools:context="com.example.thinkpad.listviewtest.MainActivity">

    <TextView
        android:id="@+id/hello_view"
        android:layout_width="match_parent"
        android:layout_height="match_parent"
        android:text="Hello World!" />
        <!--在java代码中并没有出现Hello World!而是这里出现-->
        <!--因为Android程序的设计讲究逻辑和视图分离-->
        <!--在布局文件中编写界面,在活动中引入进来-->
</LinearLayout>
整理学习自郭霖大佬的《第一行代码》
目前小白一名,持续学习Android中,如有错误请批评指正!