前言
在平时的开发过程中我们会使用到许多的数据结构,其中表也许是使用最多的一种。明白Collections容器的朋友一定都是使用过其中的List容器。这里我将通过创建自己的List来说明表的源码实现。
这里主要实现两个库类重要子集ArrayList和LinkedList的代码。
区别
ArrayList和LinkedList分别是表的两种实现方式。各自有着各自的优点和缺点。我们都知道ArrayList的底层是基于数组的方式实现,而LinkedList则是基于链表的方式。
ArrayList
ArrayList是通过数组来实现的一种数据结构,它由固定容量创建的一个数组,但是在需要的时候可以用双倍容量创建一个不同的数组。
优点:当需要对其中的元素进行索引时只需要花费常数时间。
缺点:当需要添加和删除元素时最坏情况下的时间复杂度为O(N)。这是由于在添加或者删除时需要移动数组后面的所有元素。但是,如果需要添加或是删除操作的元素位于表的高端时,则只花费O(1)的时间。
补充:当我们需要对一个数组进行扩容时,这将会是一件十分复杂的事情。
int[] oldArr = new int[10];
int[] newArr = new int[oldArr.length * 2];   //扩展后的数组

for(int i=0;i<oldArr.length;i++){
    newArr[i] = oldArr[i];
}
oldArr = newArr;
LinkedList
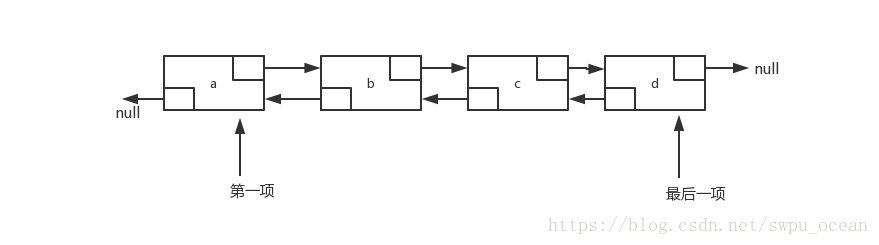
LinkedList是由一系列结点组成,这些结点在内存中不需要连续,每一个结点都包含一个表元素(数据),以及到该元素后面一个结点的链(称为next链)。最后一个结点的next链引用为null。
但是通常我们会使用到双链表。双链表就是在简单的链表上给每个结点加上一个到它前面一个结点的。
优点:**当需要进行添加或是删除操作时只需要花费线性时间。**当我们需要添加或是删除节点时,只需要修改该节点的前后节点链即可。
缺点:当**需要进行索引时最坏情况需要花费O(N)的时间复杂度。**因为它需要遍历整个链表。
Collections接口
Collections API位于java.util包中。其中Collections接口扩展了Iterable接口,实现了Iterable接口的类可以拥有增强的for循环。
public interface Collection<T> extends Iterable<T>{
        int size();
        boolean isEmpty();
        void clear();
        boolean contains(T item);
        boolean add(T item);
        boolean remove(T item);
        Iterator<T> iterator();
    }
实现Iterable接口的集合必须提供一个iterator方法,该方法返回一个Iterator类型的对象。在这个对象中会记录当前元素的位置。当我们使用迭代器遍历集合元素时就需要使用到该方法。
public interface Iterator<E>{
        boolean hasNext();
        E next();
        void remove();
    }
在iterator接口中有三个方法用于我们迭代元素。其中hasNext用来告诉是否存在下一项,next将会返回当前位置的元素,并随后将当前位置后移,remove可用于移除元素。
这里需要强调的是,我们应该避免使用Collection中的remove方法,而尽量使用iterator中的remove方法。因为当我们使用Collection中的remove方法时需要重新去索引元素的位置,而iterator自身存储了当前元素的位置,因而可以减少索引时间上的开销。
下面是迭代器的使用方法:
public static <T> void print(Collection<T> coll){
        Iterator<T> iterator = coll.iterator();
        while (iterator.hasNext()){
            T item = iterator.next();
            System.out.println(item);
        }
    }
ArrayList 类的实现
这里我将编写ArrayList类的底层实现,为了避免与java.util中的类库相混,这里我将类命名成ArrayListTest。
在我们编写的ArrayListTest类中有以下几处细节:
ArrayListTest将以数组为底层实现,并且将数组的初始大小设置为10,以及该类拥有当前数组中元素的项数size。- 在该类中我们使用
ensureCapacity方法来对数组进行扩容,通过获得一个新数组,并将老数组拷贝到新数组中改变数组的容量,允许虚拟机回收老数组。 ArrayListTest类提供get、set等实现。ArrayListTest类提供容器基本使用方法。如size()、isEmpty()和clear()方法,以及remove()和add()对元素进行操作。- 我们在这里实现了
Iterator接口的类,并重写了其中的hasNext、next和remove方法
ArrayListTest类的完整代码如下:
/**
 * @author: zhangocean
 * @Date: 2018/10/02 12:36
 */
public class ArrayListTest<T> implements Iterable<T>{

    private static final int DEFAULT_CAPACITY = 10;
    private int size;
    private T[] items;

    public ArrayListTest(){
        doClear();
    }

    public void clear(){
        doClear();
    }

    public int size(){
        return size;
    }

    private void doClear(){
        size = 0;
        ensureCapacity(DEFAULT_CAPACITY);
    }

    public void ensureCapacity(int newSize){
        if(newSize<size){
            return;
        }
        T[] old = items;
        items = (T[]) new Object[newSize];

        for(int i=0;i<size();i++){
            items[i] = old[i];
        }
    }

    public boolean add(T x){
        add(size(), x);
        return true;
    }

    public boolean isEmpty(){
        return size() == 0;
    }

    public T get(int index){
        if(index < 0 || index >= size){
            throw new IndexOutOfBoundsException();
        }
        return items[index];
    }

    public T set(int index, T x){
        if(index < 0 || index >= size){
            throw new IndexOutOfBoundsException();
        }
        T old = items[index];
        items[index] = x;
        return old;
    }

    public void add(int id, T x){
        if(items.length == size){
            ensureCapacity(size() * 2 +1);
        }
        for(int i=size;i>id;i--){
            items[i] = items[i-1];
        }
        items[id] = x;

        size++;
    }

    public T remove(int index){
        T removeItem = items[index];
        int i=index;
        while (i<size()-1){
            items[i] = items[i+1];
            i++;
        }
        items[i] = null;
        size--;
        return removeItem;
    }

    @Override
    public String toString() {
        StringBuilder str = new StringBuilder("ArrayListTest{items=[");
        int i=0;
        while (i<size()){
            if(items[i] != null){
                str.append(items[i]).append(",");
            } else {
                break;
            }
            i++;
        }
        if(isEmpty()){
            return str + "]}";
        }
        return str.substring(0,str.length()-1) + "]}";
    }

    @Override
    public Iterator iterator() {
        return new ArrayListIterator();
    }

    private class ArrayListIterator implements Iterator{

        private int current = 0;

        @Override
        public boolean hasNext() {
            return current<size();
        }

        @Override
        public T next() {
            if(!hasNext()){
                throw new NoSuchElementException();
            }
            return items[current++];
        }

		 @Override
        public void remove() {
            ArrayListTest.this.remove(--current);
        }
    }

}
在其中33行处可以看到这样一行语句items = (T[]) new Object[newSize],因为泛型数组的创建是非法的,我们的做法是创建了一个Object类型的数组,然后通过泛型进行强制转换。这将产生一个编译器警告,但是泛型集合的实现中这是不可避免的。
在其中的add方法中,如果添加元素达到了当前数组的容量大小后就需要对数组进行扩容,由于扩充容量的代价是非常昂贵的,于是在这里我将对扩容后的大小设置为原来大小的两倍,以避免频繁扩容带来的代价。
下面是对于ArrayListTest类的测试:
public class Main {
    public static void main(String[] args) {

       ArrayListTest<Integer> arrayList = new ArrayListTest<Integer>();
       for(int i=0;i<10;i++){
           arrayList.add(i);
       }
       System.out.println("ArrayListTest:" + arrayList);
       arrayList.remove(1);
       System.out.println("remove:" + arrayList);
       arrayList.set(1,100);
       System.out.println("set:" + arrayList);
       System.out.println("get:" + arrayList.get(1));
       arrayList.clear();
       System.out.println("clear:" + arrayList);
    }
}
输出结果如下:
ArrayListTest:ArrayListTest{items=[0,1,2,3,4,5,6,7,8,9]}
remove:ArrayListTest{items=[0,2,3,4,5,6,7,8,9]}
set:ArrayListTest{items=[0,100,3,4,5,6,7,8,9]}
get:100
clear:ArrayListTest{items=[]}
LinkedList 类的实现
LinkedList的实现相对于ArrayList的实现要过于复杂一点。由于它是将双链表作为实现,而且还需要保存链表两端的引用。同ArrayList一样,为了避免与类库中的类相混,这里我将类命名成LinkedListTest。
LinkedListTest类有以下细节需要注意:
- 由于底层实现是链表形式,因此我们需要创建一个
Node类作为链表中的每个结点。该节点包含数据以及到前一个结点的链(next链)和到后一个结点的链(previous链)。 - 在该实现中我们需要创建两个空节点作为链表的两端。
- 这里仍然包含大多数操作方法,如
add、set、get等等。 - 在这里实现的
iterator接口中,我们会对每次add、remove等操作过程进行监控,如果预期的modCount和实际的modCount不一样,则在迭代中将抛出异常。
LinkedListTest类的完整代码如下:
/**
* @author: zhangocean
* @Date: 2018/10/02 14:48
*/
public class LinkedListTest<T> implements Iterable {
private int size;
private int modCount = 0;
private Node<T> beginNode;
private Node<T> endNode;
//结点类
private class Node<T> {
public T data;
public Node<T> previous;
public Node<T> next;
public Node(T data, Node<T> p, Node<T> n) {
this.data = data;
this.previous = p;
this.next = n;
}
}
public LinkedListTest() {
doClear();
}
public void doClear() {
clear();
}
public void clear() {
beginNode = new Node<T>(null, null, null);
endNode = new Node<T>(null, beginNode, null);
beginNode.next = endNode;
size = 0;
modCount++;
}
public int size() {
return size;
}
public boolean isEmpty() {
return size() == 0;
}
public boolean add(T x) {
add(size(), x);
return true;
}
public void add(int index, T x) {
addBefore(getNode(index, 0, size()), x);
}
public T get(int index) {
return getNode(index).data;
}
public T set(int index, T newVal) {
Node<T> node = getNode(index);
T oldData = node.data;
node.data = newVal;
return oldData;
}
public T remove(int index) {
return remove(getNode(index));
}
public T remove(Node<T> node) {
node.next = node.previous.next;
node.previous = node.next.previous;
size--;
modCount++;
return node.data;
}
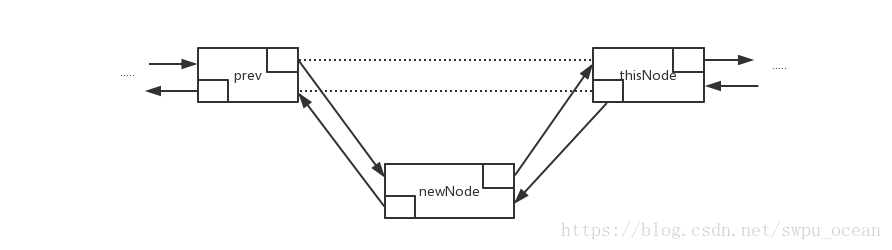
//在thisNode结点前插入一个结点
private void addBefore(Node<T> thisNode, T x) {
Node<T> newNode = new Node<T>(x, thisNode.previous, thisNode);
newNode.previous.next = newNode;
thisNode.previous = newNode;
size++;
modCount++;
}
private Node<T> getNode(int index) {
return getNode(index, 0, size() - 1);
}
private Node<T> getNode(int index, int lower, int upper) {
Node<T> thisNode;
if (index < lower || index > upper) {
throw new IndexOutOfBoundsException();
}
if (index < size() / 2) {
thisNode = beginNode.next;
for (int i = 0; i < index; i++) {
thisNode = thisNode.next;
}
} else {
thisNode = endNode;
for (int i = size(); i > index; i--) {
thisNode = thisNode.previous;
}
}
return thisNode;
}
@Override
public String toString() {
StringBuilder str = new StringBuilder("LinkedListTest{item=");
for (int i = 0; i < size; i++) {
str.append(get(i)).append(",");
}
return str.substring(0, str.length() - 1) + "}";
}
@Override
public Iterator iterator() {
return new LinkedListIterator();
}
private class LinkedListIterator implements Iterator {
private Node<T> current = beginNode.next;
private int expectedModCount = modCount;
private boolean okToRemove = false;
@Override
public boolean hasNext() {
return current != endNode;
}
@Override
public Object next() {
if (modCount != expectedModCount) {
throw new ConcurrentModificationException();
}
if (!hasNext()) {
throw new NoSuchElementException();
}
T data = current.data;
current = current.next;
okToRemove = true;
return data;
}
@Override
public void remove() {
if (modCount != expectedModCount) {
throw new ConcurrentModificationException();
}
if (!okToRemove) {
throw new IllegalStateException();
}
LinkedListTest.this.remove(current.previous);
expectedModCount++;
okToRemove = false;
}
}
}
在这个示例中,每次我们创建一个LinkedListTest时就会首先创建两个空节点beginNode和endNode,并将beginNode的下一个结点与endNode相连。当每次进行添加元素时,只需要修改前后两个结点的链之间的关系即可,如81-87行代码所示。
在其中有个getNode方法,该方法会对需要索引的元素位置进行判断,如果该位置位于链表的前半部分,则从表的前端进行索引,否则从尾部进行索引。
在实现的Iterator中,LinkedListIterator使用到类似于ArrayListIterator的逻辑。在该迭代器中仍保留着一个当前位置current,它表示当前链表中的第一个元素。注意,当current被定位到endNode时,对next的调用时非法的。
为了防止在迭代过程期间集合元素被修改,我们在迭代器中将对modCount进行判断,每次进行add、remove等方法时都会对modCount进行加一,因此我们只需要在迭代过程中判断modCount和expectedModCount的值是否相同,就可保证迭代过程中集合元素的完整性。
下面是对于LinkedListTest类的简单测试:
public class Main {

    public static void main(String[] args) {
        LinkedListTest<String> linkedList = new LinkedListTest<String>();
        linkedList.add("zhy");
        linkedList.add("love");
        linkedList.add("xyx");
        System.out.println(linkedList);

    }
}
嘿嘿,输出结果如下:
LinkedListTest{item=zhy,love,xyx}
总结
对于平常使用集合的过程中,我们并不会发现许多的细节,也只有当我们深入了解了集合的底层实现后才能更好、更正确的使用集合类。以上就是我对于表的两种基本实现的总结。
更多文章请关注我的个人博客:www.zhyocean.cn