新建redis用户
使用root用户登录虚机,添加用户并设置密码
#添加用户  [也可以通过-u -g -d参数指定特定的值来创建用户
[root@artisan ~]# useradd redis

#修改密码
[root@artisan ~]# passwd redis
Changing password for user redis.
New password:
BAD PASSWORD: it is too short
BAD PASSWORD: is too simple
Retype new password:
passwd: all authentication tokens updated successfull

#查看
[redis@artisan ~]$ id redis
uid=501(redis) gid=501(redis) groups=501(redis)
安装Redis
切换到redis用户,创建目录,下载解压。我这台主机可以连外网,所以直接通过wget的方式下载,如果不能访问外网的话,可以下载后ftp到主机上。
[root@artisan ~]# su - redis
[redis@artisan ~]$ mkdir -p /home/redis/redis
[redis@artisan ~]$wget http://download.redis.io/releases/redis-4.0.11.tar.gz
[redis@artisan ~]$tar -xvzf redis-4.0.11.tar.gz
[redis@artisan ~]$cd redis-4.0.11
[redis@artisan ~]$make
make 错误一 未安装gcc
[redis@artisan redis-4.0.11]$ make
cd src && make all
make[1]: Entering directory `/home/redis/redis/redis-4.0.11/src'
    CC Makefile.dep
make[1]: Leaving directory `/home/redis/redis/redis-4.0.11/src'
make[1]: Entering directory `/home/redis/redis/redis-4.0.11/src'
    CC adlist.o
/bin/sh: cc: command not found
make[1]: *** [adlist.o] Error 127
make[1]: Leaving directory `/home/redis/redis/redis-4.0.11/src'
make: *** [all] Error 2
[redis@artisan redis-4.0.11]$

然后重新make
make 错误二 jemalloc
[redis@artisan redis-4.0.11]$ make
cd src && make all
make[1]: Entering directory `/home/redis/redis/redis-4.0.11/src'
    CC adlist.o
In file included from adlist.c:34:
zmalloc.h:50:31: error: jemalloc/jemalloc.h: No such file or directory
zmalloc.h:55:2: error: #error "Newer version of jemalloc required"
make[1]: *** [adlist.o] Error 1
make[1]: Leaving directory `/home/redis/redis/redis-4.0.11/src'
make: *** [all] Error 2
参考 https://unix.stackexchange.com/questions/94479/jemalloc-and-other-errors-making-redis-on-centos-6-4
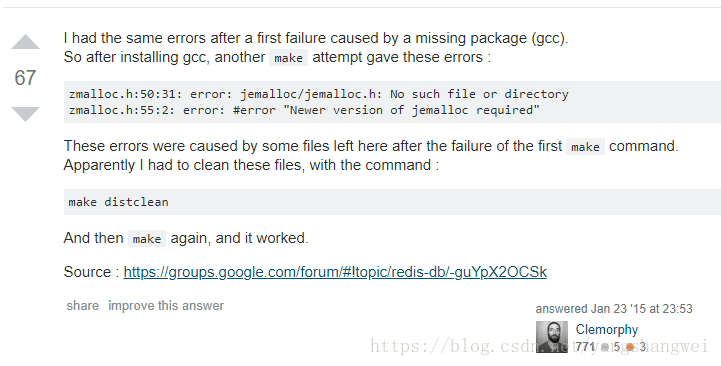
执行上述命令后
[redis@artisan redis-4.0.11]$ make distclean
......
......
......

[redis@artisan redis-4.0.11]$ make
......
......
......


Hint: It's a good idea to run 'make test' ;)

make[1]: Leaving directory `/home/redis/redis/redis-4.0.11/src'
[redis@artisan redis-4.0.11]$
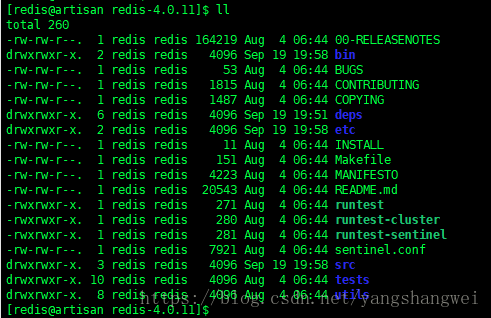
整理文件
为了方便对Redis的配置和服进行管理,建立etc和bin目录
[redis@artisan redis-4.0.11]$ pwd
/home/redis/redis/redis-4.0.11
[redis@artisan redis-4.0.11]$ mkdir etc
[redis@artisan redis-4.0.11]$ mkdir bin
[redis@artisan redis-4.0.11]$ mv redis.conf etc/
[redis@artisan redis-4.0.11]$ cd src
[redis@artisan src]$ mv mkreleasehdr.sh  redis-benchmark  redis-check-aof  redis-check-rdb  redis-cli  redis-sentinel  redis-server  redis-trib.rb ../bin
[redis@artisan src]$
启动redis
以默认的方式启动redis
可以直接使用./redis-server的方式 以默认形式启动redis.
[redis@artisan bin]$ ./redis-server
31494:C 19 Sep 20:01:36.670 # oO0OoO0OoO0Oo Redis is starting oO0OoO0OoO0Oo
31494:C 19 Sep 20:01:36.670 # Redis version=4.0.11, bits=64, commit=00000000, modified=0, pid=31494, just started
31494:C 19 Sep 20:01:36.670 # Warning: no config file specified, using the default config. In order to specify a config file use ./redis-server /path/to/redis.conf
31494:M 19 Sep 20:01:36.671 # You requested maxclients of 10000 requiring at least 10032 max file descriptors.
31494:M 19 Sep 20:01:36.671 # Server can't set maximum open files to 10032 because of OS error: Operation not permitted.
31494:M 19 Sep 20:01:36.671 # Current maximum open files is 4096. maxclients has been reduced to 4064 to compensate for low ulimit. If you need higher maxclients increase 'ulimit -n'.
                _._
           _.-``__ ''-._
      _.-``    `.  `_.  ''-._           Redis 4.0.11 (00000000/0) 64 bit
  .-`` .-```.  ```\/    _.,_ ''-._
 (    '      ,       .-`  | `,    )     Running in standalone mode
 |`-._`-...-` __...-.``-._|'` _.-'|     Port: 6379
 |    `-._   `._    /     _.-'    |     PID: 31494
  `-._    `-._  `-./  _.-'    _.-'
 |`-._`-._    `-.__.-'    _.-'_.-'|
 |    `-._`-._        _.-'_.-'    |           http://redis.io
  `-._    `-._`-.__.-'_.-'    _.-'
 |`-._`-._    `-.__.-'    _.-'_.-'|
 |    `-._`-._        _.-'_.-'    |
  `-._    `-._`-.__.-'_.-'    _.-'
      `-._    `-.__.-'    _.-'
          `-._        _.-'
              `-.__.-'

31494:M 19 Sep 20:01:36.693 # WARNING: The TCP backlog setting of 511 cannot be enforced because /proc/sys/net/core/somaxconn is set to the lower value of 128.
31494:M 19 Sep 20:01:36.693 # Server initialized
31494:M 19 Sep 20:01:36.693 # WARNING overcommit_memory is set to 0! Background save may fail under low memory condition. To fix this issue add 'vm.overcommit_memory = 1' to /etc/sysctl.conf and then reboot or run the command 'sysctl vm.overcommit_memory=1' for this to take effect.
31494:M 19 Sep 20:01:36.694 # WARNING you have Transparent Huge Pages (THP) support enabled in your kernel. This will create latency and memory usage issues with Redis. To fix this issue run the command 'echo never > /sys/kernel/mm/transparent_hugepage/enabled' as root, and add it to your /etc/rc.local in order to retain the setting after a reboot. Redis must be restarted after THP is disabled.
31494:M 19 Sep 20:01:36.694 * Ready to accept connections
ctrl+c终止该进程
^C31494:signal-handler (1537361978) Received SIGINT scheduling shutdown...
31494:M 19 Sep 20:59:38.814 # User requested shutdown...
31494:M 19 Sep 20:59:38.816 * Saving the final RDB snapshot before exiting.
31494:M 19 Sep 20:59:38.828 * DB saved on disk
31494:M 19 Sep 20:59:38.828 # Redis is now ready to exit, bye bye...
查看进程,可以看到没有该进程了。
[redis@artisan bin]$ ps -ef|grep redis-server |grep -v redis-server
[redis@artisan bin]$
指定redis.conf启动redis
[redis@artisan bin]$ ./redis-server ../etc/redis.conf
31765:C 19 Sep 21:04:08.458 # oO0OoO0OoO0Oo Redis is starting oO0OoO0OoO0Oo
31765:C 19 Sep 21:04:08.458 # Redis version=4.0.11, bits=64, commit=00000000, modified=0, pid=31765, just started
31765:C 19 Sep 21:04:08.458 # Configuration loaded
31765:M 19 Sep 21:04:08.460 # You requested maxclients of 10000 requiring at least 10032 max file descriptors.
31765:M 19 Sep 21:04:08.460 # Server can't set maximum open files to 10032 because of OS error: Operation not permitted.
31765:M 19 Sep 21:04:08.460 # Current maximum open files is 4096. maxclients has been reduced to 4064 to compensate for low ulimit. If you need higher maxclients increase 'ulimit -n'.
                _._
           _.-``__ ''-._
      _.-``    `.  `_.  ''-._           Redis 4.0.11 (00000000/0) 64 bit
  .-`` .-```.  ```\/    _.,_ ''-._
 (    '      ,       .-`  | `,    )     Running in standalone mode
 |`-._`-...-` __...-.``-._|'` _.-'|     Port: 6379
 |    `-._   `._    /     _.-'    |     PID: 31765
  `-._    `-._  `-./  _.-'    _.-'
 |`-._`-._    `-.__.-'    _.-'_.-'|
 |    `-._`-._        _.-'_.-'    |           http://redis.io
  `-._    `-._`-.__.-'_.-'    _.-'
 |`-._`-._    `-.__.-'    _.-'_.-'|
 |    `-._`-._        _.-'_.-'    |
  `-._    `-._`-.__.-'_.-'    _.-'
      `-._    `-.__.-'    _.-'
          `-._        _.-'
              `-.__.-'

31765:M 19 Sep 21:04:08.464 # WARNING: The TCP backlog setting of 511 cannot be enforced because /proc/sys/net/core/somaxconn is set to the lower value of 128.
31765:M 19 Sep 21:04:08.464 # Server initialized
31765:M 19 Sep 21:04:08.464 # WARNING overcommit_memory is set to 0! Background save may fail under low memory condition. To fix this issue add 'vm.overcommit_memory = 1' to /etc/sysctl.conf and then reboot or run the command 'sysctl vm.overcommit_memory=1' for this to take effect.
31765:M 19 Sep 21:04:08.464 # WARNING you have Transparent Huge Pages (THP) support enabled in your kernel. This will create latency and memory usage issues with Redis. To fix this issue run the command 'echo never > /sys/kernel/mm/transparent_hugepage/enabled' as root, and add it to your /etc/rc.local in order to retain the setting after a reboot. Redis must be restarted after THP is disabled.
31765:M 19 Sep 21:04:08.464 * DB loaded from disk: 0.000 seconds
31765:M 19 Sep 21:04:08.464 * Ready to accept connections
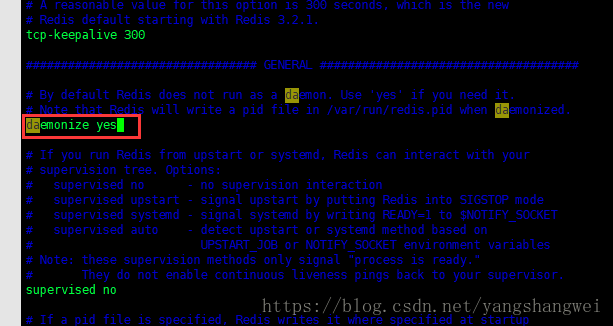
后台方式启动redis
修改redis.conf 将 daemonize no 修改为 daemonize yes,保存重启redis.
[redis@artisan redis-4.0.11]$ cd bin/
[redis@artisan bin]$ ./redis-server  ../etc/redis.conf
31864:C 19 Sep 21:11:01.500 # oO0OoO0OoO0Oo Redis is starting oO0OoO0OoO0Oo
31864:C 19 Sep 21:11:01.500 # Redis version=4.0.11, bits=64, commit=00000000, modified=0, pid=31864, just started
31864:C 19 Sep 21:11:01.500 # Configuration loaded
[redis@artisan bin]$
[redis@artisan bin]$ ps -ef|grep redis-server
redis     31865      1  0 21:11 ?        00:00:00 ./redis-server 127.0.0.1:6379
redis     31870  31812  0 21:11 pts/0    00:00:00 grep redis-server
[redis@artisan bin]$ date
Wed Sep 19 21:11:14 CST 2018
[redis@artisan bin]$
- daemonize:yes:redis采用的是单进程多线程的模式。当redis.conf中选项daemonize设置成yes时,代表开启守护进程模式。在该模式下,redis会在后台运行,并将进程pid号写入至redis.conf选项pidfile设置的文件中,此时redis将一直运行,除非手动kill该进程。
- daemonize:no当daemonize选项设置成no时,当前界面将进入redis的命令行界面,exit强制退出或者关闭连接工具(putty,xshell等)都会导致redis进程退出。
后台启动方式下,启动之后打印了很少的的内容,查看是否启动成功,ps -ef|grep redis-server 命令即可。
访问redis
我这里使用了RedisDesktopManager 来连接访问redis server .
Redis版本redis-4.0.11
目前:
- 桥接模式,虚机的网络和宿主机(本地windows)网络一致,可ping通
- 虚拟机的防火墙已经关闭
- 虚拟机中的redis server 已经以后台方式启动,通过虚拟机上的redis-cli可操作
但是仍然访问不了 。
解决方法一 关闭保护模式
- Step1: redis.conf 将 bind 127.0.0.1 注释掉 https://bingozb.github.io/62.html
- Step2: redis.conf 关闭保护模式 (protected-mode no 3.2 之后加入的新特性)
- Step3: 重启redis
- Step4: 使用本地的RedisDesktopManager,可以正常访问。
经过验证,有效。
解决方法二 设置密码
Step1: redis.conf 将 bind 127.0.0.1 注释掉 https://bingozb.github.io/62.html
Step2: redis.conf 保持默认的保护模式开启状态,无需修改,使用修改配置文件或者命令行的方式来设置密
- 修改配置文件 redis.conf ,需要重启redis
- 命令行,无需重启redis
命令行方式设置密码,无需重启redis (临时密码,重启后失效)
[redis@artisan bin]$ ./redis-cli
127.0.0.1:6379> config set requirepass
(error) ERR Wrong number of arguments for CONFIG set
127.0.0.1:6379> config set requirepass artisan
OK
127.0.0.1:6379> auth artisan
OK
127.0.0.1:6379>
或者连接的使用通过 -a 指定密码连接
[redis@artisan bin]$ ./redis-cli
127.0.0.1:6379> set name artisan
(error) NOAUTH Authentication required.
127.0.0.1:6379> exit
[redis@artisan bin]$ ./redis-cli -a artisan
Warning: Using a password with '-a' option on the command line interface may not be safe.
127.0.0.1:6379>
127.0.0.1:6379> set name artisan
OK
127.0.0.1:6379> get name
"artisan"
127.0.0.1:6379> keys *
1) "name"
127.0.0.1:6379>
#查看当前密码

127.0.0.1:6379> config get requirepass
1) "requirepass"
2) "artisan"
客户端测试

修改redis.conf,需重启redis (永久设置)
Step1:在redis.conf 找到
# requirepass foobared
取消默认的注释,设置密码,比如:
requirepass artisan
建议设置一个很复杂的密码

Step2:指定配置文件,重新启动redis
[redis@artisan bin]$ pkill redis-server
[redis@artisan bin]$ ./redis-server ../etc/redis.conf
32394:C 19 Sep 23:33:17.462 # oO0OoO0OoO0Oo Redis is starting oO0OoO0OoO0Oo
32394:C 19 Sep 23:33:17.462 # Redis version=4.0.11, bits=64, commit=00000000, modified=0, pid=32394, just started
32394:C 19 Sep 23:33:17.462 # Configuration loaded
[redis@artisan bin]$ ps -ef|grep redis-server
redis     32395      1  0 23:33 ?        00:00:00 ./redis-server *:6379
redis     32400  31939  0 23:33 pts/1    00:00:00 grep redis-server
[redis@artisan bin]$
Java 中操作带有密码的redis

操作之前先 清空redis
我们直接在虚机上的客户端操作下
[redis@artisan bin]$ ./redis-cli
127.0.0.1:6379> auth artisan
OK
127.0.0.1:6379> flushdb
OK
127.0.0.1:6379> keys *
(empty list or set)
127.0.0.1:6379>
主要是 jedis.auth(“artisan”);
package com.artisan.redis.withjava;

import redis.clients.jedis.Jedis;
import redis.clients.jedis.JedisPool;
import redis.clients.jedis.JedisPoolConfig;

public class JavaRedisInsertWithJedisPool {

	public static void main(String[] args) {
		// 实例化jedisPoolConfig并设置相关参数
		JedisPoolConfig jedisPoolConfig = new JedisPoolConfig();
		jedisPoolConfig.setMaxIdle(50);
		jedisPoolConfig.setMaxTotal(100);
		jedisPoolConfig.setMaxWaitMillis(2000);
		// 使用jedisPoolConfig初始化redis的连接池
		JedisPool jedisPool = new JedisPool(jedisPoolConfig, "192.168.31.66", 6379);
		// 从jedisPool中获取一个连接
		Jedis jedis = jedisPool.getResource();
		jedis.auth("artisan");

		int i = 0 ;
		long beginTime = System.currentTimeMillis();
		try {
			while (true) {
				long endTime = System.currentTimeMillis();
				// 超过一秒 停止操作
				if (endTime - beginTime > 1000) {
					break;
				}
				i++;
				// 写入redis
				jedis.set("artisan-" + i, String.valueOf(i));
			}
		} catch (Exception e) {
			e.printStackTrace();
		} finally {
			// 关闭redis
			jedis.close();
		}
		System.out.println("1S内对redis的写入次数为" + i);
	}

}
输出

参看客户端中的数据

127.0.0.1:6379> get artisan-999
"999"
127.0.0.1:6379>
Spring 中操作带有密码的redis

redis.properties
#ip地址
redis.host.ip=192.168.31.66
#端口号
redis.port=6379
#如果有密码
redis.password=artisan
#客户端超时时间单位是毫秒 默认是2000
redis.timeout=3000

#最大空闲数
redis.maxIdle=6
#连接池的最大数据库连接数。设为0表示无限制,如果是jedis 2.4以后用redis.maxTotal
#redis.maxActive=600
#控制一个pool可分配多少个jedis实例,用来替换上面的redis.maxActive,如果是jedis 2.4以后用该属性
redis.maxTotal=20
#最大建立连接等待时间。如果超过此时间将接到异常。设为-1表示无限制。
redis.maxWaitMillis=3000
#连接的最小空闲时间 默认1800000毫秒(30分钟)
redis.minEvictableIdleTimeMillis=300000
#每次释放连接的最大数目,默认3
redis.numTestsPerEvictionRun=4
#逐出扫描的时间间隔(毫秒) 如果为负数,则不运行逐出线程, 默认-1
redis.timeBetweenEvictionRunsMillis=30000
applicationContext.xml
<?xml version="1.0" encoding="UTF-8"?>
<beans xmlns="http://www.springframework.org/schema/beans"
	xmlns:xsi="http://www.w3.org/2001/XMLSchema-instance"
	xmlns:context="http://www.springframework.org/schema/context"
	xmlns:p="http://www.springframework.org/schema/p"
	xsi:schemaLocation="http://www.springframework.org/schema/beans
		http://www.springframework.org/schema/beans/spring-beans.xsd
		http://www.springframework.org/schema/context
		http://www.springframework.org/schema/context/spring-context.xsd">

	<context:component-scan base-package="com.artisan.redis.withSpring" annotation-config="true" />

	 <!--1,如果你有多个数据源需要通过<context:property-placeholder管理,且不愿意放在一个配置文件里,那么一定要加上ignore-unresolvable=“true" -->
    <context:property-placeholder location="classpath:redis/redis.properties"
        ignore-unresolvable="true" />

    <!--2,注意新版本2.3以后,JedisPoolConfig的property name,不是maxActive而是maxTotal,而且没有maxWait属性,建议看一下Jedis源码或百度。 -->
    <!-- redis连接池配置 -->
    <bean id="jedisPoolConfig" class="redis.clients.jedis.JedisPoolConfig">
        <!--最大空闲数 -->
        <property name="maxIdle" value="${redis.maxIdle}" />
        <!--连接池的最大数据库连接数 -->
        <property name="maxTotal" value="${redis.maxTotal}" />
        <!--最大建立连接等待时间 -->
        <property name="maxWaitMillis" value="${redis.maxWaitMillis}" />
        <!--逐出连接的最小空闲时间 默认1800000毫秒(30分钟) -->
        <property name="minEvictableIdleTimeMillis" value="${redis.minEvictableIdleTimeMillis}" />
        <!--每次逐出检查时 逐出的最大数目 如果为负数就是 : 1/abs(n), 默认3 -->
        <property name="numTestsPerEvictionRun" value="${redis.numTestsPerEvictionRun}" />
        <!--逐出扫描的时间间隔(毫秒) 如果为负数,则不运行逐出线程, 默认-1 -->
        <property name="timeBetweenEvictionRunsMillis" value="${redis.timeBetweenEvictionRunsMillis}" />
   		<property name="testOnBorrow" value="true"></property>
		<property name="testOnReturn" value="true"></property>
		<property name="testWhileIdle" value="true"></property>
    </bean>

	<!--redis连接工厂 -->
    <bean id="jedisConnectionFactory"
        class="org.springframework.data.redis.connection.jedis.JedisConnectionFactory"
        destroy-method="destroy">
        <property name="poolConfig" ref="jedisPoolConfig"></property>
        <!--IP地址 -->
        <property name="hostName" value="${redis.host.ip}"></property>
        <!--端口号 -->
        <property name="port" value="${redis.port}"></property>
        <!--如果Redis设置有密码 -->
        <property name="password" value="${redis.password}" />
        <!--客户端超时时间单位是毫秒 -->
        <property name="timeout" value="${redis.timeout}"></property>
        <property name="usePool" value="true" />
        <!--<property name="database" value="0" /> -->
    </bean>


	<!-- redis template definition -->
	<bean id="redisTemplate" class="org.springframework.data.redis.core.RedisTemplate"
		p:connection-factory-ref="jedisConnectionFactory">
		<!-- 序列化方式 建议key/hashKey采用StringRedisSerializer。 -->
		<property name="keySerializer">
			<bean class="org.springframework.data.redis.serializer.StringRedisSerializer" />
		</property>
		<property name="hashKeySerializer">
			<bean
				class="org.springframework.data.redis.serializer.StringRedisSerializer" />
		</property>
		<property name="valueSerializer">
			<bean
				class="org.springframework.data.redis.serializer.JdkSerializationRedisSerializer" />
		</property>
		<property name="hashValueSerializer">
			<bean
				class="org.springframework.data.redis.serializer.JdkSerializationRedisSerializer" />
		</property>

	</bean>

	<!-- 对string操作的封装
	<bean id="stringRedisTemplate" class="org.springframework.data.redis.core.StringRedisTemplate"
		p:connection-factory-ref="jedisConnectionFactory" />
		 -->
	<!-- <bean id="cacheManager" class="org.springframework.data.redis.cache.RedisCacheManager"
		c:template-ref="redisTemplate"/> -->

</beans>
SpringRedisInsert.java
package com.artisan.redis.withSpring;

import org.springframework.context.ApplicationContext;
import org.springframework.context.support.ClassPathXmlApplicationContext;
import org.springframework.dao.DataAccessException;
import org.springframework.data.redis.core.RedisOperations;
import org.springframework.data.redis.core.RedisTemplate;
import org.springframework.data.redis.core.SessionCallback;

public class SpringRedisInsert {

	public static void main(String[] args) {

		ApplicationContext ctx = new ClassPathXmlApplicationContext("classpath:spring/applicationContext.xml");

		RedisTemplate<String, Object> redisTemplate = (RedisTemplate) ctx.getBean("redisTemplate");

		Artisan artisan = new Artisan();
		artisan.setId(1L);
		artisan.setName("小工匠");
		artisan.setComments("使用Spring提供的RedisTemplate操作redis");
		// set
		redisTemplate.opsForValue().set("spring_redis_artisan", artisan);
		// get
		Artisan artisan1 = (Artisan) redisTemplate.opsForValue().get("spring_redis_artisan");
		System.out.println(artisan1.getId());
		System.out.println(artisan1.getName());
		System.out.println(artisan1.getComments());

		// 上面的set 和 get 方法看起来很简单 , 它可 能就来自于 同 一个 Red is 连接池的不同 Redis 的连接。
		// 为了使得所有的操作都来自于同一个连接 , 可 以使用 SessionCallback 或者 RedisCallback 这
		// 两个接口,而 RedisCallback 是 比较底层的封装 , 其使用不是很友好,所以更多 的时候会使
		// 用 SessionCallback 这个接口 , 通过这个接口就可以把多个命令放入到同一个 Redis 连接 中去执行
		Artisan artisan2 = new Artisan();
		artisan2.setId(2L);
		artisan2.setName("小工匠2");
		artisan2.setComments("2-使用Spring提供的RedisTemplate操作redis");

		SessionCallback<Artisan> sessionCallback = new SessionCallback<Artisan>() {
			@Override
			public Artisan execute(RedisOperations ops) throws DataAccessException {
				ops.boundValueOps("artisan_from_same_conn").set(artisan2);
				return (Artisan) ops.boundValueOps("artisan_from_same_conn").get();
			}
		};

		Artisan savedArtisan = redisTemplate.execute(sessionCallback);
		System.out.println(savedArtisan.getId());
		System.out.println(savedArtisan.getName());
		System.out.println(savedArtisan.getComments());
	}

}
清空redis先,确保数据干净
127.0.0.1:6379> flushdb
OK
127.0.0.1:6379> keys *
(empty list or set)
执行SpringRedisInsert#main()
没配置日志组件,忽略红色的warn

再次查看
127.0.0.1:6379> keys *
1) "artisan_from_same_conn"
2) "spring_redis_artisan"
127.0.0.1:6379> get artisan_from_same_conn
"\xac\xed\x00\x05sr\x00$com.artisan.redis.withSpring.ArtisanmS\xb5\x92\xcc\xbfS\xb1\x02\x00\x03J\x00\x02idL\x00\bcommentst\x00\x12Ljava/lang/String;L\x00\x04nameq\x00~\x00\x01xp\x00\x00\x00\x00\x00\x00\x00\x02t\x00/2-\xe4\xbd\xbf\xe7\x94\xa8Spring\xe6\x8f\x90\xe4\xbe\x9b\xe7\x9a\x84RedisTemplate\xe6\x93\x8d\xe4\xbd\x9credist\x00\n\xe5\xb0\x8f\xe5\xb7\xa5\xe5\x8c\xa02"
127.0.0.1:6379> get spring_redis_artisan
"\xac\xed\x00\x05sr\x00$com.artisan.redis.withSpring.ArtisanmS\xb5\x92\xcc\xbfS\xb1\x02\x00\x03J\x00\x02idL\x00\bcommentst\x00\x12Ljava/lang/String;L\x00\x04nameq\x00~\x00\x01xp\x00\x00\x00\x00\x00\x00\x00\x01t\x00-\xe4\xbd\xbf\xe7\x94\xa8Spring\xe6\x8f\x90\xe4\xbe\x9b\xe7\x9a\x84RedisTemplate\xe6\x93\x8d\xe4\xbd\x9credist\x00\t\xe5\xb0\x8f\xe5\xb7\xa5\xe5\x8c\xa0"
127.0.0.1:6379>
好了,到这里就先结束吧。