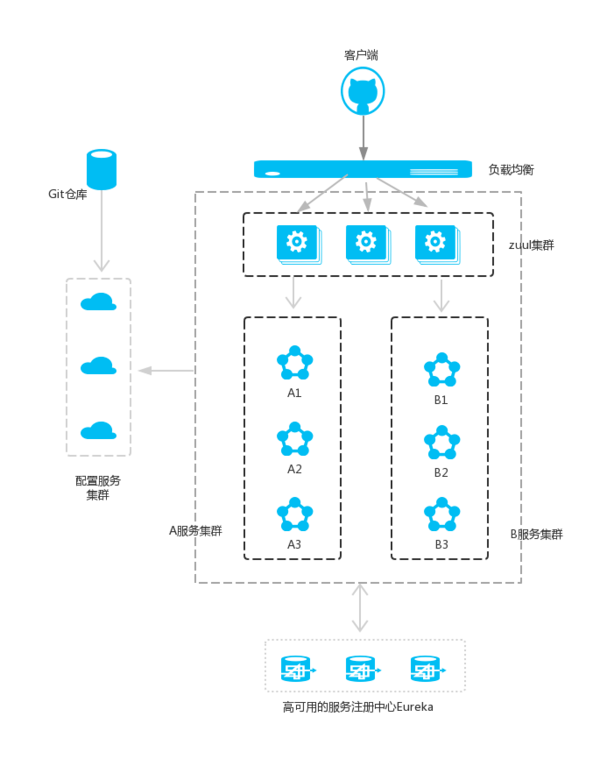
在微服务架构中,需要几个关键的组件,服务注册与发现、服务消费、负载均衡、断路器、智能路由、配置管理等,由这几个组件可以组建一个简单的微服务架构。客户端的请求首先经过负载均衡(zuul、Ngnix),再到达服务网关(zuul集群),然后再到具体的服务,服务统一注册到高可用的服务注册中心集群,服务的所有的配置文件由配置服务管理(下一篇文章讲述),配置服务的配置文件放在Git仓库,方便开发人员随时改配置。
1. Zuul介绍
Zuul的主要功能是路由和过滤器。路由功能是微服务的一部分,比如/api/user映射到user服务,/api/shop映射到shop服务。zuul实现了负载均衡。以下是微服务结构中,Zuul的基本流程。在接下来的步骤中,我们来创建一个zuul服务, 将/api-feign/**映射到我们之前创建feign-service, 将/api-ribbon/**映射到之前的ribbon-service服务。
2. 创建Zuul的Maven工程,其中关于zuul的依赖是
<dependency>
     <groupId>org.springframework.cloud</groupId>
    <artifactId>spring-cloud-starter-zuul</artifactId>
</dependency>
完整pom.xml如下:
 pom.xml
3. 创建启动类: 使用@EnableZuulProxy注解

 1 package spring.helloworld.zuul.service;
 2
 3 import org.springframework.boot.SpringApplication;
 4 import org.springframework.boot.autoconfigure.SpringBootApplication;
 5 import org.springframework.cloud.netflix.eureka.EnableEurekaClient;
 6 import org.springframework.cloud.netflix.zuul.EnableZuulProxy;
 7
 8 @EnableZuulProxy
 9 @EnableEurekaClient
10 @SpringBootApplication
11 public class ServiceZuulApplication {
12     public static void main(String[] args) {
13         SpringApplication.run(ServiceZuulApplication.class, args);
14     }
15 }
4. 编写zuul服务配置:
简单配置两个路由, 一个路由到ribbon,一个路由到feign; 由于都注册到eureka服务中心,所以都用通过serviceId来发现服务具体地址, path是路由的地址映射关系
 1 eureka:
 2     client:
 3         serviceUrl:
 4             defaultZone: http://localhost:8761/eureka/
 5 server:
 6     port: 8904
 7 spring:
 8     application:
 9         name: service-zuul
10 zuul:
11   routes:
12     ribbo:
13       path: /api-ribbon/**
14       serviceId: service-ribbon
15     feign:
16       path: /api-feign/**
17       serviceId: service-feign
这时启动zuul服务, 然后访问http://localhost:8904/api-ribbon可直接路由到http://localhost:8901/.
http://localhost:8904/api-feign/hello可路由到http://localhost:8902/hello
5. Zuul过滤器
zuul还提供了过滤功能, 只要实现接口ZuulFilter即可对请求先进行筛选和过滤之后再路由到具体服务。
 1 package spring.helloworld.zuul.service;
 2
 3 import javax.servlet.http.HttpServletRequest;
 4
 5 import org.slf4j.Logger;
 6 import org.slf4j.LoggerFactory;
 7 import org.springframework.stereotype.Component;
 8
 9 import com.netflix.zuul.ZuulFilter;
10 import com.netflix.zuul.context.RequestContext;
11
12 @Component
13 public class DemoFilter extends ZuulFilter {
14     private static Logger log = LoggerFactory.getLogger(DemoFilter.class);
15     @Override
16     public String filterType() {
17         return "pre";
18     }
19
20     @Override
21     public int filterOrder() {
22         return 0;
23     }
24
25     @Override
26     public boolean shouldFilter() {
27         return true;
28     }
29
30     @Override
31     public Object run() {
32         RequestContext ctx = RequestContext.getCurrentContext();
33         HttpServletRequest request = ctx.getRequest();
34         String s = String.format("%s >>> %s", request.getMethod(), request.getRequestURL().toString());
35         log.info(s);
36         return null;
37     }
38 }
filterType:返回一个字符串代表过滤器的类型,在zuul中定义了四种不同生命周期的过滤器类型,具体如下:
- pre:路由之前
- routing:路由之时
- post: 路由之后
- error:发送错误调用
filterOrder:过滤的顺序
- pre:路由之前
- routing:路由之时
- post: 路由之后
- error:发送错误调用
shouldFilter:这里可以写逻辑判断,是否要过滤,本文true,永远过滤。
run:过滤器的具体逻辑,这里只是将请求的URL简单些到日志中