版权声明:转载请申明原创地址 https://blog.csdn.net/pw191410147/article/details/82144183
前言:在SSM中往往整合一个redis都需要一堆配置,但是自从用了SpringBoot后这一堆配置就由框架来给我们做了,另外还给我们封装了常用的方法,下面我们来讲讲SpringBoot2.0中集成Redis,因为2.0和以前的版本有点不同,所以我们细细讲解。
第一步:直接导入Redis的依赖
<?xml version="1.0" encoding="UTF-8"?>
<project xmlns="http://maven.apache.org/POM/4.0.0" xmlns:xsi="http://www.w3.org/2001/XMLSchema-instance"
         xsi:schemaLocation="http://maven.apache.org/POM/4.0.0 http://maven.apache.org/xsd/maven-4.0.0.xsd">
    <modelVersion>4.0.0</modelVersion>

    <groupId>com.itpengwei.idea.job</groupId>
    <artifactId>springboot-job</artifactId>
    <version>0.0.1-SNAPSHOT</version>
    <packaging>jar</packaging>

    <name>springboot-job</name>
    <description>Demo project for Spring Boot</description>

    <parent>
        <groupId>org.springframework.boot</groupId>
        <artifactId>spring-boot-starter-parent</artifactId>
        <version>2.0.4.RELEASE</version>
        <relativePath/> <!-- lookup parent from repository -->
    </parent>

    <properties>
        <project.build.sourceEncoding>UTF-8</project.build.sourceEncoding>
        <project.reporting.outputEncoding>UTF-8</project.reporting.outputEncoding>
        <java.version>1.8</java.version>
    </properties>

    <dependencies>
        <dependency>
            <groupId>org.springframework.boot</groupId>
            <artifactId>spring-boot-starter-web</artifactId>
        </dependency>
        <dependency>
            <groupId>org.springframework.boot</groupId>
            <artifactId>spring-boot-starter-data-redis</artifactId>
        </dependency>
        <!--spring2.0集成redis所需common-pool2-->
        <!--<dependency>-->
            <!--<groupId>org.apache.commons</groupId>-->
            <!--<artifactId>commons-pool2</artifactId>-->
            <!--<version>2.4.2</version>-->
        <!--</dependency>-->
        <dependency>
            <groupId>org.springframework.boot</groupId>
            <artifactId>spring-boot-starter-test</artifactId>
            <scope>test</scope>
        </dependency>
    </dependencies>

    <build>
        <plugins>
            <plugin>
                <groupId>org.springframework.boot</groupId>
                <artifactId>spring-boot-maven-plugin</artifactId>
            </plugin>
        </plugins>
    </build>


</project>
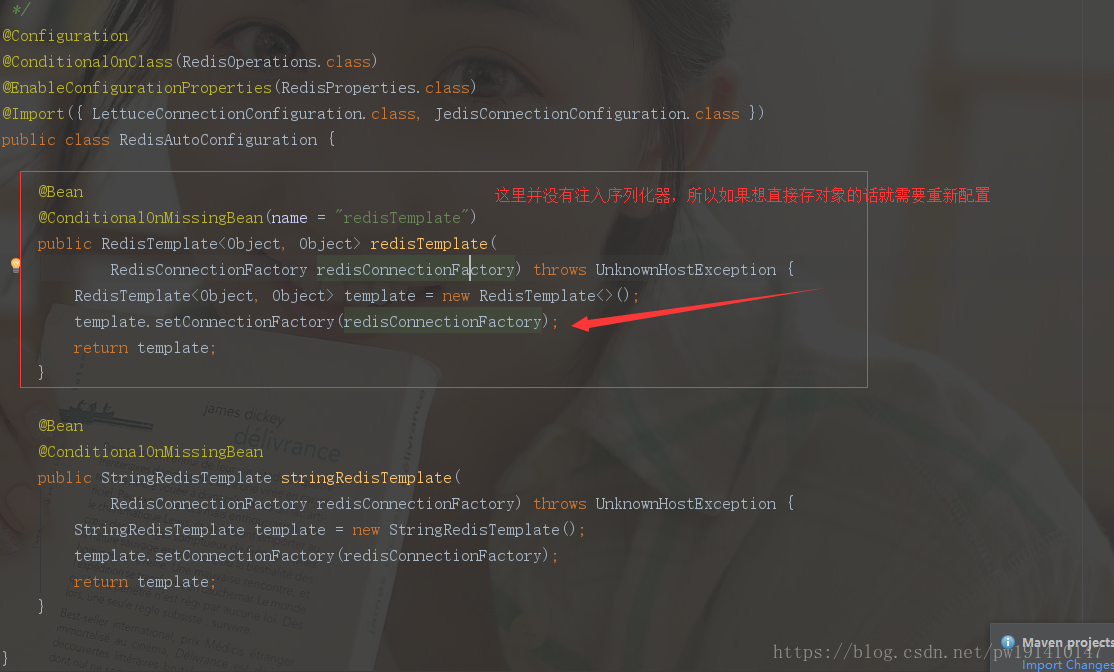
第二步:为了能够使Redis可以直接存java对象,所以我们需要对其配置,以及自定义序列化器和反序列化器
package com.itpengwei.idea.job.springbootjob.utils;

import org.springframework.core.convert.converter.Converter;
import org.springframework.core.serializer.support.DeserializingConverter;
import org.springframework.core.serializer.support.SerializingConverter;
import org.springframework.data.redis.serializer.RedisSerializer;
import org.springframework.data.redis.serializer.SerializationException;

/**
 * @author 彭伟
 * @date 2018/8/28 9:31
 */
public class RedisConverter implements RedisSerializer<Object> {
    private Converter<Object, byte[]> serializer = new SerializingConverter();//序列化器
    private Converter<byte[], Object> deserializer = new DeserializingConverter();//反序列化器

    @Override
    public byte[] serialize(Object o) throws SerializationException {//将对象序列化成字节数组
        if (o == null) return new byte[0];
        try {
            return serializer.convert(o);
        } catch (Exception e) {
            e.printStackTrace();
            return new byte[0];
        }
    }

    @Override
    public Object deserialize(byte[] bytes) throws SerializationException {//将字节数组反序列化成对象
        if (bytes == null || bytes.length == 0) return null;
        try {
            return deserializer.convert(bytes);
        } catch (Exception e) {
            e.printStackTrace();
            return null;
        }
    }
}
第三步:将我们自定义的序列化器配置进操作Bean中
package com.itpengwei.idea.job.springbootjob.config;

import com.itpengwei.idea.job.springbootjob.utils.RedisConverter;
import org.springframework.context.annotation.Bean;
import org.springframework.context.annotation.Configuration;
import org.springframework.data.redis.connection.RedisConnectionFactory;
import org.springframework.data.redis.core.RedisTemplate;
import org.springframework.data.redis.serializer.StringRedisSerializer;

/**
 * @author 彭伟
 * @date 2018/8/28 9:42
 * redis配置
 */
@Configuration
public class RedisConfig {


    /**
     * @param redisConnectionFactory
     * @return 自定义redisTemplate,自带的bean没有序列化器
     */
    @Bean
    public RedisTemplate<String, Object> redisTemplate(RedisConnectionFactory redisConnectionFactory) {
        RedisTemplate<String, Object> redisTemplate = new RedisTemplate<>();
        redisTemplate.setConnectionFactory(redisConnectionFactory);
        redisTemplate.setKeySerializer(new StringRedisSerializer());//设置key的序列化器
        redisTemplate.setValueSerializer(new RedisConverter());//设置值的序列化器
        return redisTemplate;
    }
}
至于为什么我们需要自己重新来定义呢?接下来请看这么一段源码就知道了
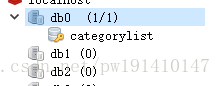
第四步:可以开始进行测试增删改查了
package com.itpengwei.idea.job.springbootjob.controller;
import com.itpengwei.idea.job.springbootjob.model.User;
import org.springframework.beans.factory.annotation.Autowired;
import org.springframework.data.redis.core.RedisTemplate;
import org.springframework.data.redis.core.StringRedisTemplate;
import org.springframework.web.bind.annotation.GetMapping;
import org.springframework.web.bind.annotation.RequestMapping;
import org.springframework.web.bind.annotation.RestController;
/**
* @author 彭伟
* @date 2018/8/28 9:47
*/
@RestController
@RequestMapping("/redis")
public class RedisController {
private String testString = "testString";
private String userKey = "userKey";
@Autowired
private RedisTemplate<String, Object> redisTemplate;
@Autowired
private StringRedisTemplate stringRedisTemplate;
@GetMapping("/add")
public String add() {
//1,添加一个Value为String
stringRedisTemplate.opsForValue().set(testString, "测试存储字符串类型");
//2,添加一个Value为对象
User user = new User();
user.setId(1);
user.setUsername("张三");
user.setPassword("1111");
user.setRediskey(userKey);
redisTemplate.opsForValue().set(user.getRediskey(), user);
return "成功";
}
@GetMapping("/getUser")
public User findUserByKey() {
User user = (User) redisTemplate.opsForValue().get(userKey);
return user;
}
@GetMapping("/getString")
public String findString() {
String s = stringRedisTemplate.opsForValue().get(testString);
return s;
}
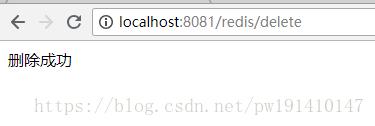
@GetMapping("/delete")
public String deleteByKey(){
//1,删除string类型
stringRedisTemplate.delete(testString);
//2,删除user对象
redisTemplate.delete(userKey);
return "删除成功";
}
}
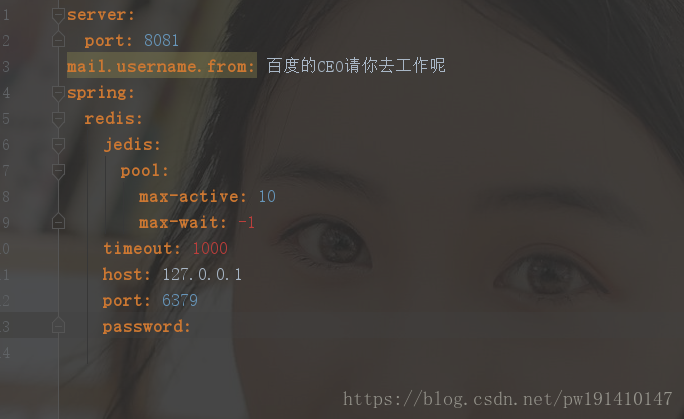
最后请看下配置吧:差点忘记把配置贴上来了
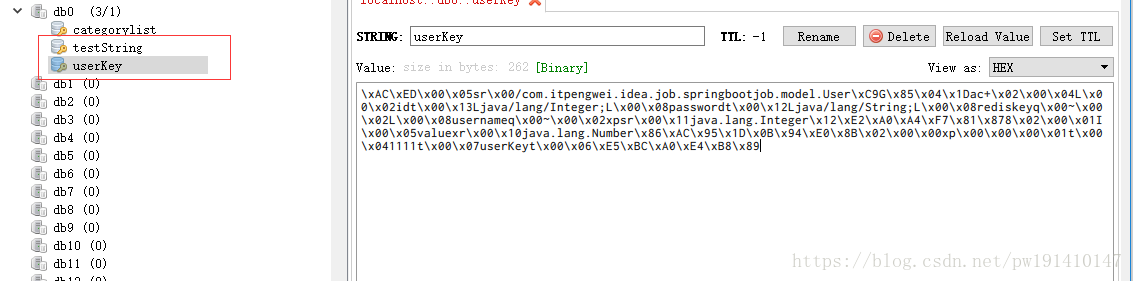
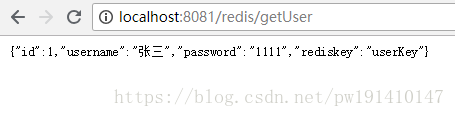
请看小编的测试结果吧:
测试add:
测试查询:
测试删除: