转: FROM GA_studio http://blog.csdn.net/tianjian4592
一个真正酷炫的动效往往让人虎躯一震,话不多说,咱们先瞅瞅效果:

--------------------------------------------------
如果你想看 GAStudio Github主页,请戳这里;
如果你想看 GAStudio更多技术文章,请戳这里;
QQ技术交流群:277582728;
--------------------------------------------------
这个效果我们需要考虑以下几个问题:
1. 这是图片还是文字;
2. 如果是图片该如何拿到图形的边沿线坐标,如果是文字呢?
3. 如果拿到了边沿线坐标,如何让光线沿着路径跑动;
4. 怎么处理过程的衔接;
以上四个问题似乎不是太好处理,而这几个问题也正好是这个效果精华所在,接下来咱们一个一个进行考虑,当然这种考虑已经基于一些国外大神的基础之上;
首先这是图片还是文字?
答案是:背景是图片,表面的文字还是图片,有些同学可能会说了,靠,这么没含量,一个帧动画而已,还虎躯一震,XXXXX,当然,答案肯定不会是这样的,背景我就不说了,普通的jpg或png图,但文字则是SVG格式的矢量图;
有了第一个问题的答案,我们来看第二个问题,如何拿到文字图形的边沿坐标;
要回答这个问题,我们先来简单的了解一个SVG(矢量图);
SVG 意为可缩放矢量图形(Scalable Vector Graphics),是使用 XML 来描述二维图形和绘图程序的语言;
使用 SVG 的优势在于:
1.SVG 可被非常多的工具读取和修改(比如记事本),由于使用xml格式定义,所以可以直接被当作文本文件打开,看里面的数据;
2.SVG 与 JPEG 和 GIF 图像比起来,尺寸更小,且可压缩性更强,SVG 图就相当于保存了关键的数据点,比如要显示一个圆,需要知道圆心和半径,那么SVG 就只保存圆心坐标和半径数据,而平常我们用的位图都是以像素点的形式根据图片大小保存对应个数的像素点,因而SVG尺寸更小;
3.SVG 是可伸缩的,平常使用的位图拉伸会发虚,压缩会变形,而SVG格式图片保存数据进行运算展示,不管多大多少,可以不失真显示;
4.SVG 图像可在任何的分辨率下被高质量地打印;
5.SVG 可在图像质量不下降的情况下被放大;
6.SVG 图像中的文本是可选的,同时也是可搜索的(很适合制作地图);
7.SVG 可以与 Java 技术一起运行;
8.SVG 是开放的标准;
9.SVG 文件是纯粹的 XML;
看起来好厉害的样子,还是回到我们的问题,从SVG图中我们可否拿到我们想要的数据点呢?根据上面的介绍,答案当然是肯定的,从SVG图中我们可以拿到我们想要的所有数据;
好的,拿到数据之后,怎么让一条线沿着路径跑起来呢?毋庸置疑,我们需要用到path;
最后我们根据效果的需要,设置几个绘制过程,进行绘制;
接下来我们一起来解决以上问题:
既然SVG是公认的xml文件格式定义的,那么我们则可以通过解析xml文件拿到对应SVG图的所有数据,我们先看下 path 类型的SVG 数据:
-
<?xml version="1.0" standalone="no"?> -
<!DOCTYPE svg PUBLIC "-//W3C//DTD SVG 1.1//EN" -
"http://www.w3.org/Graphics/SVG/1.1/DTD/svg11.dtd"> -
<svg width="100%" height="100%" version="1.1" -
xmlns="http://www.w3.org/2000/svg"> -
<path d="M250 150 L150 350 L350 350 Z" /> -
</svg>
上面有一个path 标签,里面用到了 M 和 Z 指令,M 就相当于 android Path 里的moveTo(),Z 则相当于 Path 里的close();
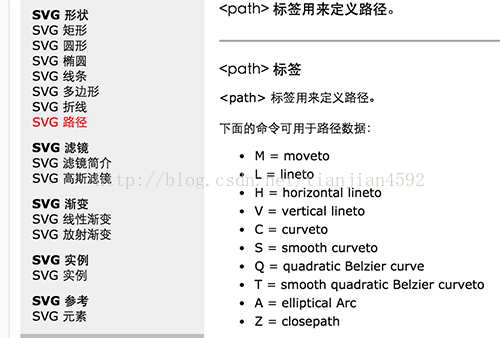
我们先看下SVG 里关于path 有哪些指令:
-
M = moveto 相当于 android Path 里的moveTo(),用于移动起始点 -
L = lineto 相当于 android Path 里的lineTo(),用于画线 -
H = horizontal lineto 用于画水平线 -
V = vertical lineto 用于画竖直线 -
C = curveto 相当于cubicTo(),三次贝塞尔曲线 -
S = smooth curveto 同样三次贝塞尔曲线,更平滑 -
Q = quadratic Belzier curve quadTo(),二次贝塞尔曲线 -
T = smooth quadratic Belzier curveto 同样二次贝塞尔曲线,更平滑 -
A = elliptical Arc 相当于arcTo(),用于画弧 -
Z = closepath 相当于closeTo(),关闭path
了解了以上path相关的指令,就可以看懂path构成的SVG图的数据了,除此之外,SVG里还定义了一些基本的图形和效果:
更多介绍和使用大家可以看 W3School
好,以上内容,我们已经知道 SVG 图是通过 Xml 格式定义的,并且里面用到了一些基本的指令对数据进行组装,构成基本图形或复杂的路径;
而对于我们来说 ,这个xml 如何拿到呢?
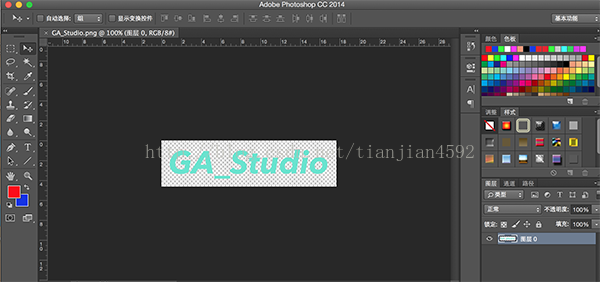
1.我们根据最后要做的效果,利用PS等作图软件设计制作出想要的图形;
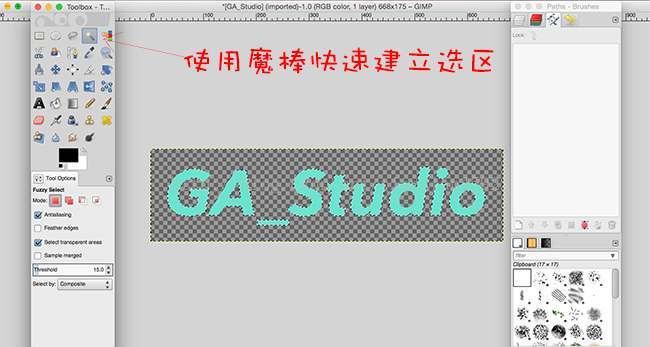
2. 使用 GIMP 之类的矢量图软件导出图片的SVG数据,方法如下:
先使用魔棒工具快速建立选区:
然后将选区导出为path:
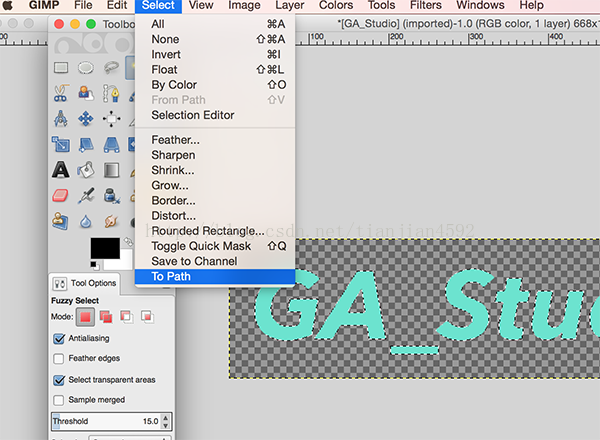
这个时候在软件的右边栏就可以看见生成的路径了,然后将路径导出:
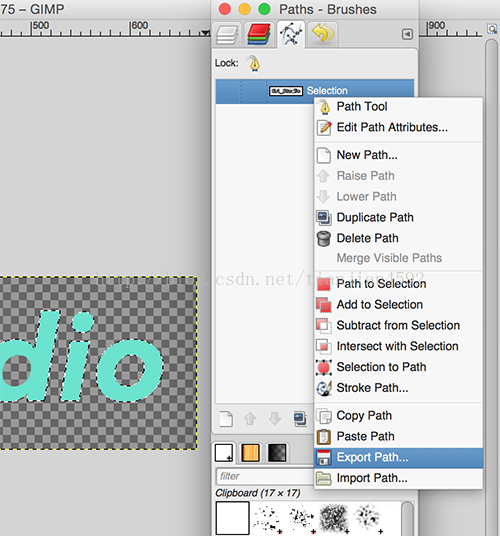
经过以上几步,我们就拿到了我们自己设计的文字或图形SVG图的Path数据,上面图片的SVG信息如下:
-
<?xml version="1.0" encoding="UTF-8" standalone="no"?> -
<!DOCTYPE svg PUBLIC "-//W3C//DTD SVG 20010904//EN" -
"http://www.w3.org/TR/2001/REC-SVG-20010904/DTD/svg10.dtd"> -
<svg xmlns="http://www.w3.org/2000/svg" -
width="6.95746in" height="1.82269in" -
viewBox="0 0 668 175"> -
<path id="Selection" -
fill="none" stroke="black" stroke-width="1" -
d="M 530.00,34.00 -
C 530.00,34.00 526.08,59.00 526.08,59.00 -
526.08,59.00 518.00,105.00 518.00,105.00 -
518.00,105.00 515.42,119.00 515.42,119.00 -
515.42,119.00 513.26,125.01 513.26,125.01 -
513.26,125.01 506.00,126.00 506.00,126.00 -
506.00,126.00 496.00,126.00 496.00,126.00 -
496.00,126.00 496.00,120.00 496.00,120.00 -
490.87,124.16 486.71,126.42 480.00,126.91 -
475.71,127.22 471.06,126.94 467.00,125.44 -
454.13,120.68 451.86,110.19 452.00,98.00 -
452.22,79.34 465.14,64.55 484.00,63.18 -
492.14,62.59 498.96,65.71 504.00,72.00 -
504.00,72.00 510.00,34.00 510.00,34.00 -
510.00,34.00 530.00,34.00 530.00,34.00 Z -
M 551.00,56.89 -
C 539.01,55.86 537.45,39.82 551.00,35.55 -
568.60,33.45 567.67,58.33 551.00,56.89 Z
中间段省略
-
M 263.00,134.00 -
C 263.00,134.00 263.00,145.00 263.00,145.00 -
263.00,145.00 202.00,145.00 202.00,145.00 -
202.00,145.00 202.00,134.00 202.00,134.00 -
202.00,134.00 263.00,134.00 263.00,134.00 Z" /> -
</svg>
根据图形路径的复杂度,生成的path数据复杂度也不一样,但格式也算是非常的清楚,即采用一定的指令把数据点进行拼接;
现在有了这些数据点,我们需要做的则是对数据进行解析,封装成我们要的Path;
解析的过程也无非是 遇到指令则采用android Path 里的对应方法进行置换,解析方式如下:
-
public Path parsePath(String s) throws ParseException { -
mCurrentPoint.set(Float.NaN, Float.NaN); -
mPathString = s; -
mIndex = 0; -
mLength = mPathString.length(); -
PointF tempPoint1 = new PointF(); -
PointF tempPoint2 = new PointF(); -
PointF tempPoint3 = new PointF(); -
Path p = new Path(); -
p.setFillType(Path.FillType.WINDING); -
boolean firstMove = true; -
while (mIndex < mLength) { -
char command = consumeCommand(); -
boolean relative = (mCurrentToken == TOKEN_RELATIVE_COMMAND); -
switch (command) { -
case 'M': -
case 'm': { -
// m指令,相当于android 里的 moveTo() -
boolean firstPoint = true; -
while (advanceToNextToken() == TOKEN_VALUE) { -
consumeAndTransformPoint(tempPoint1, -
relative && mCurrentPoint.x != Float.NaN); -
if (firstPoint) { -
p.moveTo(tempPoint1.x, tempPoint1.y); -
firstPoint = false; -
if (firstMove) { -
mCurrentPoint.set(tempPoint1); -
firstMove = false; -
} -
} else { -
p.lineTo(tempPoint1.x, tempPoint1.y); -
} -
} -
mCurrentPoint.set(tempPoint1); -
break; -
} -
case 'C': -
case 'c': { -
// c指令,相当于android 里的 cubicTo() -
if (mCurrentPoint.x == Float.NaN) { -
throw new ParseException("Relative commands require current point", mIndex); -
} -
while (advanceToNextToken() == TOKEN_VALUE) { -
consumeAndTransformPoint(tempPoint1, relative); -
consumeAndTransformPoint(tempPoint2, relative); -
consumeAndTransformPoint(tempPoint3, relative); -
p.cubicTo(tempPoint1.x, tempPoint1.y, tempPoint2.x, tempPoint2.y, -
tempPoint3.x, tempPoint3.y); -
} -
mCurrentPoint.set(tempPoint3); -
break; -
} -
case 'L': -
case 'l': { -
// 相当于lineTo()进行画直线 -
if (mCurrentPoint.x == Float.NaN) { -
throw new ParseException("Relative commands require current point", mIndex); -
} -
while (advanceToNextToken() == TOKEN_VALUE) { -
consumeAndTransformPoint(tempPoint1, relative); -
p.lineTo(tempPoint1.x, tempPoint1.y); -
} -
mCurrentPoint.set(tempPoint1); -
break; -
} -
case 'H': -
case 'h': { -
// 画水平直线 -
if (mCurrentPoint.x == Float.NaN) { -
throw new ParseException("Relative commands require current point", mIndex); -
} -
while (advanceToNextToken() == TOKEN_VALUE) { -
float x = transformX(consumeValue()); -
if (relative) { -
x += mCurrentPoint.x; -
} -
p.lineTo(x, mCurrentPoint.y); -
} -
mCurrentPoint.set(tempPoint1); -
break; -
} -
case 'V': -
case 'v': { -
// 画竖直直线 -
if (mCurrentPoint.x == Float.NaN) { -
throw new ParseException("Relative commands require current point", mIndex); -
} -
while (advanceToNextToken() == TOKEN_VALUE) { -
float y = transformY(consumeValue()); -
if (relative) { -
y += mCurrentPoint.y; -
} -
p.lineTo(mCurrentPoint.x, y); -
} -
mCurrentPoint.set(tempPoint1); -
break; -
} -
case 'Z': -
case 'z': { -
// 封闭path -
p.close(); -
break; -
} -
} -
} -
return p; -
}
有了图形对应的path,我们只需要按照我们想要的效果进行绘制即可,具体过程不再细讲,大家看代码:
-
@Override -
protected void onDraw(Canvas canvas) { -
super.onDraw(canvas); -
if (mState == STATE_NOT_STARTED || mGlyphData == null) { -
return; -
} -
long t = System.currentTimeMillis() - mStartTime; -
// 绘制出现前的边沿线和跑动过程 -
for (int i = 0; i < mGlyphData.length; i++) { -
float phase = MathUtil.constrain(0, 1, -
(t - (mTraceTime - mTraceTimePerGlyph) * i * 1f / mGlyphData.length) -
* 1f / mTraceTimePerGlyph); -
float distance = INTERPOLATOR.getInterpolation(phase) * mGlyphData[i].length; -
mGlyphData[i].paint.setColor(mTraceResidueColors[i]); -
mGlyphData[i].paint.setPathEffect(new DashPathEffect( -
new float[] { -
distance, mGlyphData[i].length -
}, 0)); -
canvas.drawPath(mGlyphData[i].path, mGlyphData[i].paint); -
mGlyphData[i].paint.setColor(mTraceColors[i]); -
mGlyphData[i].paint.setPathEffect(new DashPathEffect( -
new float[] { -
0, distance, phase > 0 ? mMarkerLength : 0, -
mGlyphData[i].length -
}, 0)); -
canvas.drawPath(mGlyphData[i].path, mGlyphData[i].paint); -
} -
if (t > mFillStart) { -
if (mState < STATE_FILL_STARTED) { -
changeState(STATE_FILL_STARTED); -
} -
// 绘制渐变出现的过程,即改变alpha过程 -
float phase = MathUtil.constrain(0, 1, (t - mFillStart) * 1f / mFillTime); -
for (int i = 0; i < mGlyphData.length; i++) { -
GlyphData glyphData = mGlyphData[i]; -
mFillPaint.setARGB((int) (phase * ((float) mFillAlphas[i] / (float) 255) * 255), -
mFillReds[i], -
mFillGreens[i], -
mFillBlues[i]); -
canvas.drawPath(glyphData.path, mFillPaint); -
} -
} -
if (t < mFillStart + mFillTime) { -
ViewCompat.postInvalidateOnAnimation(this); -
} else { -
changeState(STATE_FINISHED); -
} -
}
好了,主要的问题和思路基本如上,有些人可能会说,你这讲的跟UX分享似的,没毛线用,其实我的目的只有一个,那就是不管你是否能看懂代码,都能按照我上面所说做出自己想要的效果,并加以改变,灵活运用,毕竟轮子不需要重复造!
我本人也是对SVG矢量图刚有所了解,主要参考国外大神的一篇博客,链接如下:http://www.willowtreeapps.com/blog/muzei-esque-animated-svg-drawing-for-android/
CSDN源码下载地址:http://download.csdn.net/detail/tianjian4592/8548495
--------------------------------------------------
如果你想看 GAStudio Github主页,请戳这里;
如果你想看 GAStudio更多技术文章,请戳这里;
QQ技术交流群:277582728;
--------------------------------------------------
版权声明:本文为博主原创文章,转载请带上文章链接,谢谢! https://blog.csdn.net/tianjian4592/article/details/44733123