1.概述
1.我是买了一台阿里云的服务器,在这条服务器上,部署了三个zookeeper,进行了集群安装和配置;
2.我们这里只是简单的说明集群配置的一些步骤和细节,关于集群配置和单机配置相同的内容,我们不在赘述;
3.单机配置可以参考下面的地址:
https://blog.csdn.net/u014636209/article/details/82557542
2.集群安装
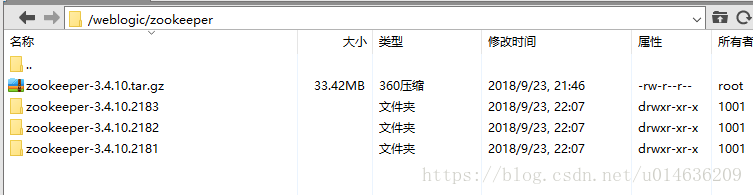
1.将zookeeper的jar包zookeeper-3.4.10.tar.gz,上传到/weblogic/zookeeper/路径下面
2.分别解压到三个文件夹中:
	zookeeper-3.4.10.2181
	zookeeper-3.4.10.2182
	zookeeper-3.4.10.2183
3.集群配置
3.1.创建数据文件夹 data
在上面三个文件夹下,分别创建文件夹data如下
/weblogic/zookeeper/zookeeper-3.4.10.2181/data
/weblogic/zookeeper/zookeeper-3.4.10.2182/data
/weblogic/zookeeper/zookeeper-3.4.10.2183/data
3.2.创建myid文件
/weblogic/zookeeper/zookeeper-3.4.10.2181/data/myid
/weblogic/zookeeper/zookeeper-3.4.10.2182/data/myid
/weblogic/zookeeper/zookeeper-3.4.10.2183/data/myid
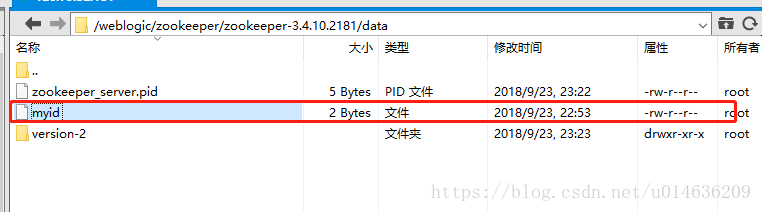
myid文件内容
/weblogic/zookeeper/zookeeper-3.4.10.2181/data/myid 内容为1
/weblogic/zookeeper/zookeeper-3.4.10.2182/data/myid 内容为2
/weblogic/zookeeper/zookeeper-3.4.10.2183/data/myid 内容为3
3.3.修改zoo.cfg文件
3.3.1 复制zoo.cfg文件
[root@izwz91h49n3mj8r232gqwez zookeeper-3.4.10.2181]# pwd
/weblogic/zookeeper/zookeeper-3.4.10.2181
[root@izwz91h49n3mj8r232gqwez zookeeper-3.4.10.2181]# cp ./conf/zoo_sample.cfg
[root@izwz91h49n3mj8r232gqwez zookeeper-3.4.10.2181]# ll ./conf/
total 16
-rw-rw-r-- 1 1001 1001  535 Mar 23  2017 configuration.xsl
-rw-rw-r-- 1 1001 1001 2161 Mar 23  2017 log4j.properties
-rw-r--r-- 1 root root 1066 Sep 23 23:22 zoo.cfg
-rw-rw-r-- 1 1001 1001  922 Mar 23  2017 zoo_sample.cfg
[root@izwz91h49n3mj8r232gqwez zookeeper-3.4.10.2181]#
zoo.cfg
zookeeper-3.4.10.2182 zookeeper-3.4.10.2183 同样操作
3.3.2 修改zoo.cfg文件内容
zookeeper-3.4.10.2181 结果如下
[root@izwz91h49n3mj8r232gqwez zookeeper-3.4.10.2181]# vim ./conf/zoo.cfg

# The number of milliseconds of each tick
tickTime=2000
# The number of ticks that the initial
# synchronization phase can take
initLimit=10
# The number of ticks that can pass between
# sending a request and getting an acknowledgement
syncLimit=5
# the directory where the snapshot is stored.
# do not use /tmp for storage, /tmp here is just
# example sakes.
#dataDir=/tmp/zookeeper
dataDir=/weblogic/zookeeper/zookeeper-3.4.10.2181/data
# the port at which the clients will connect
clientPort=2181
# the maximum number of client connections.
# increase this if you need to handle more clients
#maxClientCnxns=60
#
# Be sure to read the maintenance section of the
# administrator guide before turning on autopurge.
#
# http://zookeeper.apache.org/doc/current/zookeeperAdmin.html#sc_maintenance
#
# The number of snapshots to retain in dataDir
#autopurge.snapRetainCount=3
# Purge task interval in hours
# Set to "0" to disable auto purge feature
#autopurge.purgeInterval=1
server.1=localhost:2888:3888
server.2=localhost:2887:3887
server.3=localhost:2889:3889
~
"./conf/zoo.cfg" 33L, 1066C
zookeeper-3.4.10.2182 结果如下
[root@izwz91h49n3mj8r232gqwez zookeeper-3.4.10.2181]# vim ./conf/zoo.cfg

# The number of milliseconds of each tick
tickTime=2000
# The number of ticks that the initial
# synchronization phase can take
initLimit=10
# The number of ticks that can pass between
# sending a request and getting an acknowledgement
syncLimit=5
# the directory where the snapshot is stored.
# do not use /tmp for storage, /tmp here is just
# example sakes.
#dataDir=/tmp/zookeeper
dataDir=/weblogic/zookeeper/zookeeper-3.4.10.2181/data
# the port at which the clients will connect
clientPort=2182
# the maximum number of client connections.
# increase this if you need to handle more clients
#maxClientCnxns=60
#
# Be sure to read the maintenance section of the
# administrator guide before turning on autopurge.
#
# http://zookeeper.apache.org/doc/current/zookeeperAdmin.html#sc_maintenance
#
# The number of snapshots to retain in dataDir
#autopurge.snapRetainCount=3
# Purge task interval in hours
# Set to "0" to disable auto purge feature
#autopurge.purgeInterval=1
server.1=localhost:2888:3888
server.2=localhost:2887:3887
server.3=localhost:2889:3889
~
"./conf/zoo.cfg" 33L, 1066C
zookeeper-3.4.10.21813 结果如下
```java
[root@izwz91h49n3mj8r232gqwez zookeeper-3.4.10.2181]# vim ./conf/zoo.cfg

# The number of milliseconds of each tick
tickTime=2000
# The number of ticks that the initial
# synchronization phase can take
initLimit=10
# The number of ticks that can pass between
# sending a request and getting an acknowledgement
syncLimit=5
# the directory where the snapshot is stored.
# do not use /tmp for storage, /tmp here is just
# example sakes.
#dataDir=/tmp/zookeeper
dataDir=/weblogic/zookeeper/zookeeper-3.4.10.2181/data
# the port at which the clients will connect
clientPort=2183
# the maximum number of client connections.
# increase this if you need to handle more clients
#maxClientCnxns=60
#
# Be sure to read the maintenance section of the
# administrator guide before turning on autopurge.
#
# http://zookeeper.apache.org/doc/current/zookeeperAdmin.html#sc_maintenance
#
# The number of snapshots to retain in dataDir
#autopurge.snapRetainCount=3
# Purge task interval in hours
# Set to "0" to disable auto purge feature
#autopurge.purgeInterval=1
server.1=localhost:2888:3888
server.2=localhost:2887:3887
server.3=localhost:2889:3889
~
"./conf/zoo.cfg" 33L, 1066C
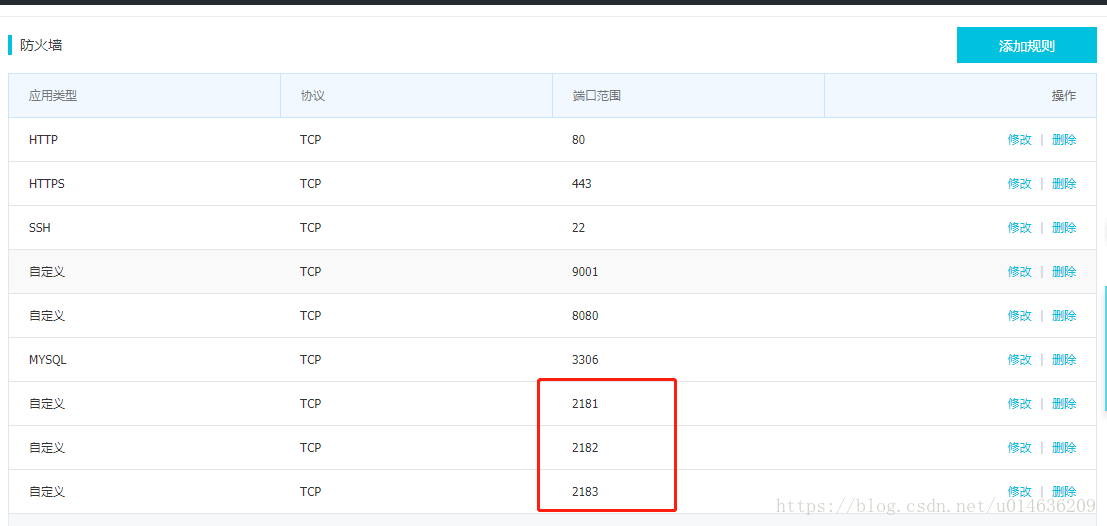
3.4.开通一下防火墙
2181 2182 2183端口开通防火墙
我用的阿里的直接开通即可
4.重启zookeeper服务即可
命令如单机模式
5.启动日志文件
在启动命令的当前目录下日志文件
[root@izwz91h49n3mj8r232gqwez zookeeper-3.4.10.2181]# pwd
/weblogic/zookeeper/zookeeper-3.4.10.2181
[root@izwz91h49n3mj8r232gqwez zookeeper-3.4.10.2181]#
[root@izwz91h49n3mj8r232gqwez zookeeper-3.4.10.2181]# sh ./bin/zkServer.sh status
如我在 /weblogic/zookeeper/zookeeper-3.4.10.2181去操作 sh ./bin/zkServer.sh status
那么会在/weblogic/zookeeper/zookeeper-3.4.10.2181创建一个zookeeper.out日志文件
用下面命令查看即可
[root@izwz91h49n3mj8r232gqwez zookeeper-3.4.10.2181]# pwd
/weblogic/zookeeper/zookeeper-3.4.10.2181
[root@izwz91h49n3mj8r232gqwez zookeeper-3.4.10.2181]# tail -f zookeeper.out