版权声明:本文为博主原创文章,未经博主允许不得转载。 https://blog.csdn.net/p106786860/article/details/51052299
在学习React Native的过程中,相信对于一个App开发工程师,没有充分的学习过前端开发技术的同学来说,顺利的搭建好开发环境还是比较纠结的。
下面,我就根据我自己学习过程中的总结,跟大家讲解讲解如何从零开始顺利的搭建React Native的开发环境,希望对大家的学习有所帮助。我是以Ubuntu操作系统进行开发的,具体步骤如下:
1.安装Git
apt-get install git
2.安装JDK
a.在官方网站下载相关的jdk-8u77-linux-x64.tar.gz包;
b.在你的指定目录下解压;
tar zxvf jdk-8u77-linux-x64.tar.gz
c.JAVA_HOME环境变量的配置;
编辑profile文件:
gedit /etc/profile
在文件尾部添加:
export JAVA_HOME=/usr/local/opt/jdk1.8.0_77
export CLASSPATH=.:$JAVA_HOME/lib:$JAVA_HOME/jre/lib:$CLASSPATH
export PATH=$JAVA_HOME/bin:$JAVA_HOME/jre/bin:$PATH
使用配置生效:
source /etc/profile
d.检验安装是否成功:java -version;
3.安装Android Studio和Android SDK
a.将下载的android-studio-ide-141.2456560-linux.zip解压到指定目录下(/usr/local/opt)下
unzip android-studio-ide-141.2456560-linux.zip
b.将下载的android-sdk_r24.4.1-linux.tgz解压到指定目录(/usr/local/opt)下
tar zxvf android-sdk_r24.4.1-linux.tgz
c.启动android-studio
cd /usr/local/opt/android-studio/bin
./studio.sh
d.创建demo应用程序并运行,检测环境是否安装成功;
提示1:pengchengxiang@ubuntu:/usr/local/opt/android-studio/bin$ sudo ./studio.sh
ERROR: Cannot start Android Studio
No JDK found. Please validate either STUDIO_JDK, JDK_HOME or JAVA_HOME environment variable points to valid JDK installation.
处理1:避免使用sudo方式启动;
提示2:在启动Android Studio的时候,有报错:Unable to run mksdcard SDK tool,则处理如下:
sudo apt-get install lib32z1 lib32ncurses5 lib32bz2-1.0 lib32stdc++6
提示3:如果在启动模拟器的时候,有如下报错,则处理如下:
Starting emulator for AVD 'AVD_for_Galaxy_Nexus_by_Google'
PANIC: Could not find AVD_for_Galaxy_Nexus_by_Google.ini file in $ANDROID_AVD_HOME nor in $HOME/.android/avd"!
处理3:ln -s /root/.android/avd /home/pengchengxiang/.android/avd
提示4:在启动android studio的过程中,如果提示:
System Health
IBus prior to 1.5.11 may cause input problem. See IDEA-78860 for details.
处理4:System Settings > Language Support,改为Keyboard input method at the bottom of the page from ibus to none.
提示5:在启动android studio的过程中,设置sdk路径的时候,如果提示:
the path ''/usr/local/opt/android-sdk-linux' is not writeable,please chose a new location
处理5:
chown -R root /usr/local/opt/android-sdk-linux
chgrp -R root /usr/local/opt/android-sdk-linux
chmod -R 777 /usr/local/opt/android-sdk-linux
4.定义ANDROID_HOME环境变量
a.在/etc/profile添加如下环境变量:
export ANDROID_HOME=/usr/local/opt/android-sdk-linux
export PATH=$PATH:$ANDROID_HOME/platform-tools
b.source /etc/profile使得配置生效;
5.使用gradle deamon
a.在gradle官网下载gradle-2.12-all.zip
b.将其解压到你安装目录下/usr/local/opt;
unzip gradle-2.12-all.zip
c.配置GRADLE_HOME环境变量,在/etc/profile文件中添加如下配置;
export GRADLE_HOME=/usr/local/opt/gradle-2.12
export PATH=$PATH:$GRADLE_HOME/bin
d.source /etc/profile使得配置生效;
e.执行gradle -v确定安装成功;
f.配置gradle deamon
touch ~/.gradle/gradle.properties && echo "org.gradle.daemon=true" >> ~/.gradle/gradle.properties
6.配置你的SDK
a.打开你的Android SDK Manager,在展示的窗口检查你是否安装如下组件:
b.配置ANDROID_HOME环境变量,在/etc/profile文件中添加如下配置;
        export ANDROID_HOME=/usr/local/opt/android-sdk-linux
        export PATH=$PATH:$ANDROID_HOME/platform-tools
c.source /etc/profile使得配置生效;
7.安装Genymotion模拟器
a.在Genymotion官网下载安装包genymotion-2.6.0-linux_x64.bin;
b.修改安装包的执行权限,并执行安装指定安装目录;
pengchengxiang@ubuntu:~/Desktop$ chmod +x genymotion-2.6.0-linux_x64.bin
pengchengxiang@ubuntu:~/Desktop$ sudo ./genymotion-2.6.0-linux_x64.bin -d /usr/local/opt/
[sudo] password for pengchengxiang:
Installing for all users.
Installing to folder [/usr/local/opt/genymotion]. Are you sure [y/n] ? y
     - Trying to find VirtualBox toolset .................... OK (Valid version of VirtualBox found: 4.3.36_Ubuntur105129)
     - Extracting files ..................................... OK (Extract into: [/usr/local/opt/genymotion])
     - Installing launcher icon ............................. OK
Installation done successfully.
You can now use these tools from [/usr/local/opt/genymotion]:
     - genymotion
     - genymotion-shell
     - gmtool
c.进入到/usr/local/opt/genymotion目录,启动模拟器;
pengchengxiang@ubuntu:/usr/local/opt/genymotion$ ./genymotion
提示1:运行虚拟机的时候,如果弹出对话框报错如下:
Unable to start the virtual device.
VirtualBox cannot start the virtual device.
To find out the cause of the proble.start the virtual device from VirtualBox.
处理1:Configure virtual device->Processor+Base Memory调整为1+1024;
提示2:运行虚拟机的时候,如果弹出对话框报错如下:
Unable to start the virtual device.
The Virtual device got no Ip address.
The VirtualBox DHCP servers has not assigned an IP address to the virtual device.
To find out the cause of the proble.start the virtual device from VirtualBox.
8.安装NodeJS
sudo apt-get install -y build-essential
curl -sL https://deb.nodesource.com/setup_4.x | sudo -E bash -
sudo apt-get install -y nodejs
9.安装Watchman
git clone https://github.com/facebook/watchman.git
cd watchman
git checkout v4.1.0  # the latest stable release
./autogen.sh
./configure --prefix=/usr/local/opt/watchman
make
sudo make install
提示1:如果在安装过程中,出现如下报错:
x86_64-linux-gnu-gcc -pthread -fno-strict-aliasing -DNDEBUG -g -fwrapv -O2 -Wall -Wstrict-prototypes -fPIC-
I/usr/include/python2.7 -c pywatchman/bser.c -o build/temp.linux-x86_64-2.7/pywatchman/bser.o
pywatchman/bser.c:31:20: fatal error: Python.h: No such file or directory
#include <Python.h>
^
compilation terminated.
error: command 'x86_64-linux-gnu-gcc' failed with exit status 1
make[1]: *** [py-build] Error 1
处理1:sudo apt-get install python-dev
提示2:如果在安装过程中,出现如下报错:
pengchengxiang@ubuntu:~/watchman$ sudo ./autogen.sh
./autogen.sh: 9: ./autogen.sh: aclocal: not found
./autogen.sh: 10: ./autogen.sh: autoheader: not found
./autogen.sh: 11: ./autogen.sh: automake: not found
./autogen.sh: 12: ./autogen.sh: autoconf: not found
处理2:apt-get install autoconf
10.安装Flow
pengchengxiang@ubuntu:~$ npm install -g flow-bin
npm WARN deprecated [email protected]: graceful-fs version 3 and before will fail on newer node releases. Please update to graceful-fs@^4.0.0 as soon as possible.
> [email protected] postinstall /usr/lib/node_modules/flow-bin/node_modules/bin-wrapper/node_modules/bin-check/node_modules/spawn-sync
> node postinstall
npm WARN deprecated [email protected]: lodash@<3.0.0 is no longer maintained. Upgrade to lodash@^4.0.0.
npm WARN deprecated [email protected]: graceful-fs version 3 and before will fail on newer node releases. Please update to graceful-fs@^4.0.0 as soon as possible.
/usr/bin/flow -> /usr/lib/node_modules/flow-bin/cli.js
> [email protected] postinstall /usr/lib/node_modules/flow-bin
> node lib/install.js
fetch : https://github.com/facebook/flow/releases/download/v0.22.1/flow-linux64-v0.22.1.zip
progress : [====================] 100% 0.0s
✔ flow binary test passed successfully
[email protected] /usr/lib/node_modules/flow-bin
├── [email protected] ([email protected], [email protected])
└── [email protected] ([email protected], [email protected], [email protected], [email protected], [email protected],        [email protected], [email protected], [email protected], [email protected])
11.安装React-Native
pengchengxiang@ubuntu:~$ npm install -g react-native-cli
/usr/bin/react-native -> /usr/lib/node_modules/react-native-cli/index.js
[email protected] /usr/lib/node_modules/react-native-cli
├── [email protected]
├── [email protected]
├── [email protected] ([email protected], [email protected], [email protected], [email protected], [email protected])
└── [email protected] ([email protected], [email protected], [email protected], [email protected], [email protected])
12.创建React-Native项目
pengchengxiang@ubuntu:~$ react-native init AwesomeProject
This will walk you through creating a new React Native project in /home/pengchengxiang/AwesomeProject
Installing react-native package from npm...
Setting up new React Native app in /home/pengchengxiang/AwesomeProject
[email protected] node_modules/react
├── [email protected] ([email protected], [email protected])
└── [email protected] ([email protected], [email protected], [email protected], [email protected], [email protected])
To run your app on iOS:
    cd /home/pengchengxiang/AwesomeProject
    react-native run-ios
- or -
Open /home/pengchengxiang/AwesomeProject/ios/AwesomeProject.xcodeproj in Xcode
    Hit the Run button
To run your app on Android:
    Have an Android emulator running (quickest way to get started), or a device connected
    cd /home/pengchengxiang/AwesomeProject
    react-native run-android
13.在Android设备上启动App
a.检查你的手机是已经通过adb连接到PC上:
b.配置Android设备8081端口,访问PC的8081端口的React服务
pengchengxiang@ubuntu:~/AwesomeProject$ adb reverse tcp:8081 tcp:8081
c.启动PC端的React服务
pengchengxiang@ubuntu:~/AwesomeProject$ sudo react-native start
[sudo] password for pengchengxiang:
┌──────────────────────────────────────────────────────────────┐
│  Running packager on port 8081.                                                                                            │
│  Keep this packager running while developing on any JS projects. Feel                                                      │
│  free to close this tab and run your own packager instance if you                                                          │
│  prefer.                                                                                                                                               │                                                                                                                                                        │
│  https://github.com/facebook/react-native                                                                                                              │
│                                                                                                                                                        └───────────────────────────────────——————─────────────────────┘
 Looking for JS files in
     /home/pengchengxiang/AwesomeProject
 [1:36:30 AM] <START> Building Dependency Graph
 [1:36:30 AM] <START> Crawling File System
 [Hot Module Replacement] Server listening on /hot
     React packager ready
d.安装并启动App
pengchengxiang@ubuntu:~/AwesomeProject$ react-native run-android
Starting JS server...
Building and installing the app on the device (cd android && ./gradlew installDebug)...
WARNING [Project: :app] Current NDK support is deprecated.  Alternative will be provided in the future.
:app:preBuild UP-TO-DATE
:app:preDebugBuild UP-TO-DATE
:app:checkDebugManifest
:app:preReleaseBuild UP-TO-DATE
:app:prepareComAndroidSupportAppcompatV72301Library UP-TO-DATE
:app:zipalignDebug UP-TO-DATE
:app:assembleDebug UP-TO-DATE
:app:installDebug
Installing APK 'app-debug.apk' on 'x600 - 5.0.2'
Installed on 1 deviced
    BUILD SUCCESSFUL
    Total time: 18.708 secs
    Starting the app (/usr/local/opt/android-sdk-linux/platform-tools/adb shell am start -n com.awesomeproject/.MainActivity)...
    Starting: Intent { cmp=com.awesomeproject/.MainActivity }
c.启动App后,点击Road JS等待加载。加载成功后,显示如下页面:


提示1:在安装项目App的时候,如果报错如下:
pengchengxiang@ubuntu:~/AwesomeProject$ sudo react-native run-android
[sudo] password for pengchengxiang:
Starting JS server...
Building and installing the app on the device (cd android && ./gradlew installDebug)...
ERROR: JAVA_HOME is not set and no 'java' command could be found in your PATH.
Please set the JAVA_HOME variable in your environment to match the
location of your Java installation.
Could not install the app on the device, read the error above for details.
Make sure you have an Android emulator running or a device connected and have
set up your Android development environment:
处理1:不使用sudo安装项目app,执行 react-native run-android
提示2:在运行项目的时候,如果报错如下:
pengchengxiang@ubuntu:~/AwesomeProject$ react-native run-android
fs.js:549
return binding.open(pathModule._makeLong(path), stringToFlags(flags), mode);
^
Error: EACCES: permission denied, open '/home/pengchengxiang/.babel.json'
at Error (native)
at Object.fs.openSync (fs.js:549:18)
at Object.fs.writeFileSync (fs.js:1156:15)
at save (/home/pengchengxiang/AwesomeProject/node_modules/react-native/node_modules/babel-register/lib/cache.js:48:19)
at nextTickCallbackWith0Args (node.js:420:9)
at process._tickCallback (node.js:349:13)
at Function.Module.runMain (module.js:443:11)
at startup (node.js:139:18)
at node.js:968:3
处理2:改变.babel.json文件的访问权限
pengchengxiang@ubuntu:~$ ls -al | grep .babel.json
-rw-r--r-- 1 root root 715363 Apr 2 00:58 .babel.json
pengchengxiang@ubuntu:~$ sudo chown pengchengxiang ~/.babel.json
pengchengxiang@ubuntu:~$ ls -al | grep .babel.json
-rw-r--r-- 1 pengchengxiang root 715363 Apr 2 00:58 .babel.json
提示3:遇见如下报错
FAILURE: Build failed with an exception.
* What went wrong:
A problem occurred configuring project ':app'.
> failed to find Build Tools revision 23.0.1
处理3,打开Android SDK,安装Build Tools revision 23.0.1
提示4:遇见如下报错
FAILURE: Build failed with an exception.
* What went wrong:
Could not create service of type TaskArtifactStateCacheAccess using TaskExecutionServices.createCacheAccess().
> Failed to create parent directory '/home/pengchengxiang/AwesomeProject/android/.gradle' when creating directory '/home/pengchengxiang/AwesomeProject/android/.gradle/2.4/taskArtifacts'
处理4:不使用sudo react-native init AwesomeProject 创建项目直接 react-native init AwesomeProject
提示5:遇见如下报错
FAILURE: Build failed with an exception.
* What went wrong:
Execution failed for task ':app:installDebug'.
> com.android.builder.testing.api.DeviceException: com.android.ddmlib.InstallException: Unable to upload some APK
处理5:把项目中的~/android/app/build.gradle中的gradle版本改为1.2.3
提示6:在启动react服务的时候,运行几秒后报错如下:
pengchengxiang@ubuntu:~/AwesomeProject$ react-native start
┌────────────────────────────────────────────────────────────────────────────┐
│ Running packager on port 8081. │
│ │
│ Keep this packager running while developing on any JS projects. Feel │
│ free to close this tab and run your own packager instance if you │
│ prefer. │
│ │
│ │
└────────────────────────────────────────────────────────────────────────────┘
Looking for JS files in
/home/pengchengxiang/AwesomeProject
[6:38:04 AM] <START> Building Dependency Graph
[6:38:04 AM] <START> Crawling File System
[Hot Module Replacement] Server listening on /hot
React packager ready.
ERROR watch /home/pengchengxiang/AwesomeProject/android/app/build/intermediates/res/debug/values-el ENOSPC
{"code":"ENOSPC","errno":"ENOSPC","syscall":"watch /home/pengchengxiang/AwesomeProject/android/app/build/intermediates/res/debug/values- el","filename":"/home/pengchengxiang/AwesomeProject/android/app/build/intermediates/res/debug/values-el"}
Error: watch /home/pengchengxiang/AwesomeProject/android/app/build/intermediates/res/debug/values-el ENOSPC
at exports._errnoException (util.js:870:11)
at FSWatcher.start (fs.js:1234:19)
at Object.fs.watch (fs.js:1262:11)
at NodeWatcher.watchdir (/home/pengchengxiang/AwesomeProject/node_modules/react-native/node_modules/sane/src/node_watcher.js:144:20)
at Walker.<anonymous> (/home/pengchengxiang/AwesomeProject/node_modules/react-native/node_modules/sane/src/node_watcher.js:353:12)
at emitTwo (events.js:87:13)
at Walker.emit (events.js:172:7)
at /home/pengchengxiang/AwesomeProject/node_modules/react-native/node_modules/sane/node_modules/walker/lib/walker.js:69:16
at /home/pengchengxiang/AwesomeProject/node_modules/react-native/node_modules/graceful-fs/graceful-fs.js:142:16
at /home/pengchengxiang/AwesomeProject/node_modules/react-native/node_modules/graceful-fs/graceful-fs.js:142:16
See http://facebook.github.io/react-native/docs/troubleshooting.html
for common problems and solutions.
处理6:sudo react-native start
提示7:如果App在启动之后,显示红色报错界面,报错如下
java.util.concurrent.ExecutionException:java.lang.RuntimeException:ReferenceError:Can't find variable:__fbBatchedBride(<unknownfile>:1>
或者Couldn‘t get the native call queue:bridge configuration isn't available
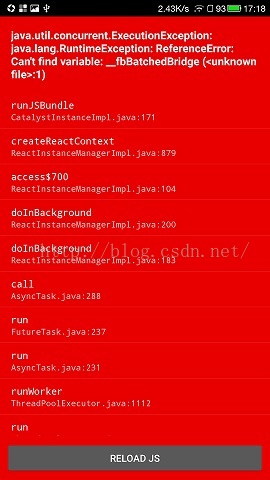

处理7:如果你使用USB在你的设备上进行调试,则运行adb reverse tcp:8081 tcp:8081,然后点击Road JS按钮,等待加载。
提示8:运行adb reverse tcp:8081 tcp:8081出现error closed
测试设备需要5.0以上才可以支持这个命令
提示9:安装完成,发现页面是空白的,什么都没有?


可以从设置——应用中选择某一个应用,然后将悬浮窗打开即可,
设置——应用管理——选择需要的app——权限管理——打开悬浮窗
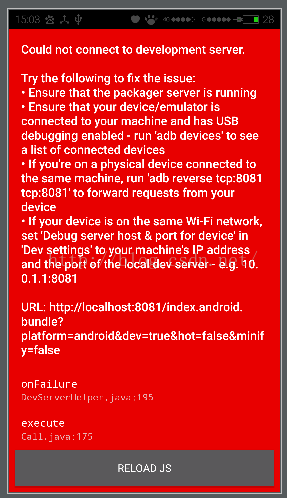
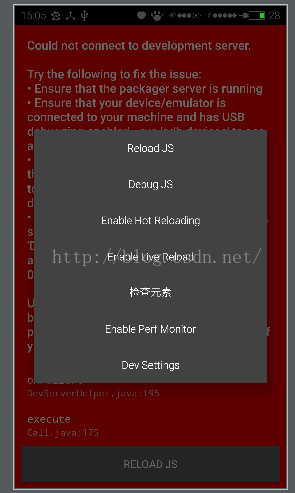
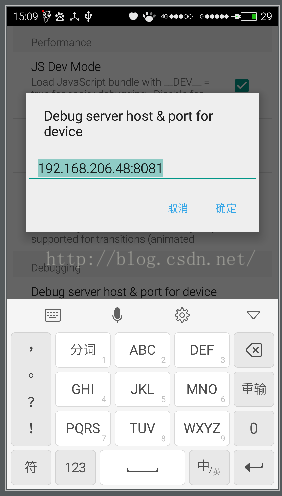
提示10:运行结束出现如图1内容,点击RELOAD JS 出现图2:如果手机和电脑不在同一个网段,或者手机不能访问到,就会出现如下页面:
处理:(5.0或4.4手机都适用)摇一摇手机,出现如图3画面-点击Dev Settings -> Debug server host for device ,填入你开发电脑的 IP 地址。ipconfig查看电脑的ip