环境搭建
【Win下Android环境搭建】
1. Node.js
官网下载安装包并安装
验证:打开cmd,输入npm
2. Java环境
3. Android环境
4. 安装Appium
github 下载Appium,安装(可能会提示缺少.net framework,建议在微软官网上安装对应的)
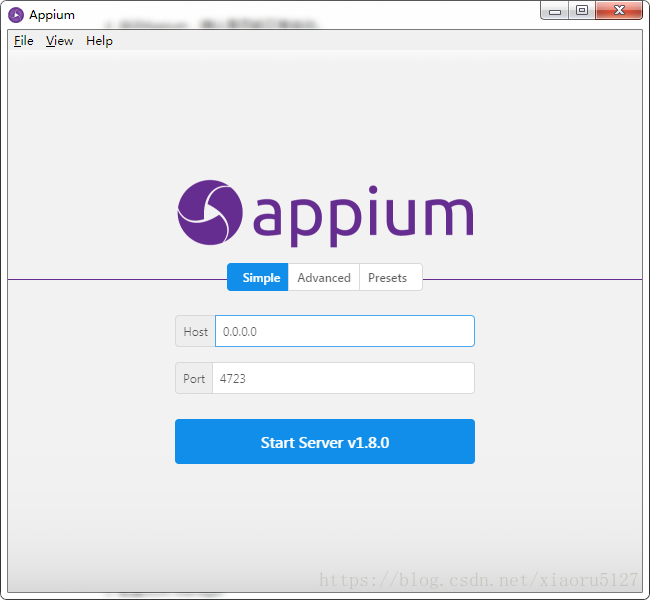
安装后,直接【Start Server】启动服务。
5.验证Appium环境
npm install -g appium-doctor
appium-doctor --android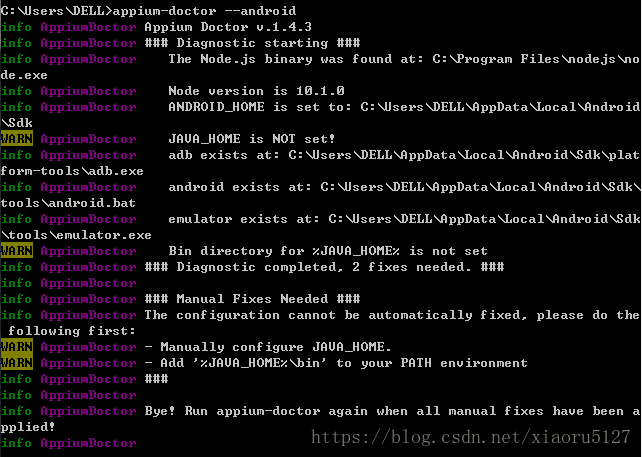
【Mac下IOS环境搭建】
基本上类似
1.Node.js
官网下载并安装
在mac下的安装目录如下
Node.js v8.11.1 to /usr/local/bin/node
npm v5.6.0 to /usr/local/bin/npm
Make sure that /usr/local/bin is in your $PATH.
安装完之后,可使用node -v查看node版本,npm -v查看npm版本
2.安装carthage
Carthage 是一款iOS项目依赖管理工具,与 Cocoapods 有着相似的功能
brew install carthage3.安装Appium
github下载Appium并安装,安装后直接【Start Server】启动服务
5.验证Appium环境
npm install -g appium-doctor
appium-doctor --ios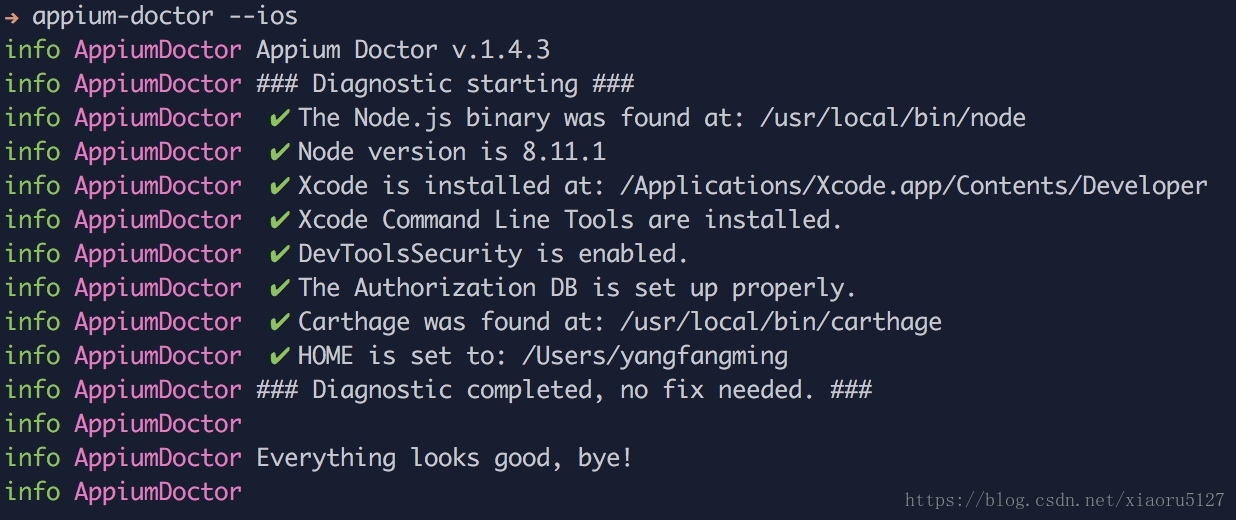
脚本环境【Ruby + cucumber】
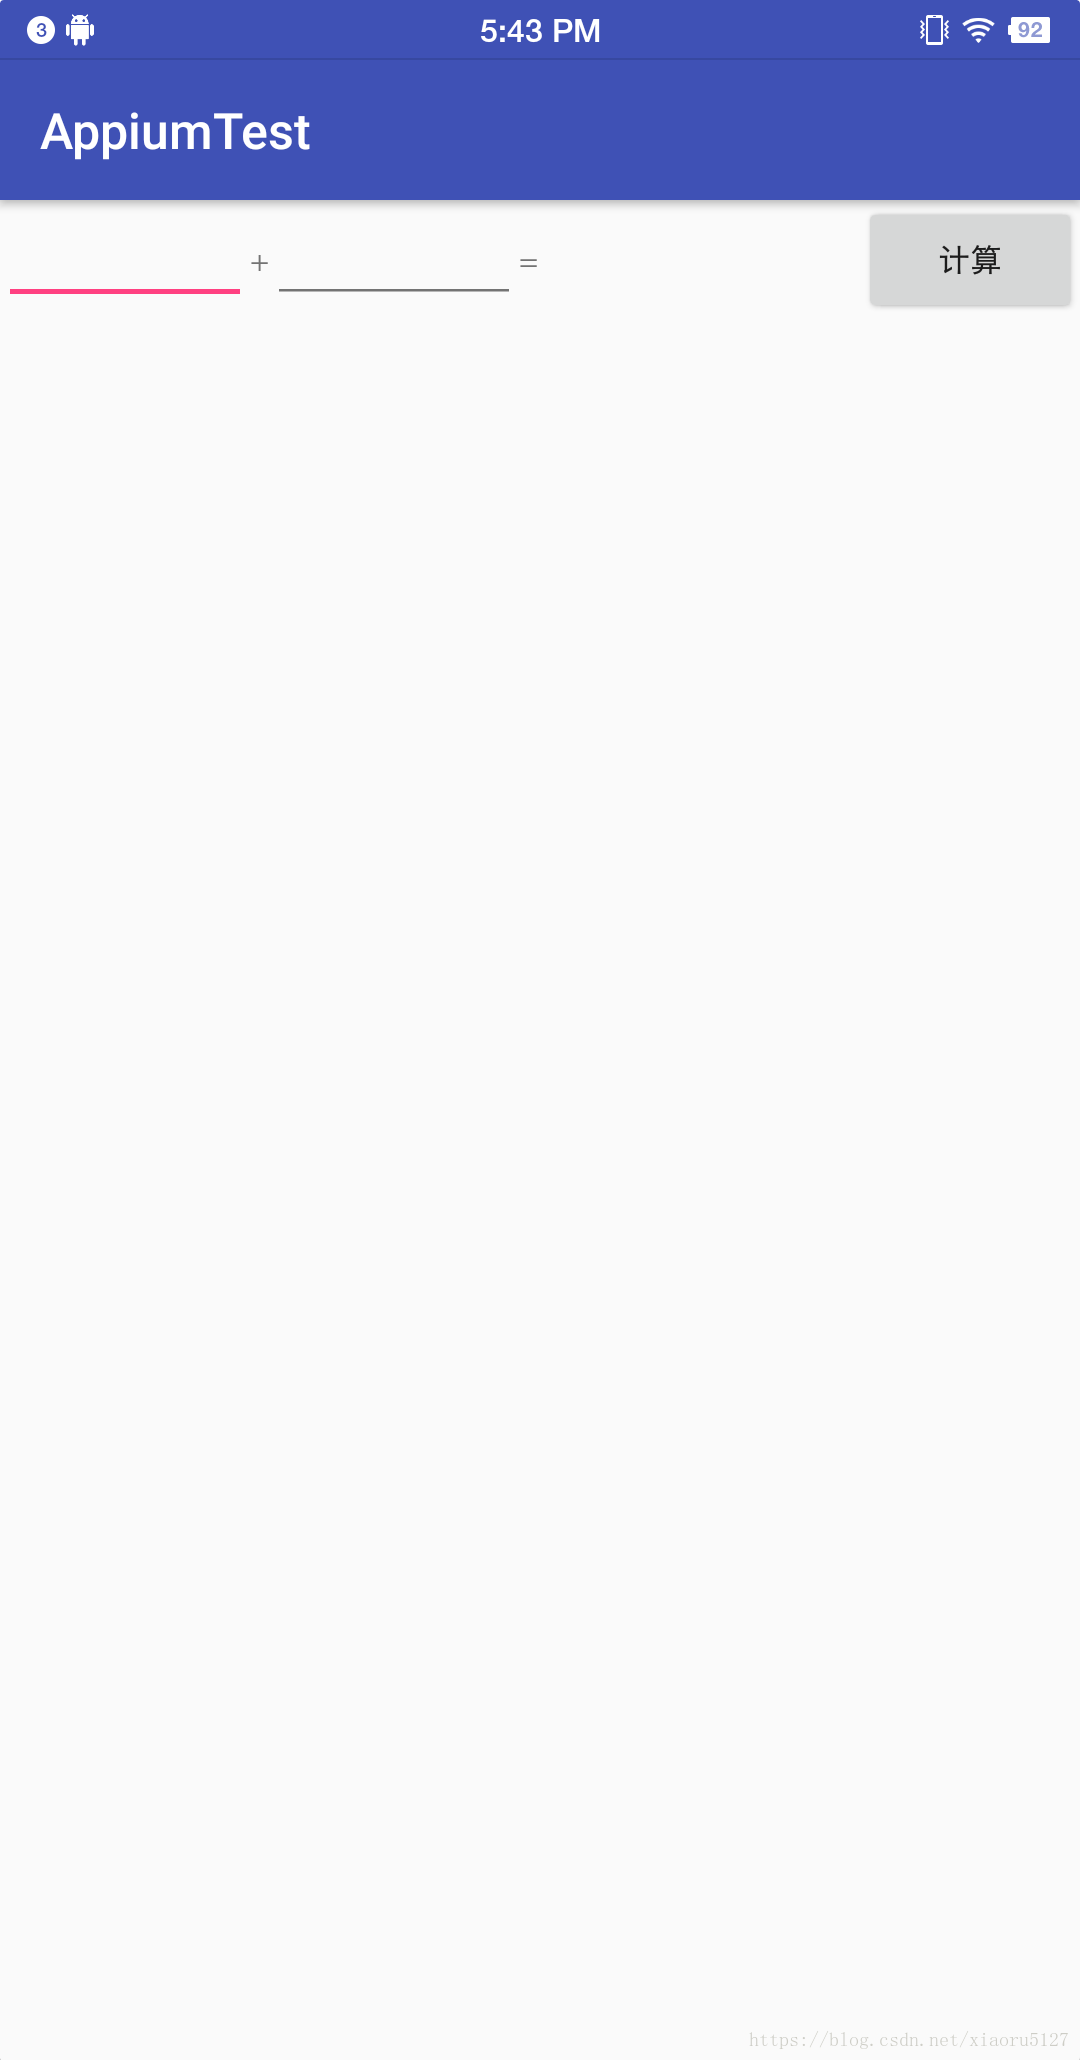
以一个求和的应用为例,app效果展示如下
1.启动Appium服务,【Start Server】
2.安装Ruby
利用rubyinstaller安装Ruby
3.安装appium_lib,一个支持Appium服务端的ruby客户端
gem update –system
gem update bundler
gem uninstall -aIx appium_lib
gem install –no-rdoc –no-ri appium_lib
4.新建一个test文件夹,新建文件,命名为Gemfile文件【没有后缀】,用编辑器打开,写入以下代码
source 'https://www.rubygems.org'

gem 'appium_lib',         '~> 9.7.4'
gem 'rest-client',        '~> 2.0.2'
gem 'rspec',              '~> 3.6.0'
gem 'cucumber',           '~> 2.4.0'
gem 'rspec-expectations', '~> 3.6.0'
gem 'spec',               '~> 5.3.4'
gem 'sauce_whisk',        '~> 0.0.13'
gem 'test-unit',          '~> 2.5.5' # required for bundle exec ruby xunit_android.rb
保存退出
用Ruby在目录下执行以下命令,安装Ruby依赖(包括cucumber),并初始化cucumber
bundle update
bundle install
cucumber --init
生成目录如下
features # 存放feature的目录
├── step_definitions # 存放steps的目录
└── support # 环境配置
└── env.rb
现在对support目录下的env.rb进行修改,改成匹配android和ios两种移动端环境
修改后目录如下
features # 存放feature的目录
├── step_definitions # 存放steps的目录
└── support # 环境配置
├── android
└── appium.txt
├── ios
└── appium.txt
├── env.rb
env.rb修改后变成如下
# This file provides setup and common functionality across all features.  It's
# included first before every test run, and the methods provided here can be
# used in any of the step definitions used in a test.  This is a great place to
# put shared data like the location of your app, the capabilities you want to
# test with, and the setup of selenium.

require 'rspec/expectations'
require 'appium_lib'
require 'cucumber/ast'

# Create a custom World class so we don't pollute `Object` with Appium methods
class AppiumWorld
end

# Load the desired configuration from appium.txt, create a driver then
# Add the methods to the world
case ENV['PLATFORM']
when 'android'
    caps = Appium.load_appium_txt file: File.expand_path('./android/appium.txt', __FILE__), verbose: true
when 'ios'
    caps = Appium.load_appium_txt file: File.expand_path('./ios/appium.txt', __FILE__), verbose: true
end

Appium::Driver.new(caps, true)
Appium.promote_appium_methods AppiumWorld

World do
    AppiumWorld.new
end

Before { $driver.start_driver }
After { $driver.driver_quit }
android目录下的appium.txt
[caps]
platformName = "Android"
deviceName = "ca0edc6b"
platformVersion = "7.1.1"
app = "E:\\test\\app-fast-develop.apk"  #apk路径
appActivity = "com.android.commonlib.appiumtest.MainActivity"
appPackage = "com.android.commonlib.appiumtest"
autoGrantPermissions = true # 处理安卓系统弹窗,自动管理授权
automationName = "UiAutomator2"
ios目录下的appium.txt
[caps]
platformName = "ios"
deviceName = "iPhone 8"
platformVersion = "11.1"
app = "E:\\test\\app-fast-develop.app"
automationName = 'XCUITest'
autoAcceptAlerts = true
waitForAppScript = "$.delay(5000); $.acceptAlert();" # 授权系统弹窗,真机测试的时候很有用
然后回到features目录,开始编写测试用例,新建sum.feature文件
#language: zh-CN

功能: 求和

  场景: 验证1+1=2
    当 在第一个输入框输入 1
    并且 在第二个输入框输入 1
    并且 点击计算按钮
    那么 结果应该为 2
运行Android测试 bundle exec cucumber PLATFORM=Android,之后报错,把错误信息(主要是要这个流程跟格式,防止自己写写错)拷贝下
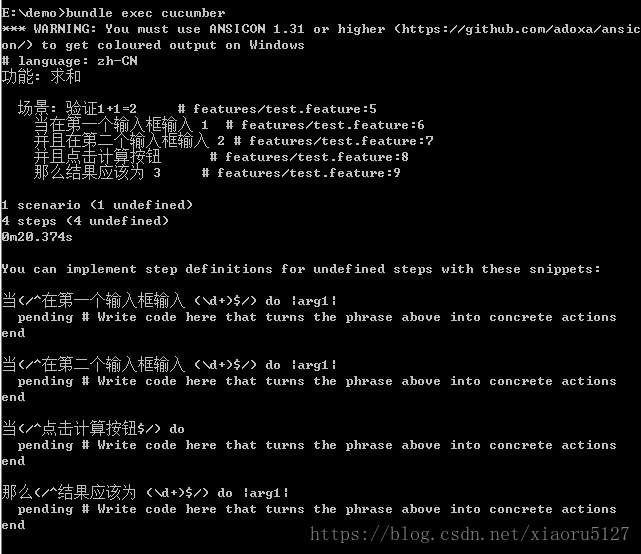
step_definitions中新建一个steps.rb
并把刚刚复制的错误信息填写过来,然后进行修改成正真的测试用例,拷贝如下
当(/^在第一个输入框输入 (\d+)$/) do |arg1|
  pending # Write code here that turns the phrase above into concrete actions
end

当(/^在第二个输入框输入 (\d+)$/) do |arg1|
  pending # Write code here that turns the phrase above into concrete actions
end

当(/^点击计算按钮$/) do
  pending # Write code here that turns the phrase above into concrete actions
end

那么(/^结果应该为 (\d+)$/) do |arg1|
  pending # Write code here that turns the phrase above into concrete actions
end
修改后
当(/^在第一个输入框输入 (\d+)$/) do |arg1|
id("a").type arg1
end
并且(/^在第二个输入框输入 (\d+)$/) do |arg1|
id("b").type arg1
end
并且(/^点击计算按钮$/) do
id('submit').click
end
那么(/^结果应该为 (\d+)$/) do |arg1|
r = id('c').text
expect(arg1).to eq(r)
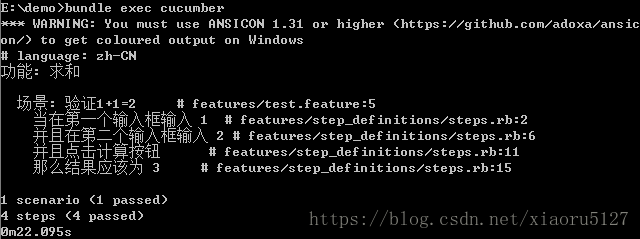
end再次运行 bundle exec cucumber PLATFORM=Android,搞定
脚本环境【Python3 + behave】
1.安装python3
brew install python32.安装Appium-Python-Client
除了官方提供的Appium-Python-Client框架,还有一个非官方由网易开源的python客户端facebook-wda;有兴趣可自行了解
pip3 install Appium-Python-Client3.安装Behave
pip3 install behave4.查看Behave支持的语言
behave --lang-listLanguages available:
ar: العربية / Arabic
bg: български / Bulgarian
ca: català / Catalan
cs: Česky / Czech
cy-GB: Cymraeg / Welsh
da: dansk / Danish
de: Deutsch / German
en: English / English
en-Scouse: Scouse / Scouse
en-au: Australian / Australian
en-lol: LOLCAT / LOLCAT
en-pirate: Pirate / Pirate
en-tx: Texan / Texan
eo: Esperanto / Esperanto
es: español / Spanish
et: eesti keel / Estonian
fi: suomi / Finnish
fr: français / French
gl: galego / Galician
he: עברית / Hebrew
hr: hrvatski / Croatian
hu: magyar / Hungarian
id: Bahasa Indonesia / Indonesian
is: Íslenska / Icelandic
it: italiano / Italian
ja: 日本語 / Japanese
ko: 한국어 / Korean
lt: lietuvių kalba / Lithuanian
lu: Lëtzebuergesch / Luxemburgish
lv: latviešu / Latvian
nl: Nederlands / Dutch
no: norsk / Norwegian
pl: polski / Polish
pt: português / Portuguese
ro: română / Romanian
ru: русский / Russian
sk: Slovensky / Slovak
sr-Cyrl: Српски / Serbian
sr-Latn: Srpski (Latinica) / Serbian (Latin)
sv: Svenska / Swedish
tr: Türkçe / Turkish
uk: Українська / Ukrainian
uz: Узбекча / Uzbek
vi: Tiếng Việt / Vietnamese
zh-CN: 简体中文 / Chinese simplified
zh-TW: 繁體中文 / Chinese traditional5.查看对应语言的关键字
behave --lang-help zh-CNTranslations for Chinese simplified / 简体中文
And: 而且<
Background: 背景
But: 但是<
Examples: 例子
Feature: 功能
Given: 假如<
Scenario: 场景
Scenario Outline: 场景大纲
Then: 那么<
When: 当<到这里,环境就搭建好了
6.编写测试代码
创建目录如下
├── test# 待测app
│   └── app-fast-develop.app
└── features
    ├── calculate.feature # behave待测功能定义
    ├── environment.py # 环境配置
    └── steps
        └── step.py # 测试steps
然后编写environment.py环境配置
# -*- coding: utf-8 -*
import os
from appium import webdriver

def before_feature(context, feature):
    app = 'E:\\test\\app-fast-develop.app'
    context.driver = webdriver.Remote(
        command_executor='http://127.0.0.1:4723/wd/hub',
        desired_capabilities={
            'app': app,
            'platformName': 'ios',
            'deviceName': 'iPhone 8',
            'platformVersion': '11.1',
            'bundleId': 'com.android.commonlib.appiumtest'
        })

def after_feature(context, feature):
    context.driver.quit()
编写calculate.feature
#language: zh-CN
功能: 求和
    场景: 1+1=2
        假如 第一个输入框输入 1
        而且 第二个输入框输入 1
        当 点击计算按钮
        那么 结果应该为 2
最后编写steps.py
# -*- coding: utf-8 -*
from behave import *

@given(u'第一个输入框输入 1')
def step_impl(context):
    el = context.driver.find_element_by_accessibility_id('textfield1')
    el.clear()
    el.set_value("1")


@given(u'第二个输入框输入 1')
def step_impl(context):
    el = context.driver.find_element_by_accessibility_id('textfield2')
    el.clear()
    el.set_value("1")


@when(u'点击计算按钮')
def step_impl(context):
    el = context.driver.find_element_by_accessibility_id('sum')
    el.click()


@then(u'结果应该为 2')
def step_impl(context):
    # el = context.driver.find_element_by_accessibility_id('result')
    el = context.driver.find_element_by_class_name('XCUIElementTypeStaticText')
    actual = el.get_attribute('value')
    print(actual)
    assert actual=='2', 'result is 2'
7.运行测试
behave
# 或者
behave --lang zh-CN
【Ruby + cucumber 基础用法】
【打印】
puts 'Hello World'
#打印instance的所有方法
puts instance.methods
【控件定位】
button定位
first_button // 查找第一个button
button(value) // 查找第一个包含value的button,返回[UIAButton|XCUIElementTypeButton]对象
buttons(value) // 查找所有包含value的所有buttons,返回[Array<UIAButton|XCUIElementTypeButton>]对象

eg:
button("登录") // 查找登录按钮
输入框定位
first_textfield // 查找第一个textfield
textfield(value) // 查找第一个包含value的textfield,返回[TextField]

eg:
textfield("用户名") // 查找
使用accessibility_id查找
id(value) // 返回id等于value的元素

eg:
id("登录") // 返回登录按钮
id("登录页面") // 返回登录页面
使用find查找
find(value) // 返回包含value的元素
find_elements(:class, 'XCUIElementTypeCell') // 通过类名查找

eg:
find("登录页面")
使用xpath查找
xpath(xpath_str)web元素定位
#测试web页面首先需要切换driver的上下文
web = driver.available_contexts[1]
driver.set_context(web)
#定位web页面的元素:通过类选择器.re-bb定位css的元素
driver.find_elements(:css, ".re-bb")
【参数传递 参数设置】
#arg1 为 (\d+)类型 arg2为"([^"]*)"类型(正则)
And(/^在输入框输入 (\d+) "([^"]*)"$/) do |arg1, arg2|
    #寻找内容为"请输入密码"的输入框,并输入arg1+arg2
  textfield("请输入密码").type arg1+arg2
end
【常用事件】
点击事件
#通过坐标点击
tap(x: 68, y: 171)

#通过按钮元素点击
button("登录").click
手势滑动
// 滑动手势
swipe(direction:, element: nil) // direction - Either 'up', 'down', 'left' or 'right'.

eg: 上滑手势
swipe(direction: "up", element: nil)
【延迟】
// wait
wait { find("登录页面") } // 等待登录页面加载完成
//等待某界面加载完成,等待SplashActivity加载完成,如果超时也会继续往下走,之后再判断SplashActivity是否存在
wait{ elements = find_elements(:class, 'SplashActivity')    }
exist = exists { find_element(:class, 'SplashActivity') }
// sleep
sleep(2) // 延时2秒
【rspec断言】
相等
expect(actual).to eq(expected)  # passes if actual == expected
expect(actual).to eql(expected) # passes if actual.eql?(expected)
expect(actual).not_to eql(not_expected) # passes if not(actual.eql?(expected))
比较
expect(actual).to be >  expected
expect(actual).to be >= expected
expect(actual).to be <= expected
expect(actual).to be <  expected
expect(actual).to be_within(delta).of(expected)
类型判断
expect(actual).to be >  expected
expect(actual).to be >= expected
expect(actual).to be <= expected
expect(actual).to be <  expected
expect(actual).to be_within(delta).of(expected)
Bool值比较
expect(actual).to be_truthy   # passes if actual is truthy (not nil or false)
expect(actual).to be true     # passes if actual == true
expect(actual).to be_falsy    # passes if actual is falsy (nil or false)
expect(actual).to be false    # passes if actual == false
expect(actual).to be_nil      # passes if actual is nil
expect(actual).to_not be_nil  # passes if actual is not nil
错误
expect { ... }.to raise_error
expect { ... }.to raise_error(ErrorClass)
expect { ... }.to raise_error("message")
expect { ... }.to raise_error(ErrorClass, "message")
异常
expect { ... }.to throw_symbol
expect { ... }.to throw_symbol(:symbol)
expect { ... }.to throw_symbol(:symbol, 'value')
【python3 + behave基础用法】
Jenkins集成[Ruby + cucumber] 本部分待续…
输出报表命令
bundle exec cucumber --format html --out ./report/report.html
结果如下

1.Jenkins环境搭建方面参考这个 搭建Jenkins持续集成服务
PS:跑一个简单的demo集成看看
2.然后按照本文所介绍的再服务器上安装Appium测试环境。
PS:服务器本地跑下测试
3.我们可以在【构建】这部分加入测试,除了原来的build,可以加入Execute Shell
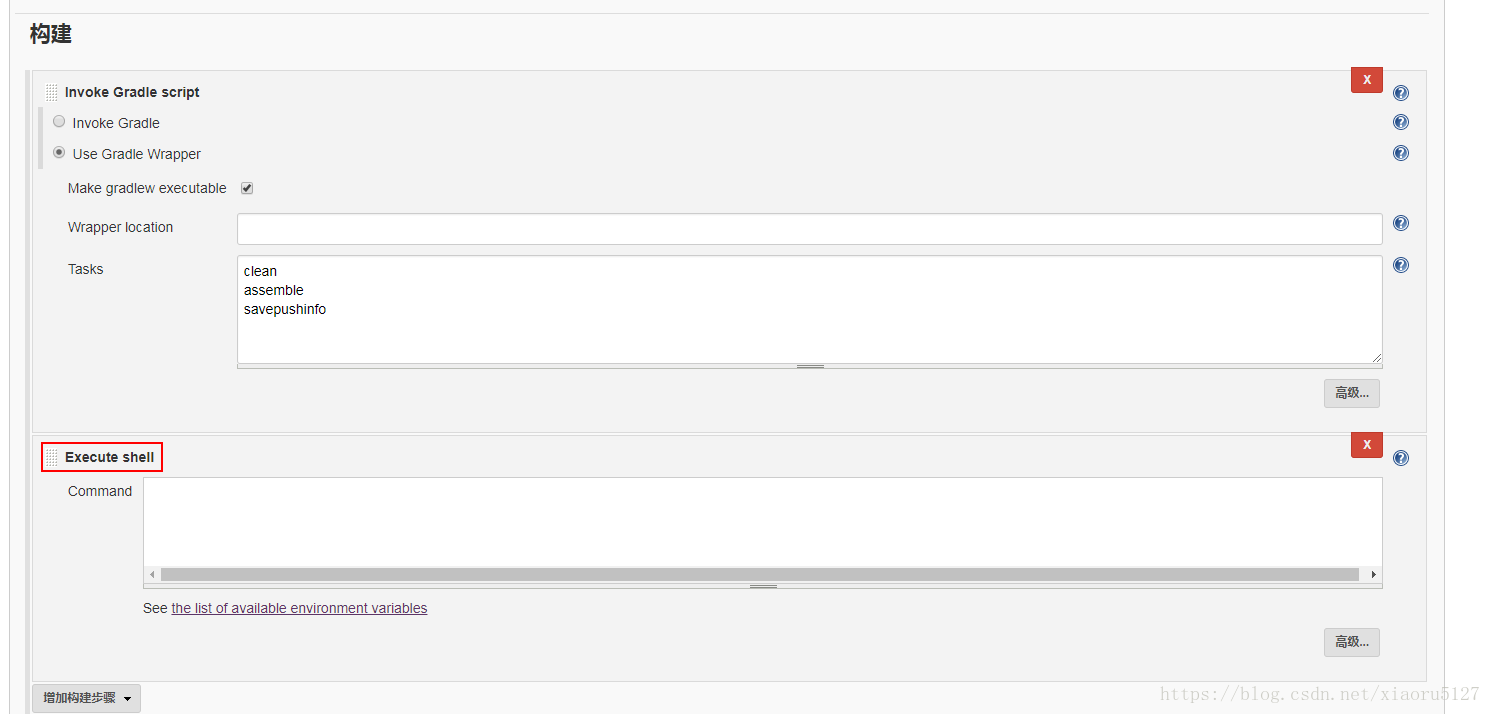
把build生成的apk拷贝到测试目录下;
然后进入测试目录运行bundle install安装依赖;
最终运行cucumber命令执行测试并输出报表
cucumber –format json -o ./report/cucumber.json
敏捷实践 (1) - 我们是如何自动化App验收标准
敏捷实践 (2) - appium支持与无法支持的测试
敏捷实践 (3) - Appium Ruby Console
敏捷实践(4) - 我们是如何改进AC
敏捷实践(5) - 敏捷开发=快这里写链接内容