首先先要安装python+opencv环境
这里我们用python3.5环境,
可以去https://repo.continuum.io/archive/下载windows,linux,macos的anaconda旧版本
安装好后建议对pip源进行更换,可以减少pip在安装包时出现的超时错误
具体在anaconda目录下的Lib\site-packages\pip-9.0.1-py3.5.egg\pip\models文件夹中的index.py文件

将最后的网址更换到国内的镜像网址:
http://pypi.douban.com/ 豆瓣
http://pypi.hustunique.com/ 华中理工大学
http://pypi.sdutlinux.org/ 山东理工大学
http://pypi.mirrors.ustc.edu.cn/ 中国科学技术大学
https://pypi.tuna.tsinghua.edu.cn/清华
然后在cmd下试一下pip install numpy 检查numpy包是否已经安装:
出现:

说明已经安装,否则这命令也能自动安装
让后安装opencv,可惜的是我原来的opencv是3.0版本的好像还不支持python3.5
再去下载一个更高版本的,配置环境太慢了,这里我选择了用pip进行opencv的安装:
先去http://www.lfd.uci.edu/~gohlke/pythonlibs/#numpy网站下载对应的opencv包,我的是:
opencv_python-3.2.0+contrib-cp35-cp35m-win_amd64.whl
然后在cmd下pip install 路径+文件名,安装相应文件

如图安装成功,这里3.2.0可能是opencv的版本,cp35可能是python 注意选择自己python版本对应的包
安装好后先检查一下opencv是否安装完全:
import cv2
import numpy as np

img = cv2.imread("D:\\1.jpg")
cv2.imshow("mingyue",img)
cv2.waitKey(10000)
说明opencv已经安装完全
先介绍一下opencv自带的人脸检测器
opencv主要自带了人脸的Haar特征分类器,在安装目录中\data\haarcascades已经有训练好的人脸xml 文件,之后会试一下
这里我们为方便之后的开发 我们用Dlib库
c需要从Dlib的网站上下载,还要cmake编译一下来获得.lib文件等
python的话可以直接用pip安装
pip install Dlib
先介绍一下用Dlib进行简单的人脸检测
Dlib自带了人脸检测的特征提取器 get_frontal_face_detector()
官网上解释为:This function returns an object_detector that is configured to find human faces that are looking more or less towards the camera. It is created using the scan_fhog_pyramid object.(该函数返回一个object_detector,它被配置为找到或多或少看到相机的人脸。 它使用scan_fhog_pyramid对象创建。))
import dlib
import cv2
detector = dlib.get_frontal_face_detector()
win = dlib.image_window()
f="D:/renlian/2.jpg"
print("Processing file: {}".format(f))
img = cv2.imread(f)
img=cv2.cvtColor(img,cv2.COLOR_BGR2RGB)
dets = detector(img, 1)
print("Number of faces detected: {}".format(len(dets)))
for i, d in enumerate(dets):
    print("dets{}".format(d))
    print("Detection {}: Left: {} Top: {} Right: {} Bottom: {}"
    .format( i, d.left(), d.top(), d.right(), d.bottom()))
dets, scores, idx = detector.run(img, 1)
for i, d in enumerate(dets):
    print("Detection {}, dets{},score: {}, face_type:{}".format( i, d, scores[i], idx[i]))
win.set_image(img)
win.add_overlay(dets)
dlib.hit_enter_to_continue()
结果为
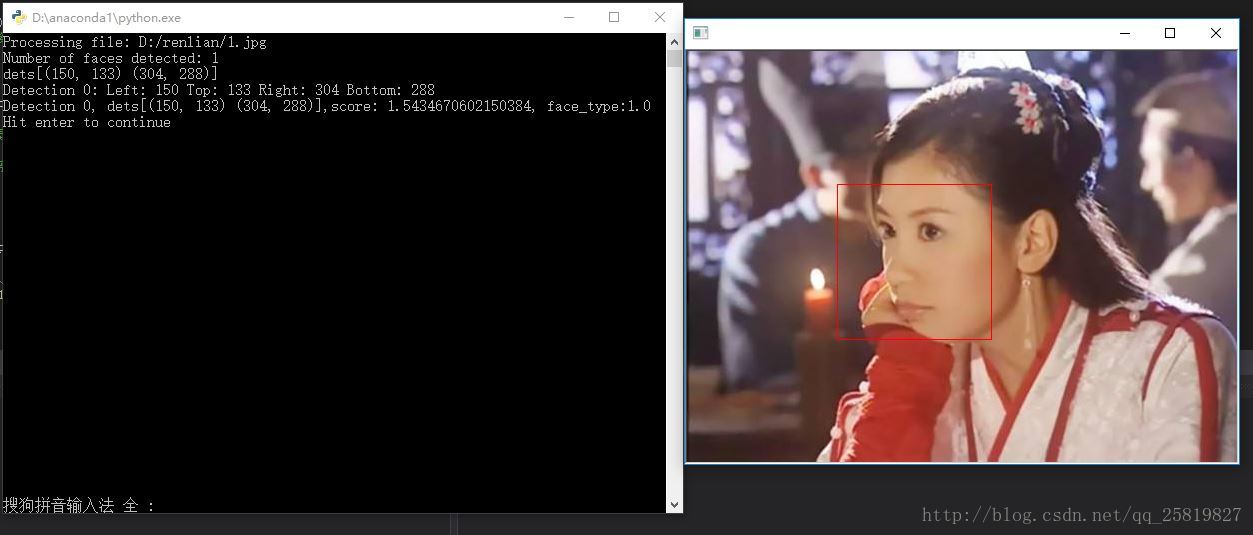
其中:
dets = detector(img, 1)为进行人脸检测
for i, d in enumerate(dets):
     print("dets{}".format(d))
     print("Detection {}: Left: {} Top: {} Right: {} Bottom: {}"
    .format( i, d.left(), d.top(), d.right(), d.bottom()))
为打印人脸位置
dets, scores, idx = detector.run(img, 1)
获取匹配度
win.add_overlay(dets)画框
这里注意 我用opencv读入图片 opencv颜色为BGR顺序而Dlib显示时是RGB形式所以要进行转换用
img=cv2.cvtColor(img,cv2.COLOR_BGR2RGB)进行转换
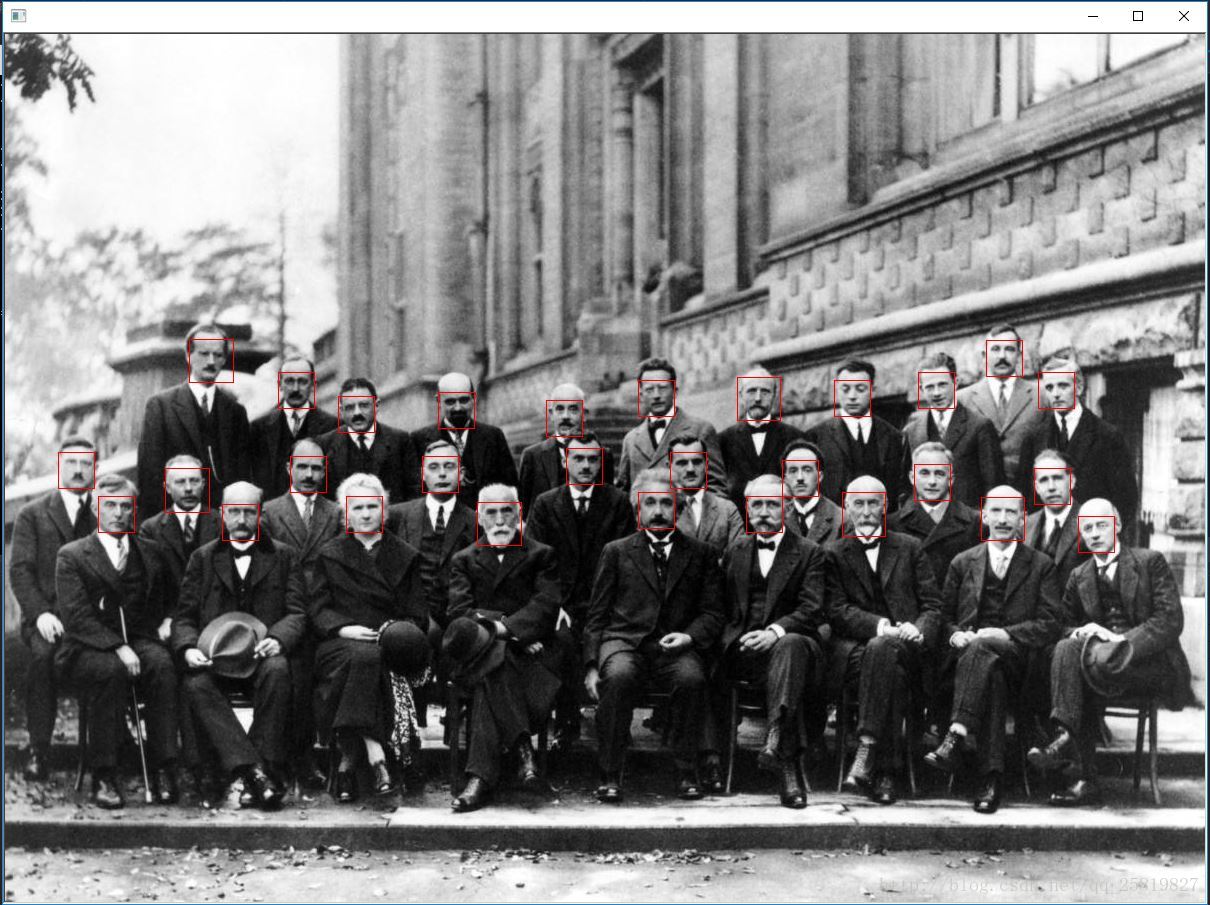
放上一张大图来测试一下