目录
Nginx是一个高性能的HTTP和反向代理服务器,该程序由俄罗斯Rambler.ru 站点开发,Nginx因为性能稳定、低系统资源消耗而闻名。默认监听端口: tcp / 80
Nginx安装方式:
yum源安装
yum安装会比源码包编译安装简单的多,默认会安装许多模块,但缺点是如果以后想安装第三方模块那就没办法了。
但是默认的 yum 源很多都没有nginx包的,想安装nginx,我们可以在 /etc/yum.repos.d/ 下新建一个 nginx.repo 文件,然后加入下面的内容 (Redhat 7 和 Centos 7 中适用)
[nginx]
name=nginx repo
baseurl=http://nginx.org/packages/centos/7/$basearch/
gpgcheck=0
enabled=1
然后 yum -y install nginx 安装即可。
目录结构:
程序可执行文件: /usr/sbin/nginx
主要配置文件: /etc/nginx/conf.d/default.conf
网页主页目录:/usr/share/nginx/html/
日志文件目录:/var/log/nginx/
控制服务: systemctl start / stop / restart / status nginx
源码包安装
- 源码安装之前先安装编译工具: yum -y install gcc gcc-c++ make
- 源码安装包含三个源码包: nginx程序主包:nginx-xxx nginx程序依赖包 :pcre-xxx 和 zlib-xxx 百度云网盘链接:链接: https://pan.baidu.com/s/17msvtirIlbL2vXJaU-cp7Q 提取码: nq7w
- 解压,然后分别进入三个解压目录, ./configure 编译, make && make install 安装即可
目录结构:
安装完成后,nignx默认安装在 /usr/local/ 目录下
程序可执行文件: /usr/local/nginx/sbin/nginx
配置文件: /usr/local/nginx/conf/nginx.conf
网页主页目录:/usr/loca/nginx/html/
日志文件目录:/usr/local/nginx/log/
但是,当你去 /usr/local/nginx/sbin/ 下执行 ./nginx 命令运行程序时,有可能会报错
[root@Centos sbin]# ./nginx
./nginx: error while loading shared libraries: libpcre.so.1: cannot open shared object file: No such file or directory
报这个错是因为我们的 libpcre 的相关库文件在 /usr/loca/lib/ 下,而nginx默认读的是 /lib64/ 下的。所以,我们只需要添加一个软链接即可解决: ln -s /usr/local/lib/libpcre.* /lib64/
解决了上面的问题,我们就可以直接启动nignx了:我们可以使用这个命令启动nginx : /usr/local/nginx/sbin/nginx ,也可以去 /usr/local/nginx/sbin/ 目录下直接 nginx 启动。但是这样未免太麻烦了。于是,我们也可以创建一个软链接: ln -s /usr/local/nginx/sbin/nginx /usr/sbin/nginx ,这样,无论我们到了哪个位置,都可以直接 nginx 启动。然后停止的话,可以用 nginx -s stop 。

但是这样还是很麻烦,我们想像控制其他程序一样控制nginx,那咋办,我们可以写一个脚本,放在 /etc/init.d/ 下面,然后我们就可以使用 service start /stop /status / restart nginx 命令来控制nginx了
#!/bin/sh
# nginx - this script starts and stops the nginx daemon
# chkconfig: - 85 15
# description: Nginx is an HTTP(S) server, HTTP(S) reverse \
# proxy and IMAP/POP3 proxy server
# processname: nginx
# config: /etc/nginx/nginx.conf
# config: /usr/local/nginx/conf/nginx.conf
# pidfile: /usr/local/nginx/logs/nginx.pid
# Source function library.
. /etc/rc.d/init.d/functions
# Source networking configuration.
. /etc/sysconfig/network
# Check that networking is up.
[ "$NETWORKING" = "no" ] && exit 0
nginx="/usr/local/nginx/sbin/nginx"
prog=$(basename $nginx)
NGINX_CONF_FILE="/usr/local/nginx/conf/nginx.conf"
[ -f /etc/sysconfig/nginx ] && . /etc/sysconfig/nginx
lockfile=/var/lock/subsys/nginx
make_dirs() {
# make required directories
user=`$nginx -V 2>&1 | grep "configure arguments:" | sed 's/[^*]*--user=\([^ ]*\).*/\1/g' -`
if [ -z "`grep $user /etc/passwd`" ]; then
useradd -M -s /bin/nologin $user
fi
options=`$nginx -V 2>&1 | grep 'configure arguments:'`
for opt in $options; do
if [ `echo $opt | grep '.*-temp-path'` ]; then
value=`echo $opt | cut -d "=" -f 2`
if [ ! -d "$value" ]; then
# echo "creating" $value
mkdir -p $value && chown -R $user $value
fi
fi
done
}
start() {
[ -x $nginx ] || exit 5
[ -f $NGINX_CONF_FILE ] || exit 6
make_dirs
echo -n $"Starting $prog: "
daemon $nginx -c $NGINX_CONF_FILE
retval=$?
echo
[ $retval -eq 0 ] && touch $lockfile
return $retval
}
stop() {
echo -n $"Stopping $prog: "
killproc $prog -QUIT
retval=$?
echo
[ $retval -eq 0 ] && rm -f $lockfile
return $retval
}
restart() {
#configtest || return $?
stop
sleep 1
start
}
reload() {
#configtest || return $?
echo -n $"Reloading $prog: "
killproc $nginx -HUP
RETVAL=$?
echo
}
force_reload() {
restart
}
configtest() {
$nginx -t -c $NGINX_CONF_FILE
}
rh_status() {
status $prog
}
rh_status_q() {
rh_status >/dev/null 2>&1
}
case "$1" in
start)
rh_status_q && exit 0
$1
;;
stop)
rh_status_q || exit 0
$1
;;
restart|configtest)
$1
;;
reload)
rh_status_q || exit 7
$1
;;
force-reload)
force_reload
;;
status)
rh_status
;;
condrestart|try-restart)
rh_status_q || exit 0
;;
*)
echo $"Usage: $0 {start|stop|status|restart|condrestart|try-restart|reload|force-reload|configtest}"
exit 2
esac
Nginx中支持PHP
ningx中支持php的包为 php-fpm (php fastcgi process manager) , PHP-FPM提供了更好的PHP进程管理方式,可以有效控制内存和进程、可以平滑重载PHP配置。
注意:安装 php-fpm-xxx 的时候,有很多的依赖包也要安装。 yum -y install php-fpm
首先修改nginx配置文件: /etc/nginx/conf.d/default.conf
location / {
        root   /usr/share/nginx/html;
        index   index.php index.html index.htm;         //在这里加上 index.php
   }

// 把下面这几行的注释给删除,然后修改
location ~ \.php$ {
        root           /usr/share/nginx/html;        //这里修改为网站主页的目录
        fastcgi_pass   127.0.0.1:9000;
        fastcgi_index  index.php;
        fastcgi_param  SCRIPT_FILENAME  $document_root$fastcgi_script_name;   //这里需要修改
        include        fastcgi_params;
    }
修改完nginx配置文件后,开启php-fpm: systemctl start php-fpm
然后让nginx重新加载配置文件: nginx -s reload
Nginx配置反向代理服务器
正常代理

将外界客户端发来的请求,转发给真正提供服务的服务器。
修改nginx配置文件:/etc/nginx/nginx.conf ,在最后的 http{ } 中加入以下内容
// 下面这些代码的意思是将本机80号端口接受来的消息转发给 192.168.10.10 的 80 号端口
upstream www.xie.com{                          //这里的域名随便填,但是要和下面的对应
        server 192.168.10.10:80;            //真正提供服务的服务器的ip地址和端口
    }
server{
listen  80;                                  // 监听80号端口发过来的消息
location  /{
         proxy_pass http://www.xie.com;
         index  index.html index.jsp;
         }
}
根据不同端口进行转发
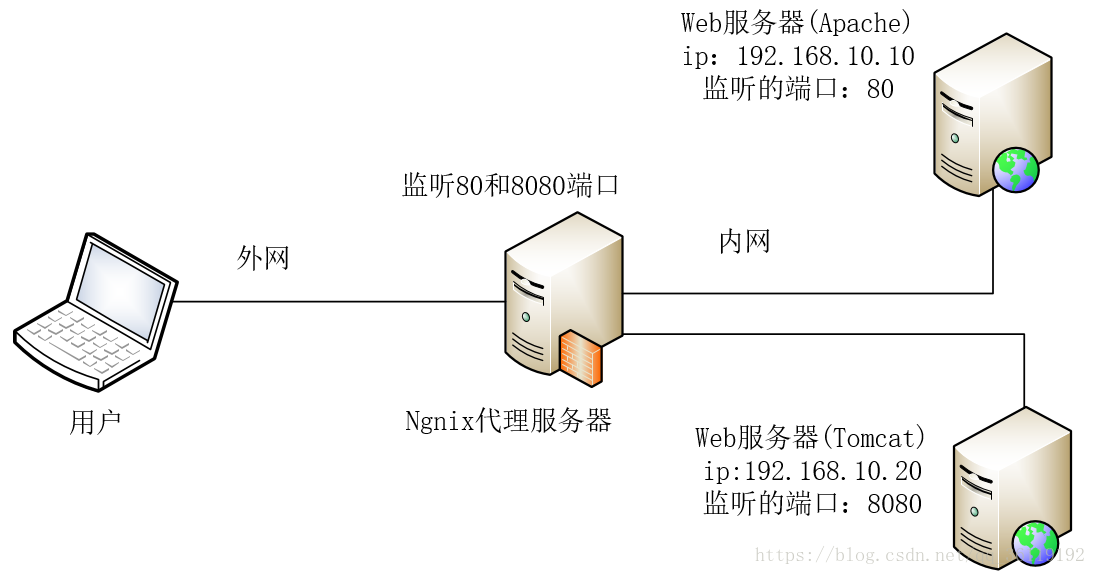
//这些代码的意思是将80端口接收到的信息转发给 192.168.10.10的80端口,而将接受到的 8080端口的信息转发给 192.168.10.20的8080端口
upstream www.xie.com{
        server 192.168.10.10:80;
 }

upstream www.xie2.com{
        server 192.168.10.20:8080;
 }

server{
listen 80;
location /{
    proxy_pass http://www.xie.com;
    index  index.html index.jsp;
         }
}

server{
listen 8080;
location /{
    proxy_pass http://www.xie2.com;
    index  index.html;
        }
}
负载均衡

1:轮询:每个请求按时间顺序逐一分配到不同的后端服务器,如果后端服务器down掉,能自动剔除
upstream www.xie.com{
        server 192.168.10.10:80;
        server 192.168.10.20:80;
    }
server{
listen 80;
location /{
  proxy_pass http://www.xie.com;
  index  index.html index.jsp;
  }
}

2:ip_hash:每个请求按访问ip的hash结果分配,这样每个访客固定访问一个后端服务器,可以解决session的问题。
upstream www.xie.com{
        ip_hash;
        server 192.168.10.10:80;
        server 192.168.10.20:80;
    }
server{
listen 80;
location /{
  proxy_pass http://www.xie.com;
  index  index.html index.jsp;
  }
}

3:weight:指定轮询几率,weight和访问比率成正比,用于后端服务器性能不均的情况。
upstream www.xie.com{
        server 192.168.10.10:80 weight=10;
        server 192.168.10.20:80 weight=20;
    }
server{
listen 80;
location /{
  proxy_pass http://www.xie.com;
  index  index.html index.jsp;
  }
}

4: fair : 按后端服务器的响应时间来分配请求,响应短的服务器优先分配
upstream www.xie.com{
        server 192.168.10.10:80 weight=10;
        server 192.168.10.20:80 weight=20;
        fair;
    }
server{
listen 80;
location /{
  proxy_pass http://www.xie.com;
  index  index.html index.jsp;
  }
}