Nginx源码安装及配置
LNMP架构的部署
LNMP平台就是Linux、Ngnix、MySQL、PHP的组合架构,需要Linux服务器、MySQL数据库、PHP解析环境
准备工作
配置阿里的yum源
# 配置yum仓库
1. 禁用 yum插件 fastestmirror
1)修改插件的配置文件

[root@lamp ~]# cp /etc/yum/pluginconf.d/fastestmirror.conf /etc/yum/pluginconf.d/fastestmirror.conf.bak		# 备份源文件
[root@lamp ~]# vim /etc/yum/pluginconf.d/fastestmirror.conf	# 修改
enabled = 1         //由1改为0,禁用该插件

2)修改yum的配置文件
[root@lamp ~]# cp /etc/yum.conf /etc/yum.conf.bak
[root@lamp ~]# vim /etc/yum.conf
plugins =1         //改为0,不使用插件

2. 获取阿里云 repo
[root@lamp ~]# cp /etc/yum.repos.d/CentOS-Base.repo /etc/yum.repos.d/CentOS-Base.repo.bak

[root@lamp ~]# wget -O /etc/yum.repos.d/CentOS-Base.repo http://mirrors.aliyun.com/repo/Centos-7.repo

[root@lamp ~]# cp /etc/yum.repos.d/epel.repo /etc/yum.repos.d/epel.repo.bak
[root@lamp ~]# wget -O /etc/yum.repos.d/epel.repo http://mirrors.aliyun.com/repo/epel-7.repo

3.清理原来的缓存,重新缓存
yum clean all

yum makecache

yum repolist

4.关闭防火墙和selinux
[root@lamp htdocs]# systemctl stop firewalld
[root@lamp htdocs]# systemctl disable firewalld
Removed symlink /etc/systemd/system/multi-user.target.wants/firewalld.service.
Removed symlink /etc/systemd/system/dbus-org.fedoraproject.FirewallD1.service.

[root@lamp htdocs]# setenforce 0
[root@lamp htdocs]# sed -ri '/^SELINUX=/cSELINUX=disabled' /etc/selinux/config
[root@lamp htdocs]# getenforce
Permissive
Nginx源码安装
Nginx安装官网: 下载
# 安装依赖
[root@lamp ~]# yum -y install pcre-devel zlib-devel
# 创建运行用户、组
[root@lamp ~]# groupadd nginx
[root@lamp ~]# useradd -M -s /sbin/nologin nginx -g nginx
[root@lamp ~]# id nginx
uid=1002(nginx) gid=1002(nginx) groups=1002(nginx)
# 配置编译安装
[root@lamp nginx-1.14.2]# ./configure --prefix=/usr/local/nginx --user=nginx --group=nginx --with-http_stub_status_module 开启模块
make && make install
echo $? # 返回0 说明安装成功
# 创建nginx链接文件
[root@lamp nginx-1.14.2]# ln -s /usr/local/nginx/sbin/nginx /usr/local/sbin/
[root@lamp ~]# nginx -v
nginx version: nginx/1.14.2
# 开启nginx
[root@lamp ~]# nginx # 80端口被占用
nginx: [emerg] bind() to 0.0.0.0:80 failed (98: Address already in use)
nginx: [emerg] bind() to 0.0.0.0:80 failed (98: Address already in use)
nginx: [emerg] bind() to 0.0.0.0:80 failed (98: Address already in use)
^C
[root@lamp ~]# systemctl stop httpd
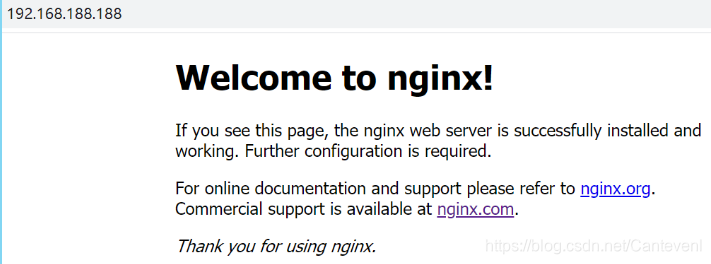
[root@lamp ~]# nginx
打开浏览器
Nginx配置
添加到系统管理
[root@lamp ~]# vim /lib/systemd/system/nginx.service

[Unit]
Description=nginx - high performance web server
Documentation=http://nginx.org/en/docs
After=network.target remote-fs.target nss-lookup.target

[Service]
Type=forking
PIDFile=/usr/local/nginx/nginx.pid
ExecStartPre=/usr/local/nginx/sbin/nginx -t -c /usr/local/nginx/conf/nginx.conf
ExecStart=/usr/local/nginx/sbin/nginx -c /usr/local/nginx/conf/nginx.conf
ExecReload=/bin/kill -s HUP $MAINPID
ExecStop=/bin/kill -s QUIT $MAINPID
PrivateTmp=true

[Install]
WantedBy=multi-user.target

# 上面三段必须全部写入nginx.service

[root@lamp logs]# chmod +x /usr/lib/systemd/system/nginx.service

[root@lamp logs]# systemctl enable nginx.service

# 可以操作
systemctl start nginx.service
systemctl reload nginx.service
systemctl restart nginx.service
systemctl stop nginx.service
基本配置
[root@lamp conf]# vim nginx.conf
worker_processes 2; # 工作进程的数量
events {
use epoll; # 使用epoll模型
worker_connections 4096; # 每个进程处理4096个连接
}
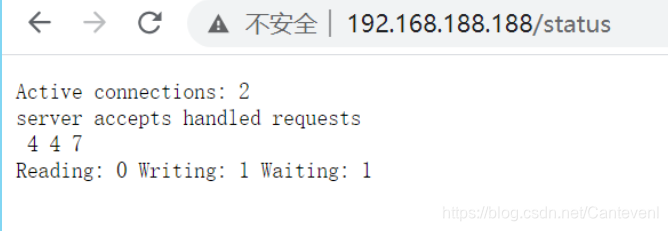
# 访问状态统计
server {
listen 80;
server_name localhost;
#charset koi8-r;
#access_log logs/host.access.log main;
location / {
root html;
index index.html index.htm;
}
location /status {
# 访问位置为 /status
stub_status on; # 打开状态统计功能
access_log off; # 关闭此位置的日志记录
}
# 检查语法
[root@lamp conf]# nginx -t
nginx: the configuration file /usr/local/nginx/conf/nginx.conf syntax is ok
nginx: configuration file /usr/local/nginx/conf/nginx.conf test is successful
# 修改最大连接数
[root@lamp nginx-1.14.2]# ulimit -n
1024
[root@lamp nginx-1.14.2]# ulimit -n 65535
[root@lamp nginx-1.14.2]# ulimit -n
65535
# 重启
[root@lamp conf]# nginx -s stop
[root@lamp conf]# nginx
# 打开浏览器
基于授权的访问控制
# 使用htpasswd命令生成用户名和密码
[root@lamp conf]# cd /usr/local/httpd/bin/
[root@lamp bin]# ls
ab         apxs      dbmmanage  envvars-std  htcacheclean  htdigest  httpd      logresolve
apachectl  checkgid  envvars    fcgistarter  htdbm         htpasswd  httxt2dbm  rotatelogs
[root@lamp bin]# ./htpasswd -c /usr/local/nginx/passwd.db xiaotian
New password:
Re-type new password:
Adding password for user xiaotian

[root@lamp bin]# cat /usr/local/nginx/passwd.db
xiaotian:$apr1$cNMusfDr$LxOltq94lBIOY/j6Svm1l/

[root@lamp bin]# chmod 400 /usr/local/nginx/passwd.db
[root@lamp bin]# chown nginx /usr/local/nginx/passwd.db
[root@lamp bin]# ll -d /usr/local/nginx/passwd.db
-r-------- 1 nginx root 47 Mar 21 23:56 /usr/local/nginx/passwd.db

# 修改主配置文件
# 在相应的位置添加
  location / {


            root   html;
            index  index.html index.htm;
            auth_basic "secret";		# 添加认证配置
            auth_basic_user_file /usr/local/nginx/passwd.db;
        }

# 重启

输入账号和密码之后才能访问网站

基于客户端的访问控制
location / {
root html;
index index.html index.htm;
# auth_basic "secret";
# auth_basic_user_file /usr/local/nginx/passwd.db;
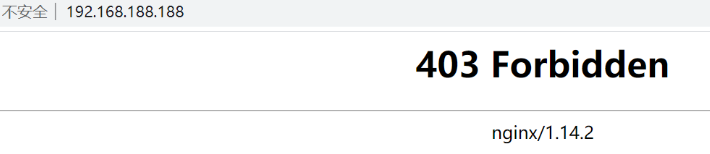
deny 192.168.188.1;
allow all;
}
拒绝了192.168.188.1的ip访问
Nginx虚拟主机
# 创建新的目录 拿来放测试网页 再将测试网页放入www目录
[root@lamp nginx]# vim /usr/local/nginx/www

# 编辑主配置文件
[root@lamp nginx]# vim conf/nginx.conf
# 将之前写的注销
		# auth_basic "secret";
        # auth_basic_user_file /usr/local/nginx/passwd.db;
        # deny 192.168.188.1;
        # allow all;

# 配置虚拟主机
server {


        listen       80;
        server_name  www.hs.com;	# hosts文件里的域名
        location / {


           root /usr/local/nginx/www/hs;	# 网页位置
           index index.html index.htm index.php;
        }

    }

    server {


        listen       80;
        server_name  www.cy.com;
        location / {


           root /usr/local/nginx/www/cy;
           index index.html index.htm index.php;
        }

    }
# 检查语法
[root@lamp nginx]# nginx -t

# 重启
# win10的hosts文件自行配置
打开浏览器

LNMP应用部署
MySQL源码安装
1. 准备工作
[root@lamp conf]# yum list installed mariadb*
Installed Packages
mariadb-libs.x86_64                                  1:5.5.56-2.el7                                  @anaconda
[root@lamp conf]# yum list installed mysql*
Error: No matching Packages to list
[root@lamp conf]# rpm -qa |grep ^C
[root@lamp conf]# rpm -qa |grep mariadb*
mariadb-libs-5.5.56-2.el7.x86_64
[root@lamp conf]# rpm -qa |grep mysql*

# 将mariadb卸载
[root@lamp conf]# rpm -e --nodeps mariadb-libs-5.5.56-2.el7.x86_64

# 安装cmake依赖
yum install -y ncurses-devel

# 安装cmake
tar xf cmake-2.8.6.tar.gz
./configure
gmake && gmake install

# 创建mysql用户和用户组
groupadd  mysql
useradd -M -s /sbin/nologin mysql -g mysql
2. 源码包安装mysql
# 安装mysql
tar xf mysql-5.6.36.tar.gz

# 进入解压后的目录
cmake
-DCMAKE_INSTALL_PREFIX=/usr/local/mysql 	# 安装基目录
-DSYSCONFDIR=/etc 		# 默认配置文件my.cnf路径
-DDEFAULT_CHARSET=utf8 	# 默认字符集
-DDEFAULT_COLLATION=utf8_general_ci 	# 默认字符集校验规则
-DWITH_EXTRA_CHARSETS=all	# 扩展字符集

# 返回值为0说明成功
echo $?	0

# 这里需要二十多分钟 请耐心等待
make && make install
echo $?	0

# 安装成功之后
# 将mysql安装后的目录的权限改成mysql:mysql
chown -R mysql:mysql mysql/

# 将模板配置文件复制到/etc/my.cnf
cd mysql/support-files/
cp my-default.cnf  /etc/my.cnf

# 初始化数据库
/usr/local/mysql/scripts/mysql_install_db --user=mysql  --basedir=/usr/local/mysql --datadir=/usr/local/mysql/data/

# 将mysql服务添加进系统服务
cd support-files/
cp mysql.server /etc/init.d/mysqld
ls /etc/init.d/mysqld

# 添加mysqld进入系统服务
chkconfig --add mysqld
chkconfig --list mysqld

# 启动mysql
service mysqld start

# 检测mysql是否启动成功
netstat -antpl |grep mysqld
ps -aux |grep mysql

# 添加环境变量
echo "PATH=$PATH:/usr/local/mysql/bin" >> /etc/profile
source /etc/profile

# 设置mysql用户和用户密码
mysqladmin -u root password '123'

# 通过mysql连接mysqld
mysql -uroot -p123

# 进入mysql然后查看库
show databases;
# 成功!! !

给root账户在本地主机授权 让mysql能够通过win10Navicat Premium 连接
mysql> grant all on *.* to 'root'@'%' identified by '123456';

# 刷新授权
mysql> flush privileges;
PHP源码安装
配置网页动静分离,解析PHP,有两种方法可以选择
- 使用PHP的FPM模块
- 将访问PHP页面的Web请求转交给Apache服务器去处理
较新版本的PHP已经自带FPM模块,用来对PHP解析实例进行管理、优化解析效率
- FastCGI将Http Server和动态脚本语言分离开
- Nginx专门处理静态请求,转发动态请求
- PHP_FPM专门解析PHP动态请求
单服务器的LNMP架构通常使用FPM的方式来解析PHP
php安装
PHP编译安装步骤
- 编译安装PHP
- 编译选项时添加“–enable-fpm”以启用此模块
- 安装后的调整,主要是配置文件的建立与相应命令工具的路径优化
- 安装ZendGuardLoader(提高PHP解析效率),并进行加载配置
# 安装依赖
yum -y install libpng libpng-devel pcre pcre-devel libxml2-devel libjepeg-devel
yum -y install curl curl-devel
yum -yinstall libcurl-devel

# 配置编译安装php
./configure
--prefix=/usr/local/php5
--with-gd
--with-curl
--with-zlib
--with-mysqli=/usr/local/mysql/bin/mysql_config
--with-mysql=/usr/local/mysql
--with-config-file-path=/usr/local/php5
--enable-mbstring
--enable-fpm	# 添加fpm模块 这个一定要加!!!

# 如果安装php的make时候出现,//usr/lib64/libpthread.so.0: error adding symbols: DSO missing from command

# 先make clean一下, 然后再make

# 复制模板文件作为php的主配置文件
# 开发时使用php.ini-development	生产环境用php.ini-production
[root@lnmp php-5.5.38]# cp php.ini-development /usr/local/php5/php.ini
[root@lamp php5]# ls
bin  etc  include  lib  php  php.ini  sbin  var
安装 ZendGuardLoader
ZendGuardLoader能够提高php的解析效率
[root@lnmp ~]# tar xf zend-loader-php5.5-linux-x86_64_update1.tar.gz

[root@lnmp zend-loader-php5.5-linux-x86_64]# ls
opcache.so  README.txt  ZendGuardLoader.so
[root@lnmp zend-loader-php5.5-linux-x86_64]# cp ZendGuardLoader.so /usr/local/php5/lib/php/

[root@lamp php5]# vim php.ini
zend_extension=/usr/local/php5/lib/php/ZendGuardLoader.so  # 指定ZendGuardLoader.so的路径
zend_loader.enable=1  #开启zend_loader
配置Nginx 支持PHP环境
# 复制模板文件作为配置文件
[root@lnmp php-5.5.38]# cp /usr/local/php5/etc/php-fpm.conf.default /usr/local/php5/etc/php-fpm.conf

# 修改php-fpm.conf文件
# 去掉前面的分号
pid = run/php-fpm.pid	# 确定pid文件位置
user = nginx
group = nginx
pm.max_children=50		# fpm模块的最大进程数
pm.start_servers=20		# 启动时开启的进程数
pm.min_spare_servers=5	# 最小空闲进程数
pm.max_spare_servers=20	# 最大空闲进程数

# 启动PHP-FPM模块(9000端口)
# 设置软连接,方便命令使用
[root@lamp bin]# ln -s /usr/local/php5/bin/* /usr/local/bin
[root@lamp bin]# ln -s /usr/local/php5/sbin/* /usr/local/sbin

# 启动php-fpm
[root@lamp bin]# php-fpm
[root@lamp bin]# netstat -antpl|grep php-fpm
tcp        0      0 127.0.0.1:9000          0.0.0.0:*               LISTEN      17516/php-fpm: mast
写一个Nginx和php-fpm的启动脚本
我写了两个脚本 都可以参考使用
[root@lnmp nginx]# vim /etc/init.d/nginx
# 第一个脚本
#!/bin/bash
#chkconfig: 2345 99 20
#description:Nginx Server Control Script
PROG="/usr/local/nginx/sbin/nginx"
PIDF="/usr/local/nginx/logs/nginx.pid"
PROG_FPM="/usr/local/sbin/php-fpm"
PIDF_FPM="/usr/local/php5/var/run/php-fpm.pid"

start(){


        netstat -anput | grep nginx >>/dev/null
        if [ $? -eq 0 ];then
                echo "nginx is already running"
        else
                $PROG
                $PROG_FPM
                echo "starting nginx success"
        fi
}

stop(){


        netstat -anput |grep nginx >>/dev/null
        if [ $? -eq 0 ];then
                kill -s QUIT $(cat $PIDF)
                kill -s QUIT $(cat $PIDF_FPM)
                echo "stopping nginx success"
        else
                echo "nginx not running"
        fi
}

reload(){


        netstat -anput |grep nginx >>/dev/null
        if [ $? -eq 0 ];then
                kill -s HUP $(cat $PIDF)
                echo "reload nginx success"
        else
                echo "nginx not running"
        fi
}

status(){


        $PROG -v
        netstat -anput |grep nginx >>/dev/null
        if [ $? -eq 0 ];then
                echo "nginx is running"
        else
                echo "nginx not running"
        fi
}
case $1 in
start)
        start
        ;;
stop)
        stop
        ;;
restart)
        stop
        start
        ;;
reload)
        reload
        ;;
status)
        status
        ;;
*)
        echo "Usage:$0 {start|stop|restart|reload|status}"
        exit 1
esac


# 第二个脚本
#!/bin/bash
# chkconfig:2345 99 20
# description:Nginx Server Control Script
PROG="/usr/local/sbin/nginx"
PIDF="/usr/local/nginx/logs/nginx.pid"
PROG_FPM="/usr/local/sbin/php-fpm"
PIDF_FPM="/usr/local/php5/var/run/php-fpm.pid"
case "$1" in
start)
        $PROG
        $PROG_FPM
        ;;

stop)
        kill -s QUIT $(cat $PIDF)
        kill -s QUIT $(cat $PIDF_FPM)
        ;;

restart)
        $0 stop
        $0 start
        ;;

reload)
        kill -s HUP $(cat $PIDF)
        ;;

*)
        echo "Usage:$0(start|stop|restart|reload)"
        exit 1
esac
exit 0
然后添加系统服务
# 添加系统服务
chmod +x /etc/init.d/nginxd
chkconfig --add nginx
chkconfig nginx on

# 开启服务
[root@lnmp nginx]# service nginx start

[root@lnmp nginx]# netstat -antpl |grep :80
tcp        0      0 0.0.0.0:80              0.0.0.0:*               LISTEN      17913/nginx: master
[root@lnmp nginx]# netstat -antpl |grep :9000
tcp        0      0 127.0.0.1:9000          0.0.0.0:*               LISTEN      17916/php-fpm: mast
配置Nginx支持PHP解析
# 先做好备份
[root@lamp conf]# cp nginx.conf nginx.conf.bak
[root@lamp conf]# vim nginx.conf
 server {


        listen       80;
        server_name  localhost;
        location ~ \.php$ {


        root /usr/local/nginx/www;
        fastcgi_pass 127.0.0.1:9000;
        fastcgi_index index.php;
        include fastcgi.conf;
        }

[root@lamp conf]# nginx -t
nginx: the configuration file /usr/local/nginx/conf/nginx.conf syntax is ok
nginx: configuration file /usr/local/nginx/conf/nginx.conf test is successful

# 编写测试文件
[root@lnmp www]# vim index.php
<?php
phpinfo();
?>

# 编写数据库测试文件
<?php
$link=mysqli_connect('localhost','root','123');
if($link) echo "恭喜你,数据库连接成功啦!!";
mysqli_close($link);
?>

# 浏览器显示乱码
# 修改主配置文件php.ini
engine = On
short_open_tag = On
default_charset = "UTF-8"
file_uploads = On
upload_max_filesize = 2M
max_file_uploads = 20
post_max_size = 8M
short_open_tag = On
extension=php_mysqli.dll	# 可选

# 重启nginx
service nginx restart

部署博客
在主配置文件server{}里面写
有多种写法
#修改主配置文件
# 第一种如果有域名 则可以使用这种
 server {


        listen 80;
        server_name www.cy.com;

        location / {


            root /usr/local/nginx/wordpress;
            index  index.php index.html index.htm;
        }
        location ~ \.php$ {


            root /usr/local/nginx/wordpress;
            fastcgi_pass 127.0.0.1:9000;
            fastcgi_index index.php;
            include fastcgi.conf;
        }
     }

# 如果使用ip 可以这样写
server {


        listen       80;
        server_name  localhost;

        location / {


        root /usr/local/nginx/wordpress;
        index index.php index.html index.htm;
        }
        location ~ \.php$ {


        root /usr/local/nginx/wordpress;
        index index.php;
        fastcgi_pass 127.0.0.1:9000;
        fastcgi_index index.php;
        include fastcgi.conf;
        }

# 和第二种location写法不一样 但效果也是将php动态页面交给php-fpm解析
server {


        listen       80;
        server_name  localhost;

        location ~ \.php$ {


        root /usr/local/nginx/wordpress;
        index index.php;
        fastcgi_pass 127.0.0.1:9000;
        fastcgi_index index.php;
        include fastcgi.conf;
        }
        location = / {


        rewrite (.*) /index.php;
        }
    }

部署论坛
server {


        listen 80;
        server_name www.hs.com;

        location / {


            root /usr/local/nginx/discuz;
            index  index.php index.html index.htm;
        }
        location ~ \.php$ {


            root /usr/local/nginx/discuz;
            fastcgi_pass 127.0.0.1:9000;
            fastcgi_index index.php;
            include fastcgi.conf;
        }
     }
# 或者
server {


        listen       8080;		# 注意!我改变了端口号
        server_name  localhost;

        location / {


        root /usr/local/nginx/discuz;
        index index.php index.html index.htm;
        }
        location ~ \.php$ {


        root /usr/local/nginx/discuz;
        index index.php;
        fastcgi_pass 127.0.0.1:9000;
        fastcgi_index index.php;
        include fastcgi.conf;
        }
论坛的安装包在upload里面

我们需要将upload里面所有文件移出来
然后赋予权限
[root@lnmp wordpress]# mv upload/* ./
[root@lnmp wordpress]# chmod -R 777 *
在浏览器输入ip:8080端口


论坛部署成功

部署商城
# 是为了修改时区
# [root@lnmp ecshop]# vim /usr/local/php5/php.ini
date.timezone = Asia/Shanghai

# 主配置
server {


        listen 8060;	# 注意 端口号
        server_name localhost;

        location / {


        root /usr/local/nginx/shop;
        index index.php index.html index.htm;
        }
        location ~ \.php$ {


        root /usr/local/nginx/shop;
        index index.php;
        fastcgi_pass 127.0.0.1:9000;
        fastcgi_index index.php;
        include fastcgi.conf;
        }
        #location = / {


        #rewrite (.*) /index.php;
        fastcgi_pass 127.0.0.1:9000;
        fastcgi_index index.php;
        include fastcgi.conf;
        }
        #location = / {


        #rewrite (.*) /index.php;
        #}
    }

# 修改别名
server {


        listen 8060;
        server_name www.hs.com www.cy.com;	# 在原本域名后面再加一个新的别名

        location / {


        root /usr/local/nginx/shop;
        index index.php index.html index.htm;
        }
        location ~ \.php$ {


        root /usr/local/nginx/shop;
        index index.php;
        fastcgi_pass 127.0.0.1:9000;
        fastcgi_index index.php;
        include fastcgi.conf;
        }
        #location = / {


        #rewrite (.*) /index.php;
        #}
    }
商城部署成功

我们通过不同端口可以访问不同的网页