Nginx unit 源码安装初体验
上次介绍了从yum的安装方法(https://www.cnblogs.com/wang-li/p/9684040.html),这次将介绍源码安装,目前最新版为1.4,()Current latest version is 1.4, released on September 20, 2018.
我们就安装1.4,然后搭配PHP 7
PHP安装
略过,给编译参数即可
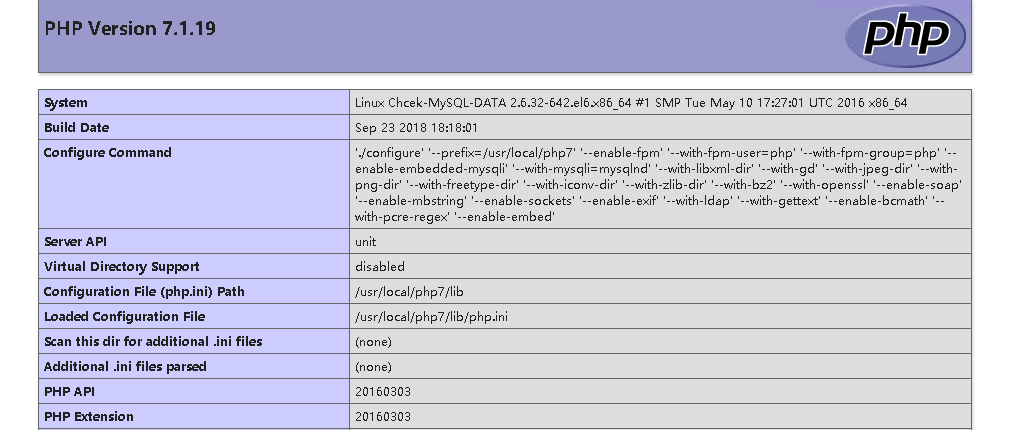
# /usr/local/php7/bin/php -i | grep config
Configure Command =>  './configure'  '--prefix=/usr/local/php7' '--enable-fpm' '--with-fpm-user=php' '--with-fpm-group=php' '--enable-embedded-mysqli' '--with-mysqli=mysqlnd' '--with-libxml-dir' '--with-gd' '--with-jpeg-dir' '--with-png-dir' '--with-freetype-dir' '--with-iconv-dir' '--with-zlib-dir' '--with-bz2' '--with-openssl' '--enable-soap' '--enable-mbstring' '--enable-sockets' '--enable-exif' '--with-ldap' '--with-gettext' '--enable-bcmath' '--with-pcre-regex' '--enable-embed'
#
Nginx Unit介绍
Nginx Unit是一个动态Web和应用程序服务器,旨在以多种语言运行应用程序。单位是轻量级,多语言,并通过API动态配置。服务器的设计允许根据工程或操作的需要重新配置特定的应用参数。
支持的语言:
Python
PHP
Go
Perl
Ruby
JavaScript/Node.js 和 Java 即将推出
构建工具make gcc的安装
# yum install gcc make -y
下载nginx unit包,地址:https://unit.nginx.org/download/
# wget https://unit.nginx.org/download/unit-1.4.tar.gz
目前最新版的就是1.4(当前时间,2018-09-24 00:10:53)
下载之后,利用tar解压,可以用./configure --help 查看帮助
安装:
unit 安装
# ./configure --prefix=/usr/local/unit
# make
# make install

unit-php安装
查看帮助
# ./configure php --help
如果操作系统存在多个php,可以使用--config参数指定php-config相应的版本即可

安装
# ./configure php

如果出现如下报错:
# ./configure php
configuring PHP module
checking for PHP ... found
+ PHP SAPI: [cli embed fpm phpdbg cgi]
checking for PHP embed SAPI ... not found

./configure: error: no PHP embed SAPI found.

#

因为为系统没有发现php对应sapi,如果安装完php后,请将libphp.so拷贝至系统lib目录下,如我的机器:
# cp -a /usr/local/php7/lib/libphp7.so /usr/lib64/

/usr/local/php7 是我php源码安装的地址
/usr/lib64/ 是系统放.so文件地方

然后执行make && make install
使用unit
注册unit
启动程序
监听的端口是127.0.0.1的8224端口
# ./sbin/unitd --control 127.0.0.1:8224
获取8224的内容,可以看到,内容为空
# curl 127.0.0.1:8224
{
    "listeners": {},
    "applications": {}
}
我们将会写我们的unit配置json文档,例如:http://unit.nginx.org/configuration/ 要运行程序,最低得配置必须至少包含一个侦听器和关联的应用程序
# cat /etc/unit/start.json
{
    "listeners": {
        "*:8300": {
            "application": "blogs"
        }
    },

    "applications": {
        "blogs": {
            "type": "php7",
            "processes": 2,
            "root": "/usr/local/nginx/php",
            "index": "index.php",

        "user": "php",
        "group": "php",

        "options": {
            "file": "/usr/local/php7/lib/php.ini"
            }
        }
    }
}
#
当然,root路径的值,在服务器是有内容的:
# cat /usr/local/nginx/php/index.php
<?php
    phpinfo();
?>
#
当json编写完毕后,可以试着用如下网页工具进行对json的检测:http://www.bejson.com/
顺便提一下,如果需要使用curl的unix-socket的话,需要将curl软件升级不低于7.4的才可以,curl下载地址:https://curl.haxx.se/download/
下载
# wget https://curl.haxx.se/download/curl-7.55.0.tar.gz
安装
# ./configure
# make
# make install
查看版本
如果在编译的时候不指定安装目录,则会安装到/usr/local/bin下面
# /usr/local/bin/curl --version
curl 7.55.0 (x86_64-pc-linux-gnu) libcurl/7.55.0 OpenSSL/1.0.1e zlib/1.2.3
Release-Date: 2017-08-09
Protocols: dict file ftp ftps gopher http https imap imaps pop3 pop3s rtsp smb smbs smtp smtps telnet tftp
Features: IPv6 Largefile NTLM NTLM_WB SSL libz UnixSockets HTTPS-proxy
#
将json put至我们的unit刚刚启动的方法中
# /usr/local/bin/curl -X PUT -d@/etc/unit/start.json '127.0.0.1:8224/config'
{
"success": "Reconfiguration done."
}
#
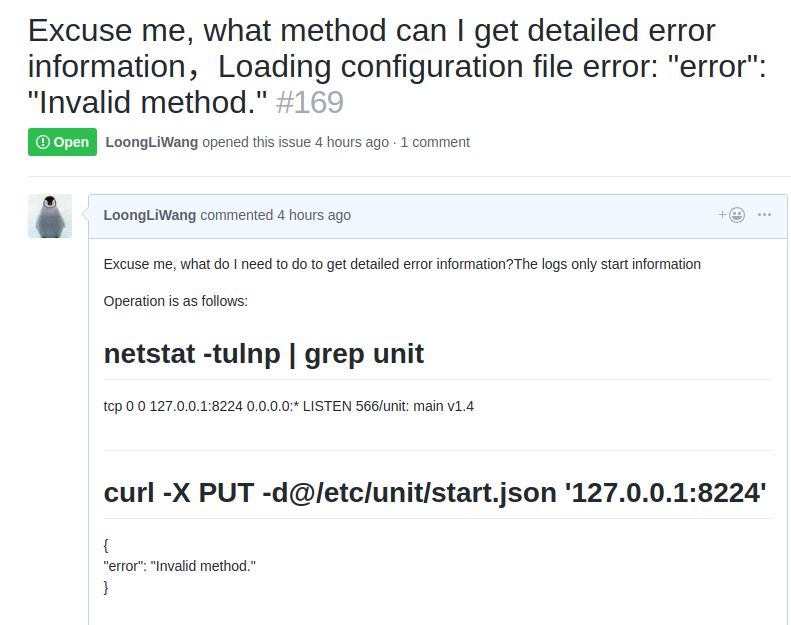
注意,我们不能将json文件put至127.0.0.1:8224上,应该put至127.0.0.1:8224/config上才行,否则的话,会报错Invalid method,我曾遇到过此问题,于是乎在github上询问了一下,大佬告诉我的方法(https://github.com/nginx/unit/issues/169)

接下来我们访问ip+端口的方法,试着能不能打开网页,可以看到,我们通过域名+8300的形式,可以打开网页

与nginx集成
没有安装nginx可以参考文档:https://www.cnblogs.com/wang-li/p/9030718.html
配置一下nginx conf
# sed -n '194,200p' nginx.conf location / { root php; index index.php index.html index.htm; proxy_pass http://127.0.0.1:8300; proxy_set_header Host host; proxy_set_header X-Forwarded-Forhost;proxy s et h eaderX−Forwarded−Forproxy_add_x_forwarded_for; } #
检查语法,平滑重启nginx
# /usr/local/nginx/sbin/nginx -t
nginx: the configuration file /usr/local/nginx/conf/nginx.conf syntax is ok
nginx: configuration file /usr/local/nginx/conf/nginx.conf test is successful
# /usr/local/nginx/sbin/nginx -s reload
#
通过访问Nginx的方式,也可以获取相应的网页:
查看Nginx的log可以看到:

下次我将尝试着用unit代替之前的php-fpm,