微服务之五springCloud服务注册
Eureka是Spring Cloud Netflix微服务组件之一,功能主要是完成微服务架构中的服务治理。那么什么是服务治理呢?听起来很高大上的意思。其实说得直白一些,就是对对微服务实例的自动管理,包括自动发现,自动注册等。
从开发的历程来看,以前开发规模小,应用小的时候儿,几把刀枪配置一下,搞搞配置文件,改几个字段就搞定了。但是,什么东西都不能放大,当应用的规模到达一定量级后,这事就不好整了。
成千上万台服务器,分布在不同的机房甚至全球的不同地方。这时候,自动处理机制就应运而生。当然,要达到治理上述的这种规模,现在这个技术还是搞不掂的。不过,凡事从小做起,日盈月进,则功将毕。说多了,扯回来。
需要一个多模块的JAVA 项目。
首先,在intel idea中创建一个Maven项目做为父框架。不用选择模板,一路走下来,设置好groupid和artifactid.
pom.xml如下:
<?xml version="1.0" encoding="UTF-8"?>
<project xmlns="http://maven.apache.org/POM/4.0.0"
xmlns:xsi="http://www.w3.org/2001/XMLSchema-instance"
xsi:schemaLocation="http://maven.apache.org/POM/4.0.0 http://maven.apache.org/xsd/maven-4.0.0.xsd">
<modelVersion>4.0.0</modelVersion>
<groupId>com.example</groupId>
<artifactId>fjf</artifactId>
<version>1.0-SNAPSHOT</version>
<packaging>pom</packaging>
<name>eureka</name>
<description>Demo project for Spring Boot</description>
<parent>
<groupId>org.springframework.boot</groupId>
<artifactId>spring-boot-starter-parent</artifactId>
<version>2.0.3.RELEASE</version>
<relativePath/>
</parent>
<modules>
<module>eureka-server</module>
<module>service-hello</module>
</modules>
<properties>
<project.build.sourceEncoding>UTF-8</project.build.sourceEncoding>
<project.reporting.outputEncoding>UTF-8</project.reporting.outputEncoding>
<java.version>1.8</java.version>
<spring-cloud.version>Finchley.RELEASE</spring-cloud.version>
</properties>
<dependencies>
<dependency>
<groupId>org.springframework.boot</groupId>
<artifactId>spring-boot-starter-test</artifactId>
<scope>test</scope>
</dependency>
</dependencies>
<dependencyManagement>
<dependencies>
<dependency>
<groupId>org.springframework.cloud</groupId>
<artifactId>spring-cloud-dependencies</artifactId>
<version>${spring-cloud.version}</version>
<type>pom</type>
<scope>import</scope>
</dependency>
</dependencies>
</dependencyManagement>
<build>
<plugins>
<plugin>
<groupId>org.springframework.boot</groupId>
<artifactId>spring-boot-maven-plugin</artifactId>
</plugin>
</plugins>
</build>
</project>
这里重点是那个packaging modules两个配置一定要设置。
然后按照前面的博文中提到的方法创建一个SpringBoot项目,在选择时勾选Eureka,完成即可。最终的配置文件:
<?xml version="1.0" encoding="UTF-8"?>
<project xmlns="http://maven.apache.org/POM/4.0.0" xmlns:xsi="http://www.w3.org/2001/XMLSchema-instance"
xsi:schemaLocation="http://maven.apache.org/POM/4.0.0 http://maven.apache.org/xsd/maven-4.0.0.xsd">
<modelVersion>4.0.0</modelVersion>
<groupId>com.example</groupId>
<artifactId>eureka-server</artifactId>
<version>0.0.1-SNAPSHOT</version>
<packaging>jar</packaging>
<name>eureka-server</name>
<description>Demo project for Spring Boot</description>
<parent>
<groupId>com.example</groupId>
<artifactId>fjf</artifactId>
<version>1.0-SNAPSHOT</version>
</parent>
<properties>
<project.build.sourceEncoding>UTF-8</project.build.sourceEncoding>
<project.reporting.outputEncoding>UTF-8</project.reporting.outputEncoding>
<java.version>1.8</java.version>
<spring-cloud.version>Finchley.SR1</spring-cloud.version>
</properties>
<dependencies>
<dependency>
<groupId>org.springframework.cloud</groupId>
<artifactId>spring-cloud-starter-netflix-eureka-server</artifactId>
</dependency>
<dependency>
<groupId>org.springframework.cloud</groupId>
<artifactId>spring-cloud-starter-netflix-eureka-server</artifactId>
</dependency>
<dependency>
<groupId>org.springframework.boot</groupId>
<artifactId>spring-boot-starter-test</artifactId>
<scope>test</scope>
</dependency>
</dependencies>
<dependencyManagement>
<dependencies>
<dependency>
<groupId>org.springframework.cloud</groupId>
<artifactId>spring-cloud-dependencies</artifactId>
<version>${spring-cloud.version}</version>
<type>pom</type>
<scope>import</scope>
</dependency>
</dependencies>
</dependencyManagement>
<build>
<plugins>
<plugin>
<groupId>org.springframework.boot</groupId>
<artifactId>spring-boot-maven-plugin</artifactId>
</plugin>
</plugins>
</build>
</project>
然后就是要执行服务了,首先要配置一下@EnableEurekaServer这个注解,它是用于启动一个服务注册中心提供给其它应用。在SpringBoot的主程序中:
@SpringBootApplication
@EnableEurekaServer
public class EurekaServerApplication {
public static void main(String[] args) {
SpringApplication.run(EurekaServerApplication.class, args);
}
}
服务本身既是服务端又是客户端,所以还需要在资源中配置一下application.yml:
server:
port: 8761
eureka:
instance:
hostname: localhost
client:
registerWithEureka: false
fetchRegistry: false
serviceUrl:
defaultZone: http://${eureka.instance.hostname}:${server.port}/eureka/
spring:
application:
name: eurka-server
registerWithEureka设置为false,表示不向服务中心注册自己。serviceUrl表示服务区提供的地址。
当然,如果觉得独立出一个配置文件比较麻烦,可以直接在application.properties文件中直接配置。但配置的格式略有不同。
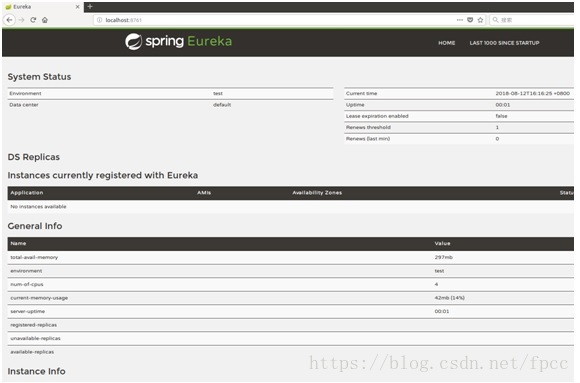
这样就可以启动服务注册的程序了,点击运行,即可打开了一个注册的服务。在浏览器上输入:http://localhost:8761
应该注意到在上图的DS Replicas下面的Application中,啥也没有发现,因为还没有一个应用注册上来。那就做一个Client上来。
仍然按SpringBoot的项目方式生成一个Eureka Client。名字随意取。最终的配置文件如下:
<?xml version="1.0" encoding="UTF-8"?>
<project xmlns="http://maven.apache.org/POM/4.0.0" xmlns:xsi="http://www.w3.org/2001/XMLSchema-instance"
xsi:schemaLocation="http://maven.apache.org/POM/4.0.0 http://maven.apache.org/xsd/maven-4.0.0.xsd">
<modelVersion>4.0.0</modelVersion>
<groupId>com.example</groupId>
<artifactId>service-hello</artifactId>
<version>0.0.1-SNAPSHOT</version>
<packaging>jar</packaging>
<name>service-hello</name>
<description>Demo project for Spring Boot</description>
<parent>
<groupId>com.example</groupId>
<artifactId>fjf</artifactId>
<version>1.0-SNAPSHOT</version>
</parent>
<properties>
<project.build.sourceEncoding>UTF-8</project.build.sourceEncoding>
<project.reporting.outputEncoding>UTF-8</project.reporting.outputEncoding>
<java.version>1.8</java.version>
<spring-cloud.version>Finchley.SR1</spring-cloud.version>
</properties>
<dependencies>
<dependency>
<groupId>org.springframework.cloud</groupId>
<artifactId>spring-cloud-starter-netflix-eureka-client</artifactId>
</dependency>
<dependency>
<groupId>org.springframework.boot</groupId>
<artifactId>spring-boot-starter-web</artifactId>
</dependency>
<dependency>
<groupId>org.springframework.boot</groupId>
<artifactId>spring-boot-starter-test</artifactId>
<scope>test</scope>
</dependency>
</dependencies>
<dependencyManagement>
<dependencies>
<dependency>
<groupId>org.springframework.cloud</groupId>
<artifactId>spring-cloud-dependencies</artifactId>
<version>${spring-cloud.version}</version>
<type>pom</type>
<scope>import</scope>
</dependency>
</dependencies>
</dependencyManagement>
<build>
<plugins>
<plugin>
<groupId>org.springframework.boot</groupId>
<artifactId>spring-boot-maven-plugin</artifactId>
</plugin>
</plugins>
</build>
</project>
同样的道理,也需要一个注解@EnableEurekaClient 表明自己是一个eurekaclient.
@SpringBootApplication
@EnableEurekaClient
@RestController
public class ServiceHelloApplication {
public static void main(String[] args) {
SpringApplication.run(ServiceHelloApplication.class, args);
}
@Value("${server.port}")
String port;
@RequestMapping("/hello")
public String home(@RequestParam(value = "name", defaultValue = "fjf") String name) {
return "hello " + name + " ,i am from port:" + port;
}
}
也得在resources文件下增加一个application.yml文件:
server:
port: 8762
spring:
application:
name: service-hello
eureka:
client:
serviceUrl:
defaultZone: http://localhost:8761/eureka/
这时候儿就可以切换到客户端启动,启动这个客户端服务后,就可以在浏览器中输入
http://localhost:8762/hello?name=test
你就可以在浏览器上看到:
hello,test,I am from port:8762
这时在刚刚的服务网页看不到服务的地方会看到多了一条注册的记录
这样一个初步的服务注册发现就实现了。