与多线程相关的方法—-Callable,Future和FutureTask
除了Runnable之外,Java中还有Callable,Futrue,FutureTask这几个与多线程相关的概念,与Runnable不同的是这几个类都只能运用到线程池中,而Runnable既能运用到Thread中,又能运用到线程池中。
Callable
Callable与Runnable的功能大致相似,不同的是Callable是一个泛型接口,它有一个泛型参数V,该接口中有一个返回值(类型为V)的call()方法,而Runnable的run()方法不能将结果返回:
public interface Callable<V> {
    V call() throws Exception;
}
Future
Future为线程池指定了一个可管理的任务标准。它提供了对Runnable或者Callable任务的执行结果进行取消,查询是否完成,获取结果,设置结果操作:
public interface Future<V> {

/**
    尝试去取消这个任务的执行,但是这个尝试有可能失败,当这个任务已经完成或者取消的时候,或者因为其他原因。
    如果该任务已经开始执行了,将由mayInterruptIfRunning这个参数来决定是否打断任务的执行。
 *
 */
boolean cancel(boolean mayInterruptIfRunning);

/**
 该任务是否取消
 * */
boolean isCancelled();

/**
 * Returns {@code true} if this task completed.
 * 该任务是否完成
 **/
boolean isDone();

/**
    获取结果,如果任务未完成,则等待,直到完成。因此该方法会阻塞
 **/
V get() throws InterruptedException, ExecutionException;

/**
    获取结果,如果任务未完成,直到timeout或者返回结果。该方法会阻塞
* */
V get(long timeout, TimeUnit unit)
    throws InterruptedException, ExecutionException, TimeoutException;
}
FutureTask
在上面我们可以看到,Future只是定义了一些规范的接口,而FutureTask是它的实现类。
FutureTask实现了RunnableFture<V>,而RunnableFuture又实现了Runnable和Future<V>,因此FutureTaske具备它们的能力。
public class FutureTask<V> implements RunnableFuture<V>

public interface RunnableFuture<V> extends Runnable, Future<V> {
    /**
     * Sets this Future to the result of its computation
     * unless it has been cancelled.
    * */
    void run();
}
FutureTask会像Thread包装Runnable一样,对Callable和Runnable进行包装:
 public FutureTask(Callable<V> callable) {
    if (callable == null)
        throw new NullPointerException();
    this.callable = callable;
    this.state = NEW;       // ensure visibility of callable
}

public FutureTask(Runnable runnable, V result) {
    this.callable = Executors.callable(runnable, result);
    this.state = NEW;       // ensure visibility of callable
}
我们可以看到,当传入Runnable的时候,会用Executors.callable方法转换成Callable类型,即FutureTask最终执行的都是Callable类型的任务:
public static <T> Callable<T> callable(Runnable task, T result) {
    if (task == null)
        throw new NullPointerException();
    return new RunnableAdapter<T>(task, result);
}

 private static final class RunnableAdapter<T> implements Callable<T> {
    private final Runnable task;
    private final T result;
    RunnableAdapter(Runnable task, T result) {
        this.task = task;
        this.result = result;
    }
    public T call() {
        task.run();
        return result;
    }
}
我们可以看到在用Runnable构造FutureTask的时候,会将Runnable包装为一个RunnableAdapter,在它的Call方法中,其实是执行的Runnable的run方法,但是返回是我们在构造FutureTask的时候传入的result,如果我们不是特别需要它,可以传入null。
了解基本概念后,通过代码来演示Runnable,Callable,FutureTask的运用:
public class FutureDemo {

//线程池
static ExecutorService mExecutor = Executors.newSingleThreadExecutor();

public static void main(String[] args){
    try {

        futureWithRunnable();
        futureWithCallable();
        futureTask();

    }catch(Exception e){

    }
}

//向线程池中提交Runnable对象
private static void futureWithRunnable()throws InterruptedException,ExecutionException{
    Future<?> result = mExecutor.submit(new Runnable() {
        @Override
        public void run() {
             fibc(20);
        }
    });

    System.out.println("future result form runnable : "+result.get() );
}


//提交Callable对象,有返回值
private static void futureWithCallable()throws InterruptedException,ExecutionException{
    Future<Integer> result2 = mExecutor.submit(new Callable<Integer>() {
        @Override
        public Integer call() throws Exception {
            return fibc(20);
        }
    });

    System.out.println("future result form callable : "+result2.get());
}

//提交FutureTask对象
private static void futureTask()throws InterruptedException,ExecutionException{

    FutureTask<Integer> futureTask = new FutureTask<>(
            new Callable<Integer>() {
                @Override
                public Integer call() throws Exception {
                    return fibc(20);
                }
            }
    );
    mExecutor.submit(futureTask);
    System.out.println("future result form futureTask : "+futureTask.get());
}

private static int fibc(int num){
    if(num ==0){
        return 0;
    }
    if(num == 1){
        return  1;
    }

    return fibc(num-1)+fibc(num-2);
}

}
执行的结果:
future result form runnable : null
future result form callable : 6765
future result form futureTask : 6765
在futureWithRunnable方法中提交了一个Runnable对象,在run方法中进行计算,该方法没有返回值,因此通过Future对象的get函数得到的值为null。
Callable实现的是V call方法,将Callable对象提交给线程池后会返回一个Future对象,通过该对象可以对任务进行取消,获取结果等操作。
FutrueTask是一个RunnableFuture,因此即实现了Runnable又实现了Future这两个接口,它可以包装Runnable(实际上会转为Callable)和Callable,提交给ExecuteService来执行后,也可以通过Future对象的get方法来得到结果。
那么这里面是如何运转的呢?不急,先要知道其他知识
线程池
当我们需要频繁创建多个线程进行耗时操作时,每次都通过new Thread实现并不是一种好方式,每次new Thread新建和销毁对象性能较差,线程缺乏统一的管理,可能无限制新建线程,相互之间竞争,可能占用过多系统资源导致死锁,并且缺乏定时执行,定期执行,线程中断等功能。
java通过Executor提供了四种线程池:
newCachedThreadPool创建一个可缓存线程池,如果线程池长度超过处理需要,可灵活回收空闲线程,若无可回收,则新建线程。—->ThreadPoolExecutor
newFixedThreadPool 创建一个定长线程池,可控制线程最大并发数,超出的线程会在队列中等待。—->ThreadPoolExecutor
newScheduledThreadPool 创建一个定长线程池,支持定时及周期性任务执行。—->ScheduledThreadPoolExecutor
newSingleThreadExecutor 创建一个单线程化的线程池,它只会用唯一的工作线程来执行任务,保证所有任务按照指定顺序(FIFO, LIFO, 优先级)执行。—->ThreadPoolExecutor
优点:
- 重用存在的线程,减少对象创建,销毁的开销
- 可有效控制最大量并发线程数,提供系统资源的使用率,同时避免过多资源竞争,避免阻塞。
- 提供定时执行,定期执行,单线程,并发控制等功能。
线程池原理的简单解释就是会创建多个线程并且进行管理,提交给线程的任务会被线程池指派给其中的线程进行执行,通过线程池的统一调度,管理使得多线程的使用更简单,高效。

线程池都实现了ExecutorService接口,该接口定义了线程池需要实现的接口,如submit,execute,shutdown等。它的实现有ThreadPoolExecutor和ScheduledPoolExcutor。ThreadPoolExecutor是运用最多的线程池实现,ScheduledThreadPoolExecutor则用于周期性地执行任务。通常,我们都不会直接通过new的形式来创建线程池,由于常见参数过程相对复杂,因为JDK给我们提供了Executors工厂类来简化这份过程。
线程池的类图:

ExecutorService
ExecutorService的声明周期包括3中状态:运行,关闭,终止。创建后便进入到了运行状态。当调用shutdown()方法时,便进入到了关闭状态,此时意味着ExecutorService不再接受新的任务,但它还在执行已经提交了的任务。当所有已经提交了的任务完成后,就变成了终止状态。
public interface ExecutorService extends Executor {
void shutdown();

boolean isShutdown();

boolean isTerminated();

boolean awaitTermination(long timeout, TimeUnit unit)
    throws InterruptedException;

<T> Future<T> submit(Callable<T> task);


<T> Future<T> submit(Runnable task, T result);


Future<?> submit(Runnable task);

<T> List<Future<T>> invokeAll(Collection<? extends Callable<T>> tasks)
    throws InterruptedException;


<T> List<Future<T>> invokeAll(Collection<? extends Callable<T>> tasks,
                              long timeout, TimeUnit unit)
    throws InterruptedException;


<T> T invokeAny(Collection<? extends Callable<T>> tasks)
    throws InterruptedException, ExecutionException;


<T> T invokeAny(Collection<? extends Callable<T>> tasks,
                long timeout, TimeUnit unit)
    throws InterruptedException, ExecutionException, TimeoutException;
}

//用来执行被提交的任务,也就是一个运行新任务的简单接口
public interface Executor {

/**
 * Executes the given command at some time in the future.  The command
 * may execute in a new thread, in a pooled thread, or in the calling
 * thread, at the discretion of the {@code Executor} implementation.
 *
 * @param command the runnable task
 * @throws RejectedExecutionException if this task cannot be
 * accepted for execution
 * @throws NullPointerException if command is null
 */
void execute(Runnable command);
}
启动指定数量的线程:ThreadPoolExecutor
ThreadPoolExecutor是线程池的实现之一,它的功能时启动指定数量的线程以及将任务添加到一个队列中,并且将任务分发给空闲的线程。
它有四种构造方法:
public ThreadPoolExecutor(int corePoolSize,
                          int maximumPoolSize,
                          long keepAliveTime,
                          TimeUnit unit,
                          BlockingQueue<Runnable> workQueue) {
    this(corePoolSize, maximumPoolSize, keepAliveTime, unit, workQueue,
         Executors.defaultThreadFactory(), defaultHandler);
}


public ThreadPoolExecutor(int corePoolSize,
                          int maximumPoolSize,
                          long keepAliveTime,
                          TimeUnit unit,
                          BlockingQueue<Runnable> workQueue,
                          ThreadFactory threadFactory) {
    this(corePoolSize, maximumPoolSize, keepAliveTime, unit, workQueue,
         threadFactory, defaultHandler);
}


public ThreadPoolExecutor(int corePoolSize,
                          int maximumPoolSize,
                          long keepAliveTime,
                          TimeUnit unit,
                          BlockingQueue<Runnable> workQueue,
                          RejectedExecutionHandler handler) {
    this(corePoolSize, maximumPoolSize, keepAliveTime, unit, workQueue,
         Executors.defaultThreadFactory(), handler);
}


public ThreadPoolExecutor(int corePoolSize,
                          int maximumPoolSize,
                          long keepAliveTime,
                          TimeUnit unit,
                          BlockingQueue<Runnable> workQueue,
                          ThreadFactory threadFactory,
                          RejectedExecutionHandler handler) {
    if (corePoolSize < 0 ||
        maximumPoolSize <= 0 ||
        maximumPoolSize < corePoolSize ||
        keepAliveTime < 0)
        throw new IllegalArgumentException();
    if (workQueue == null || threadFactory == null || handler == null)
        throw new NullPointerException();
    this.corePoolSize = corePoolSize;
    this.maximumPoolSize = maximumPoolSize;
    this.workQueue = workQueue;
    this.keepAliveTime = unit.toNanos(keepAliveTime);
    this.threadFactory = threadFactory;
    this.handler = handler;
}
前三种构造方法,最终都会调用最后一种构造方法。所以我们只用分析最后一种:
先看看各个参数是什么意思:
- corePoolSize:线程池中所保存的核心线程数。线程池启动后默认是空的,只有任务来临时才会创建线程处理请求。prestartAllCoreThread方法可以在线程池启动后即开启所有核心线程以等待任务。
- maximumPoolSize:线程池允许创建的最大线程数。当workQueue使用无界队列时(如LinkedBlockingQueue),则此参数无效。它与corePoolSize的作用是调整“线程池中实际允许的线程的数量”。例如当新任务提交给线程池时,如果线程池中运行的线程数量小于corePoolSize,则创建新线程来处理请求;如果,线程池中运行的线程数量大于等于corePoolSize,但是小于maximumPoolSize,则仅当队列满时才创建新线程,否则放入队列。
- keepAliveTime:当线程池线程总数大于核心线程数时,终止多余的空闲线程的时间。当一个线程不工作时,过keepAliveTime 长时间将停止该线程。
- Unit:keepAliveTime参数的时间单位,可选值有毫秒,秒,分等。
- workQueue:任务队列,如果当前线程池到达核心线程数,且当前所有的线程处于活动状态,则将新加入的任务放到此队列中。
- threadFactory:线程工厂,让用户可以制定线程的过程,通常不需要设置。
- Handler:拒绝策略,当线程池与workQueue队列都满了的情况下,对新加的任务采取的处理策略。
运行策略
- 线程池创建是,里面没有一个线程。任务队列是作为参数传进来的,不过就算任务队列中有任务,线程池也不会马上执行它们。
- 当调用execute()方法添加一个任务时,线程池会做如下判断:
a. 如果正在运行的线程数量小于corePoolSize,那么马上创建线程运行这个任务。
b. 如果正在运行的线程数量大于等corePoolSize且队列没有满,那么将这个任务放入队列
c. 如果这时候队列满了,而且运行的线程数量小于maximumPoolSize,那么要创建新线程运行这个任务。
d. 如果队列满了,且运行的线程大于等于maximumPoolSize,那么线程池会采用拒绝策略。 - 当一个线程完成任务时,它会从队列中取下一个任务来执行
- 当一个线程无事可做的时候,超过一定的时间(keepAliveTime)时,线程池会判断,如果当前运行的线程数量大于corePoolSize,那么这个线程就被停止。所以线程池的所有任务完成后,它最终会收缩到corePoolSize的大小。
workQueue常用的几个实现:
- ArrayBlockingQueue:基于数组结构的有界队列,此队列按FIFO的原则对任务进行排序,如果队列满了,还有任务来且行的线程大于等于maximumPoolSize,会调用拒绝策略。
- LinkedBlockingQueue:基于链表结构的无界队列,此队列按FIFO的原则对任务进行排序。因为它是无界的,根本就不会满,所以采用此队列后的线程池将不会使用拒绝策略,同时还将忽略maximumPoolSize参数。
- SynchronousQueue:直接将任务提交给线程而不是将它加入到队列,实际上此队列是空的。每个插入的操作必须等到另一个调用移除的操作;如果新任务来了,线程池没有任务可用线程处理的话,则调用拒绝策略。其实要是把maximumPoolSize设置为无界(Integer.MAX_VALUE)的,加上SynchronousQ ueue队列,就等同于Executors.newCachedThreadPool()。
- PriorityBlockingQueue:具有优先级的队列的有界队列,可以自定义优先级,模式是按自然排序。
当线程池和队列都满了的情况下,对新加的任务的处理策略:
- AbortPolicy:拒绝任务,抛出RejectedExecutionException异常。线程池的默认策略。
- CallerRunsPolicy:拒绝新任务加入,如果该线程池还没有被关闭,那么将这个新任务执行在调用线程中。
- DiscardOldestPolicy:如果执行任务程序尚未关闭,则位于工作队列头的任务将被删除,然后重试执行程序(如果再次失败,则重复此过程)。这样的结果是最后加入的任务反而有可能被执行到,先前加入的都被抛弃了。
- DiscardPolicy:加不进的任务都被抛弃,同时没有异常抛出。
先看一下代码实例:
启动指定数量的线程——ThreadPoolExecutor
对于Android平台来说,由于资源有限,最常使用的就是通过Executors.newFixedThreadPool(int size)方法来启动固定数量的线程池:
public class ExecutorDemo {

private static final int MAX = 10;

public static void main(String[] args){

    try {
        fixedThreadPool(3);
    }catch (Exception e){

    }

}

private static void fixedThreadPool(int size)throws InterruptedException,ExecutionException{
    ExecutorService service = Executors.newFixedThreadPool(size);
    for(int i =0;i<MAX;i++){
        Future<Integer> task = service.submit(new Callable<Integer>() {
            @Override
            public Integer call() throws Exception {
                System.out.println("执行
线程:"+Thread.currentThread().getName());
                return fibc(40);
            }
        });
        System.out.println("第"+i+"次计算,结果:"+task.get());
    }
}
private static int fibc(int num){
    if(num ==0){
        return 0;
    }
    if(num == 1){
        return  1;
    }

    return fibc(num-1)+fibc(num-2);
}

}
执行结果:
执行线程:pool-1-thread-1
第0次计算,结果:102334155
执行线程:pool-1-thread-2
第1次计算,结果:102334155
执行线程:pool-1-thread-3
第2次计算,结果:102334155
执行线程:pool-1-thread-1
第3次计算,结果:102334155
执行线程:pool-1-thread-2
第4次计算,结果:102334155
执行线程:pool-1-thread-3
第5次计算,结果:102334155
执行线程:pool-1-thread-1
第6次计算,结果:102334155
执行线程:pool-1-thread-2
第7次计算,结果:102334155
执行线程:pool-1-thread-3
第8次计算,结果:102334155
执行线程:pool-1-thread-1
第9次计算,结果:102334155
我们一步步分析:
首先看它的构造:
public static ExecutorService newFixedThreadPool(int nThreads) {
    return new ThreadPoolExecutor(nThreads, nThreads,
                                  0L, TimeUnit.MILLISECONDS,
                                  new LinkedBlockingQueue<Runnable>());
}
在这个方法中,调用的是ThreadPoolExecutor的构造方法,corePoolSize和maximumPoolSize相同,都是nThreads,KeepAliveTime的参数是10ms,最后设置的是无界任务队列。这样该线程池中就含有固定个数的线程,并且它能容纳无限个任务。
我们通过submit来提交任务,这里我们用的是Callable,因为我们需要返回结果:它会返回一个Future:
//这个方法在AbstractExecutorService类中实现的,它继承了ExecutorService
public <T> Future<T> submit(Callable<T> task) {
    if (task == null) throw new NullPointerException();
    RunnableFuture<T> ftask = newTaskFor(task);
    execute(ftask);
    return ftask;
}

//这个方法在AbstractExecutorService类中
 protected <T> RunnableFuture<T> newTaskFor(Callable<T> callable) {
    return new FutureTask<T>(callable);
}

//这个方法在ThreadPoolExecutor中实现
public void execute(Runnable command) {
        if (command == null)
        throw new NullPointerException();

         //得到运行状态和活动线程数
        int c = ctl.get();

        // 如果c中有效线程数目小于corePoolSize大小,尝试添加新的worker线程处理任务command:
        // 从c中获取有效线程数目调用的是workerCountOf()方法,
        // 添加新的worker线程处理任务command调用的是addWorker()方法,
        // 线程数的判断利用corePoolSize作为边界约束条件
        // 方法返回值是标志添加worker是否成功的标志位,ture表示成功,false表示失败,
        // 如果为true,则直接返回,否则重新获取ctl的值
        if (workerCountOf(c) < corePoolSize) {
            if (addWorker(command, true))//加入任务是否成功
                return;
            c = ctl.get();
        }

        // 根据c判断当前线程池的状态是否为RUNNING状态,即既可以接受新任务,又会处理队列任务的状态,
        // 并且通过offer()方法,尝试将commond添加到队列workQueue中
        // BlockingQueue的offer()方法表示如果可能的话,将参数对象加到BlockingQueue里,
        // 即如果BlockingQueue可以容纳,则返回true,否则返回false
        if (isRunning(c) && workQueue.offer(command)) {
            int recheck = ctl.get();

            // 如果当前线程池的状态不是RUNNING,并且从队列workQueue移除command成功的话,
        // 调用reject()方法拒绝任务command,
            if (! isRunning(recheck) && remove(command))

            // 否则如果当前工作线程woker数目为0,尝试添加新的worker线程,但是不携带任务
            else if (workerCountOf(recheck) == 0)
                addWorker(null, false);
        }
        // 如果尝试添加新的worker线程处理任务command失败,
        // 调用reject()方法拒绝任务command,线程数的判断利用maximumPoolSize作为边界约束条件
        else if (!addWorker(command, false))
            reject(command);
    }
在前面分析中,我们知道FutrueTask继承于RunnableFuture,RunnableFuture继承了Runnable和Future。
需要了解几个东西:
 private final AtomicInteger ctl = new AtomicInteger(ctlOf(RUNNING, 0));
private static final int COUNT_BITS = Integer.SIZE - 3;
private static final int CAPACITY   = (1 << COUNT_BITS) - 1;

// runState is stored in the high-order bits
private static final int RUNNING    = -1 << COUNT_BITS;
private static final int SHUTDOWN   =  0 << COUNT_BITS;
private static final int STOP       =  1 << COUNT_BITS;
private static final int TIDYING    =  2 << COUNT_BITS;
private static final int TERMINATED =  3 << COUNT_BITS;

// Packing and unpacking ctl
private static int runStateOf(int c)     { return c & ~CAPACITY; }
private static int workerCountOf(int c)  { return c & CAPACITY; }
private static int ctlOf(int rs, int wc) { return rs | wc; }
ctl是对线程池的运行状态和线程池中有效线程的数量进行控制的一个字段, 它包含两部分的信息: 线程池的运行状态 (runState) 和线程池内有效线程的数量 (workerCount),这里可以看到,使用了Integer类型来保存,高3位保存runState,低29位保存workerCount。COUNT_BITS 就是29,CAPACITY就是1左移29位减1(29个1),这个常量表示workerCount的上限值,大约是5亿。
- runStateOf:获取运行状态;
- workerCountOf:获取活动线程数;
- ctlOf:获取运行状态和活动线程数的值。
线程池的状态转移过程:

- RUNNING:能接受新提交的任务,并且也能处理阻塞队列中的任务;
- SHUTDOWN:关闭状态,不再接受新提交的任务,但却可以继续处理阻塞队列中已保存的任务。在线程池处于 RUNNING 状态时,调用 shutdown()方法会使线程池进入到该状态。(finalize() 方法在执行过程中也会调用shutdown()方法进入该状态);
- STOP:不能接受新任务,也不处理队列中的任务,会中断正在处理任务的线程。在线程池处于 RUNNING 或 SHUTDOWN 状态时,调用 shutdownNow() 方法会使线程池进入到该状态;
- TIDYING:如果所有的任务都已终止了,workerCount (有效线程数) 为0,线程池进入该状态后会调用 terminated() 方法进入TERMINATED 状态。
- TERMINATED:在terminated() 方法执行完后进入该状态,默认terminated()方法中什么也没有做。
进入TERMINATED的条件如下:
- 线程池不是RUNNING状态;
- 线程池状态不是TIDYING状态或TERMINATED状态;
- 如果线程池状态是SHUTDOWN并且workerQueue为空;
- workerCount为0;
- 设置TIDYING状态成功 。
定时执行一些任务——ScheduledThreadPoolExecutor
在某些情况下,我们可能需要定时地执行一些任务,此时可以通过ScheduledThreadPool来实现。我们只需要通过Executors的newScheduledThreadPool方法就可以创建定时执行 任务的线程池:
private static void scheduldPoolThread() throws CancellationException{

        ScheduledExecutorService executorService = Executors.newScheduledThreadPool(3);
        executorService.scheduleAtFixedRate(new Runnable() {
            @Override
            public void run() {
                System.out.println("Thread: "+Thread.currentThread().getName()
                +" ,定时计算;");
                System.out.println("结果:"+fibc(30));
            }
        },1,2, TimeUnit.SECONDS);
        executorService.scheduleAtFixedRate(new Runnable() {
            @Override
            public void run() {
                System.out.println("Thread: "+Thread.currentThread().getName()
                        +" ,定时计算2;");
                System.out.println("结果2:"+fibc(40));
            }
        },1,2, TimeUnit.SECONDS);
    }
结果 :
Thread: pool-1-thread-1 ,定时计算;
Thread: pool-1-thread-2 ,定时计算2;
结果:832040
结果2:102334155
Thread: pool-1-thread-1 ,定时计算;
Thread: pool-1-thread-3 ,定时计算2;
结果:832040
结果2:102334155
Thread: pool-1-thread-1 ,定时计算;
Thread: pool-1-thread-2 ,定时计算2;
结果:832040
结果2:102334155
该线程池中有3个线程,我指定了两个定时任务,因此,该线程池中有两个线程来定时完成任务。
参数1是要执行的任务,参数2是第一次运行任务时的延迟时间,参数3是定时任务的 周期,参数4是时间单元,这里设置的是秒。
其实ScheduledExecutorService的用法主要有三个:
//可调度的执行者服务接口
public interface ScheduledExecutorService extends ExecutorService {

    //指定时延后调度执行任务
    public ScheduledFuture<?> schedule(Runnable command,
                                       long delay, TimeUnit unit);

    //指定时延后调度执行任务
    public <V> ScheduledFuture<V> schedule(Callable<V> callable,
                                           long delay, TimeUnit unit);

    //指定时延后开始执行任务,以后每隔period的时长再次执行该任务
    public ScheduledFuture<?> scheduleAtFixedRate(Runnable command,
                                                  long initialDelay,
                                                  long period,
                                                  TimeUnit unit);

    //指定时延后开始执行任务,以后任务执行完成后等待delay时长,再次执行任务
    public ScheduledFuture<?> scheduleWithFixedDelay(Runnable command,
                                                     long initialDelay,
                                                     long delay,
                                                     TimeUnit unit);
}
例如:
 //延时任务
    executorService.schedule(new Runnable() {
        @Override
        public void run() {
            System.out.println("Thread: "
                    +Thread.currentThread().getName()+"-延时定时;");
             System.out.println("延时结果:"+(System.currentTimeMillis()-last));
        }
    },1,TimeUnit.SECONDS);
输出结果:
Thread: pool-1-thread-1-延时定时;
延时结果:1003
- scheduleAtFixedRate:该方法在initialDelay时长后第一次执行任务,以后每隔period时长,再次执行任务。注意,period是从任务开始执行算起的。开始执行任务后,定时器每隔period时长检查该任务是否完成,如果完成则再次启动任务,否则等该任务结束后才再次启动任务,看下图示例。
 //循环任务,按照上一次任务的发起时间计算下一次任务的开始时间
        executorService.scheduleAtFixedRate(new Runnable() {
            @Override
            public void run() {
                System.out.println("Thread: "+Thread.currentThread().getName()
                +" ,定时计算; "+System.currentTimeMillis());
                System.out.println("结果:"+(System.currentTimeMillis()-last));
            }
        },1,2, TimeUnit.SECONDS);
输出结果:
Thread: pool-1-thread-2 ,定时计算2; 1534175605475
结果:1007
Thread: pool-1-thread-1 ,定时计算; 1534175607474
结果:3006
Thread: pool-1-thread-3 ,定时计算; 1534175609474
结果:5006
我们可以看到,任务几乎是每隔2s开始执行的。
- scheduleWithFixDelay:该方法在initialDelay时长后第一次执行任务,以后每当任务执行完成后,等待delay时长,再次执行任务
//循环任务,以上一次任务的结束时间计算下一次任务的开始时间
        executorService.scheduleWithFixedDelay(new Runnable() {
            @Override
            public void run() {
                System.out.println("Thread: "+Thread.currentThread().getName()
                        +" ,定时计算1; "+System.currentTimeMillis());
                System.out.println("结果1:"+(System.currentTimeMillis()-last));
            }
        },1,1,TimeUnit.SECONDS);
输出结果:
Thread: pool-1-thread-1 ,定时计算1; 1534175838550
结果1:1006
Thread: pool-1-thread-1 ,定时计算1; 1534175839551
结果1:2007
Thread: pool-1-thread-2 ,定时计算1; 1534175840553
结果1:3009
我们可以看到,下一次任务距离上一次任务的时候总是1s;
接下来来看看源码分析:
 public static ScheduledExecutorService newScheduledThreadPool(int corePoolSize) {
        return new ScheduledThreadPoolExecutor(corePoolSize);
    }
ScheduledThreadPoolExecutor继承自ScheduledExecutorService
首先看看schedule方法的实现:
//delay时长后执行任务command,该任务只执行一次
public ScheduledFuture<?> schedule(Runnable command,
                                       long delay,
                                       TimeUnit unit) {
        if (command == null || unit == null)
            throw new NullPointerException();

        RunnableScheduledFuture<Void> t = decorateTask(command,
            new ScheduledFutureTask<Void>(command, null,
                                          triggerTime(delay, unit),
                                          sequencer.getAndIncrement()));
        delayedExecute(t);
        return t;
    }

    protected <V> RunnableScheduledFuture<V> decorateTask(
        Runnable runnable, RunnableScheduledFuture<V> task) {
        return task;
    }
我们可以看到,我们执行的是ScheduledFutureTask
首先我们要先看看ScheduledFuture,RunnableScheduledFuture,ScheduledFutureTask的关系:
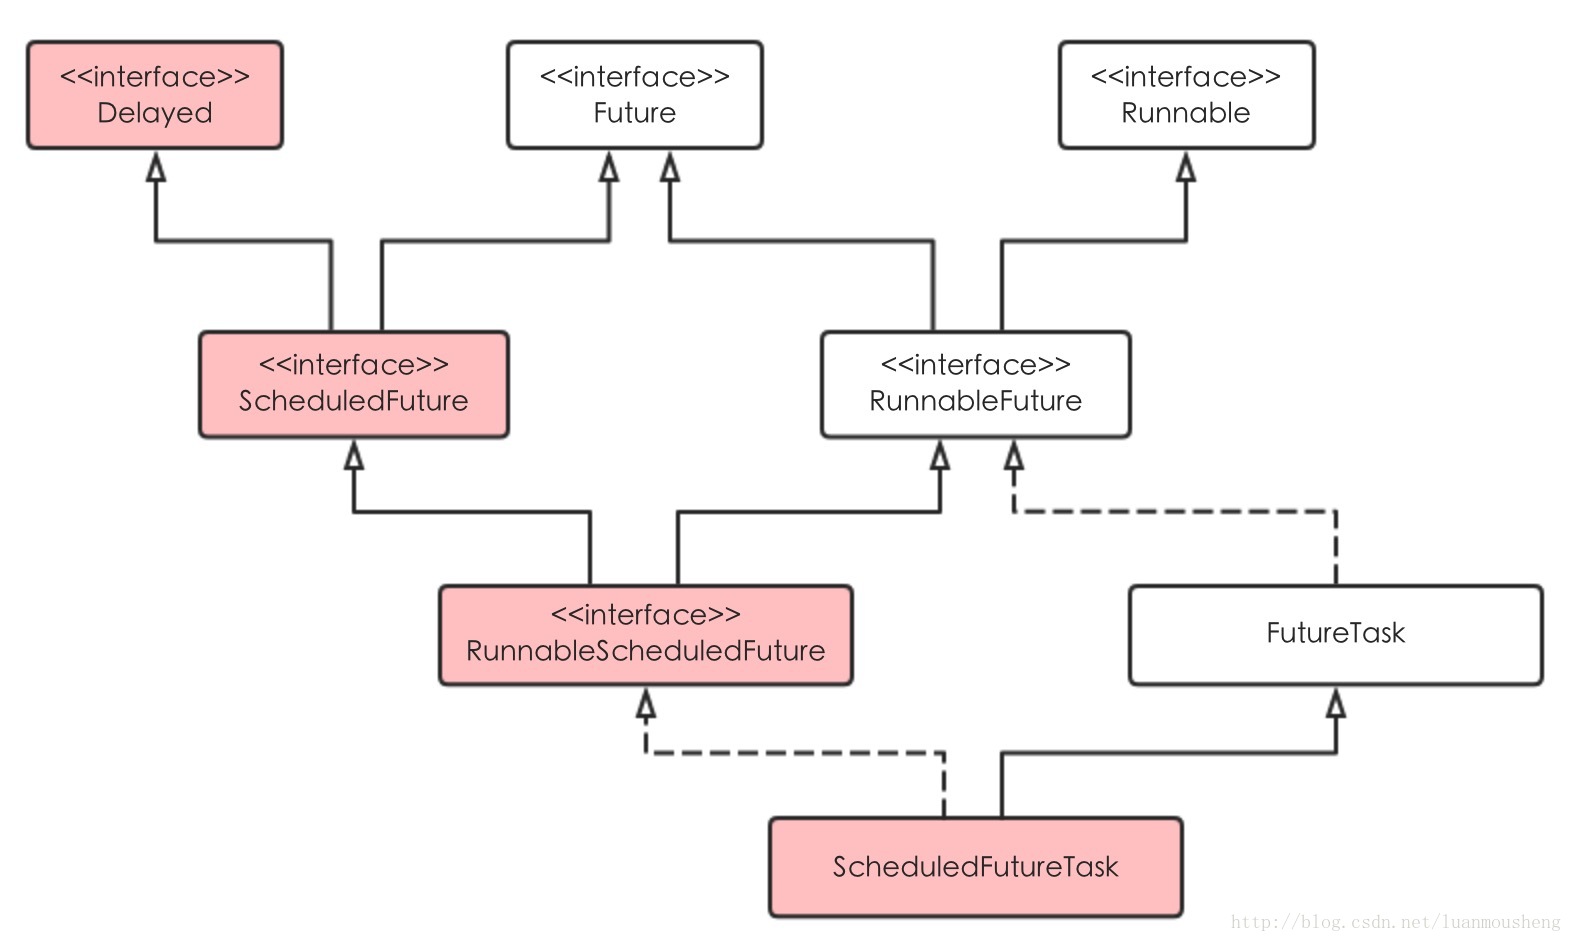
- Delayed接口:提供了getDelay方法,该方法返回对象剩余时延。接口继承了Comparable接口,表示对象支持排序:
//继承Comparable接口,表示该类对象支持排序
public interface Delayed extends Comparable<Delayed> {
    //返回该对象剩余时延
    long getDelay(TimeUnit unit);
}- ScheduledFuture接口:它是延时的Future,仅仅继承了Delayed和Future接口,并没有添加其他方法:
//仅仅继承了Delayed和Future接口
public interface ScheduledFuture<V> extends Delayed, Future<V> {
}- RunnableScheduledFuture接口:可运行的ScheduledFuture,该接口继承了ScheduledFurture和RunnableFuture:
public interface RunnableScheduledFuture<V> extends RunnableFuture<V>, ScheduledFuture<V> {
    //是否是周期任务,周期任务可被调度运行多次,非周期任务只被运行一次
    boolean isPeriodic();
}- ScheduledFutureTask:该类是ScheduledThreadPoolExecutor的内部类,继承了FutureTask,实现了RunnableScheduledFuture接口
ScheduledFutureTask(Runnable r, V result, long ns, long period) {
    //调用父类FutureTask的构造方法
    super(r, result);
    //time表示任务下次执行的时间
    this.time = ns;
    //周期任务,正数表示按照固定速率,负数表示按照固定时延
    this.period = period;
    //任务的编号
    this.sequenceNumber = sequencer.getAndIncrement();
}
这里需要注意几点,
- time表示任务下一次执行的时间,单位为纳秒。
- period=0表示该任务不是周期性任务,正数表示每隔period时长执行任务,负数表示任务执行完成后到下一次被调度运行的延时时间。
- sequenceNumber表示该任务的编号,通过线程池的sequencer成员变量从0开始生成编号。
这几个接口了解后,我们继续看源码:
//delay时长后执行任务command,该任务只执行一次
public ScheduledFuture<?> schedule(Runnable command, long delay, TimeUnit unit) {
    if (command == null || unit == null)
      throw new NullPointerException();
    //这里的decorateTask方法仅仅返回第二个参数
    RunnableScheduledFuture<?> t = decorateTask(command,
                                                new ScheduledFutureTask<Void>(command, null,
                                                                              triggerTime(delay, unit)));
    //延时或者周期执行任务的主要方法
    delayedExecute(t);
    return t;
}我们可以看到,delayedExecute(t);这个方法是来执行任务的,继续深入:
 private void delayedExecute(RunnableScheduledFuture<?> task) {
         //查看线程池是否shutdown,如果shutdown就拒绝该任务
        if (isShutdown())
            reject(task);
        else {
        //加入任务进队列
            super.getQueue().add(task);
            //再次检查线程池是否shutdown和线程池是否在运行状态
            if (isShutdown() &&
                !canRunInCurrentRunState(task.isPeriodic()) &&
                remove(task))
                task.cancel(false);
            else
            / 确保线程池中至少有一个线程启动,即使corePoolSize为0
            // 该方法在ThreadPoolExecutor中实现
                ensurePrestart();
        }
    }
ensurePrestart方法在ThreadPoolExecutor中定义:
void ensurePrestart() {
int wc = workerCountOf(ctl.get());
if (wc < corePoolSize)
addWorker(null, true);
else if (wc == 0)
addWorker(null, false);
}
然后我们来看看scheduleAtFixedRate方法:
public ScheduledFuture<?> scheduleAtFixedRate(Runnable command,
                                                  long initialDelay,
                                                  long period,
                                                  TimeUnit unit) {
        if (command == null || unit == null)
            throw new NullPointerException();
        if (period <= 0L)
            throw new IllegalArgumentException();
        ScheduledFutureTask<Void> sft =
            new ScheduledFutureTask<Void>(command,
                                          null,
                                          triggerTime(initialDelay, unit),
                                          unit.toNanos(period),
                                          sequencer.getAndIncrement());
        RunnableScheduledFuture<Void> t = decorateTask(command, sft);
        sft.outerTask = t;
        delayedExecute(t);
        return t;
}triggerTime方法用于获取下一次执行的具体时间
 private long triggerTime(long delay, TimeUnit unit) {
        return triggerTime(unit.toNanos((delay < 0) ? 0 : delay));
    }

    /**
     * Returns the nanoTime-based trigger time of a delayed action.
     */
    long triggerTime(long delay) {
        return System.nanoTime() +
            ((delay < (Long.MAX_VALUE >> 1)) ? delay : overflowFree(delay));
    }
这里的delay < (Long.MAX_VALUE >> 1是为了判断是否要防止Long类型溢出,如果delay的值小于Long类型最大值的一半,则直接返回delay,否则需要进行防止溢出处理。
scheduleWithFixedDelay方法和上面的类似:
public ScheduledFuture<?> scheduleWithFixedDelay(Runnable command,
                                                     long initialDelay,
                                                     long delay,
                                                     TimeUnit unit) {
        if (command == null || unit == null)
            throw new NullPointerException();
        if (delay <= 0L)
            throw new IllegalArgumentException();
        ScheduledFutureTask<Void> sft =
            new ScheduledFutureTask<Void>(command,
                                          null,
                                          triggerTime(initialDelay, unit),
                                          -unit.toNanos(delay),
                                          sequencer.getAndIncrement());
        RunnableScheduledFuture<Void> t = decorateTask(command, sft);
        sft.outerTask = t;
        delayedExecute(t);
        return t;
}注意这里的unit.toNanos(-delay));,这里把周期设置为负数来表示是相对固定的延迟执行。
ScheduledFutureTask的run方法
我们知道,当线程池中的工作线程启动时,不断地从阻塞队列中取出任务并执行,当然取出的任务实现了Runnable接口,所以是通过调用任务的run方法来执行任务的:
public void run() {
    // 是否是周期性任务
    boolean periodic = isPeriodic();
    // 当前线程池运行状态下如果不可以执行任务,取消该任务
    if (!canRunInCurrentRunState(periodic))
        cancel(false);
    // 如果不是周期性任务,调用FutureTask中的run方法执行
    else if (!periodic)
        ScheduledFutureTask.super.run();
    // 如果是周期性任务,调用FutureTask中的runAndReset方法执行
    // runAndReset方法不会设置执行结果,所以可以重复执行任务
    else if (ScheduledFutureTask.super.runAndReset()) {
        // 计算下次执行该任务的时间
        setNextRunTime();
        // 重复执行任务
        reExecutePeriodic(outerTask);
    }
}