一,概述
AutoLayout相比AutoResizing更加实用,是可以完全替代AutoResizing的一种自动布局方式。而在使用AutoLayout前,我们必须理解一个属性,那就是translatesAutoresizingMaskIntoConstraints。该属性表示autoresizingMask和autolayout两种方式的转换。这个属性对于在代码中生成的view来说默认是true,而对于IB中拖出来的view来说默认是false.
对于这一属性,官方文档给出的解释是这样的:
/* By default, the autoresizing mask on a view gives rise to constraints that fully determine
 the view's position. This allows the auto layout system to track the frames of views whose
 layout is controlled manually (through -setFrame:, for example).
 When you elect to position the view using auto layout by adding your own constraints,
 you must set this property to NO. IB will do this for you.
 */
@property(nonatomic) BOOL translatesAutoresizingMaskIntoConstraints NS_AVAILABLE_IOS(6_0); // Default YES
从以上的描述中,我们可以知道在使用AutoResizing布局时,AutoLayout会根据autoResizing来创建同等行为的constraint出来确定视图的位置。从而实现了视图的自动布局。而当我们确定选择使用AutoLayout添加自己的约束的时候,我们必须设置此属性为NO,XIB中这个属性默认是NO。
在实际的使用过程中,我还需要注意两点:
1. 当我们设置这个属性为YES的时候,view的布局结果由AutoResizingMask,frame,center这些因素共同决定,如果再在其上添加AutoLayout约束,自定义的AutoLayout约束就会和AutoResizing里
Autolayout约束冲突而报错。
2.我们设置该属性为NO,AutoResizing并不会直接失效,只有当我们为视图设置了constraint之后,AutoResizing才会失效。
二,使用方法
那么AutoLayout在开发中具体如何使用呢,这其实分为两种情况,一种是借助xib中的约束功能通过连线的方法实现。还有一种就是代码直接添加约束,但是代码自动布局是一件很麻烦的事,我们通常又会借助第三方即Masonry。
了解一下几种约束
Width:对视图宽度的约束
Height:对视图高度的约束
Horizontal Spacing:对视图间水平距离的约束
Vertical Spacing:对视图间垂直距离的约束
Leading Space to Superview:与父视图左边界的约束
Trailing Space to Superview:与父视图右边界的约束
Top Space to Superview:与父视图上边界的约束
Bottom Space to Superview:与父视图下边界的约束
Widths Equally:视图等宽约束
Heights Equally:视图等高约束
第一种:借助xib中的约束功能通过连线的方法实现
1> Align:
英文解释的意思为排序,那么我们即可以理解为,排序…点击展开选项,我会挨个解释一下。
* Leading Edges 选中的views们 左 对齐
* Trailing Edges 选中的views们 右 对齐
* Top Edges 选中的views们 上 对齐
* Bottom Edges 选中的views们 下 对齐
* Horizontal Centers 选中的views们 水平方向 中心对齐
* Vertical Centers 选中的views们 垂直方向 中心对齐
* Baselines 选中的views们基于 基线 对齐
* Horizontally in Container 选中的视图 相对于 父视图 进行 水平方向 对齐
* Vertical in Container 选中的视图 相对于 父视图 进行 垂直方向 对齐
* Update Frames None 再设置了这些约束之后不进行Frame的更改
* Update Frames Items of New Constraints 设置了这些约束之后 只更改选中的这些views的Frame
* Update Frames All Frames in Container 更改该 vc 里所有View的约束 (慎用!!!!!!)
2 > Pin:
英文解释为 大头针,其实我们就可以认为,这个展开项内的所有的现象都是为了将视图订在某一个位置的。那么我们再次展开选项
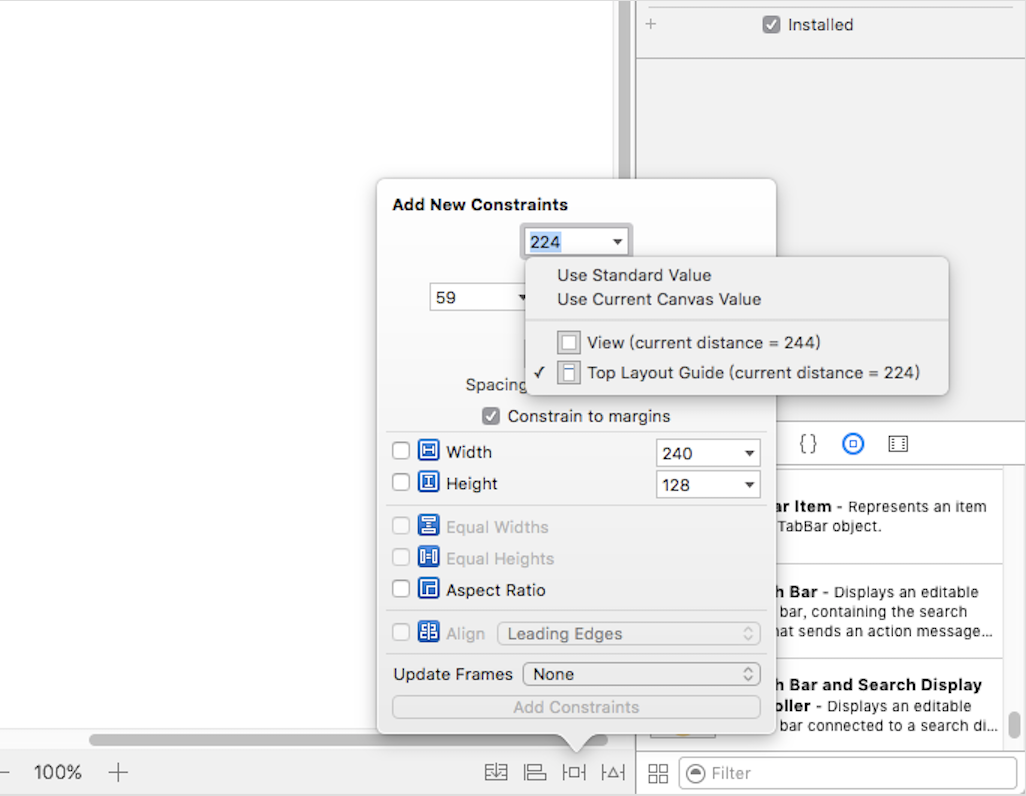
上方的输入框 这个输入框时表示当前选中的views或者view距离父视图的上方距离为多少,左右下同理,不一一赘述了。
而点击这个倒三角开启的选项中
* User Standard Value :是说使用标准的的值,而且这个值只有在是设置上下方向的时候才有用。默认的值其实就是距离 Bottom Layout Guide,也就是上下基线。下基线就是距离视图最底部。上基线就是距离StatusView下方的位置。而这里的默认值其实是8
* User Current Canvas Value : 使用当前位置设置。默认为当前设置方向最近的一个VIew,且没有覆盖遮挡的视图
剩下的选项,会根据当前视图的布置情况有所不同,但是道理相当,这个选项是让你设置你要根据那个视图进行当前位置距离的设置的
* Width 和 Height : 这个不需要我赘述了吧。分别是 宽度和高度 的设置
* Constarain to Margins : 这个是否需要外边距 默认为 8 。一般没啥卵用,都会去掉
* Equal Widths 和 Equal Heights : 这两个选项需要选择两个视图。比如选中View1和View2,那么可以分别设置这个两个视图宽度和高度相等
* Aspect Ratio 这个属性是设置选中View的比例。当你点击设置的时候,默认他会设置当前视图的比例。比如你的View高度为40宽度为30。那么你的比例就将设置为3:4. 如果你希望修改这个比例的属性,咱们在讲完这三个东西之后,我会讲解
* Align 这个东西你不得不承认这个东西和咱们学习的第一个Align重复的… 在这里就不赘述了
* Update Frames 这个查看上面 Align选项的这个属性就好了
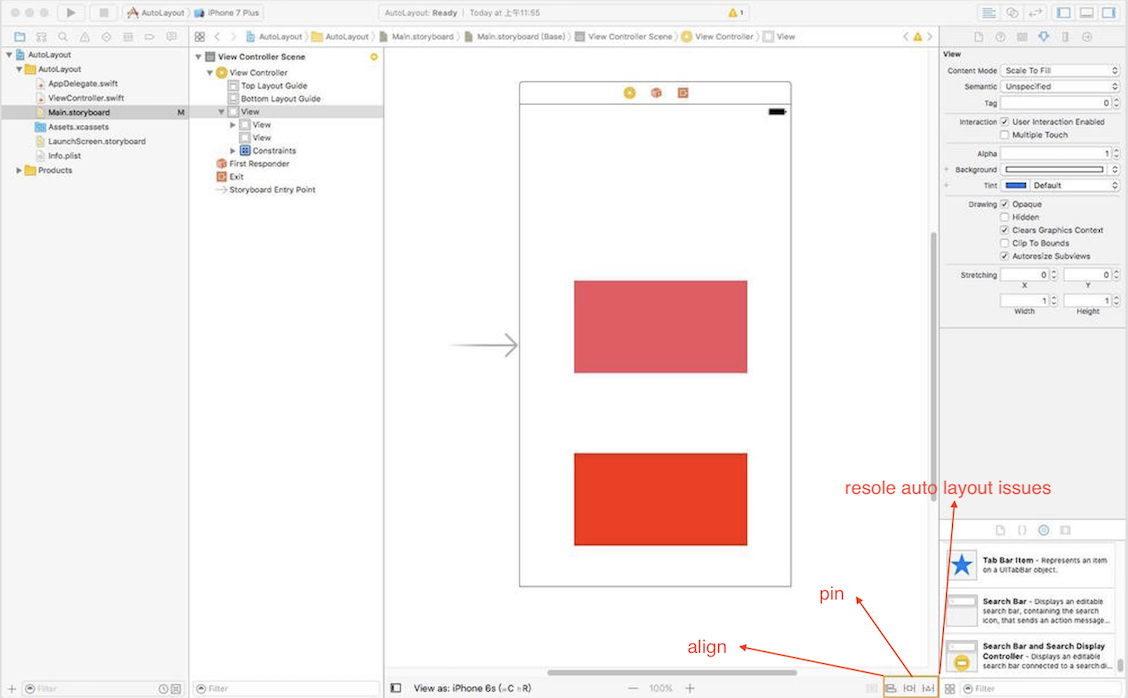
3 > Resole auto layout issues
他的这个解释已经很好理解了,自动布局问题的解决。就是如果你在布局的
时候出现了一些问题。比如,咱们再设置约束之后,出现黄色或者红色的的颜色的时候。就需要使用以下方式修改。红色说明咱们设置的约束有缺失或者有冲突的问题,黄色则说明,约束正确,但是当前View的Frame和约束描述的Frame不一致
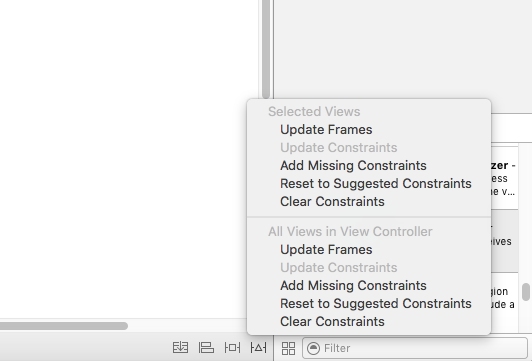
看到以上视图咱们可以看出它分为两个而且这两种除了名字不一样,选项是一摸一样的额。
(1) Selected Views : 这个说的就是你要处理的约束问题是当前你选中的View。
(2) All Views in View Controller : 则是说明要解决的约束问题是这个ViewController所有的VIew的(这个可得慎重的)。
* Update Frames 修改Frame,当你的约束设置正确但是Frame不对的时候使用者选项可以讲View的Frame展示成为约束所描述的样子
* Update Constaints 而这个选项,说实话我没用过。他的意思咱们也可以知道他是通过Frame 去修改 约束……
* Add Missing Constraints 添加缺失的约束,这个选项我也没使用过,因为这个方法添加的缺失的约束不一定就是正确的约束,在实际运行中肯定会出现问题所以尽量自己把缺失的约束自己添加了。
* Reset to Suggested Constaints 重新设置建议的约束?没使用过,不知道什么意思
* Clear Constraints 清除约束,会删除选中的视图的所有的约束。在All Views in View Controller 你要是做这个选项的时候可得慎重,使用了就说明你要删除当前VC所有的约束。当然你可以 ctrl-z
拓展:
是使用XIB、StoryBoard好些还是使用纯代码布局好?
1、 在一些比较简单、固定的界面。比如登录、注册或者其他只是进行内容展示的界面使用XIB、StoryBoard开发起来会更简单快一些,这个时候我们也应该使用XIB、StoryBoard开发。
2、 在一些复杂、控件较多和功能多的界面尽量使用代码进行布局开发。因为控件多功能复杂的界面如果使用XIB、StoryBoard。那么通过拉线的形式添加 约束布局,大家应该都有经历过,一个XIB里拉 满了密密麻麻的约束线,可以肯定的是过不了多久连自己都看晕了。如果这个模块要交给第二个人维护,那么这些 密密麻麻的约束线肯定是一个让人头疼的问题。因为XIB中约束过多的话,首先可读性是非常差的,带来的后续问题是开发思路不清晰、维护难。
3、需要复用的模块尽量使用代码布局。如果使用XIB、StoryBoard则无法很好的对代码模块进行复用。
第二种:代码直接添加约束
Auto Layout 中约束对应的类为 NSLayoutConstraint,一个 NSLayoutConstraint 实例代表一条约束。 (在iOS6之后,引入了autolayout这个概念,相应的也增加了NSLayoutConstraint这个对象,这个对象就是专门用来进行约束布局的设置对象。通过这个对象,我们可以设置类似视图对象之间的间距,约束的宽高,比例等属性。创建NSLayoutConstraint对象的方法有两种:)
NSLayoutConstraint有两个方法,我们主要介绍 constraintWithItem:也是最常用的。
第一方式:创建NSLayoutConstraint对象
+(instancetype)constraintWithItem:(id)view1 attribute:(NSLayoutAttribute)attribute1 relatedBy:(NSLayoutRelation)relation toItem:(nullable id)view2 attribute:(NSLayoutAttribute)attribute2 multiplier:(CGFloat)multiplier constant:(CGFloat)constant;
意思是:(描述的是一个view与另外一个view的位置和大小约束关系。)
view1:要添加约束的视图对象。
view2:与之对应添加约束的视图对象,例如,如过我要设置view1的上边距离父视图的上边一定间距,这个view2就是view1的父视图。
attribute(属性):有上、下、左、右、宽、高等。
relation(关系):有(<=,==,>=)小于等于、等于、大于等于。(注意:小于等于或大于等于优先会使用等于关系,如果等于不能满足,才会使用小于或大于。例如设置一个大于等于100 的关系,默认会是 100,当视图被拉伸时,100 无法被满足,尺寸才会变得更大。)
multiplier(比例):约束的比例,比如view1的宽是view2的宽的两倍,这个multiplie就是2.
AutoLayout 的核心计算公式:
view1.attribute1 = view2.attribute2 * multiplier + constant value
item1 =(>=,<=) multiplier * item2 + constant。
举个简单的例子来说我们想设置第一个视图的宽度是第二个视图宽度的2倍,我们可以这样写:
[self.view addConstraint:[NSLayoutConstraint constraintWithItem:view2 attribute:NSLayoutAttributeWidth relatedBy:NSLayoutRelationEqual toItem:view1 attribute:NSLayoutAttributeWidth multiplier:2 constant:0]];
在这个方程式中,attribute1 和 attribute2 是自动布局可以调整时解决这些制约因素的变量。当你创建约束定义其他值。例如,如果您定义两个按钮的相对位置,第二个按钮的起始位置距离第一个按钮结束位置后8像素点。这种关系为线性方程如下所示:
button2.leading = 1.0 × button1.trailing + 8.0
例如一: 假如我们设计一个简单的页面。一个子view在父view中,其中子view的上下左右边缘都离父view的边缘40个像素。如下:
//设置背景颜色
self.view.backgroundColor = [UIColor redColor];
//创建子view
UIView *subView = [[UIView alloc]init];
//设置子view背景颜色
subView.backgroundColor = [UIColor blackColor];
//将子view添加到父视图上
[self.view addSubview:subView];
//使用Auto Layout约束,禁止将Autoresizing Mask转换为约束
[subView setTranslatesAutoresizingMaskIntoConstraints:NO];
//layout 子view
//子view的上边缘离父view的上边缘40个像素
NSLayoutConstraint *contraint1 = [NSLayoutConstraint constraintWithItem:subView attribute:NSLayoutAttributeTop relatedBy:NSLayoutRelationEqual toItem:self.view attribute:NSLayoutAttributeTop multiplier:1.0 constant:40.0];
//子view的左边缘离父view的左边缘40个像素
NSLayoutConstraint *contraint2 = [NSLayoutConstraint constraintWithItem:subView attribute:NSLayoutAttributeLeft relatedBy:NSLayoutRelationEqual toItem:self.view attribute:NSLayoutAttributeLeft multiplier:1.0 constant:40.0];
//子view的下边缘离父view的下边缘40个像素
NSLayoutConstraint *contraint3 = [NSLayoutConstraint constraintWithItem:subView attribute:NSLayoutAttributeBottom relatedBy:NSLayoutRelationEqual toItem:self.view attribute:NSLayoutAttributeBottom multiplier:1.0 constant:-40.0];
//子view的右边缘离父view的右边缘40个像素
NSLayoutConstraint *contraint4 = [NSLayoutConstraint constraintWithItem:subView attribute:NSLayoutAttributeRight relatedBy:NSLayoutRelationEqual toItem:self.view attribute:NSLayoutAttributeRight multiplier:1.0 constant:-40.0];
//把约束添加到父视图上
NSArray *array = [NSArray arrayWithObjects:contraint1,contraint2,contraint3,contraint4, nil];
[self.view addConstraints:array];
注意事项:
(1)、添加约束前确定已经把需要布局的子view添加到父view上了
(添加约束之前,一定要保证相关控件都已经在各自的父控件上。用上面的例子就是 [self.view addSubview:purpleView]; 一定要放在添加 left 约束之前,否则程序会 crash-崩溃,因为要确保 purpleView 要已经在 self.view 上了。建议先写 [self.view addSubview:purpleView]; 之后,再专心写约束。)
(2)、一定要禁止将Autoresizing Mask转换为约束 view.translatesAutoresizingMaskIntoConstraints = NO;
(要先禁止 autoresizing 功能,防止 AutoresizingMask 转换成 Constraints,避免造成冲突,需要设置 view 的下面属性为 NO:)
(3)、要把子view的约束加在父view上
(4)、因为iOS中原点在左上角所以使用offset时注意right和bottom用负数
(5)、不用再给 view 设置 frame
例如二: 子view在父view的中间,且子view长300,高200。
//设置背景颜色
[self.view setBackgroundColor:[UIColor redColor]];

//创建子view
UIView *subView = [[UIView alloc] init];

//设置子view背景颜色
[subView setBackgroundColor:[UIColor blackColor]];

//将子view添加到父视图上
[self.view addSubview:subView];

//使用Auto Layout约束,禁止将Autoresizing Mask转换为约束
[subView setTranslatesAutoresizingMaskIntoConstraints:NO];

//layout 子view

//子view的中心横坐标等于父view的中心横坐标 (水平居中)
NSLayoutConstraint *constrant1 = [NSLayoutConstraint constraintWithItem:subView attribute:NSLayoutAttributeCenterX relatedBy:NSLayoutRelationEqual toItem:self.view attribute:NSLayoutAttributeCenterX multiplier:1.0 constant:0.0];

//子view的中心纵坐标等于父view的中心纵坐标(垂直居中)
NSLayoutConstraint *constrant2 = [NSLayoutConstraint constraintWithItem:subView attribute:NSLayoutAttributeCenterY relatedBy:NSLayoutRelationEqual toItem:self.view attribute:NSLayoutAttributeCenterY multiplier:1.0 constant:0.0];

//子view的宽度为300 这里直接设置自身宽为300
NSLayoutConstraint *constrant3 = [NSLayoutConstraint constraintWithItem:subView attribute:NSLayoutAttributeWidth relatedBy:NSLayoutRelationGreaterThanOrEqual toItem:nil attribute:NSLayoutAttributeNotAnAttribute multiplier:1.0 constant:300.0];

//设置自身宽,宽可以参照其他控件设置,比如是self.view宽的一半,则应该这样写

//参照其他控件设置位置
 NSLayoutConstraint *contraint = [NSLayoutConstraint constraintWithItem:libraryView attribute:NSLayoutAttributeToprelatedBy:NSLayoutRelationEqual toItem:labelLibrary attribute:NSLayoutAttributeBottom multiplier:1.0 constant:20.0];


//距离父视图底部40
 NSLayoutConstraint *contraint = [NSLayoutConstraint constraintWithItem:btn attribute:NSLayoutAttributeBottomrelatedBy:NSLayoutRelationEqual toItem:self.view attribute:NSLayoutAttributeBottom multiplier:1.0 constant:-40.0];

//居中显示
 NSLayoutConstraint *contraint = [NSLayoutConstraint constraintWithItem:clickLabel attribute:NSLayoutAttributeCenterY relatedBy:NSLayoutRelationEqual toItem:bgView attribute:NSLayoutAttributeCenterY multiplier:1.0 constant:0.0];

 NSLayoutConstraint *contraint = [NSLayoutConstraint constraintWithItem:clickLabel attribute:NSLayoutAttributeCenterXrelatedBy:NSLayoutRelationEqual toItem:bgView attribute:NSLayoutAttributeCenterX multiplier:1.0 constant:0.0];


//子view的高度为200
NSLayoutConstraint *constrant4 = [NSLayoutConstraint constraintWithItem:subView attribute:NSLayoutAttributeHeight relatedBy:NSLayoutRelationGreaterThanOrEqual toItem:nil attribute:NSLayoutAttributeNotAnAttribute multiplier:1.0 constant:200.0];

//把约束添加到父视图上
NSArray *array = [NSArray arrayWithObjects:contraint1,contraint2,contraint3,contraint4, nil];

[self.view addConstraints:array];

//可以直接用addConstraints
    [self.view addConstraints:@[[NSLayoutConstraint constraintWithItem:subView attribute:NSLayoutAttributeCenterX relatedBy:NSLayoutRelationEqual toItem:self.view attribute:NSLayoutAttributeCenterX multiplier:1.0 constant:0.0],

                                [NSLayoutConstraint constraintWithItem:subView attribute:NSLayoutAttributeCenterY relatedBy:NSLayoutRelationEqual toItem:self.view attribute:NSLayoutAttributeCenterY multiplier:1.0 constant:0.0],

                                [NSLayoutConstraint constraintWithItem:subView attribute:NSLayoutAttributeHeight relatedBy:NSLayoutRelationGreaterThanOrEqual toItem:nil attribute:NSLayoutAttributeNotAnAttribute multiplier:1.0 constant:200.0],

                                [NSLayoutConstraint constraintWithItem:subView attribute:NSLayoutAttributeWidth relatedBy:NSLayoutRelationGreaterThanOrEqual toItem:nil attribute:NSLayoutAttributeNotAnAttribute multiplier:1.0 constant:300.0]]];
注意事项:
(1)、如果是设置view自身的属性,不涉及到与其他view的位置约束关系。 比如view自身的宽、高等约束时,方法constraintWithItem:的第四个参数view2(secondItem)应设为nil;且第五个参数attribute2(secondAttribute)应设为 NSLayoutAttributeNotAnAttribute 。
(2)、在设置宽和高这两个约束时,relatedBy参数使用的是 NSLayoutRelationGreaterThanOrEqual,而不是 NSLayoutRelationEqual。
因为 Auto Layout 是相对布局,所以通常你不应该直接设置宽度和高度这种固定不变的值,除非你很确定视图的宽度或高度需要保持不变。
三、添加约束(addConstraint)的规则
在创建约束了之后,需要将其添加到作用的控件上才能生效,注意在添加约束的时候目标控件需要遵循以下规则(这里控件就用 view 表示):
(1)对于两个同层级 view 之间的约束关系,添加到它们的父 view 上

(2)对于两个不同层级 view 之间的约束关系,添加到他们最近的共同父 view 上

(3)对于有层次关系的两个 view 之间的约束关系,添加到层次较高的父 view 上

(4)对于比如长宽之类的,只作用在该 view 自己身上的话,添加到该 view 自己上。
可以看出,widthConstraint 和 Constraint 属于第(4)种,leftConstraint 和 rightConstraint 属于第(3)种。
例如四:
topView在父视图的左边间距10,下边间距-10,宽度为100,高度为20的实现代码
UIView *topView = [[UIView alloc] init];

    topView.backgroundColor = [UIColor redColor];

    [self.view addSubview:topView];

    topView.translatesAutoresizingMaskIntoConstraints = NO;

    [self.view addConstraints:@[

                                 [NSLayoutConstraint constraintWithItem:topView

                                                             attribute:NSLayoutAttributeLeft relatedBy:NSLayoutRelationEqual toItem:self.view attribute:NSLayoutAttributeLeft multiplier:1.0 constant:10],

                                [NSLayoutConstraint constraintWithItem:topView

                                                             attribute:NSLayoutAttributeBottom relatedBy:NSLayoutRelationEqual toItem:self.view attribute:NSLayoutAttributeBottom multiplier:1.0 constant:-10],

                                [NSLayoutConstraint constraintWithItem:topView

                                                             attribute:NSLayoutAttributeWidth relatedBy:NSLayoutRelationEqual toItem:nil attribute:NSLayoutAttributeNotAnAttribute multiplier:1.0 constant:100],

                                [NSLayoutConstraint constraintWithItem:topView

                                                             attribute:NSLayoutAttributeHeight relatedBy:NSLayoutRelationEqual toItem:nil attribute:NSLayoutAttributeNotAnAttribute multiplier:1.0 constant:20]

                                ]];
四、使用 Auto Layout (NSLayoutConstraint)实现动画
目前貌似还有很多人对于 Auto Layout 的动画实现还不是很了解。毕竟以前我们处理动画之类的交互大都是和view的frame属性打交道,即使用传统的 animation方法修改view的frame。大致类似于
CGRect newFrame = view.frame;
newFrame.size.height = 300;

[UIView animateWithDuration:3.0 animations:^{
view.frame = newFrame;
} completion:^(BOOL finished) {
}];
那么在Auto Layout下我们又该如何处理相关的动画呢?根据前面说到的Auto Layout布局约束的原理,在某个时刻约束也是会被还原成frame使视图显示,这个时刻可以通过layoutIfNeeded这个方法来进行控制,可 以立刻生成新的frame并展
//先根据初始化添加的约束生成最初的frame并显示view
[self.view layoutIfNeeded];
[UIView animateWithDuration:3.0 animations:^{
//遍历查找view的heigh约束,并修改它
NSArray *constrains = self.view.constraints;
for (NSLayoutConstraint* constraint in constraints) {
if (constraint.firstAttribute == NSLayoutAttributeHeight) {
constraint.constant = 300;
}
}
//更新约束 在某个时刻约束会被还原成frame使视图显示
[self.view layoutIfNeeded];
} completion:^(BOOL finished) {
}];
这样我们就可以通过 AutoLayout 实现传统的animation方法。需要注意的是在调用animation方法之前一定要先调用layoutIfNeeded,这是为了让view先生成最初的frame并显示,否则动画效果会失效。
例如1:
在界面左下方放置一个宽高各为50的红色View,它离左边缘与下边缘的间距都为20,在红色方块的右边放一个离它20间距,离self.view底部也间距20,宽高相等的蓝色方块,然后需求:我将在蓝色方块的右边再加个同样大小的黄色方块,然后,要求点击屏幕,然后蓝色方块被移除,黄色方块替代蓝色方块的位置!
//创建redView

UIView *redView = [[UIView alloc]init];
redView.backgroundColor = [UIColor redColor];
redView.translatesAutoresizingMaskIntoConstraints = NO;
[self.view addSubview:redView];

//创建redView第一个约束,相对self.view的左边缘间距20
NSLayoutConstraint * redLeftLc = [NSLayoutConstraint constraintWithItem:redView attribute:NSLayoutAttributeLeftMargin relatedBy:NSLayoutRelationEqual toItem:self.view attribute:NSLayoutAttributeLeft multiplier:1.0f constant:20.0];

//只有在没有参照控件的情况下,约束才加到自身,不然加到父控件上
[self.view addConstraint:redLeftLc];

//创建redView第二个约束,相对self.view的底边缘间距20
NSLayoutConstraint *reomLc = [NSLayoutConstraint constraintWithItem:redView attribute:NSLayoutAttributeBottom relatedBy:NSLayoutRelationEqual toItem:self.view attribute:NSLayoutAttributeBottomMargin multiplier:1.0f constant:-20];//由于是redview相对self.view往上减20,所以是-20

//添加约束

[self.view addConstraint:reomLc];

//创建redView第三个约束,设置自身宽,宽可以参照其他控件设置,比如是self.view宽的一半,则应该这样写


//这里直接设置自身宽为50
NSLayoutConstraint * redWLc = [NSLayoutConstraint constraintWithItem:redView attribute:NSLayoutAttributeWidth relatedBy:NSLayoutRelationEqual toItem:nil attribute:kNilOptions multiplier:1.0f constant:50.0f];

//由于没有参照物,所以约束添加于自身身上
[redView addConstraint:redWLc];

//创建最后一个约束,自身的高
NSLayoutConstraint * redHLc = [NSLayoutConstraint constraintWithItem:redView attribute:NSLayoutAttributeHeight relatedBy:NSLayoutRelationEqual toItem:nil attribute:kNilOptions multiplier:1.0f constant:50];

//由于没有参照物,所以约束添加于自身身上
[redView addConstraint:redHLc];


//在红色方块的右边放一个离它20间距,离self.view底部也间距20,宽高相等的蓝色方块

//先创建一个一个蓝色的view添加到视图上,剩下的就是用autolayout来设置它的“frame”了
UIView *blueView = [[UIView alloc]init];
blueView.backgroundColor = [UIColor blueColor];
blueView.translatesAutoresizingMaskIntoConstraints = NO;
[self.view addSubview:blueView];
self.blueView = blueView;

//创建第一个约束,左边间距,由于是想要与红色有20的间距,那么参照参数“toItem”就应该填redView
NSLayoutConstraint *blueLeft = [NSLayoutConstraint constraintWithItem:blueView attribute:NSLayoutAttributeLeft relatedBy:NSLayoutRelationEqual toItem:redView attribute:NSLayoutAttributeRight multiplier:1.0f constant:20.0f];

//与其他控件发生约束,所以约束添加到父控件上

[self.view addConstraint:blueLeft];

//现在我们已经可以确定自己水平方向的位置了,还差垂直方向的位置,现在我们来创建第二个约束,参照物依然是红色方块,需求是要离self.view底部20间距,这正好和红色一样,可以直接与红色方块底部对齐.

NSLayoutConstraint *blueBottom = [NSLayoutConstraint constraintWithItem:blueView attribute:NSLayoutAttributeBottom relatedBy:NSLayoutRelationEqual toItem:redView attribute:NSLayoutAttributeBottom multiplier:1.0f constant:0.0f];//与红色方块底部对齐,倍数1.0f.差值0.0f

//与其他控件发生约束,所以约束添加到父控件上
[self.view addConstraint:blueBottom];

//剩下两个约束差不多,它们都以redView为参照,与其等宽等高

NSLayoutConstraint *blueW = [NSLayoutConstraint constraintWithItem:blueView attribute:NSLayoutAttributeWidth relatedBy:NSLayoutRelationEqual toItem:redView attribute:NSLayoutAttributeWidth multiplier:1.0f constant:0.0f];

[self.view addConstraint:blueW];

 NSLayoutConstraint *blueH = [NSLayoutConstraint constraintWithItem:blueView attribute:NSLayoutAttributeHeight relatedBy:NSLayoutRelationEqual toItem:redView attribute:NSLayoutAttributeHeight multiplier:1.0f constant:0.0f];

 [self.view addConstraint:blueH];
其实Autolayout的思想非常简单,刚开始使用的时候不要想着马上一气呵成,最好一个控件一个控件的实现依赖,分别满足其位置与尺寸的需求,如果一下子几个控件一起弄的话,你得思路非常清晰,往往大家犯错是犯在约束添多了,而不是添少了。(就如上面的例子,很多人会在设置了与红色等高等宽后,还同时去添加顶部对齐与底部对齐,这样高度就重复设置了,他会忽略了,上下同时对齐不仅给予了垂直位置,也给予了高度,所以思路必须清晰!)
autolayout动画需求:我将在蓝色方块的右边再加个同样大小的黄色方块,然后,要求点击屏幕,然后蓝色方块被移除,黄色方块替代蓝色方块的位置
(这个例子可以再讲一个autolayout的知识点:优先级(priority))
//先创建黄色View
UIView *yellowV = [[UIView alloc]init];

yellowV.backgroundColor = [UIColor yellowColor];

yellowV.translatesAutoresizingMaskIntoConstraints = NO;

[self.view addSubview:yellowV];

//开始创建约束,左间距约束
NSLayoutConstraint *yellowLeft = [NSLayoutConstraint constraintWithItem:yellowV attribute:NSLayoutAttributeLeft relatedBy:NSLayoutRelationEqual toItem:blueView attribute:NSLayoutAttributeRight multiplier:1.0f constant:20];

//与其他控件发生约束,所以约束添加到父控件上
[self.view addConstraint:yellowLeft];

//添加底部约束
NSLayoutConstraint *yellowBottom = [NSLayoutConstraint constraintWithItem:yellowV attribute:NSLayoutAttributeBottom relatedBy:NSLayoutRelationEqual toItem:self.view attribute:NSLayoutAttributeBottom multiplier:1.0f constant:-20];

//与其他控件发生约束,所以约束添加到父控件上
[self.view addConstraint:yellowBottom];

//这里直接设置宽高约束,就省事不加参照控件了.
NSLayoutConstraint *yellowW = [NSLayoutConstraint constraintWithItem:yellowV attribute:NSLayoutAttributeWidth relatedBy:NSLayoutRelationEqual toItem:nil attribute:kNilOptions multiplier:1.0f constant:50.0f];

[yellowV addConstraint:yellowW];

NSLayoutConstraint *yellowH = [NSLayoutConstraint constraintWithItem:yellowV attribute:NSLayoutAttributeHeight relatedBy:NSLayoutRelationEqual toItem:nil attribute:kNilOptions multiplier:1.0f constant:50.0f];

[yellowV addConstraint:yellowH];

//接下来我再黄色View添加一个约束,这个约束涉及到优先级.

//对黄色View添加约束,约束黄色view与红色View的间距为20

NSLayoutConstraint *yellowAnotherLeft = [NSLayoutConstraint constraintWithItem:yellowV attribute:NSLayoutAttributeLeft relatedBy:NSLayoutRelationEqual toItem:redView attribute:NSLayoutAttributeRight multiplier:1.0f constant:20];

UILayoutPriority priority = 250;//设置优先级

yellowAnotherLeft.priority = priority;

//与其他控件发生约束,所以约束添加到父控件上
[self.view addConstraint:yellowAnotherLeft];
想必大家应该看出些端倪,我在前面已经给黄色View添加了对蓝色View间距位20的view,现在又给黄色view对红色View添加一个间距20的约束,这很明显是不可能出现的情况,黄色View怎么可能同时做到这两个约束呢,用术语来说就是约束冲突,但是大家注意看这段代码:
UILayoutPriority priority = 250;//设置优先级
我给yellowAnotherLeft这个约束添加了优先级,优先级的范围是0~1000,数字越大,优先级越高,在不设置的情况下默认为1000.
这说明了,我最后添加的这个约束的优先级是低的,这个约束只有在它的冲突约束被抹掉后,它才能实现
也就是说,我把蓝色view移除后,黄色View相对于蓝色View左间距20这个约束就不成立了,那么黄色view会自动的变为与红色View间距20
//去除蓝色方块
//现在大家明白优先级是什么情况了吧!最后加几行代码,来实现这个动画吧!
-(void)touchesBegan:(NSSet *)touches withEvent:(UIEvent *)event

{

//先把蓝色方块从父视图上移除

    [self.blueView removeFromSuperview];

//动画更新界面

    [UIView animateWithDuration:1.0f animations:^{

        [self.view layoutIfNeeded];

    }];

}
autolayout的动画就是这样实现的,将操作代码走完后,再让动画块去更新界面,动画就出来了
五、更新/修改约束
Auto Layout 的更新、修改约束操作只有constant属性可以修改,其它都是只读的。所以对于现有约束的修改和更新都是围绕NSLayoutConstraint实例的constant属性展开的。
1、如果你是使用 Xib/StoryBoard 的话,在程序运行时想动态的改变视图的约束这样做:
约束Constraint也可以像控件一样做IBOutlet链接,通过拖线关联到文件。(事例这里是改变子view相对于父view的top约束)
首先在你的ViewController的头文件里定义一个约束属性:
@property (nonatomic, weak) IBOutlet NSLayoutConstraint *topConstraint ;
然后在XIB里选中 File's Owner,选中Outlet栏目。将对应的Outlet拖动到View对应Constraint连接起来就可以了。跟button/label做链接一摸一样的。这样我们就可以获得view上面的某个具体约束了,然后就可以在文件中对这个约束进行我们想要的修改。
//更新约束
self.topConstraint.constant = 10;
总结来说就是:拖线关联到文件获得约束,修改约束的constant属性。
2、如果你是使用 Xib/StoryBoard ,但是不想通过上述拉线的方式获得约束然后再去更新它,你还可以采用代码的方式修改约束:
但是无论采用哪种方式,我们都要遵循Auto Layout 的约束更新机制:想要更新视图上面的约束,就要先找到对应的约束再去更新它。遍历view上面的所有约束,查找到要更新的约束再进行更新。
所以我们要像上面一样要先获得top约束。在代码中的体现就是通过约束的标识字段,在其父view的constraints数组中遍历查找。这是因为每个view的constraints数组中保存的实际上是 layout 子view所需的约束的集合。
我们可以通过下面的辅助函数实现:
NSArray *constrains = self.view.constraints;
for (NSLayoutConstraint* constraint in constrains) {

 if (constraint.firstAttribute == NSLayoutAttributeTop) {
    constraint.constant = 10;
 }
}
这里只判断了一个标识字段(NSLayoutAttributeTop),但是大多数情况下view上面的约束依赖不会那么简单,所以需要查找判断多个标识字段,才能找到。
3、如果你是使用代码布局,那就用上面2介绍的方法更新约束,或者在添加约束之前先将该约束记录下来,方便后面的更新修改。
六、Auto Layout 关于更新约束的几个方法
* setNeedsLayout:告知页面需要更新,但是不会立刻开始更新。执行后会立刻调用layoutSubviews。

* layoutIfNeeded:告知页面布局立刻更新。所以一般都会和setNeedsLayout一起使用。如果希望立刻生成新的frame需要调用此方法,利用这点一般布局动画可以在更新布局后直接使用这个方法让动画生效。

* layoutSubviews:系统重写布局。

* setNeedsUpdateConstraints:告知需要更新约束,但是不会立刻开始。

* updateConstraintsIfNeeded:告知立刻更新约束。

* updateConstraints:系统更新约束。

这么多方法中,目前使用比较多的是 layoutIfNeeded 。因为在Auto Layout 实现动画的时候,layoutIfNeeded 方法可以立刻生成新的frame特性是一大利器。