使用Objective-C风格的方法进行代码autolayout布局
在iOS 6之后系统引入了相关的类来进行autolayout的代码方式创建与布局设置。
使用代码进行 autolayout 布局首先要了解一个重要的类:NSLayoutConraint。NSLayoutConraint 类是进行代码autolayout布局的核心类,其创建出具体的自动布局约束对象。使用Xcode 创建一个工程,在ViewController.m文件的viewDidLoad方法中添加如下代码:
- (void)viewDidLoad {


    [super viewDidLoad];
    // Do any additional setup after loading the view.
    UIView * myView = [[UIView alloc]init];
    myView.translatesAutoresizingMaskIntoConstraints = NO;
    myView.backgroundColor = [UIColor redColor];
    //添加约束前,必须将子视图添加在父视图上
    [self.view addSubview:myView];
    //将viewl视图约束在屏幕竖直方向的中间
    NSLayoutConstraint *constraintX = [NSLayoutConstraint constraintWithItem:myView attribute:NSLayoutAttributeCenterX relatedBy:NSLayoutRelationEqual toItem:self.view attribute:NSLayoutAttributeCenterX multiplier:1 constant:0];
    [self.view addConstraint:constraintX];
    //将viewl视图约束在屏幕水平方向的中间
    NSLayoutConstraint *constraintY = [NSLayoutConstraint constraintWithItem:myView attribute:NSLayoutAttributeCenterY relatedBy:NSLayoutRelationEqual toItem:self.view attribute:NSLayoutAttributeCenterY multiplier:1 constant:0];
    [self.view addConstraint:constraintY];
    //将视图的宽度约束为100
    NSLayoutConstraint *constraintW = [NSLayoutConstraint constraintWithItem:myView attribute:NSLayoutAttributeWidth relatedBy:NSLayoutRelationEqual toItem:nil attribute:NSLayoutAttributeNotAnAttribute multiplier:1 constant:100];
    [myView addConstraint:constraintW];
    //将视图的高度约束为100
    NSLayoutConstraint * constraintH = [NSLayoutConstraint constraintWithItem:myView attribute:NSLayoutAttributeHeight relatedBy:NSLayoutRelationEqual toItem:nil attribute:NSLayoutAttributeNotAnAttribute multiplier:1 constant:100];
    [myView addConstraint:constraintH];
}
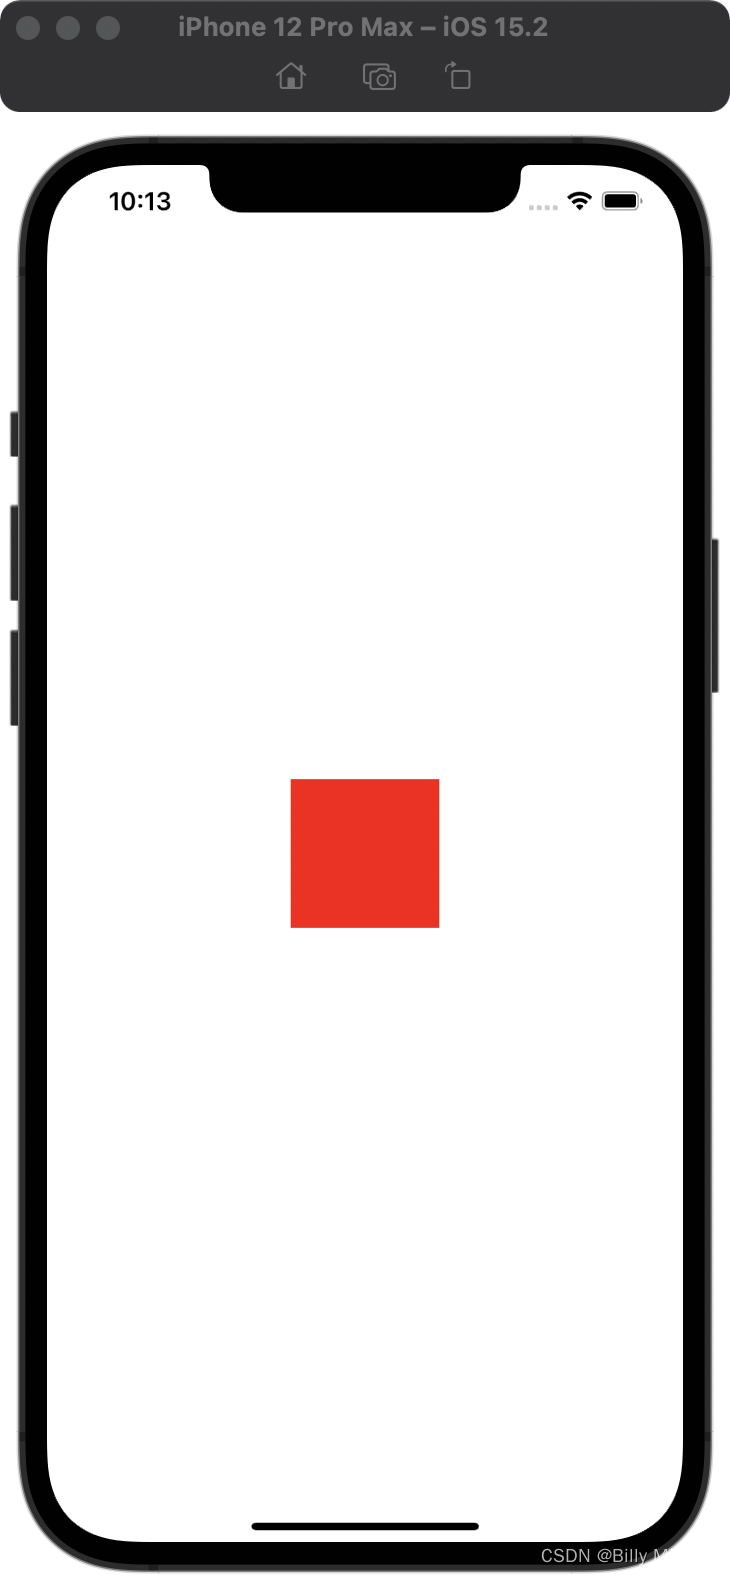
效果:
上面代码看起来非常复杂,然而用到的核心方法只有一个,即创建autolayout约束对象:
NSLayoutConstraint *constraintX = [NSLayoutConstraint constraintWithItem:myView attribute:NSLayoutAttributeCenterX relatedBy:NSLayoutRelationEqual toItem:self.view attribute:NSLayoutAttributeCenterX multiplier:1 constant:0];
它是一个类方法:
+ (instancetype)constraintWithItem:(id)view1 attribute:(NSLayoutAttribute)attr1 relatedBy:(NSLayoutRelation)relation toItem:(nullable id)view2 attribute:(NSLayoutAttribute)attr2 multiplier:(CGFloat)multiplier constant:(CGFloat)c
constraintWithItem:attribute:relatedBy:toItem:attribute:multiplier:constant:方法参数有7个。第1个参数设置要约束的第一个视图对象。第2个参数设置约束的第一个参数的约束属性,具体 参数意义后面会介绍。第3个参数设置约束属性间的关系,参数具体意义后面会介绍。第4个参数设置要约束的第二个视图对象。第5个参参数设置第二个视图对象的约束属性。第6个参数设置约束的比例。第7个参数设置约束的值。
其中,第2个参数和第5个参数都需要设文置为NSLayoutAttribute类型的枚举,枚举值为要约束控件的具体属性,常用枚举值及含义如下:
typedef NS_ENUM(NSInteger, NSLayoutAttribute) {


    NSLayoutAttributeLeft = 1,//约束控件的左边
    NSLayoutAttributeRight,//约束控件的右边
    NSLayoutAttributeTop,//约束控件的顶边
    NSLayoutAttributeBottom,//约束控件的底边
    NSLayoutAttributeLeading,//约束控件的前边
    NSLayoutAttributeTrailing,//约束控件的后边
    NSLayoutAttributeWidth,//约束控件的宽度
    NSLayoutAttributeHeight,//约束控件的高度
    NSLayoutAttributeCenterX,//约束控件的中心横轴位置
    NSLayoutAttributeCenterY,//约束控件的中心纵轴位置
    NSLayoutAttributeLastBaseline,//约束控件的文字基线位置
#if TARGET_OS_IPHONE
    NSLayoutAttributeBaseline NS_SWIFT_UNAVAILABLE("Use 'lastBaseline' instead") = NSLayoutAttributeLastBaseline,
#else
    NSLayoutAttributeBaseline = NSLayoutAttributeLastBaseline,
#endif
    NSLayoutAttributeFirstBaseline API_AVAILABLE(macos(10.11), ios(8.0)),

#if TARGET_OS_IPHONE
	//对应各个边距
    NSLayoutAttributeLeftMargin API_AVAILABLE(ios(8.0)),
    NSLayoutAttributeRightMargin API_AVAILABLE(ios(8.0)),
    NSLayoutAttributeTopMargin API_AVAILABLE(ios(8.0)),
    NSLayoutAttributeBottomMargin API_AVAILABLE(ios(8.0)),
    NSLayoutAttributeLeadingMargin API_AVAILABLE(ios(8.0)),
    NSLayoutAttributeTrailingMargin API_AVAILABLE(ios(8.0)),
    NSLayoutAttributeCenterXWithinMargins API_AVAILABLE(ios(8.0)),
    NSLayoutAttributeCenterYWithinMargins API_AVAILABLE(ios(8.0)),
#endif

    NSLayoutAttributeNotAnAttribute = 0//默认属性
};
边距和上面那些还是有一定差距的,我们看下效果:
NSLayoutConstraint *constraintX = [NSLayoutConstraint constraintWithItem:myView attribute:NSLayoutAttributeLeft relatedBy:NSLayoutRelationEqual toItem:self.view attribute:NSLayoutAttributeLeftMargin multiplier:1 constant:0];
先看约束NSLayoutAttributeLeftMargin:

NSLayoutConstraint *constraintX = [NSLayoutConstraint constraintWithItem:myView attribute:NSLayoutAttributeLeft relatedBy:NSLayoutRelationEqual toItem:self.view attribute:NSLayoutAttributeLeft multiplier:1 constant:0];
再看NSLayoutAttributeLeft:

可以看到Margin是有边距的,这个后面再研究。上面的枚举值中,在从左向右的布局结构中,NSLayoutAttributeLeft、NSLayoutAttributeRight和NSLayoutAttributeLeading、NSLayoutAttributeTrailing效果一致。上面所有枚举值中,有一个比较特殊,即NSLayoutAttributeNotAnAttribute值,它没有任何意义,只是作为某些情况下方法中的占位,例如:
NSLayoutConstraint *constraintH = [NSLayoutConstraint constraintwithItem:myView attribute:NSLayoutAttributeHeight relatedby:NSLayoutRelationEqual toItem:nil attribute:NSLayoutAttributeNotAnAttribute multiplier:1 constant:100];
创建约束对象的方法中,第参数需要设置为LouRelation类型的枚举,这个值决定了所约束属性间的关系,枚举值及含义如下:
typedef NS_ENUM(NSInteger, NSLayoutRelation) {


    NSLayoutRelationLessThanOrEqual = -1,	//小于等于所约束的值
    NSLayoutRelationEqual = 0,			 	//严格等于所约束的值
    NSLayoutRelationGreaterThanOrEqual = 1,	//大于等于所约束的值
};
创建约束对象方法的最后两个参数决定了约束值,第6个参数设置约束的比例,第7个参数设置具体的约束值。例如,需要设置第1个控件的宽度是第2个控件宽度的2倍多100单位距离,可使用如下代码:
NSLayoutConstraint *constraintW = [NSLayoutConstraint constraintWithItem:myView attribute:NSLayoutAttributeWidth relatedBy:NSLayoutRelationEqual toItem:nil attribute:NSLayoutAttributeNotAnAttribute multiplier:2 constant:100];
multiplier与constant参数的计算方法遵守如下公式:
view1宽度 = view2宽度 * multiplier + constant
运行工程,可以看到,无论横屏模式还是竖屏模式,也无论屏幕尺寸如何,色块控件始终出现在屏幕的正中央,宽度、高度均为 100 单位。
小提示:
- 在使用
addConstraint:方法添加约束之前,必须先将子视图添加到父视图上,否则会出错- 某些与父视图相关的约束,约束对象必须添加在父视图上。
- 若想使用代码添加控件的autolayout约束, 则必须先将控件的
translatesAutoresizingMaskIntoConstraints属性设置为NO。
使用格式化的字符进行autolayout布局对象创建
前面介绍使用代码进行autolayout布局时,有一个致命的缺陷,一个十分简单的布局结构却要写十分冗长的代码。此外,还有一种十分神奇的创建autolayout的方法:
- (void)viewDidLoad {


    [super viewDidLoad];
    self.view.backgroundColor = [UIColor lightGrayColor];
    // Do any additional setup after loading the view.
    UIView * myView = [[UIView alloc]init];
    myView.translatesAutoresizingMaskIntoConstraints = NO;
    myView.backgroundColor = [UIColor redColor];
    //添加约束前,必须将子视图添加在父视图上
    [self.view addSubview:myView];

    NSArray *constraintArray = [NSLayoutConstraint constraintsWithVisualFormat:@"H:|-20-[myView(100@1000)]" options:0 metrics:nil views:_NSDictionaryOfVariableBindings(@"myView", myView)];
    NSArray *constraintArray2 = [NSLayoutConstraint constraintsWithVisualFormat:@"V:|-100-[myView(100)]" options:0 metrics:nil views:_NSDictionaryOfVariableBindings(@"myView", myView)];
    [self.view addConstraints:constraintArray];
    [self.view addConstraints:constraintArray2];
}
代码一下子简洁不少,看一下运行效果:

上面代码中,使用constraintsWithVisualFormat:options:metrics:views:方法用于根据VFL格式化字符串创建一系列的NSLayoutConstrsint约束对象,这些创建出来的约束对象会以数组的形式返回。要理解这个方法,首先需要理解什么是VFL。
乍一看,VFL确实十分令人费解,但是完全理解它之后就能感受到它的优美之处,它像极了中国古老的象形语言,通过半画半文字的方式表达信息。上面的第一条语句实际是约束了 myView视图左侧距离父视图 20个单位,宽度为100个单位,并且这条约束的优先级为1000。第二条语句约束了myView 视图上侧距离父视图100个单位,myView视图的高度为100。现在可以解释一下 VFL 语言的语法含义了,最前面的H或者V代表约束的布局方向,H(horizontal)是为水平方向添加约束, V(vertical)是为竖直方向添加约束。“|”表示父视图的边缘。在H约束布局中,如果“”出现在字符串的左端,则代表父视图的左边界;如果“|”出现在字符串的右端,则代表父视图的右边界。在 V约束布局中,如果“|”出现在字符串的左边,则代表父视图的上边界;如果“|”出现在字符串的右端,则代表父视图的下边界。“-x-”表示具体的约束距离,x既可为常量也可为变量,例如前面示例中的20就是常量,为变量的情况后面会有讨论。[]内为要布局摆放的控件名称,()内约束控件的尺寸。在H约束布局中,其含义是约束控件的宽度。在V约束布局中,其含义是约束控件的高度。@符号后面的值为设置此约束的优先级。
理解了VFL语句的含义后,再来看通过VFL语句创建约束集合的方法:
NSArray *constraintArray = [NSLayoutConstraint constraintsWithVisualFormat:@"H:|-20-[myView(100@1000)]" options:0 metrics:nil views:_NSDictionaryOfVariableBindings(@"myView", myView)];
constraintsWithVisualFormat:options:metrics:views:方法中第1个参数为创建约束的VFL字符串,第2个参数设置所约束控件的对齐模式,其需要设置为NSLayoutFormatOptions类型的枚举。这个枚举中常用枚举值及含义如下:
typedef NS_OPTIONS(NSUInteger, NSLayoutFormatOptions) {


	//约束的控件左对齐
    NSLayoutFormatAlignAllLeft = (1 << NSLayoutAttributeLeft),
    //约束的控件右对齐
    NSLayoutFormatAlignAllRight = (1 << NSLayoutAttributeRight),
    //约束的控件上对齐
    NSLayoutFormatAlignAllTop = (1 << NSLayoutAttributeTop),
    //约束的控件下对齐
    NSLayoutFormatAlignAllBottom = (1 << NSLayoutAttributeBottom),
    //约束的控件前对齐
    NSLayoutFormatAlignAllLeading = (1 << NSLayoutAttributeLeading),
    //约束的控件后对齐
    NSLayoutFormatAlignAllTrailing = (1 << NSLayoutAttributeTrailing),
    //约束的控件X轴中心对齐
    NSLayoutFormatAlignAllCenterX = (1 << NSLayoutAttributeCenterX),
    //约束的控件Y轴中心对齐
    NSLayoutFormatAlignAllCenterY = (1 << NSLayoutAttributeCenterY),
    NSLayoutFormatAlignAllLastBaseline = (1 << NSLayoutAttributeLastBaseline),
    NSLayoutFormatAlignAllFirstBaseline API_AVAILABLE(macos(10.11), ios(8.0)) = (1 << NSLayoutAttributeFirstBaseline),
#if TARGET_OS_IPHONE
	//约束的控件文字基线对齐
    NSLayoutFormatAlignAllBaseline NS_SWIFT_UNAVAILABLE("Use 'alignAllLastBaseline' instead") = NSLayoutFormatAlignAllLastBaseline,
#else
    NSLayoutFormatAlignAllBaseline = NSLayoutFormatAlignAllLastBaseline,
#endif

    NSLayoutFormatAlignmentMask = 0xFFFF,

    /* choose only one of these three
     */
    NSLayoutFormatDirectionLeadingToTrailing = 0 << 16, // default
    NSLayoutFormatDirectionLeftToRight = 1 << 16,
    NSLayoutFormatDirectionRightToLeft = 2 << 16,

    NSLayoutFormatDirectionMask = 0x3 << 16,

#if TARGET_OS_IPHONE
    /* choose only one spacing format
     */
     //仅选择一种间距格式
    NSLayoutFormatSpacingEdgeToEdge API_AVAILABLE(ios(11.0),tvos(11.0)) = 0 << 19, // default

    /* Valid only for vertical layouts. Between views with text content the value
     will be used to determine the distance from the last baseline of the view above
     to the first baseline of the view below. For views without text content the top
     or bottom edge will be used in lieu of the baseline position.
     The default spacing "]-[" will be determined from the line heights of the fonts
     involved in views with text content, when present.
     */
     /*仅对垂直布局有效。在具有文本内容的视图之间该值
     将用于确定与上面视图的最后一个基线的距离
     到下面视图的第一个基线。对于没有文本内容的视图,顶部
     或下边缘将用于代替基线位置。
     默认间距“]-[”将从字体的行高确定
     涉及具有文本内容的视图(如果存在)。
     */
    NSLayoutFormatSpacingBaselineToBaseline API_AVAILABLE(ios(11.0),tvos(11.0)) = 1 << 19,

    NSLayoutFormatSpacingMask API_AVAILABLE(ios(11.0),tvos(11.0)) = 0x1 << 19,
#endif
};
上面创建约束的方法中第4个参数为变量映射字典,如果 VFL 字符串中需要使用到某些变量,则需要使用这个参数将变量映射到VFL字符串中,示例如下:
NSNumber *width = @100;
NSNumber *left = @20;
NSArray *constraintArray = [NSLayoutConstraint constraintsWithVisualFormat:@"H:|-left-[myView(wid@1000)]" options:0 metrics:@{

    @"left" : left, @"wid" : width} views:_NSDictionaryOfVariableBindings(@"myView", myView)];
上面示例代码中创建了两个NSNumber类型的变量量,在 metrics 参数中,使用字典键值对的模式将 VFL 中对应的字符串应设置变量对象。
关于constraintsWithVisualFormat:options:metrics:views:方法中还有最后一个参数views,它对应的参数是一个约束对象映射字典。与变量映射的原理一样,需需要将VFL 中使用到的具体控件名映射成视图控件对象。_NSDictionaryOfVariableBindings()宏可以帮助开发者快捷地创建这个映射字典,开发者只需将使用到的视图控件对象直接传入。即可。需要注意的是,使用 _NSDictionaryOfVariableBindings()宏进行快捷映射字典创建时,视图控件的名称必须和VFL中的名称完全一致。如果手写这个映射字典,则上面的代码和下面是等价的:
NSArray *constraintArray = [NSLayoutConstraint constraintsWithVisualFormat:@"H:|-left-[myView(wid@1000)]" options:0 metrics:@{

    @"left" : left, @"wid" : width} views:@{

    @"myView" : myView}];
管理约束的几个方法
除了已经介绍的添加约束的方法外,autolayout 框架中还提供了一些移除约束的方法。对于进行autolayout约束的视图控件而言,其中所有可用的有关设置约束的方法如下:
//添加一个约束对象
- (void)addConstraint:(NSLayoutConstraint *)constraint API_AVAILABLE(ios(6.0)); // This method will be deprecated in a future release and should be avoided.  Instead, set NSLayoutConstraint's active property to YES.
//添加一组约束对象
- (void)addConstraints:(NSArray<__kindof NSLayoutConstraint *> *)constraints API_AVAILABLE(ios(6.0)); // This method will be deprecated in a future release and should be avoided.  Instead use +[NSLayoutConstraint activateConstraints:].
//移除一个约束对象
- (void)removeConstraint:(NSLayoutConstraint *)constraint API_AVAILABLE(ios(6.0)); // This method will be deprecated in a future release and should be avoided.  Instead set NSLayoutConstraint's active property to NO.
//移除一组约束对象
- (void)removeConstraints:(NSArray<__kindof NSLayoutConstraint *> *)constraints API_AVAILABLE(ios(6.0));
应用
@interface ViewController ()<UITextViewDelegate>

@property (nonatomic, strong) UITextView *textView;
@property (nonatomic, strong) NSArray *array1;
@property (nonatomic, strong) NSArray *array2;

@end

@implementation ViewController


- (void)viewDidLoad {


    [super viewDidLoad];

    _textView = [[UITextView alloc] init];
    _textView.layer.borderColor = [UIColor grayColor].CGColor;
    _textView.layer.borderWidth = 1;
    _textView.translatesAutoresizingMaskIntoConstraints = NO;
    _textView.delegate = self;
    [self.view addSubview:_textView];

    _array1 = [NSLayoutConstraint constraintsWithVisualFormat:@"H:|-100-[textView]-100-|" options:0 metrics:nil views:_NSDictionaryOfVariableBindings(@"textView", _textView)];
    _array2 = [NSLayoutConstraint constraintsWithVisualFormat:@"V:|-150-[textView(30)]" options:0 metrics:nil views:_NSDictionaryOfVariableBindings(@"textView", _textView)];

    [self.view addConstraints:_array1];
    [self.view addConstraints:_array2];
}

- (CGSize)getContentSize:(UITextView*)myTextView{


    return [myTextView sizeThatFits:CGSizeMake(myTextView.frame.size.width, FLT_MAX)];
}

- (BOOL)textView:(UITextView *)textView shouldChangeTextInRange:(NSRange)range replacementText:(NSString *)text {


    if (_textView.contentSize.height != _textView.frame.size.height && _textView.contentSize.height < 100) {


        float height = textView.contentSize.height;

        [self.view removeConstraints:_array2];
        _array2 = [NSLayoutConstraint constraintsWithVisualFormat:@"V:|-150-[textView(height)]" options:0 metrics:@{

    @"height" : [NSNumber numberWithFloat:height]} views:_NSDictionaryOfVariableBindings(@"textView", _textView)];

        [self.view addConstraints:_array2];

    }
    [self.view updateConstraintsIfNeeded];

    return YES;
}

@end
实现一个可以自适应多行输入高度的UITextView。
抛出疑问: 不知道为什么输入字符时第二行只有一个字符时UITextView的contentSize不改变,或者删除字符时第二行删光后UITextView的contentSize也不改变。