通过跟踪全志Android系统编译及镜像生成过程和阅读手册”A64 dev tree&sysconfig使用文档.pdf”, 发现全志A64方案不单继续使用传统的script.fex配置脚本, 而且也加入了设备树的应用.
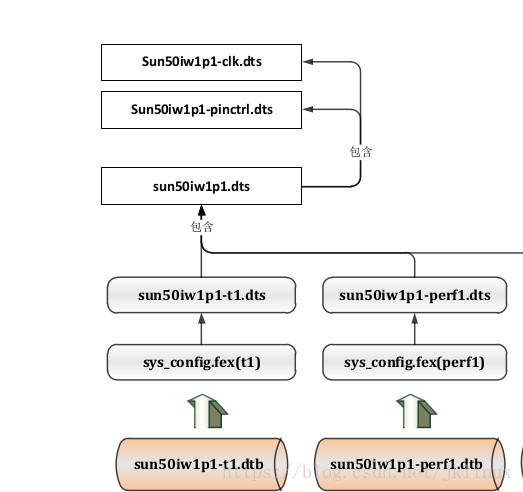
上图的sys_config.fex就是全志传统的script.fex。 设备树的dtb文件是由dts文件和sys_config.fex文件组合生成. 而且sys_config.fex里的内容的优先级别比dts要高.
dtc -O dtb -o lichee/out/sun50iw1p1/android/common/sunxi.dtb \
    -b 0 -i lichee/linux-3.10/arch/arm64/boot/dts          \
    -F  lichee/tools/pack/out/sys_config_fix.fex          \
    -d  lichee/linux-3.10/arch/arm64/boot/dts/.sun50iw1p1-soc.dtb.d.dtc.tmp  \
        lichee/linux-3.10/arch/arm64/boot/dts/.sun50iw1p1-soc.dtb.dts
//生成的设备树dtb文件在lichee/out/sun50iw1p1/android/common/sunxi.dtb
//////////////////////////////////////////////////////////////////////////////////////////////////////////////////////////////////////////////
现bsp里的内核版本是linux-3.10, 设备树的调用函数与linux-4.x版本完全不一样.
设备树所用的头文件:
#include <linux/of.h>
//设备树里的每个设备及每个设备子节点都用此结构体描述
struct device_node {
    const char *name;
    const char *type;
    phandle phandle;
    const char *full_name;

    struct  property *properties; //属性
    struct  property *deadprops;    /* removed properties */
    struct  device_node *parent;  //在设备子节点对象,指向属于的设备对象
    struct  device_node *child;   //在设备对象,指向子节点
    struct  device_node *sibling;  //指向同级的下一个对象.
    struct  device_node *next;  /* next device of same type */
                    //应是指向device_type是同样的对象
    struct  device_node *allnext;   /* next in list of all nodes */
    ...
};


//下面函数用于获取设备树里的设备节点及设备子节点
extern struct device_node *of_find_node_by_name(struct device_node *from,
const char *name);  //通过名字查找相应的设备节点
static inline int of_get_child_count(const struct device_node *np); //获取指定设备的子节点个数
extern struct device_node *of_find_node_by_path(const char *path); //通过路径来获取设备节点,可用于获取设备子节点
extern struct device_node *of_find_node_by_type(struct device_node *from,
const char *type);  //通过指定的device_type来获取设备节点


//下面函数用于获取设备节点或设备子节点的属性
static inline int of_property_read_u32(const struct device_node *np,
    const char *propname, u32 *out_value)
extern int of_property_read_u32_index(const struct device_node *np,
                       const char *propname,
                       u32 index, u32 *out_value);
extern int of_property_read_u8_array(const struct device_node *np,
            const char *propname, u8 *out_values, size_t sz);
extern int of_property_read_u16_array(const struct device_node *np,
            const char *propname, u16 *out_values, size_t sz);
extern int of_property_read_u32_array(const struct device_node *np,
                      const char *propname,
                      u32 *out_values,
                      size_t sz);
extern int of_property_read_u64(const struct device_node *np,
                const char *propname, u64 *out_value);

extern int of_property_read_string(struct device_node *np,
                   const char *propname,
                   const char **out_string);
通常,在设备树里描述一个设备就相当于在内核源码里描述一个struct platform_device. 然后可与platform_driver相匹配,
在platform_driver里的probe函数里获取设备在设备树里的描述信息. 但在此linux-3.10版本里,设备树里的设备信息是用链表存储起来,
可以直接调用上面的函数获取设备树里的信息,并不一定需要platform_driver与设备匹配才可以. 当然也可以在platform_driver的probe函数里,
通过pdev->dev.of_node访问到设备树里的匹配上的设备节点.
在linux-3.10/arch/arm64/boot/dts/.sun50iw1p1-soc.dtb.dts 设备树里描述两个设备:
 jkdev { /* 设备 */
  compatible = "jk,mydev";
  autorepeat = <1>;

  btn1 {  /* 设备子节点 */
      label = "btn1";   /* 设备子节点的属性 */
      code  = <0x11>;
  };
  btn2 {
      label = "btn2";
      code  = <0x22>;
  };
 };

 jkdev2 {
   compatible = "jk,mydev2";
   device_type = "jktype";
   what = "hello";
 };
修改完成后,在android源码目录下执行”pack”生成镜像重烧即可。
使用新镜像启动后, 可在板上系统/sys/bus/platform/devices/目录下看到jkdev*的子目录.
只获取出上面两个设备的驱动代码test.c:
#include <linux/init.h>
#include <linux/module.h>
#include <linux/of.h>
#include<linux/of_address.h>
#include<linux/of_irq.h>
#include<linux/of_gpio.h>

static int __init test_init(void)
{
    struct device_node *nd;
    int n;
    const char *str;
///////设备jdev/////
    nd = of_find_node_by_name(NULL, "jkdev");
    if (!nd)
        printk("no found\n");
    else
        printk("found it\n");

    n = of_get_child_count(nd);
    printk("child node count = %d\n", n);

    of_property_read_u32(nd, "autorepeat", &n);
    printk("autorepeat = %d\n", n);

//子节点btn1//
    nd = of_find_node_by_path("/jkdev/btn1");
    if (!nd)
        printk("btn1 node no found\n");
    if (nd)
    {
        if (0 == of_property_read_string(nd, "label", &str))
            printk("label = %s\n", str);
        if (0 == of_property_read_u32(nd, "code", &n))
            printk("code = %x\n", n);
    }
//子节点btn2//
    nd = of_find_node_by_path("/jkdev/btn2");
    if (!nd)
        printk("btn2 node no found\n");
    if (nd)
    {
        if (0 == of_property_read_string(nd, "label", &str))
            printk("label = %s\n", str);
        if (0 == of_property_read_u32(nd, "code", &n))
            printk("code = %x\n", n);
    }

/////////////////////////////////////////

//// jdev2 ////////////////通过device_type获取设备
    nd = of_find_node_by_type(NULL, "jktype");
    if (nd && (0 == of_property_read_string(nd, "what", &str)))
        printk("what = %s\n", str);

    return 0;
}

static void __exit test_exit(void)
{
    printk("exit ...\n");
}


module_init(test_init);
module_exit(test_exit);
MODULE_LICENSE("GPL");
编译驱动模块在板上加载后的输出信息:
root@tulip-p1:/sys/bus/platform/devices # insmod /data/test.ko
[11612.757753] found it
[11612.760475] child node count = 2
[11612.763998] autorepeat = 1
[11612.767058] label = btn1
[11612.771038] code = 11
[11612.773601] label = btn2
[11612.776361] code = 22
[11612.778892] what = hello