上一篇我们介绍了使用WebGL的基础,包括顶点着色器、片元着色器、初始化WebGL,初始化着色器以及变换、动画、颜色、纹理等,这一部分的内容我们就来进入三维的世界。和上一篇文章一样,我们的这篇只做个大概的介绍,详细的内容部分请参阅《WebGL编程指南》一书。
代码存储在我的GitHub中。
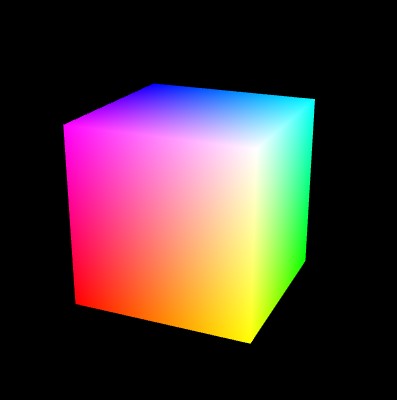
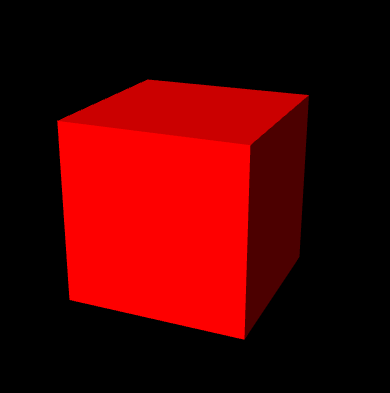
首先我们来绘制一个三维的实例。
示例程序:https://zrysmt.github.io/demo/webgl-demo/demo/10-HelloCube.html.
实例的源码程序:https://github.com/zrysmt/data-viz/blob/master/webgl/demo/HelloCube.js
其实这里我们应该注意到示例和源码的结构对应,下面的一些我可能只给出一个url地址。
1.视图、投影和索引矩阵
- #### 从main函数开始
function main() {
    // Retrieve <canvas> element
    var canvas = document.getElementById('webgl');

    // Get the rendering context for WebGL
    var gl = getWebGLContext(canvas);
    if (!gl) {
        console.log('Failed to get the rendering context for WebGL');
        return;
    }

    // Initialize shaders
    if (!initShaders(gl, VSHADER_SOURCE, FSHADER_SOURCE)) {
        console.log('Failed to intialize shaders.');
        return;
    }

    // Set the vertex coordinates and color
    var n = initVertexBuffers(gl);
    if (n < 0) {
        console.log('Failed to set the vertex information');
        return;
    }

    // Set clear color and enable hidden surface removal
    gl.clearColor(0.0, 0.0, 0.0, 1.0);
    gl.enable(gl.DEPTH_TEST);

    // Get the storage location of u_MvpMatrix
    var u_MvpMatrix = gl.getUniformLocation(gl.program, 'u_MvpMatrix');
    if (!u_MvpMatrix) {
        console.log('Failed to get the storage location of u_MvpMatrix');
        return;
    }

    // Set the eye point and the viewing volume
    var mvpMatrix = new Matrix4();
    mvpMatrix.setPerspective(30, 1, 1, 100);
    mvpMatrix.lookAt(3, 3, 7, 0, 0, 0, 0, 1, 0);

    // Pass the model view projection matrix to u_MvpMatrix
    gl.uniformMatrix4fv(u_MvpMatrix, false, mvpMatrix.elements);

    // Clear color and depth buffer
    gl.clear(gl.COLOR_BUFFER_BIT | gl.DEPTH_BUFFER_BIT);

    // Draw the cube
    gl.drawElements(gl.TRIANGLES, n, gl.UNSIGNED_BYTE, 0);
}- #### 顶点着色器和片元着色器
和上一篇有一些的不同
var VSHADER_SOURCE =
    'attribute vec4 a_Position;\n' +
    'attribute vec4 a_Color;\n' +
    'uniform mat4 u_MvpMatrix;\n' +      //模型矩阵,设置视图/投影
    'varying vec4 v_Color;\n' +          //传值给片元着色器
    'void main() {\n' +
    '  gl_Position = u_MvpMatrix * a_Position;\n' +
    '  v_Color = a_Color;\n' +
    '}\n';

// Fragment shader program
var FSHADER_SOURCE =
    '#ifdef GL_ES\n' +
    'precision mediump float;\n' +    //精度限定 中等精度
    '#endif\n' +
    'varying vec4 v_Color;\n' +
    'void main() {\n' +
    '  gl_FragColor = v_Color;\n' +
'}\n';关于attribute uniform varying
attribute:只能是全局的,只能出现在顶点着色器,标识逐顶点信息;
uniform:只能是全局的,可以在顶点着色器和片元着色器上,如果两个地方均定义,那么这变量被两个着色器共享了;
varying:只能是全局的,负责从顶点着色器向片元着色器传输数据。
- #### 视图矩阵(view matrix)
视点、观察点和上方向决定视图矩阵
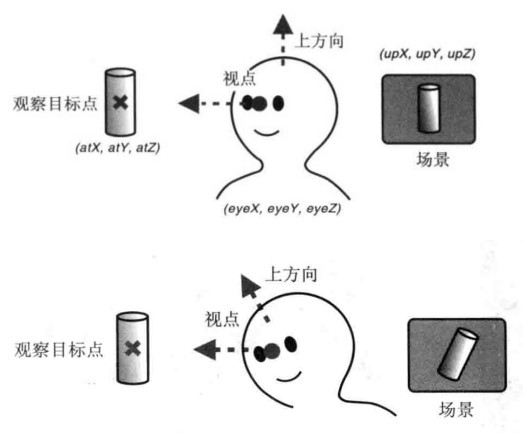
var mvpMatrix = new Matrix4();
    mvpMatrix.setLookAt(3, 3, 7, 0, 0, 0, 0, 1, 0)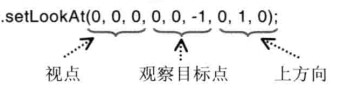
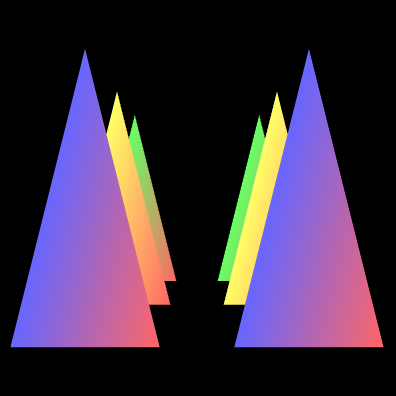
- #### 投影矩阵
投影的作用就是使得距离近的看的比较大,距离远的看的比较小
示例
projMatrix.setPerspective(30, canvas.width/canvas.height, 1, 100);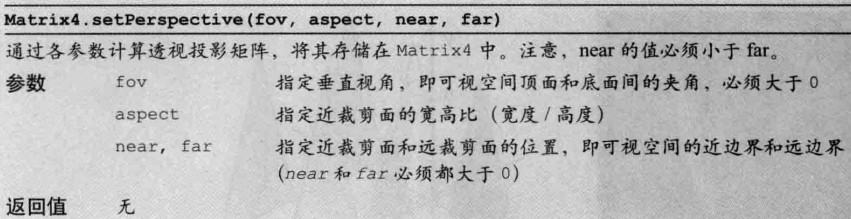
三角形与可视空间的位置
其实投影矩阵的核心就是两种变换,1)按比例缩放;2)平移
- #### 消除被遮挡的面
gl.enable(gl.DEPTH_TEST);清除颜色和深度buffer
 // Clear color and depth buffer
gl.clear(gl.COLOR_BUFFER_BIT | gl.DEPTH_BUFFER_BIT); - #### 重要的公式
我们总结下一个重要的公式,WebGL绘制物体的位置为:
<投影矩阵> X <视图矩阵> X <模型矩阵> X <顶点坐标>- #### 绘制立方体
function initVertexBuffers(gl) {
var verticesColors = new Float32Array([
// Vertex coordinates and color
1.0, 1.0, 1.0, 1.0, 1.0, 1.0, // v0 White
-1.0, 1.0, 1.0, 1.0, 0.0, 1.0, // v1 Magenta
-1.0, -1.0, 1.0, 1.0, 0.0, 0.0, // v2 Red
1.0, -1.0, 1.0, 1.0, 1.0, 0.0, // v3 Yellow
1.0, -1.0, -1.0, 0.0, 1.0, 0.0, // v4 Green
1.0, 1.0, -1.0, 0.0, 1.0, 1.0, // v5 Cyan
-1.0, 1.0, -1.0, 0.0, 0.0, 1.0, // v6 Blue
-1.0, -1.0, -1.0, 0.0, 0.0, 0.0 // v7 Black
]);
// Indices of the vertices
var indices = new Uint8Array([
0, 1, 2, 0, 2, 3, // front
0, 3, 4, 0, 4, 5, // right
0, 5, 6, 0, 6, 1, // up
1, 6, 7, 1, 7, 2, // left
7, 4, 3, 7, 3, 2, // down
4, 7, 6, 4, 6, 5 // back
]);
// Create a buffer object
var vertexColorBuffer = gl.createBuffer();
var indexBuffer = gl.createBuffer();
if (!vertexColorBuffer || !indexBuffer) {
return -1;
}
// Write the vertex coordinates and color to the buffer object
// 存入缓冲:颜色/位置
gl.bindBuffer(gl.ARRAY_BUFFER, vertexColorBuffer);
gl.bufferData(gl.ARRAY_BUFFER, verticesColors, gl.STATIC_DRAW);
var FSIZE = verticesColors.BYTES_PER_ELEMENT;
// Assign the buffer object to a_Position and enable the assignment
var a_Position = gl.getAttribLocation(gl.program, 'a_Position');
if (a_Position < 0) {
console.log('Failed to get the storage location of a_Position');
return -1;
}
gl.vertexAttribPointer(a_Position, 3, gl.FLOAT, false, FSIZE * 6, 0);
gl.enableVertexAttribArray(a_Position);
// Assign the buffer object to a_Color and enable the assignment
var a_Color = gl.getAttribLocation(gl.program, 'a_Color');
if (a_Color < 0) {
console.log('Failed to get the storage location of a_Color');
return -1;
}
gl.vertexAttribPointer(a_Color, 3, gl.FLOAT, false, FSIZE * 6, FSIZE * 3);
gl.enableVertexAttribArray(a_Color);
// Write the indices to the buffer object
// 存入缓冲:索引
gl.bindBuffer(gl.ELEMENT_ARRAY_BUFFER, indexBuffer);
gl.bufferData(gl.ELEMENT_ARRAY_BUFFER, indices, gl.STATIC_DRAW);
return indices.length;
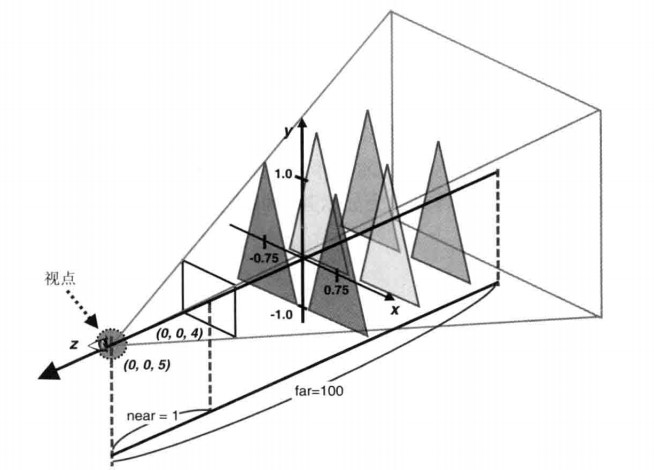
}立方体的结构
     v6----- v5
    /|      /|
   v1------v0|
   | |     | |
   | |v7---|-|v4
   |/      |/
v2------v3首先顶点坐标和顶点坐标的颜色存储在verticesColors矩阵中。
而WebGL的绘制是按照三角形的形式一个一个绘制的,那么意味着一个立方体的一个面有两个三角形,一个立方体总共需要2*6 = 12个三角形,一个三角形需要3个顶点,那么一共需要绘制 3*12 = 36个顶点。我们知道一个立方体只需要8个顶点就可以了。为此我们在这里使用了索引矩阵(indices),索引矩阵也要写入缓存中。
这样我们就能完成绘制了
gl.drawElements(gl.TRIANGLES, n, gl.UNSIGNED_BYTE, 0);注意这里的n = indices.length
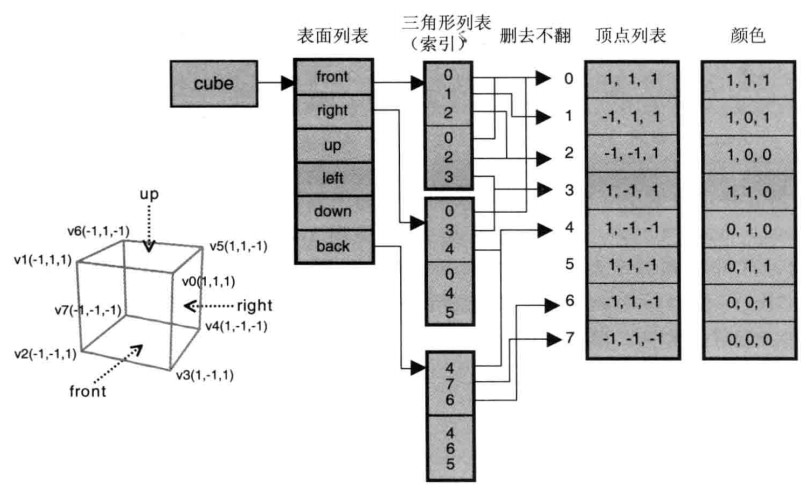
2.光照
光照有三种形式的:
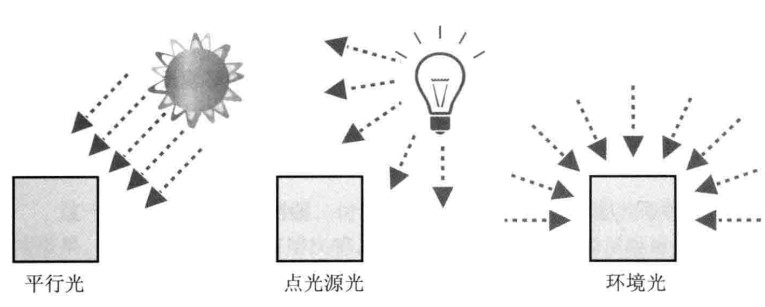
物理表面反射光纤:分为漫反射和环境反射
- #### 环境反射
<环境反射光颜色> = <入射光颜色> X <表面基底色>- #### 平行光下的漫反射
<漫反射光颜色> = <入射光颜色> X <表面基底色> X cosθ即:
<漫反射光颜色> = <入射光颜色> X <表面基底色> X (<光线方向> · <法线方向>)我们只用漫反射的效果的时候
示例

由于只考虑漫反射,右边的部分几乎是黑色了,这时候我们来考虑下环境光。
环境反射下的表面的反射光颜色
<表面的反射光颜色> = <漫反射颜色> + <环境反射光颜色>示例
我们来看下着色器源码
var VSHADER_SOURCE =
  'attribute vec4 a_Position;\n' +
  'attribute vec4 a_Color;\n' +        //表面颜色
  'attribute vec4 a_Normal;\n' +       // 表面法向量
  'uniform mat4 u_MvpMatrix;\n' +
  'uniform vec3 u_DiffuseLight;\n' +   // 漫反射光颜色
  'uniform vec3 u_LightDirection;\n' + // 漫反射入射光方向 (in the world coordinate, normalized)归一化后
  'uniform vec3 u_AmbientLight;\n' +   // 环境光颜色
  'varying vec4 v_Color;\n' +
  'void main() {\n' +
  '  gl_Position = u_MvpMatrix * a_Position;\n' +
     // 归一化方向量
  '  vec3 normal = normalize(a_Normal.xyz);\n' +
     // <归一化的光线方向> 点乘 <归一化法线向量>
  '  float nDotL = max(dot(u_LightDirection, normal), 0.0);\n' +
     // 计算漫反射颜色
  '  vec3 diffuse = u_DiffuseLight * a_Color.rgb * nDotL;\n' +
     // 计算环境光颜色
  '  vec3 ambient = u_AmbientLight * a_Color.rgb;\n' +
     // 两者相加得到物体最终的颜色
  '  v_Color = vec4(diffuse + ambient, a_Color.a);\n' +
  '}\n';

// Fragment shader program
var FSHADER_SOURCE =
  '#ifdef GL_ES\n' +
  'precision mediump float;\n' +
  '#endif\n' +
  'varying vec4 v_Color;\n' +
  'void main() {\n' +
  '  gl_FragColor = v_Color;\n' +
  '}\n';
对于变化后的物体,物体的法向量也会改变
示例
<变换后的法向量> = <法向量> X <变化矩阵的逆转置矩阵> normalMatrix.setInverseOf(modelMatrix);
normalMatrix.transpose();
gl.uniformMatrix4fv(u_NormalMatrix, false, normalMatrix.elements);在顶点着色器中变化原法向量
vec3 normal = normalize(vec3(u_NormalMatrix * a_Normal))最后我们来看下最终的漫反射光颜色的公式
“`
<漫反射光颜色> = <入射光颜色> X <表面基底色> X (<光线方向> ·(<模型矩阵逆转置矩阵> X <法线方向>))
- #### 点光源
光线方向 = 归一化(点光源方向 - 顶点坐标)
```
// 顶点处的光线方向 = 点光源的光坐标 - 顶点坐标
 ' vec3 lightDirection = normalize(u_LightPosition - vec3(vertexPosition));\n'
3.层次模型
有的物体的运动会带动别的物体,如上臂的运动会带动下臂和手掌的运动。
示例:https://zrysmt.github.io/demo/webgl-demo/ch09/JointModel.html
示例源码:https://github.com/zrysmt/data-viz/blob/master/webgl/ch09/JointModel.js
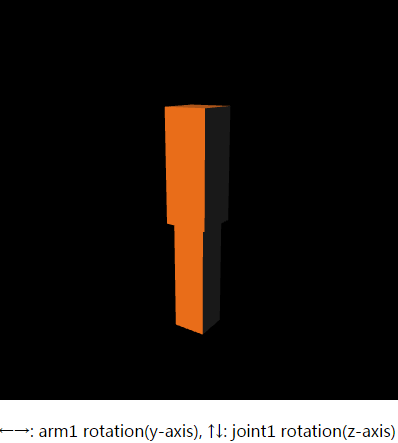
下边的(Arm1)会带动上边的(Arm2)运动,而上边的运动不会带动下边的。
思路:共用一个变换的模型矩阵:g_modelMatrix,Arm1变化g_modelMatrix也会变化,那么Arm2也会使用这个模型。谁能控制谁,关键是谁先写上去,谁后写上去,先写上去的控制后写上去的。
 // Arm1
 var arm1Length = 10.0; // Length of arm1
 g_modelMatrix.setTranslate(0.0, -12.0, 0.0);
 g_modelMatrix.rotate(g_arm1Angle, 0.0, 1.0, 0.0); // Rotate around the y-axis
 drawBox(gl, n, viewProjMatrix, u_MvpMatrix, u_NormalMatrix); // Draw |
 // Arm2
 g_modelMatrix.translate(0.0, arm1Length, 0.0);    // Move to joint1
 g_modelMatrix.rotate(g_joint1Angle, 0.0, 0.0, 1.0); // Rotate around the z-axis
 g_modelMatrix.scale(1.3, 1.0, 1.3); // Make it a little thicker
 drawBox(gl, n, viewProjMatrix, u_MvpMatrix, u_NormalMatrix); // Draw