在上一篇文章中,我们介绍了Babel是如何将JSX代码转译成可执行代码的,随后也实现了一个自己的解析器,模拟了Babel转译的过程。
现在我们再来回顾一下,假如有如下业务代码:
const style = {
  color: 'red',
  fontSize: '20px',
};

const greet = function (name) {
  return `hello ${name}`;
};

const App = (
  <div className="container">
    <p style={style}>saying {greet('scott')} hah</p>
    <div>
      <p>this is jsx-like code</p>
      <i className="icon"/>
      <p>parsing it now</p>
      <img className="icon"/>
    </div>
    <input type="button" value="i am a button"/>
    <em/>
  </div>
);

console.log(App);

ReactDOM.render(App, document.getElementById('root'));
经过转译之后,会生成下面的可执行代码:
var style = {
  color: 'red',
  fontSize: '20px'
};

var greet = function greet(name) {
  return 'hello ' + name;
};

var App = React.createElement(
  'div',
  { className: 'container' },
  React.createElement(
    'p',
    { style: style },
    'saying ',
    greet('scott'),
    ' hah'
  ),
  React.createElement(
    'div',
    null,
    React.createElement(
      'p',
      null,
      'this is jsx-like code'
    ),
    React.createElement('i', { className: 'icon' }),
    React.createElement(
      'p',
      null,
      'parsing it now'
    ),
    React.createElement('img', { className: 'icon' })
  ),
  React.createElement('input', { type: 'button', value: 'i am a button' }),
  React.createElement('em', null)
);

console.log(App);

ReactDOM.render(App, document.getElementById('root'));
引入所需的React库:
<!DOCTYPE html>
<html>
  <body>
    <div id="root"></div>
    <script crossorigin src="https://unpkg.com/react@16/umd/react.production.min.js"></script>
    <script crossorigin src="https://unpkg.com/react-dom@16/umd/react-dom.production.min.js"></script>
    <script src="index.js"></script>
  </body>
</html>
运行以上代码,我们会发现控制台打印信息如下图所示:

从图中可以看出,type就是标签名,其他字段比较常用的有key、ref以及props,其中props中会包含className、style和children等字段。这些信息最终会映射成真实的DOM节点,所以这些就是我们熟知的Virtual DOM,而ReactDOM.render()函数就是将虚拟DOM转换成真实的DOM。
我们现在可以得出一个结论,React.createElement()负责根据代码生成虚拟DOM,ReactDOM.render()负责将虚拟DOM映射到真实DOM上。
究竟React.createElement()和ReactDOM.render()是如何将程序转换成真实DOM的呢?接下来,我们就来试着实现React.createElement()和ReactDOM.render()的逻辑。
先来实现React.createElement()方法:
const React = {
  // 创建DOM描述对象 即虚拟DOM
  createElement(tag, attrs, ...children) {
    let vnode = {
      type: tag,
      props: {
        ...attrs,
        children: [],
      }
    };

    children.forEach(child => {
      vnode.props.children.push(child);
    });

    return vnode;
  }
};
以上代码会生成下面的虚拟DOM结构:

然后是ReactDOM.render()方法:
const ReactDOM = {
  // 渲染真实DOM
  render(vnode, container) {
    let realDOM = this.generateDOM(vnode);
    container.appendChild(realDOM);
  },
  // 获取真实DOM
  generateDOM(vnode) {
    let elem = document.createElement(vnode.type);
    // 特殊key值映射
    let specialKeyMap = {
      className: 'class',
      fontSize: 'font-size',
    };
    let {props} = vnode;

    // 设置DOM属性
    props && Object.keys(props).forEach(key => {
      if (key === 'children') {
        // 处理子节点
        props.children.forEach(child => {
          if (typeof child === 'string') {
            // 纯内容节点
            elem.appendChild(document.createTextNode(child));
          } else {
            // DOM节点
            elem.appendChild(this.generateDOM(child));
          }
        });
      } else if (key === 'style') {
        // 设置样式属性
        let styleObj = props.style;
        let styleItems = [];

        Object.keys(styleObj).forEach(styleKey => {
          styleItems.push(`${specialKeyMap[styleKey] || styleKey}:${styleObj[styleKey]}`);
        });

        elem.setAttribute('style', styleItems.join(';'));
      } else {
        // 设置其他属性
        elem.setAttribute(specialKeyMap[key] || key, props[key]);
      }
    });

    return elem;
  }
};
最后我们把前面引用的React库替换成上面我们自己实现的代码,然后运行,见证奇迹的时刻到了:
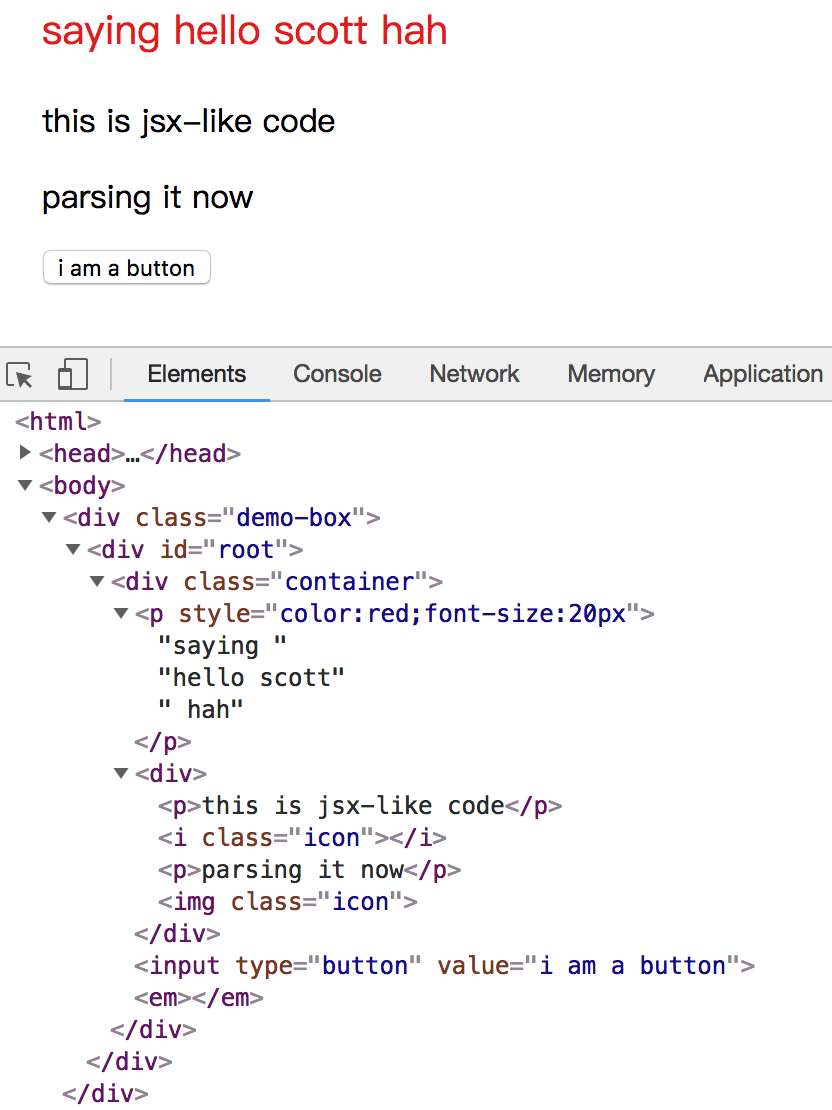
只需两段简短的代码,我们就生成了一个迷你版的虚拟DOM,并最终生成了真实的DOM结构,是不是很简单?当然,React所实现的功能远不止这些,我们后续会继续介绍。