现在新的电脑都是UEFI的启动方式了,EasyBCD就变得不好用了。在网上找到了easyefi的工具。
安装ubuntu后,我想删除window的启动项
~$ efibootmgr
BootCurrent: 0001
Timeout: 1 seconds
BootOrder: 0001,000E,000C,000D,0000
Boot0000* Windows Boot Manager
Boot0001* ubuntu
Boot000C* UEFI : LAN : IP4 Intel(R) Ethernet Connection (H) I219-LM
Boot000D* UEFI : LAN : IP6 Intel(R) Ethernet Connection (H) I219-LM
Boot000E* UEFI : HP SSD EX900 250GB : PART 4 : OS Bootloader
~$ sudo efibootmgr -b 0 -B
BootCurrent: 0001
Timeout: 1 seconds
BootOrder: 0001,000E,000C,000D
Boot0001* ubuntu
Boot000C* UEFI : LAN : IP4 Intel(R) Ethernet Connection (H) I219-LM
Boot000D* UEFI : LAN : IP6 Intel(R) Ethernet Connection (H) I219-LM
Boot000E* UEFI : HP SSD EX900 250GB : PART 4 : OS Bootloader
------引用文章---------------------------------
用 EasyUEFI 在 Win8/10 中硬盘安装 Ubuntu
作者:TeliuTe 来源:基础教程网
1、准备Ubuntu安装文件
1)下载带amd的64位 Ubuntu 桌面版光盘镜像文件,如 ubuntu-16.04.2-desktop-amd64.iso:http://releases.ubuntu.com/16.04/
其他下载地址可以参阅前面的课程;
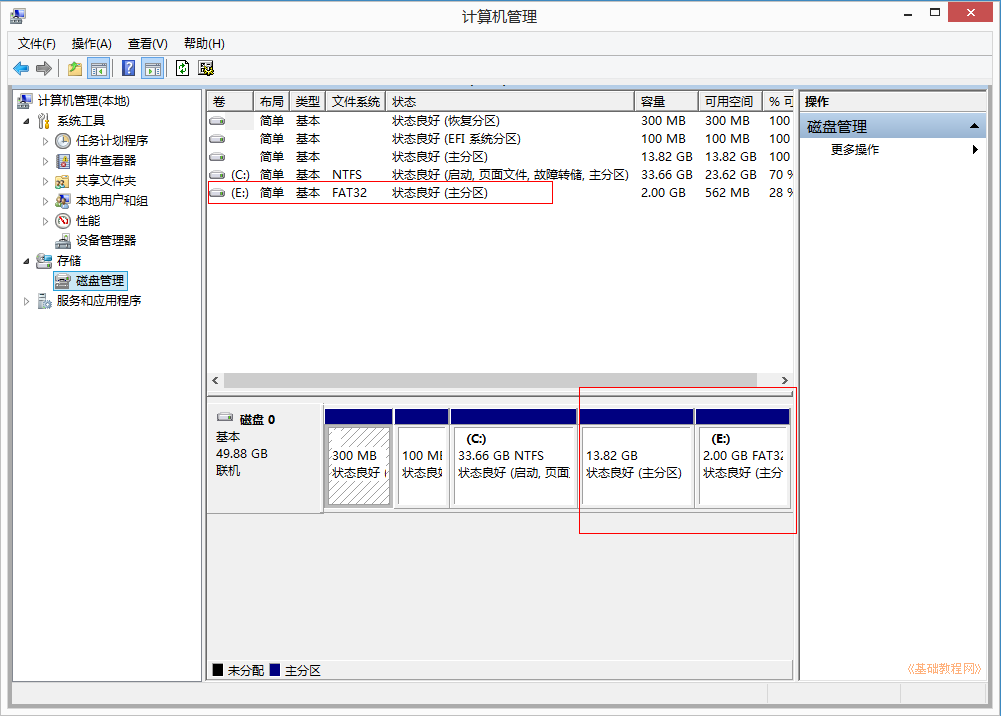
2)分出一个5G左右的分区,格式化为FAT32,将下载的光盘镜像解压到里面;
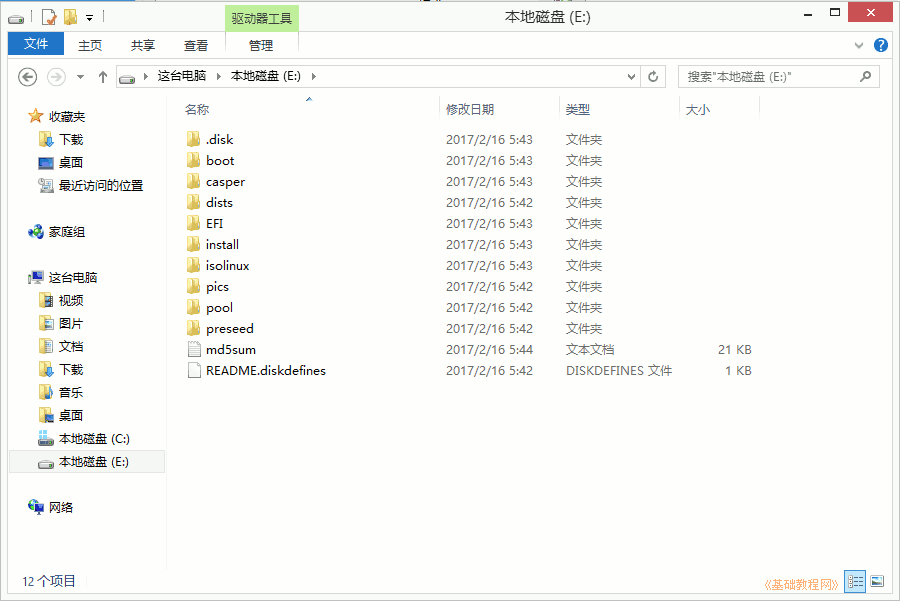
3)再分出40G空间,作为安装Ubuntu系统的空间,不用格式化,记住分区大小和位置;
4)Win8/10要关闭快速启动、关闭安全启动,参考第2条安装常见问题:=http://teliute.org/fw/win8insu2.html
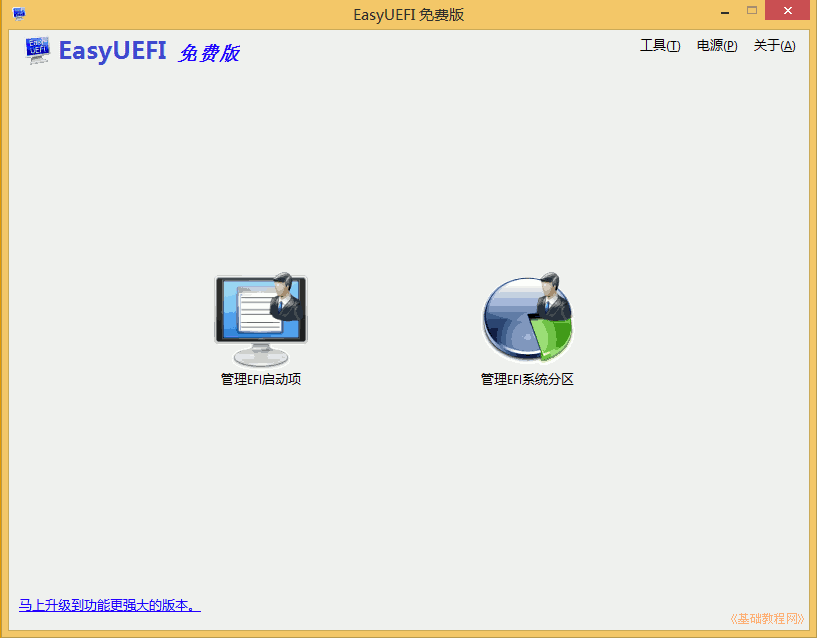
2、安装 EasyUEFI,添加启动项
1)EasyUEFI个人版是免费的,可以在官网或友链下载: http://www.easyuefi.com/index-cn.html,下载完后双击运行安装,
2)在出来的安装对话框中,一路点“继续、确定、完成”,一般默认选中了简体中文;
安装完自动运行,或双击桌面上图标运行,进入主窗口,再点“管理EFI启动项”
3)在出来程序窗口中间栏,点击第二个绿色加号图标的“添加新项目”;
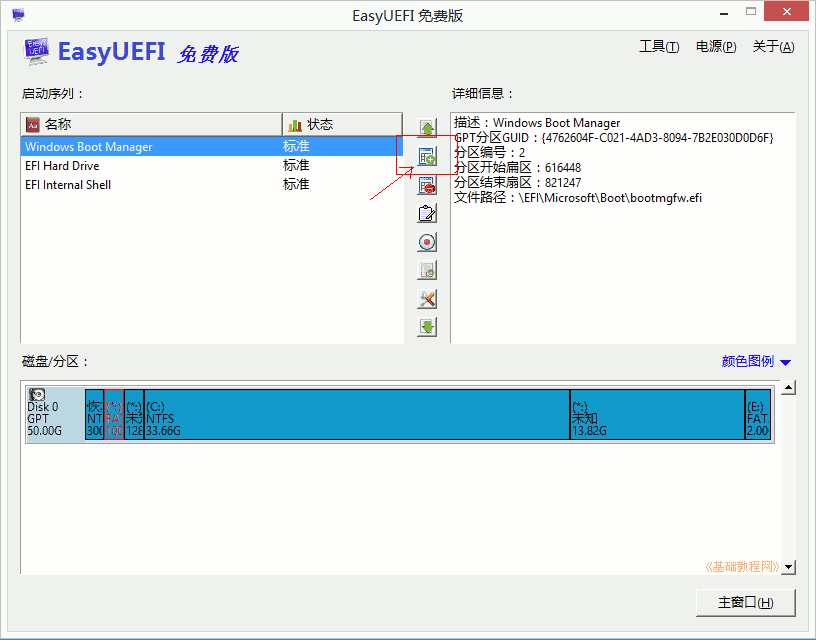
4)在出来的面板上边类型里选择Linux,右边文本框里输入名称“Ubuntu”,然后在中间的分区图表中,选中后边的FAT32分区,上边有个圆点;
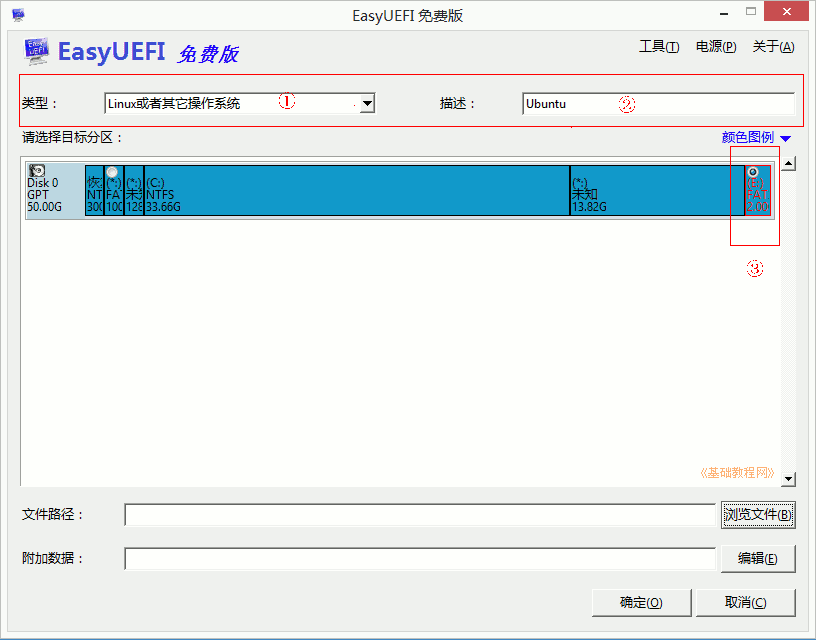
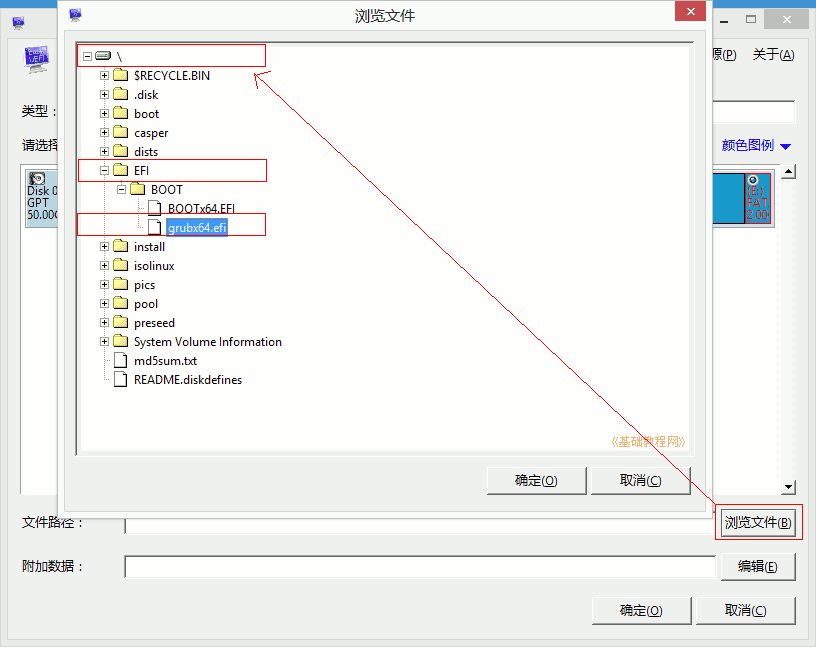
5)再点右下角的“浏览文件”按钮,在面板中依次点开加号,找到“\EFI\BOOT\grubx64.efi”,点“确定”;
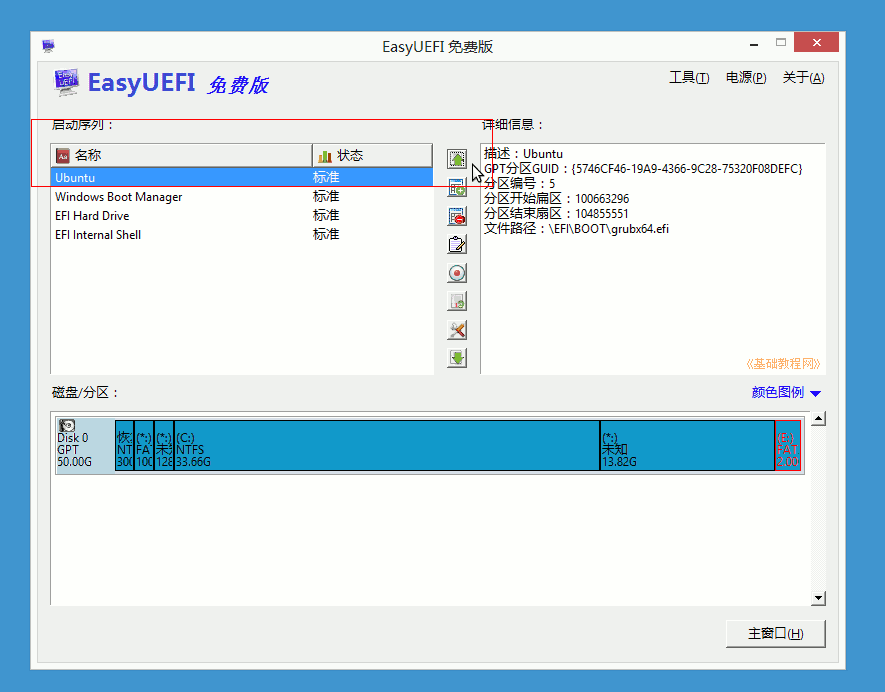
6)点“确定”返回主窗口,在左边的启动列表里,选中“Ubuntu”,点中间第一个绿色向上箭头,调到第一位,点击返回主窗口;
7)关闭所有窗口,重启计算机,可以按“win键+R”调出运行框,输入 shutdown.exe -f -r -t 0
3、安装Ubuntu系统
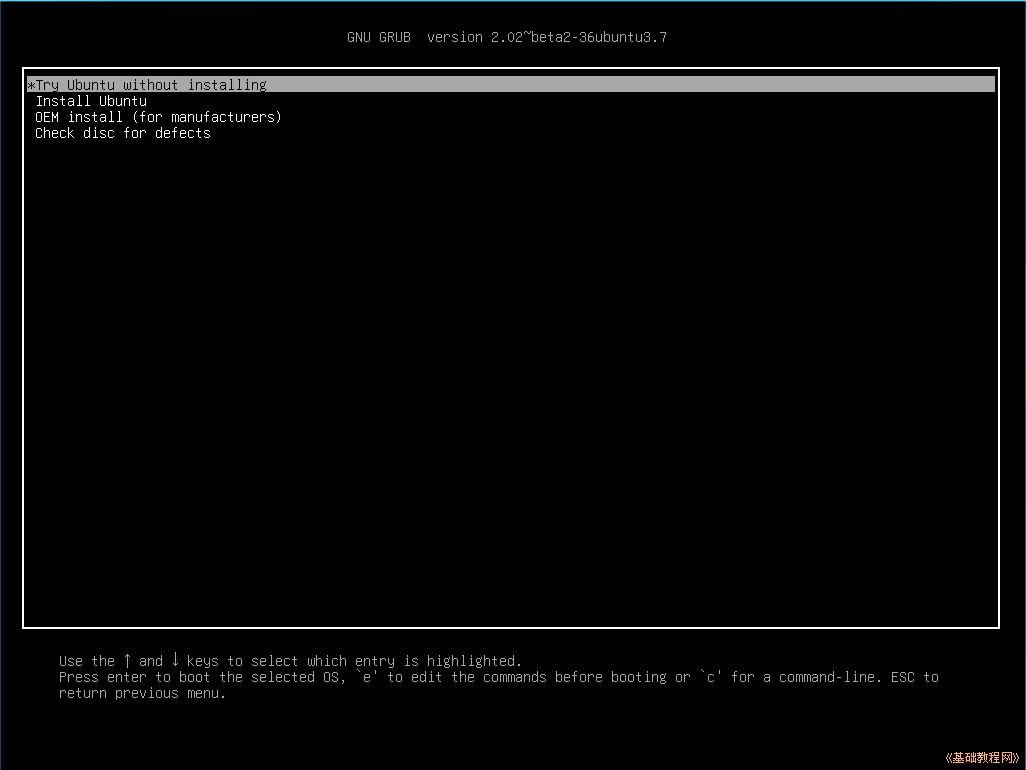
1)重新启动后,出现Ubuntu安装菜单,按回车键进入第一个试用Ubuntu(Try Ubuntu);
This is efibootmgr, a Linux user-space application to modify the Intel
Extensible Firmware Interface (EFI) Boot Manager.  This application
can create and destroy boot entries, change the boot order, change
the next running boot option, and more.

Details on the EFI Boot Manager are available from the EFI
Specification, v1.02 or above, available from http://developer.intel.com.

Note: efibootmgr requires that the kernel module efivars be loaded
prior to use.  'modprobe efivars' should do the trick.

usage: efibootmgr [options]
	-a | --active         sets bootnum active
	-A | --inactive       sets bootnum inactive
	-b | --bootnum XXXX   modify BootXXXX (hex)
	-B | --delete-bootnum delete bootnum (hex)
	-c | --create         create new variable bootnum and add to bootorder
	-d | --disk disk      (defaults to /dev/sda) containing loader
	-e | --edd [1|3|-1]   force EDD 1.0 or 3.0 creation variables, or guess
	-E | --device num     EDD 1.0 device number (defaults to 0x80)
	-g | --gpt            force disk w/ invalid PMBR to be treated as GPT
	-H | --acpi_hid XXXX  set the ACPI HID (used with -i)
	-i | --iface name     create a netboot entry for the named interface
	-l | --loader name    (defaults to \elilo.efi)
	-L | --label label    Boot manager display label (defaults to "Linux")
	-n | --bootnext XXXX  set BootNext to XXXX (hex)
	-N | --delete-bootnext delete BootNext
	-o | --bootorder XXXX,YYYY,ZZZZ,...     explicitly set BootOrder (hex)
	-O | --delete-bootorder delete BootOrder
	-p | --part part       (defaults to 1) containing loader
	-q | --quiet           be quiet
	--test filename   don't write to NVRAM, write to filename
	-t | --timeout seconds   Boot manager timeout
	-T | --delete-timeout    delete Timeout value
	-u | --unicode | --UCS-2  pass extra args as UCS-2 (default is ASCII)
	-U | --acpi_uid XXXX    set the ACPI UID (used with -i)
	-v | --verbose         print additional information
	-V | --version         return version and exit
	-w | --write-signature  write unique sig to MBR if needed


Typical usage:
1) Root can use it to display the current Boot Manager settings.
  [root@localhost ~]# efibootmgr
  BootCurrent: 0004
  BootNext: 0003
  BootOrder: 0004,0000,0001,0002,0003
  Timeout: 30 seconds
  Boot0000* Diskette Drive(device:0)
  Boot0001* CD-ROM Drive(device:FF)
  Boot0002* Hard Drive(Device:80)/HD(Part1,Sig00112233)
  Boot0003* PXE Boot: MAC(00D0B7C15D91)
  Boot0004* Linux

  This shows:
  BootCurrent - the boot entry used to start the currently running
  system.

  BootOrder - the boot order as would appear in the boot manager.  The
  boot manager tries to boot the first active entry on this list.  If
  unsuccessful, it tries the next entry, and so on.

  BootNext - the boot entry which is scheduled to be run on next boot.
  This superceeds BootOrder for one boot only, and is deleted by the
  boot manager after first use.  This allows you to change the next boot
  behavior without changing BootOrder.

  Timeout - the time in seconds between when the boot manager appears
  on the screen until when it automatically chooses the startup value
  from BootNext or BootOrder.

  Five boot entries (0000 - 0004), the active/inactive flag (* means
  active), and the name displayed on the screen.


2) An OS installer would call 'efibootmgr -c'.  This assumes that
   /boot/efi is your EFI System Partition, and is mounted at /dev/sda1.
   This creates a new boot option, called "Linux", and puts it at the top
   of the boot order list.  Options may be passed to modify the
   default behavior.  The default OS Loader is elilo.efi.

3) A system administrator wants to change the boot order.  She would
   call 'efibootmgr -o 3,4' to specify PXE boot first, then Linux
   boot.

4) A system administrator wants to change the boot order for the next
   boot only.  She would call 'efibootmgr -n 4' to specify that the
   Linux entry be taken on next boot.

5) A system administrator wants to delete the Linux boot option from
   the menu.  'efibootmgr -b 4 -B' deletes entry 4 and removes it
   from BootOrder.

6) A system administrator wants to create a boot option to network
   boot (PXE).  Unfortunately, this requires knowing a little more
   information about your system than can be easily found by
   efibootmgr, so you've got to pass additional information - the ACPI
   HID and UID values.  These can generally be found by using the EFI
   Boot Manager (in the EFI environment) to create a network boot
   entry, then using efibootmgr to print it verbosely.  Here's one example:

     Boot003* Acpi(PNP0A03,0)/PCI(5|0)/Mac(00D0B7F9F510) \
	ACPI(a0341d0,0)PCI(0,5)MAC(00d0b7f9f510,0)

   In this case, the ACPI HID is "0A0341d0" and the UID is "0".
   For the zx2000 gigE, the HID is "222F" and the UID is "500".
   For the rx2000 gigE, the HID is "0002" and the UID is "100".
   You create the boot entry with:
   'efibootmgr -c -i eth0 -H 222F -U 500 -L netboot'

Many other uses may be found.

Please direct any bugs, features, patches, etc. to Matt Domsch
.