本节重点
Binder连接池
AIDL是一种最常用的IPC方式,是日常开发中涉及IPC时的首选。前面提到AIDL的流程是 客户端在Service的onBind方法中拿到继承AIDL的Stub对象,然后客户端就可以通过这个Stub对象进行RPC。
那么如果项目庞大,有多个业务模块都需要使用AIDL进行IPC,随着AIDL数量的增加,我们不能无限制地增加Service,我们需要把所有AIDL放在同一个Service中去管理。
流程是:
1. 服务端只有一个Service,我们应该把所有AIDL放在一个Service中去管理,不同业务模块
之间是不能有耦合的
2. 服务端提供一个 queryBinder 接口,这个借口能够根据业务模块的特征来返回响应的
Binder对象给客户端
3. 不同的业务模块拿到所需的Binder对象就可以进行RPC了
选用合适的IPC方式

DEMO下载地址
IPC之Binder连接池Demo下载
在本节中要再次介绍一下ADIL,原因是AIDL是一种最常用的进程间通信方式,是日常开发中涉及进程间通信时的首选,所以我们需要额外强调一下它。
如何使用AIDL在上面的一节中已经进行了介绍,这里在回顾一下大致流程:首先创建一个Service和一个AIDL接口,接着创建一个类继承自AIDL接口中的Stub类并实现Stub中的抽象方法,在Service的onBind方法中返回这个类的对象,然后客户端就可以绑定服务端Service,建立连接后就可以访问远程服务端的方法了。
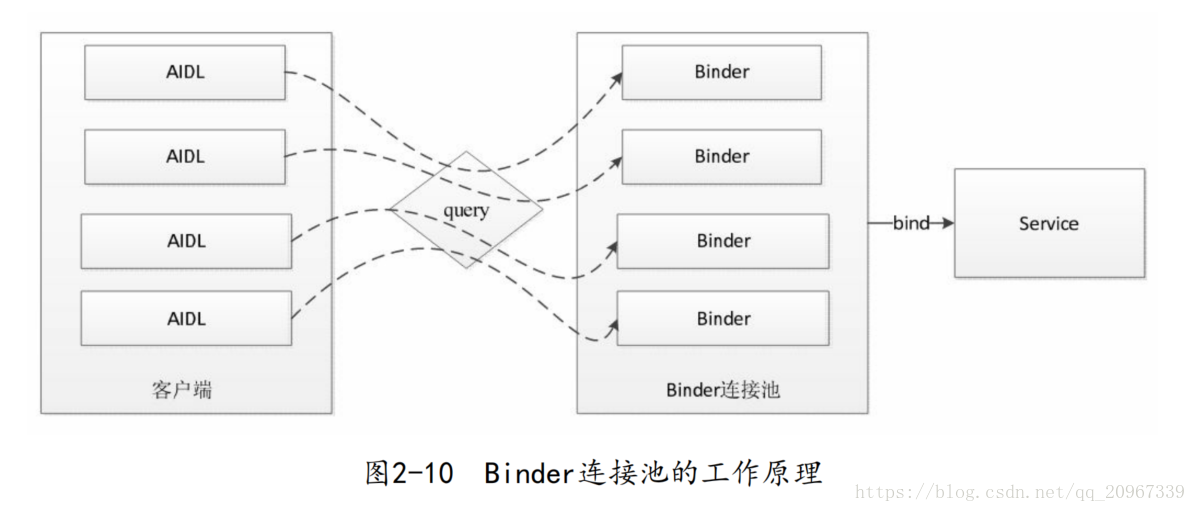
上述过程就是典型的AIDL的使用流程。但是随着项目越来越大,多个业务模块都需要使用AIDL来进行进程间通信的话,就需要将所有AIDL放在同一个service中管理。
在这种模式下,整个工作机制是这样的:每个业务模块创建自己的AIDL接口并实现此接口,这个时候不同业务模块之间是不能有耦合的,所有实现细节我们要单独开来,然后向服务端提供自己的唯一标识和其对应的Binder对象;对于服务端来说,只需要一个Service就可以了,服务端提供一个queryBinder接口,这个接口能够根据业务模块的特征来返回相应的Binder对象给它们,不同的业务模块拿到所需的Binder对象后就可以进行远程方法调用了。由此可见,Binder连接池的主要作用就是将每个业务模块的Binder请求统一转发到远程Service中去执行,从而避免了重复创建Service的过程,它的工作原理如下所示。
通过上面的理论介绍,也许还有点不好理解,下面对Binder连接池的代码实现做一下说明。首先,为了说明问题,我们提供了两个AIDL接口(ISecurityCenter和ICompute)来模拟上面提到的多个业务模块都要使用AIDL的情况,其中ISecurityCenter接口提供加解密功能,声明如下:
package com.nextvpu.myapplication;

interface ISecurityCenter {
    String encrypt(String content);
    String decrypt(String password);
}
而ICompute接口提供计算加法的功能,声明如下:
package com.nextvpu.myapplication;

interface ICompute {
    int add(int a, int b);
}
虽然说上面两个接口的功能都比较简单,但是用于分析Binder连接池的工作原理已经足够了,读者可以写出更复杂的例子。接着看一下上面两个AIDL接口的实现,也比较简单,代码如下:
package com.nextvpu.myapplication;

import android.os.RemoteException;

class SecurityCenterImpl extends ISecurityCenter.Stub {

    private static final char SECRET_CODE = '^';

    @Override
    public String encrypt(String content) throws RemoteException {
        char[] chars = content.toCharArray();
        for (int i = 0; i < chars.length; i++) {
            chars[i] ^=SECRET_CODE;
        }
        return new String(chars);
    }

    @Override
    public String decrypt(String password) throws RemoteException {
        return encrypt(password);
    }
}
public class ComputeImpl extends ICompute.Stub {
@Override
public int add(int a,int b) throws RemoteException {
return a + b;
}
}
现在业务模块的AIDL接口定义和实现都已经完成了,注意这里并没有为每个模块的AIDL单独创建Service,接下来就是服务端和Binder连接池的工作了。
首先,为Binder连接池创建AIDL接口IBinderPool.aidl,代码如下所示。
package com.nextvpu.myapplication;

interface IBinderPool {

    /**
     * @param binderCode, the unique token of specific Binder<br/>
     * @return specific Binder who's token is binderCode.
     */
    IBinder queryBinder(int binderCode);
}
接着,为Binder连接池创建远程Service并实现IBinderPool,下面是queryBinder的具体实现,可以看到请求转发的实现方法,当Binder连接池连接上远程服务时,会根据不同模块的标识即binderCode返回不同的Binder对象,通过这个Binder对象所执行的操作全部发生在远程服务端。
     @Override
        public IBinder queryBinder(int binderCode) throws RemoteException {
            IBinder binder = null;
            switch (binderCode){
                case BINDER_SECURITY_CENTER:
                    binder = new com.nextvpu.myapplication.SecurityCenterImpl();
                    break;
                case BINDER_COMPUTE:
                    binder = new ComputeImpl();
                    break;
                default:
                    break;
            }

            return binder;
        }
远程Service的实现就比较简单了,代码如下所示。
package com.nextvpu.myapplication;

import android.app.Service;
import android.content.Intent;
import android.os.Binder;
import android.os.IBinder;
import android.support.annotation.Nullable;
import android.util.Log;

public class BinderPoolService extends Service{

    private Binder mBinderPool = new BinderPool.BinderPoolImpl();

    @Override
    public void onCreate() {
        super.onCreate();
    }

    @Nullable
    @Override
    public IBinder onBind(Intent intent) {
        Log.e("xyz","onBind");
        return mBinderPool;
    }

    @Override
    public void onDestroy() {
        super.onDestroy();
    }
}
下面还剩下Binder连接池的具体实现,在它的内部首先它要去绑定远程服务,绑定成功后,客户端就可以通过它的queryBinder方法去获取各自对应的Binder,拿到所需的Binder以后,不同业务模块就可以进行各自的操作了,Binder连接池的代码如下所示。
package com.nextvpu.myapplication;

import android.content.ComponentName;
import android.content.Context;
import android.content.Intent;
import android.content.ServiceConnection;
import android.os.IBinder;
import android.os.RemoteException;

import java.util.concurrent.CountDownLatch;

public class BinderPool {
    public static final int BINDER_NONE = -1;
    public static final int BINDER_COMPUTE = 0;
    public static final int BINDER_SECURITY_CENTER = 1;

    private Context mContext;
    private IBinderPool mBinderPool;
    private static volatile BinderPool sInstance;
    private CountDownLatch mConnectBinderPoolCountDownLatch;

    private BinderPool(Context context){
        mContext = context.getApplicationContext();
        connectBinderPoolService();
    }

    public static BinderPool getInstance(Context context){
        if (sInstance == null){
            synchronized (BinderPool.class){
                if (sInstance == null){
                    sInstance = new BinderPool(context);
                }
            }
        }
        return sInstance;
    }

    private synchronized void connectBinderPoolService(){
        mConnectBinderPoolCountDownLatch = new CountDownLatch(1);
        Intent service = new Intent(mContext,BinderPoolService.class);
        mContext.bindService(service,mBinderPoolConnection,Context.BIND_AUTO_CREATE);

        try {
            mConnectBinderPoolCountDownLatch.await();
        }catch (InterruptedException e){
            e.printStackTrace();
        }
    }

    public IBinder queryBinder(int binderCode){
        IBinder binder = null;
        try {
            if (mBinderPool!=null){
                binder = mBinderPool.queryBinder(binderCode);
            }
        }catch (RemoteException e){
            e.printStackTrace();
        }
        return binder;
    }

    private ServiceConnection mBinderPoolConnection = new ServiceConnection() {
        @Override
        public void onServiceConnected(ComponentName name, IBinder service) {
            mBinderPool = IBinderPool.Stub.asInterface(service);
            try{
                mBinderPool.asBinder().linkToDeath(mBinderPoolDeathRecipient,0);
            }catch (RemoteException e){
                e.printStackTrace();
            }
            mConnectBinderPoolCountDownLatch.countDown();
        }

        @Override
        public void onServiceDisconnected(ComponentName name) {

        }
    };

    private IBinder.DeathRecipient mBinderPoolDeathRecipient = new IBinder.DeathRecipient() {
        @Override
        public void binderDied() {
            mBinderPool.asBinder().unlinkToDeath(mBinderPoolDeathRecipient,0);
            mBinderPool = null;
            connectBinderPoolService();
        }
    };

    public static class BinderPoolImpl extends IBinderPool.Stub{
        public BinderPoolImpl() {
            super();
        }


        @Override
        public IBinder queryBinder(int binderCode) throws RemoteException {
            IBinder binder = null;
            switch (binderCode){
                case BINDER_SECURITY_CENTER:
                    binder = new com.nextvpu.myapplication.SecurityCenterImpl();
                    break;
                case BINDER_COMPUTE:
                    binder = new ComputeImpl();
                    break;
                default:
                    break;
            }

            return binder;
        }
    }
}
Binder连接池的具体实现就分析完了,它的好处是显然易见的,针对上面的例子,我们只需要创建一个Service即可完成多个AIDL接口的工作,下面我们来验证一下效果。新创建一个Activity,在线程中执行如下操作:
private void doWork() {
        BinderPool binderPool = BinderPool.getInstance(MainActivity.this);
        IBinder securityBinder = binderPool.queryBinder(BinderPool.BINDER_SECURITY_CENTER);
        mSecurityCenter = SecurityCenterImpl.asInterface(securityBinder);

        String msg = "hello-word-安卓";
        System.out.println("content:" + msg);
        try {
            String password = mSecurityCenter.encrypt(msg);
            System.out.println("encrypt:" + password);
            System.out.println("decrypt:" + mSecurityCenter.decrypt(password));
        } catch (RemoteException e) {
            e.printStackTrace();
        }

        IBinder computeBinder = binderPool.queryBinder(BinderPool.BINDER_COMPUTE);
        mCompute = ComputeImpl.asInterface(computeBinder);
        try {
            System.out.println("3+5 = " + mCompute.add(3, 5));
        } catch (RemoteException e) {
            e.printStackTrace();
        }
    }
在上述代码中,我们先后调用了ISecurityCenter和ICompute这两个AIDL接口中的方法,看一下log,很显然,工作正常。
09-17 15:51:58.924 28041-28134/com.nextvpu.myapplication I/System.out: content:hello-word-安卓
    encrypt:6;221s)1,:s寗匍
09-17 15:51:58.925 28041-28134/com.nextvpu.myapplication I/System.out: decrypt:hello-word-安卓
09-17 15:51:58.926 28041-28134/com.nextvpu.myapplication I/System.out: 3+5 = 8
这里需要额外说明一下,为什么要在线程中去执行呢?这是因为在Binder连接池的实现中,我们通过CountDownLatch将bindService这一异步操作转换成了同步操作,这就意味着它有可能是耗时的,然后就是Binder方法的调用过程也可能是耗时的,因此不建议放在主线程去执行。注意到BinderPool是一个单例实现,因此在同一个进程中只会初始化一次,所以如果我们提前初始化BinderPool,那么可以优化程序的体验,比如我们可以放在Application中提前对BinderPool进行初始化,虽然这不能保证当我们调用BinderPool时它一定是初始化好的,但是在大多数情况下,这种初始化工作(绑定远程服务)的时间开销(如果BinderPool没有提前初始化完成的话)是可以接受的。另外BinderPool中有断线重连的机制,当远程服务意外终止时,BinderPool会重新建立连接,这个时候如果业务模块中的Binder调用出现了异常,也需要手动去重新获取最新的Binder对象,这个是需要注意的。
有了BinderPool可以大大方便日常的开发工作,比如如果有一个新的业务模块需要添加新的AIDL,那么在它实现了自己的AIDL接口后,只需要修改BinderPoolImpl中的queryBinder方法,给自己添加一个新的binderCode并返回对应的Binder对象即可,不需要做其他修改,也不需要创建新的Service。由此可见,BinderPool能够极大地提高AIDL的开发效率,并且可以避免大量的Service创建,因此,建议在AIDL开发工作中引入BinderPool机制。
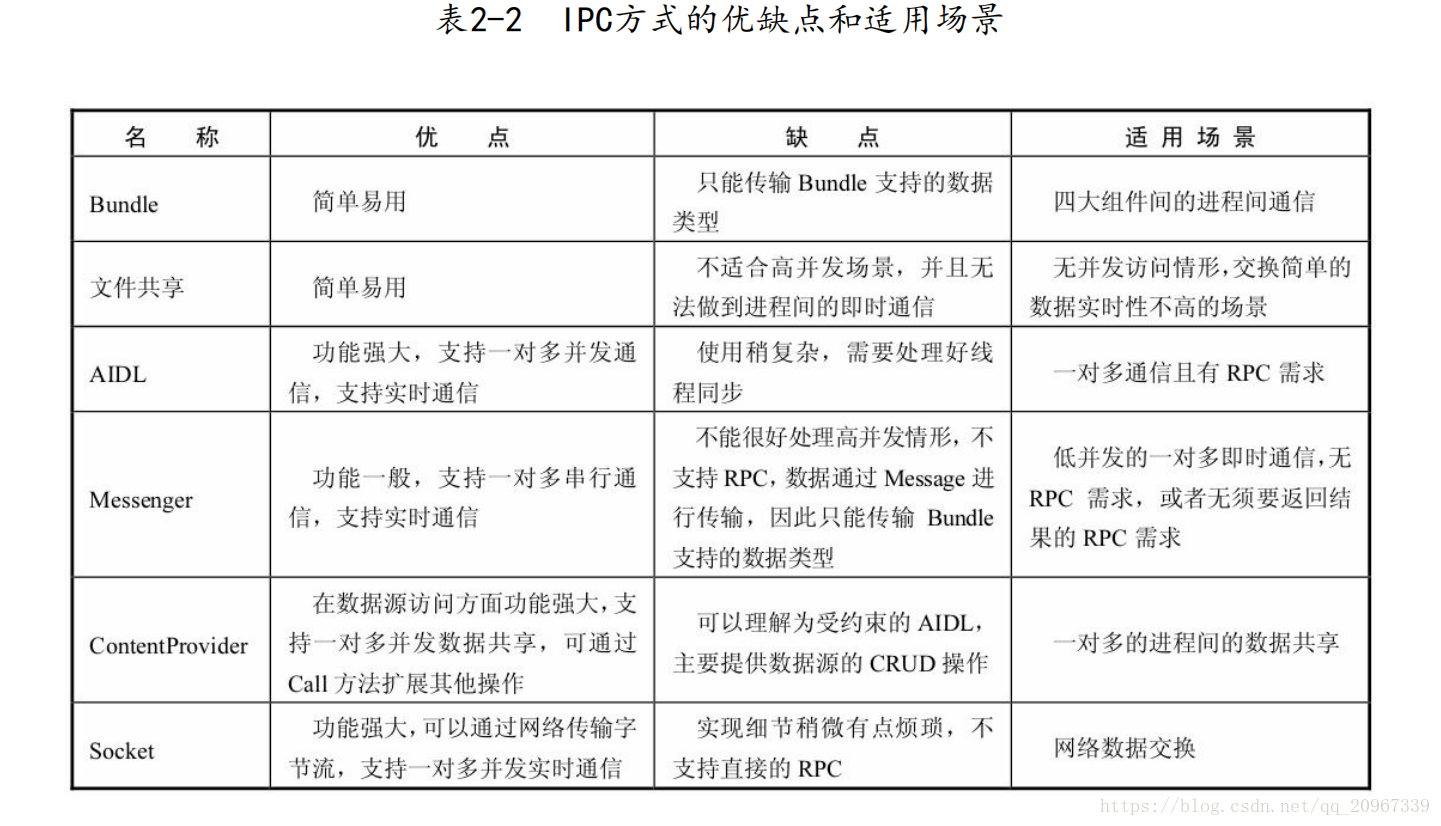
选用合适的IPC方式
在上面的一节中,我们介绍了各种各样的IPC方式,那么到底它们有什么不同呢?我们到底该使用哪一种呢?本节就为读者解答这些问题,具体内容如表2-2所示。通过表2-2,可以明确地看出不同IPC方式的优缺点和适用场景,那么在实际的开发中,只要我们选择合适的IPC方式就可以轻松完成多进程的开发场景。