下面通过一个实际的例子演示(已通过本地代码调试运行)
一、服务端代码:
1、我们提供了两个AIDL接口(ISecurityCenter和ICompute)来模拟上面提到的多个业务模块都要使用AIDL的情况,其中ISecurityCenter接口提供解密功能,声明如下:
// ISecurityCenter.aidl
package com.example.binderpoolserver;

// Declare any non-default types here with import statements

interface ISecurityCenter {
    String encrypt(String content);
    String decrypt(String password);
}
而ICompute提供了计算加法的功能:
// ICompute.aidl
package com.example.binderpoolserver;

// Declare any non-default types here with import statements

interface ICompute {
int add(int a,int b);
}
虽然说上面的两个接口的功能都比较简单,但是用于分析Binder池的工作原理还是足够的,读者可以写出更加复杂的例子。
2、编写上面2个接口的实现
SecurityCenterImpl
package com.example.binderpoolserver;

import android.os.RemoteException;

public class SecurityCenterImpl extends ISecurityCenter.Stub {
    private static final char SECRET_CODE = '^';

    @Override
    public String encrypt(String content) throws RemoteException {
        char [] chars = content.toCharArray();
        for (int i = 0; i < chars.length; i++) {
            chars[i] ^= SECRET_CODE;
        }
        return new String(chars);
    }

    @Override
    public String decrypt(String password) throws RemoteException {
        return encrypt(password);
    }
}
ComputeImpl
package com.example.binderpoolserver;

import android.os.RemoteException;

public class ComputeImpl extends ICompute.Stub {
    @Override
    public int add(int a, int b) throws RemoteException {
        return a + b;
    }
}
现在的业务模块的AIDL接口定义和实现都已经完成了,注意的是这里并没有为每个模块的AIDL创建单独的Service,接下来就是服务端和Binder连接池的工作了
3、定义Binder连接池的AIDL并实现
IBinderPool
// IBinderPool.aidl
package com.example.binderpoolserver;

// Declare any non-default types here with import statements

interface IBinderPool {
    IBinder queryBinder(int binderCode);
}
BinderPoolImpl
package com.example.binderpoolserver;

import android.os.IBinder;
import android.os.RemoteException;
import android.util.Log;

public class BinderPoolImpl extends IBinderPool.Stub {
    private static final String TAG = "Server:BinderPoolImpl";

    private static final int BINDER_SECURUITY_CENTER = 0;
    private static final int BINDER_COMPUTE = 1;

    public BinderPoolImpl(){
        super();
    }

    @Override
    public IBinder queryBinder(int binderCode) throws RemoteException {
        IBinder binder = null;
        switch (binderCode){
            case BINDER_SECURUITY_CENTER:
                binder = new SecurityCenterImpl();
                Log.d(TAG,"返回SecurityCenterImpl");
                break;
            case BINDER_COMPUTE:
                binder = new ComputeImpl();
                Log.d(TAG,"返回ComputeImpl");
                break;
        }
        return binder;
    }
}
4、编写服务端的Service
package com.example.binderpoolserver;

import android.app.Service;
import android.content.Intent;
import android.os.Binder;
import android.os.IBinder;
import android.util.Log;

public class BinderPoolService extends Service {
    private  static final String  TAG = "Server:BPS";

    private Binder mBinderPool = new BinderPoolImpl();

    @Override
    public void onCreate() {
        Log.d(TAG,"onCreate");
        super.onCreate();
    }

    @Override
    public IBinder onBind(Intent intent) {
        Log.d(TAG,"onBind");
        return mBinderPool;
    }

    @Override
    public void onDestroy() {
        Log.d(TAG,"onDestroy");
        super.onDestroy();
    }
}
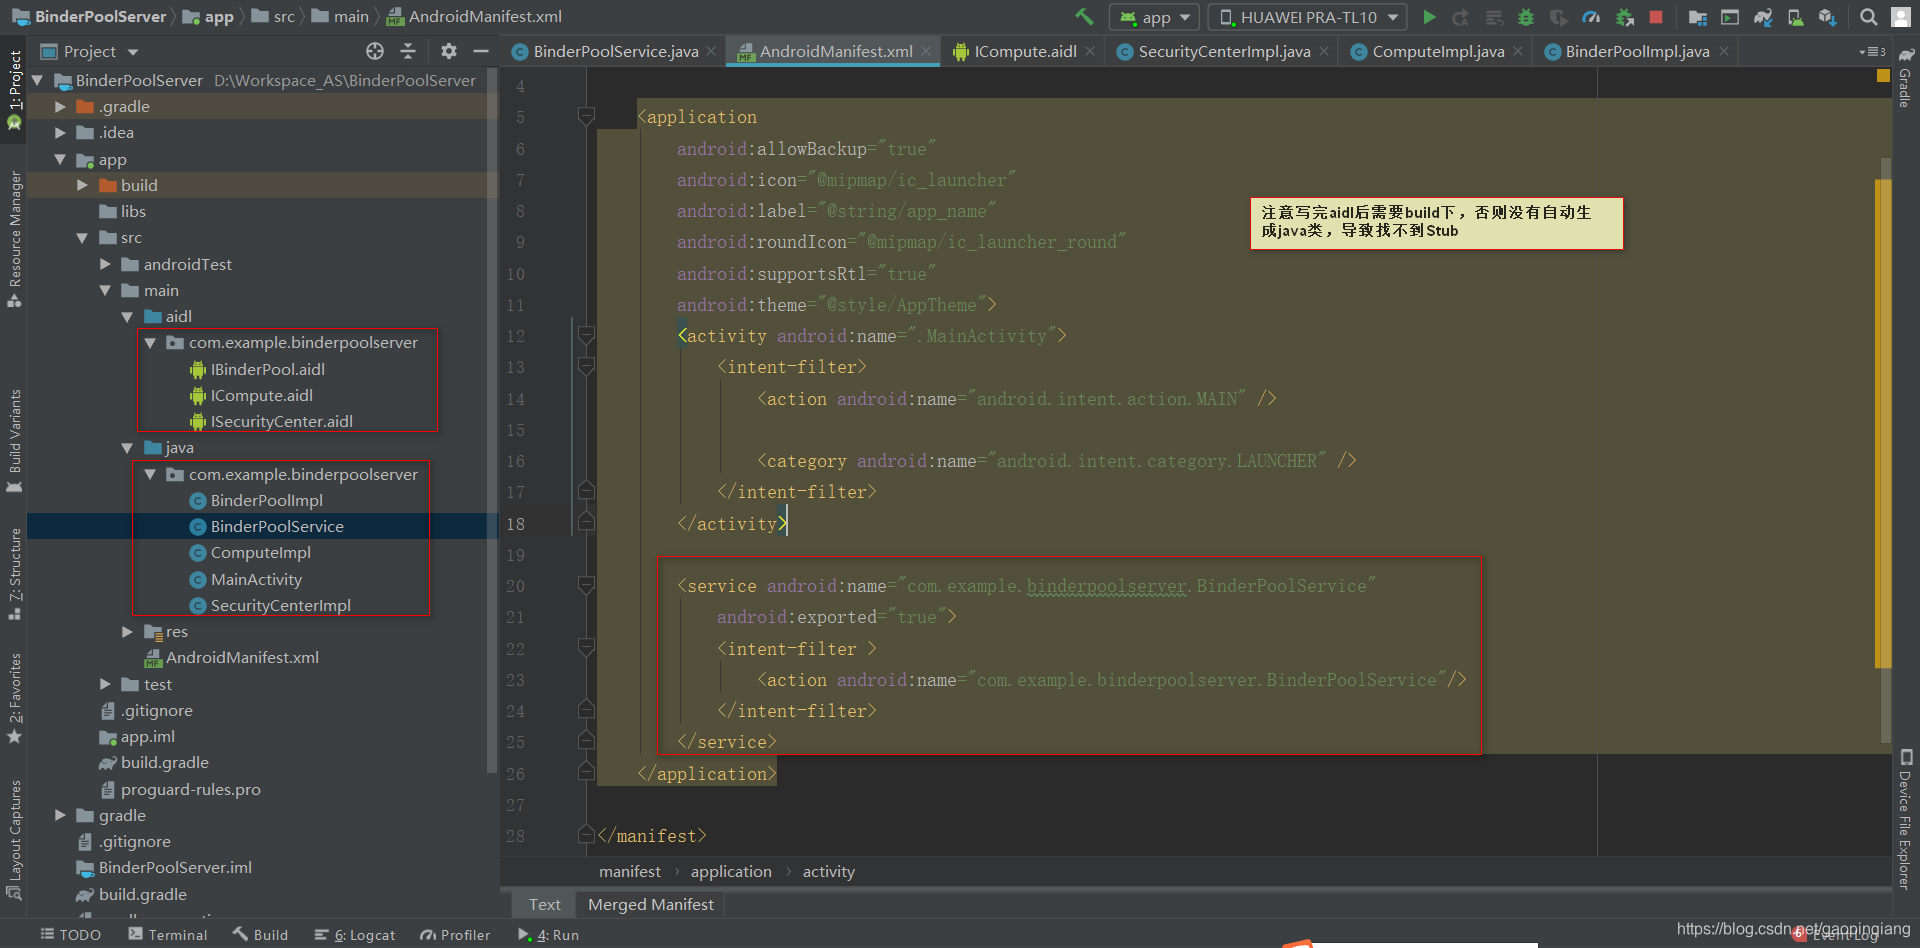
5、服务端的app在AndroidManefest中配置服务(很重要,否则调用失败)
        <service android:name="com.example.binderpoolserver.BinderPoolService"
            android:exported="true">
            <intent-filter >
                <action android:name="com.example.binderpoolserver.BinderPoolService"/>
            </intent-filter>
        </service>
特别注意,android:exported=“true” , 调试的时候遇到了“”“java.lang.SecurityException: Not allowed to bind to service Intent”这个错误。
到这里服务端app的代码已经全部写完了。代码的结构如下:
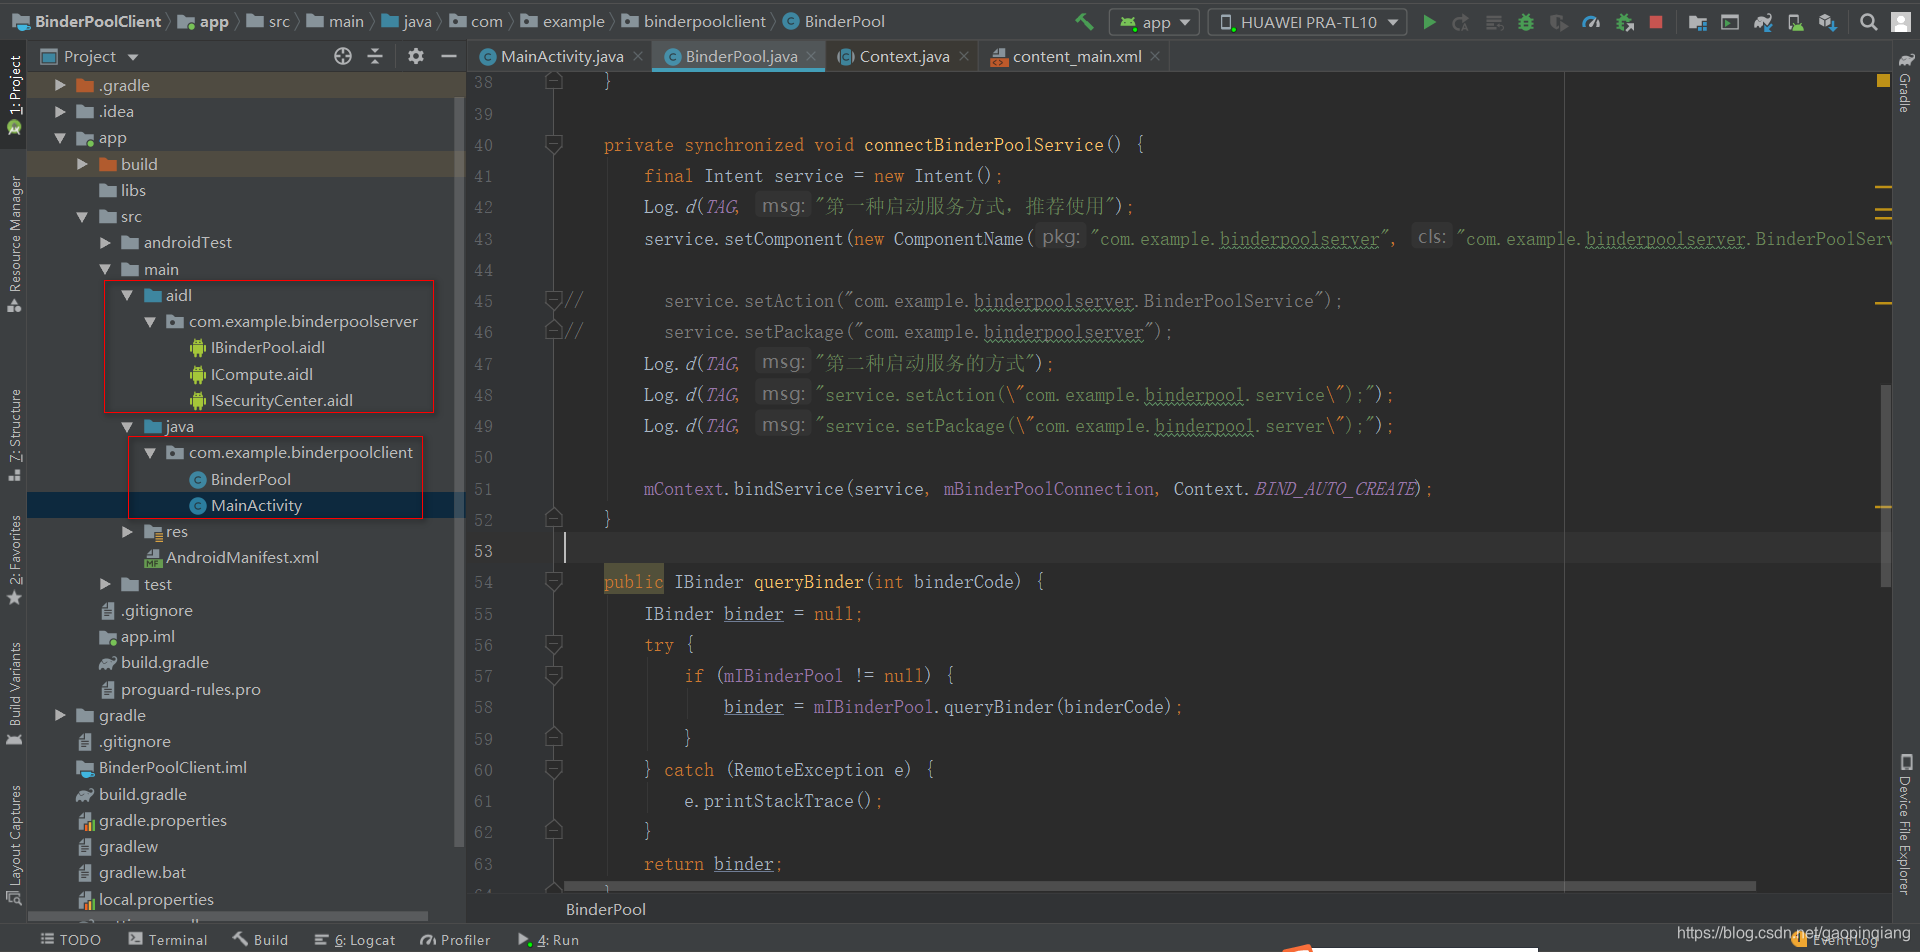
二、客户端的代码
1、将服务端的aidl包直接拷贝到客户端的工程中,并且build下。
2、Binder连接池具体实现
package com.example.binderpoolclient;

import android.content.ComponentName;
import android.content.Context;
import android.content.Intent;
import android.content.ServiceConnection;
import android.os.IBinder;
import android.os.RemoteException;
import android.util.Log;

import com.example.binderpoolserver.IBinderPool;

public class BinderPool {
    private static final String TAG = "Client:BinderPool";

    public static final int BINDER_SECURUITY_CENTER = 0;
    public static final int BINDER_COMPUTE = 1;

    private Context mContext;
    private IBinderPool mIBinderPool;
    private static volatile BinderPool sInstance;

    private BinderPool(Context context) {
        mContext = context.getApplicationContext();
        connectBinderPoolService();
    }

    public static BinderPool getInstance(Context context) {
        if (sInstance == null) {
            synchronized (BinderPool.class) {
                if (sInstance == null) {
                    sInstance = new BinderPool(context);
                    Log.d(TAG, "创建Binder连接池");
                }
            }
        }
        return sInstance;
    }

    private synchronized void connectBinderPoolService() {
        final Intent service = new Intent();
        Log.d(TAG, "第一种启动服务方式,推荐使用");
        service.setComponent(new ComponentName("com.example.binderpoolserver", "com.example.binderpoolserver.BinderPoolService"));

//        service.setAction("com.example.binderpoolserver.BinderPoolService");
//        service.setPackage("com.example.binderpoolserver");
        Log.d(TAG, "第二种启动服务的方式");
        Log.d(TAG, "service.setAction(\"com.example.binderpool.service\");");
        Log.d(TAG, "service.setPackage(\"com.example.binderpool.server\");");

        mContext.bindService(service, mBinderPoolConnection, Context.BIND_AUTO_CREATE);
    }

    public IBinder queryBinder(int binderCode) {
        IBinder binder = null;
        try {
            if (mIBinderPool != null) {
                binder = mIBinderPool.queryBinder(binderCode);
            }
        } catch (RemoteException e) {
            e.printStackTrace();
        }
        return binder;
    }

    private ServiceConnection mBinderPoolConnection = new ServiceConnection() {

        @Override
        public void onServiceConnected(ComponentName name, IBinder service) {
            Log.d(TAG, "onServiceConnected");
            mIBinderPool = IBinderPool.Stub.asInterface(service);

            Log.d(TAG, "设置死亡代理");
            try {
                mIBinderPool.asBinder().linkToDeath(mBinderPoolDeathRecipient, 0);
            } catch (RemoteException e) {
                e.printStackTrace();
            }
        }

        @Override
        public void onServiceDisconnected(ComponentName name) {

        }
    };

    private IBinder.DeathRecipient mBinderPoolDeathRecipient = new IBinder.DeathRecipient() {
        @Override
        public void binderDied() {
            mIBinderPool.asBinder().unlinkToDeath(mBinderPoolDeathRecipient, 0);
            mIBinderPool = null;
            Log.d(TAG, "重连服务");
            connectBinderPoolService();
        }
    };
}
3、在MainActivity中使用
package com.example.binderpoolclient;

import android.os.Bundle;
import android.os.IBinder;
import android.os.RemoteException;
import android.util.Log;
import android.view.View;

import androidx.appcompat.app.AppCompatActivity;

import com.example.binderpoolserver.ICompute;
import com.example.binderpoolserver.ISecurityCenter;

public class MainActivity extends AppCompatActivity {
    private static final String TAG = "Client:MainActivity";

    BinderPool binderPool;
    private ISecurityCenter mSecurityCenter;
    private ICompute mCompute;

    @Override
    protected void onCreate(Bundle savedInstanceState) {
        super.onCreate(savedInstanceState);
        setContentView(R.layout.activity_main);

        binderPool = BinderPool.getInstance(this);

    }

    public void callSecurity(View v) {
        new Thread() {
            @Override
            public void run() {
                Log.d(TAG, "callSecurity");
                IBinder securityBinder = binderPool.queryBinder(BinderPool.BINDER_SECURUITY_CENTER);
                mSecurityCenter = ISecurityCenter.Stub.asInterface(securityBinder);
                if (mSecurityCenter != null) {
                    String msg = "Android";
                    try {
                        String password = mSecurityCenter.encrypt(msg);
                        Log.d(TAG, "encrypt message = " + password);

                        String decrypt = mSecurityCenter.decrypt(password);
                        Log.d(TAG, "decrypt message = " + decrypt);
                    } catch (RemoteException e) {
                        e.printStackTrace();
                    }
                } else {
                    Log.d(TAG, "mSecurityCenter = null");
                }

            }
        }.start();


    }

    public void callCompute(View v) {
        Log.d(TAG, "callCompute");
        IBinder computeBinder = binderPool.queryBinder(BinderPool.BINDER_COMPUTE);
        mCompute = ICompute.Stub.asInterface(computeBinder);
        if (mCompute != null) {
            try {
                int result = mCompute.add(3, 5);
                Log.d(TAG, "compute result = " + result);
            } catch (RemoteException e) {
                e.printStackTrace();
            }
        } else {
            Log.d(TAG, "mCompute = null");
        }
    }

}
疑问:主线程中调用远程服务是否会导致ANR?
答案是会的,因为客户端调用了远程的服务,客户端的线程就挂起了,直到服务器返回结果。
例如:
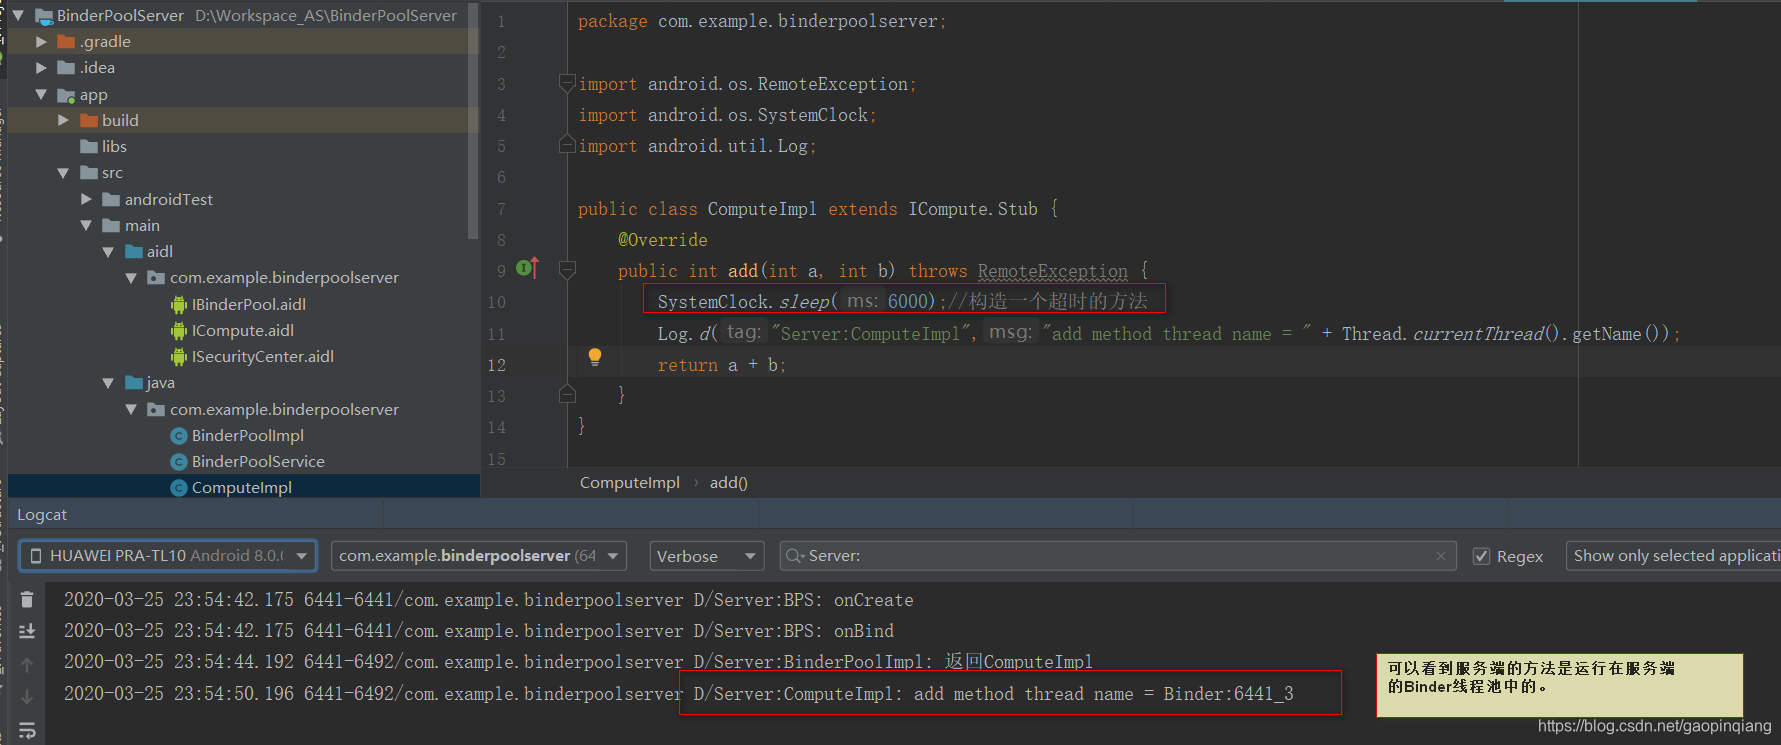
客户端的打印也是有6秒等待的。

布局文件为:
<?xml version="1.0" encoding="utf-8"?>
<LinearLayout xmlns:android="http://schemas.android.com/apk/res/android"
    xmlns:app="http://schemas.android.com/apk/res-auto"
    xmlns:tools="http://schemas.android.com/tools"
    android:layout_width="match_parent"
    android:layout_height="match_parent"
    app:layout_behavior="@string/appbar_scrolling_view_behavior"
    tools:context=".MainActivity"
    tools:showIn="@layout/activity_main"
    android:orientation="vertical"
    >

    <Button
        android:layout_width="wrap_content"
        android:layout_height="wrap_content"
        android:text="callSecurity"
        android:onClick="callSecurity"
        />
    <Button
        android:layout_width="wrap_content"
        android:layout_height="wrap_content"
        android:text="callCompute"
        android:onClick="callCompute"
        />


</LinearLayout>
到这里,客户端的代码就写完了,不出问题可以正常运行了。
特别注意:运行的时候,先要启动服务端的app,否则绑定不了服务
代码的结构如下:
看看运行的结果:
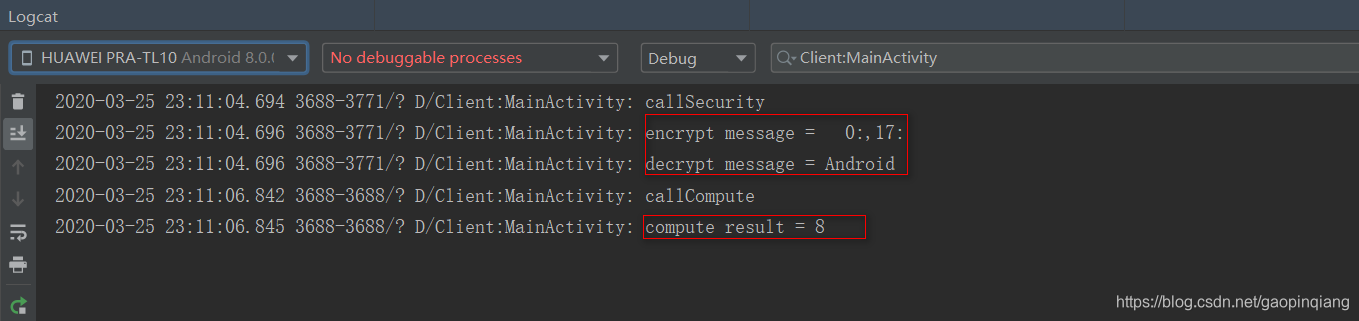
成功调用到了远程的服务方法。
有了BinderPool可以大大方便日常的开发工作,比如如果有一个新的业务模块需要添加新的AIDL,那么在他实现自己的AIDL接口后,只需要修改BinderPoolImpl中的queryBinder方法,给自己添加新的binderCode并返回对应的Binder对象就可以,不需要做其他的修改,也不需要创建新的Service,由此可见,BinderPool能够极大的提高对AIDL的开发效率,并且可以避免大量的Service创建,因此比较建议使用。
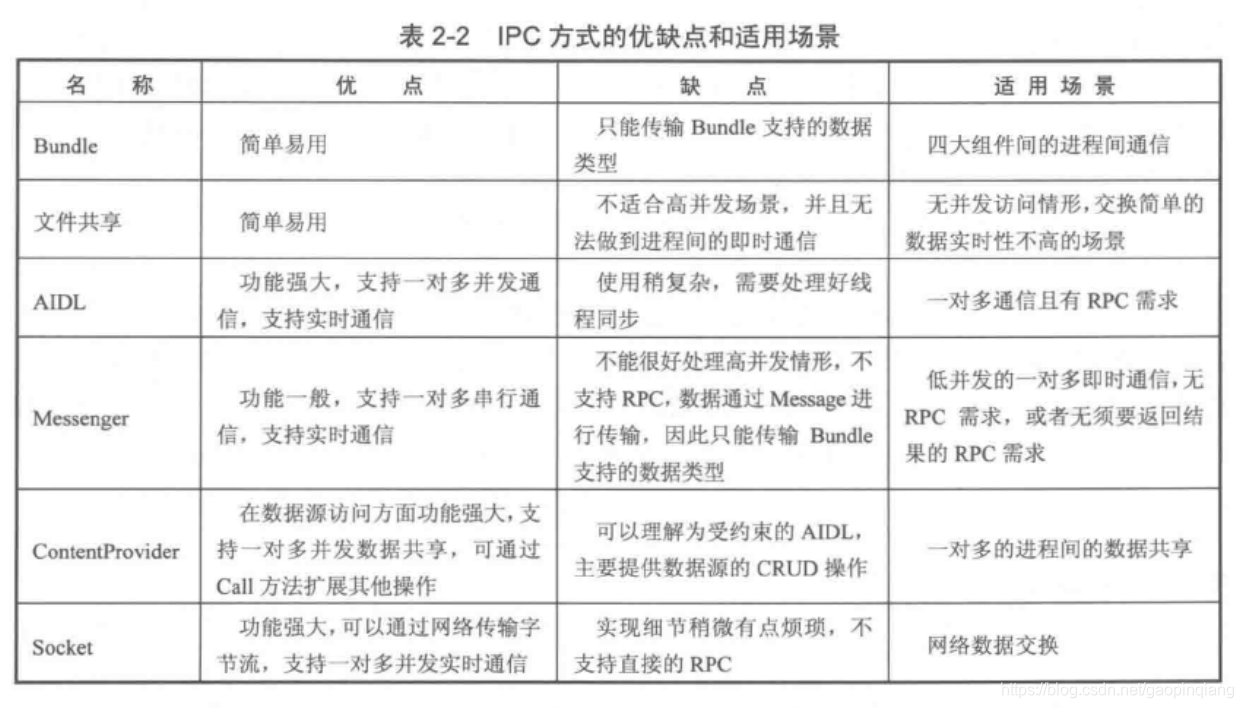
三、选择合适的IPC方式
我们介绍了各种各样的IPC方式,那么到底它们有什么不同呢?我到底该使用哪一种呢?本节就为读者解答这些问题,具体内容如表所示。通过表可以明确地看出不同IPC方式的优缺点和适用场景,那么在实际的开发中,只要我们选适的IPC方式就可以轻松完成多进程的开发场景。