下面先简单的搭建一个demo,此demo是集成入spring mvc使用的。
一、准备所需要的表
DROP TABLE IF EXISTS `sys_permission`;
CREATE TABLE `sys_permission` (
  `id` varchar(255) NOT NULL,
  `url` varchar(255) DEFAULT NULL COMMENT '链接地址',
  `description` varchar(64) DEFAULT NULL COMMENT 'url描述',
  `permission` varchar(255) DEFAULT NULL COMMENT '需要具备的权限',
  `sort` int(50) DEFAULT NULL COMMENT '排序',
  `del_flag` varchar(1) DEFAULT '1' COMMENT '删除标记 1-未删除 2-删除',
  `create_time` datetime DEFAULT NULL COMMENT '创建日期',
  `update_time` datetime DEFAULT NULL COMMENT '修改日期',
  `create_by` varchar(64) DEFAULT NULL COMMENT '创建人',
  `update_by` varchar(64) DEFAULT NULL COMMENT '修改人',
  PRIMARY KEY (`id`)
) ENGINE=InnoDB DEFAULT CHARSET=utf8;

DROP TABLE IF EXISTS `sys_role`;

CREATE TABLE `sys_role` (
  `id` varchar(64) DEFAULT NULL,
  `name` varchar(32) DEFAULT NULL COMMENT '角色名称',
  `type` varchar(10) DEFAULT NULL COMMENT '角色类型',
  `del_flag` char(1) DEFAULT '1' COMMENT '删除标记 1-未删除 2-删除',
  `create_time` datetime DEFAULT NULL COMMENT '创建日期',
  `update_time` datetime DEFAULT NULL COMMENT '修改日期',
  `create_by` varchar(64) DEFAULT NULL COMMENT '创建人',
  `update_by` varchar(64) DEFAULT NULL COMMENT '修改人',
  PRIMARY KEY (`id`)
) ENGINE=InnoDB DEFAULT CHARSET=utf8;

DROP TABLE IF EXISTS `sys_role_permission`;

CREATE TABLE `sys_role_permission` (
  `id` varchar(64) NOT NULL,
  `rid` varchar(64) DEFAULT NULL COMMENT '角色ID',
  `pid` varchar(64) DEFAULT NULL COMMENT '权限ID',
  PRIMARY KEY (`id`)
) ENGINE=InnoDB DEFAULT CHARSET=utf8;

DROP TABLE IF EXISTS `sys_user_role`;

CREATE TABLE `sys_user_role` (
  `id` varchar(64) NOT NULL,
  `uid` varchar(64) DEFAULT NULL COMMENT '用户ID',
  `rid` varchar(64) DEFAULT NULL COMMENT '角色ID',
  PRIMARY KEY (`id`)
) ENGINE=InnoDB DEFAULT CHARSET=utf8;

DROP TABLE IF EXISTS `sys_user`;

CREATE TABLE `sys_user` (
  `id` int(11) NOT NULL AUTO_INCREMENT COMMENT '主键',
  `username` varchar(55) NOT NULL COMMENT '用户名',
  `password` varchar(200) DEFAULT NULL COMMENT '密码',
  `age` int(3) DEFAULT NULL COMMENT '年龄',
  `QQ` varchar(12) DEFAULT NULL COMMENT 'qq',
  `wechat` varchar(55) DEFAULT NULL COMMENT '微信',
  `email` varchar(55) DEFAULT NULL,
  `phone` varchar(55) DEFAULT NULL,
  `nick` varchar(55) DEFAULT NULL COMMENT '昵称',
  `sex` varchar(2) NOT NULL DEFAULT '0' COMMENT '性别 1-男 2-女 0-未知',
  `status` varchar(2) DEFAULT '1' COMMENT '1-正常 2-禁止登陆',
  `del_flag` varchar(2) DEFAULT '1' COMMENT '删除标记 1-未删除 2-删除',
  `create_time` date DEFAULT NULL,
  `update_time` date DEFAULT NULL,
  PRIMARY KEY (`id`)
) ENGINE=InnoDB DEFAULT CHARSET=utf8;

alter table `sys_user` AUTO_INCREMENT=100000000
权限基本这五张表就够用了,有些面试会问做权限管理需要几张表,实体类创建这里就不贴出来了。
二、realm域的编写
上篇文章中已经提到,realm是用来做权限认证和用户认证的,具体实现就是继承org.apache.shiro.realm.AuthorizingRealm重写方法
- protected AuthorizationInfo doGetAuthorizationInfo(PrincipalCollection principalCollection) 权限认证,即授权
- protected AuthenticationInfo doGetAuthenticationInfo(AuthenticationToken authcToken) throws AuthenticationException 登录认证
具体实现如下:
package com.wangcongming.crm.config.shiro;

import com.wangcongming.crm.dao.PermissionDao;
import com.wangcongming.crm.dao.RoleDao;
import com.wangcongming.crm.dao.UserDao;
import com.wangcongming.crm.entity.Permission;
import com.wangcongming.crm.entity.Role;
import com.wangcongming.crm.entity.User;
import com.wangcongming.crm.rao.RedisRao;
import org.apache.shiro.SecurityUtils;
import org.apache.shiro.authc.*;
import org.apache.shiro.authz.AuthorizationInfo;
import org.apache.shiro.authz.SimpleAuthorizationInfo;
import org.apache.shiro.realm.AuthorizingRealm;
import org.apache.shiro.subject.PrincipalCollection;
import org.apache.shiro.util.ByteSource;
import org.slf4j.Logger;
import org.slf4j.LoggerFactory;
import org.springframework.beans.factory.annotation.Autowired;

import java.util.HashSet;
import java.util.List;
import java.util.Set;
import java.util.concurrent.TimeUnit;

/**
 *
 * @ClassName:  NDShiroRealm
 * @Description:shiro身份校验核心类
 * @author: wangcongming
 * @date:   2018年2月1日 下午3:05:39
 *
 */
public class NDShiroRealm extends AuthorizingRealm {

	private final static Logger logger = LoggerFactory.getLogger(NDShiroRealm.class);

	@Autowired
	private UserDao userDao;
	@Autowired
	private RoleDao roleDao;
	@Autowired
	private PermissionDao permissionDao;

	/**
	 * 认证信息.(身份验证) : Authentication 是用来验证用户身份
	 *
	 * @param authcToken
	 * @return
	 * @throws AuthenticationException
	 */
	@Override
	protected AuthenticationInfo doGetAuthenticationInfo(
			AuthenticationToken authcToken) throws AuthenticationException {
		UsernamePasswordToken token = (UsernamePasswordToken) authcToken;
		String name = token.getUsername();
		String password = String.valueOf(token.getPassword());
		User user = userDao.findUserByUsername(name);
		if (null == user) {
			throw new AccountException("帐号或密码不正确!");
		}

		if("0".equals(user.getStatus())){
			throw new DisabledAccountException("此帐号已经被禁止登录,请联系管理员");
		}
		ByteSource salt = ByteSource.Util.bytes(name);
		return new SimpleAuthenticationInfo(user, user.getPassword(),salt, getName());
	}

	/**
	 *
	 * <p>Title: doGetAuthorizationInfo</p>
	 * <p>Description: 授权</p>
	 * @param principals
	 * @return
	 * @see AuthorizingRealm#doGetAuthorizationInfo(PrincipalCollection)
	 */
	@Override
	protected AuthorizationInfo doGetAuthorizationInfo(
			PrincipalCollection principals) {
		logger.info("**********开始为用户授权***********");
		User user = (User)SecurityUtils.getSubject().getPrincipal();
		String userId = user.getId();
		SimpleAuthorizationInfo info =  new SimpleAuthorizationInfo();
		//根据用户ID查询角色(role),放入到Authorization里。
		List<Role> roles = roleDao.findRoles(userId);
		Set<String> roleSet = new HashSet<String>();
		for (Role role : roles) {
			roleSet.add(role.getType());
		}
		info.setRoles(roleSet);
		//根据用户ID查询权限(permission),放入到Authorization里。
		List<Permission> permissions = permissionDao.findPermissionsByUid(userId);
		Set<String> permissionSet = new HashSet<String>();
		for (Permission   permission : permissions) {
			String p = permission.getPermission();
			permissionSet.add(p);
		}
		info.setStringPermissions(permissionSet);
        return info;
	}
}
- 登陆认证doGetAuthenticationInfo()方法,返回的时候是new SimpleAuthenticationInfo,传了4个参数,查看源码可以看到
public SimpleAuthenticationInfo(Object principal, Object hashedCredentials, ByteSource credentialsSalt, String realmName) {
	this.principals = new SimplePrincipalCollection(principal, realmName);
	this.credentials = hashedCredentials;
	this.credentialsSalt = credentialsSalt;
}
Object principal :这个参数可以传用户,或者用户名,传入用户名,则通过SecurityUtils.getSubject().getPrincipal()方法取出的是用户名,如果是用户,则取出的直接就是用户
Object hashedCredentials:这个参数是该用户数据库中保存的密码
ByteSource credentialsSalt:这个是盐值,用于对用户名进行加密,可以通过用户名+固定字符串获取,也可以随机生成(随机生成的需要写入数据库中,在这里从库中读取到)
String realmName:realm的名字,可以通过getName()获取到一个唯一的realm名,每次登陆唯一
- 授权doGetAuthorizationInfo()
授权就是将用户的权限和角色查询出来,放入到SimpleAuthorizationInfo对象中即可
三、配置文件配置
- spring-shiro.xml配置
new SimpleAuthenticationInfo(user, user.getPassword(),salt, getName());


public SimpleAuthenticationInfo(Object principal, Object hashedCredentials, ByteSource credentialsSalt, String realmName) {
	this.principals = new SimplePrincipalCollection(principal, realmName);
	this.credentials = hashedCredentials;
	this.credentialsSalt = credentialsSalt;
}


<?xml version="1.0" encoding="UTF-8"?>
<beans xmlns="http://www.springframework.org/schema/beans"
	xmlns:xsi="http://www.w3.org/2001/XMLSchema-instance" xmlns:aop="http://www.springframework.org/schema/aop"
	xmlns:tx="http://www.springframework.org/schema/tx" xmlns:util="http://www.springframework.org/schema/util"
	xmlns:context="http://www.springframework.org/schema/context"
	xsi:schemaLocation="
       http://www.springframework.org/schema/beans http://www.springframework.org/schema/beans/spring-beans.xsd
       http://www.springframework.org/schema/tx http://www.springframework.org/schema/tx/spring-tx.xsd
       http://www.springframework.org/schema/aop http://www.springframework.org/schema/aop/spring-aop.xsd
       http://www.springframework.org/schema/util http://www.springframework.org/schema/util/spring-util.xsd
       http://www.springframework.org/schema/context http://www.springframework.org/schema/context/spring-context.xsd">

    <bean id="sessionDAO" class="org.apache.shiro.session.mgt.eis.EnterpriseCacheSessionDAO"></bean>

	<bean id="cacheManager" class="org.apache.shiro.cache.ehcache.EhCacheManager">
		<property name="cacheManagerConfigFile" value="classpath:ehcache.xml" />
	</bean>

	<!-- 管理Session -->
	<bean id="sessionManager" class="org.apache.shiro.web.session.mgt.DefaultWebSessionManager">
		<property name="sessionDAO" ref="sessionDAO"/>
		<property name="cacheManager" ref="cacheManager" />
	</bean>

	<!-- 安全管理器 -->
    <bean id="securityManager" class="org.apache.shiro.web.mgt.DefaultWebSecurityManager">
        <property name="realm" ref="NDShiroRealm"/>
        <property name="sessionManager" ref="sessionManager"/>
    </bean>

	<!-- 授权 认证 -->
	<bean id="NDShiroRealm" class="com.wangcongming.crm.config.shiro.NDShiroRealm" >
		<property name="credentialsMatcher">
			<bean class="org.apache.shiro.authc.credential.HashedCredentialsMatcher">
				<property name="hashAlgorithmName" value="MD5"></property>
				<property name="hashIterations" value="1024"></property>
			</bean>
		</property>
	</bean>
	<!-- aop式方法级权限检查 depends-on="lifecycleBeanPostProcessor"  -->
	<!-- <bean id="defaultAdvisorAutoProxyCreator" class="org.springframework.aop.framework.autoproxy.DefaultAdvisorAutoProxyCreator"
		>
		<property name="proxyTargetClass" value="true"/>
	</bean> -->

	<bean id="shiroFilter" class="org.apache.shiro.spring.web.ShiroFilterFactoryBean">
		<property name="securityManager" ref="securityManager" />
		<!-- 如果不设置默认会自动寻找Web工程根目录下的"/login.jsp"页面,登录页面,用于用户登出跳转 -->
		<property name="loginUrl" value="/user/login/page.do" />
		<!-- 登录成功后要跳转的链接 -->
		<property name="successUrl" value="/menu/index.do" />
		<!-- 未授权界面 -->
		<property name="unauthorizedUrl" value="unauthorizedUrl.jsp" />
		<property name="filterChainDefinitions">
			<value>
				#静态文件
				/bootstrap/** = anon
				/build/** = anon
				/dist/** = anon
				/documentation/** = anon
				/echart/** = anon
				/font-awesome-4.7.0/** = anon
				/ionicons-2.0.1/** = anon
				/js/** = anon
				/plugins/** = anon
				/resources/** = anon
				/**.css = anon
				/**.js = anon
				#登录页面
				/login.jsp = anon
				/shiro/login = anon
				# everything else requires authentication:
				/** = authc
			</value>
		</property>
	</bean>

</beans>
这里还要说的一点是在配置realm的时候,配置了一个credentialsMatcher,这个就是一个密码比较器,他用来比较数据库中的密码与输入的密码是否一致。所以这里配置的密码加密方式(hashAlgorithmName)和加密次数(hashIterations)一定要与添加用户时,对密码加密的方式和次数一致。添加用户的时候可以通过以下方式获得密码加密后的密码
String inPassword = new SimpleHash("MD5", //加密方式
        		inPassword,//密码原值
				salt,//盐值
				1024//加密次数
).toString();- ehcache.xml配置
<ehcache>
    <diskStore path="java.io.tmpdir"/>


    <defaultCache
        maxElementsInMemory="10000"
        eternal="false"
        timeToIdleSeconds="120"
        timeToLiveSeconds="120"
        overflowToDisk="true"
        />
    <cache name="sampleCache1"
        maxElementsInMemory="10000"
        eternal="false"
        timeToIdleSeconds="300"
        timeToLiveSeconds="600"
        overflowToDisk="true"
        />

</ehcache>
- web.xml配置
<filter>
   <filter-name>shiroFilter</filter-name>
   <filter-class>org.springframework.web.filter.DelegatingFilterProxy</filter-class>
</filter>
<filter-mapping>
   <filter-name>shiroFilter</filter-name>
  <url-pattern>/*</url-pattern>
</filter-mapping>
- spring.xml配置
spring-shiro.xml配置完成之后,还要将spring-shiro.xml配置文件引入到spring中,否则不生效
在spring.xml配置i文件中添加如下配置即可
<!-- shiro -->
<import resource="spring-shiro.xml"/>
四、用户登录和用户注销的实现
- 用户登录
	@RequestMapping(value = "/login",method = RequestMethod.POST)
	@ResponseBody
	public ResultInfo login(String userName ,String password) {
		logger.info("---->用户登录请求参数:username={}",userName);
		try {
			ResultInfo info = userService.login(userName, password);
			return info;
		} catch (LockedAccountException e) {
			ResultInfo info = new ResultInfo<>();
			info.setMsg(Constants.FAIL);
			info.setDetail(e.getMessage());
			return info;
		} catch (DisabledAccountException e) {
			ResultInfo info = new ResultInfo<>();
			info.setMsg(Constants.FAIL);
			info.setDetail(e.getMessage());
			return info;
		} catch (AccountException e) {
			ResultInfo info = new ResultInfo<>();
			info.setMsg(Constants.FAIL);
			info.setDetail(e.getMessage());
			return info;
		} catch (Exception e) {
			logger.error("登录失败:",e);
			ResultInfo info = new ResultInfo<>();
			info.setMsg(Constants.FAIL);
			info.setDetail("用户名或者密码不正确");
			return info;
		}
	}


	public ResultInfo login(String userName, String password) {

		ResultInfo info = new ResultInfo<>();
		//校验参数是否为空
		if(StringUtils.isEmpty(userName) || StringUtils.isEmpty(password)) {
			info.setMsg(Constants.FAIL);
			info.setDetail("用户名或者密码不能为空");
			return info;
		}

		//登录操作
		Subject currentUser = SecurityUtils.getSubject();
		UsernamePasswordToken token = new UsernamePasswordToken(userName, password);
		currentUser.login(token);

		info.setMsg(Constants.SUCCESS);
		info.setDetail("登录成功");
		return info;
}- 用户注销
	public ResultInfo logout() {
		ResultInfo info = new ResultInfo<>();
		SecurityUtils.getSubject().logout();
		info.setMsg(Constants.SUCCESS);
		info.setDetail("注销成功");
		return info;
	}

	@RequestMapping(value = "/logout",method = RequestMethod.GET)
	public String logout() {
		logger.info("---->用户注销请求-----");
		try {
			userService.logout();
			return "redirect:/user/login/page.do";
		} catch (Exception e) {
			logger.error("注销失败:",e);
			return null;
		}
	}
到此springmvc集成shiro的工作就全部完成了
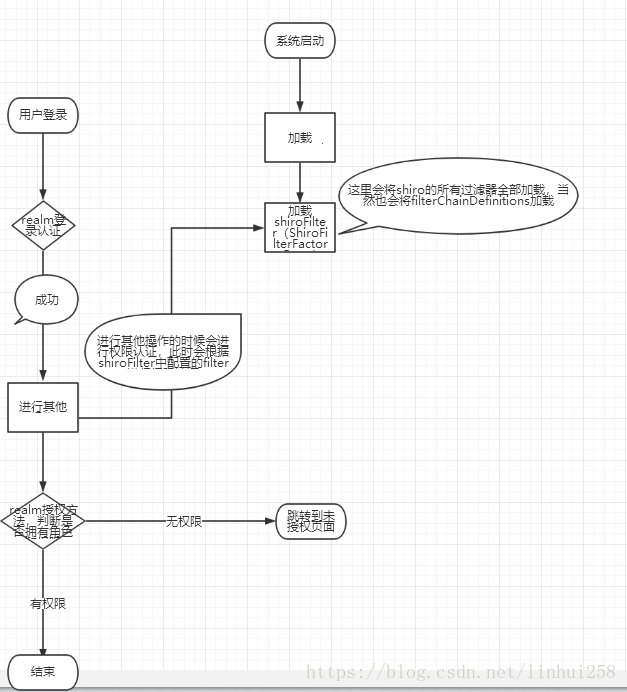
五、流程解析
到这里就实现了权限的控制,初学者也许会很奇怪,怎么就实现了呢?那么,下面就说一下shiro运行的流程