memcached
环境:centos6.8,jdk1.8.0_u172,memcached-1.5.10.tar.gz
0、环境搭建
 1 yum install libevent-devel
 2
 5 tar -zxvf memcached-1.5.10.tar.gz  -C /home/rui/
 6
 7 cd /home/rui/memcached-1.5.10
 8
 9 ./configure
10
11 make && make test
12
13 make install

1、什么是memcached
Memcached是一个用于分布式系统,高性能的,多线程的,基于事件(libevent)的,键/值缓存存储。用来存储字符串,对象等小数据,比如数据库查询出来的对象。
Memcached的作用:缓存数据库查询结果,减少数据库访问次数,提高web系统性能。[减轻数据库负载来加速动态Web应用程序]
默认端口:11211
默认项目内存:64M
使用的线程数量:4
最大同时连接:1024
2、memcached常用命令
1)启动Memcached(默认端口11211,默认内存大小64M,以后台程序形式运行)
1 memcached -l 127.0.0.1 -d -u root
查看Memcached是否启动
1 ps -ef|grep memcached

2)命令行操作Memcached
开启windows telnet客户端和服务器端,控制面板---->卸载程序--->打开或关闭windoow功能---->telnet server、telnet client前打钩
打开cmd,输入命令telnet 192.168.0.102 11211,enter,连接成功。
ctrl+],
quit,退出;
enter,进入memcached命令控制台。
3)命令,格式
 1 command key flag expiretime bytes
 2 value
 3
 4 enter ---->
 5 STORED
 6
 7 =====================================
 8 command key
 9
10 enter ---->
11
12 VALUE key flag bytes
13 value
14 END
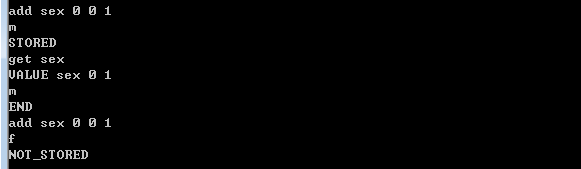
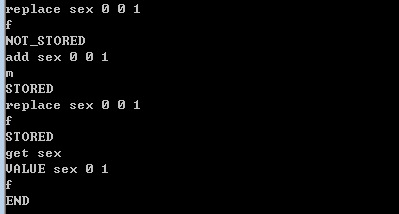
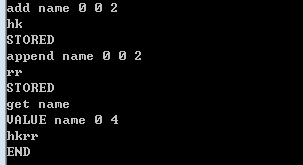
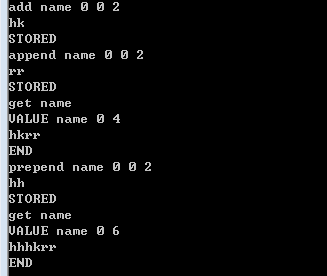
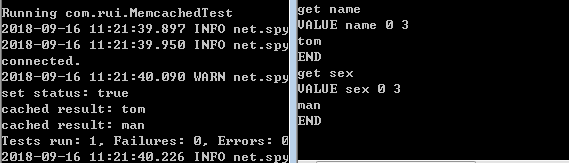
add,增加一对key-value(同一个键不能插入多个值)
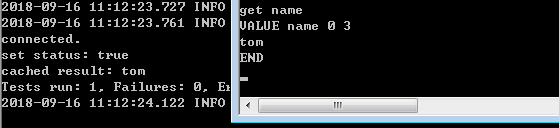
get,获得某个key的value
set,设置某个key的value(可以覆盖旧值,类似更新)

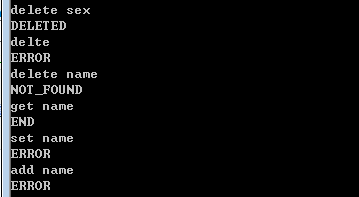
delete,删除已存在的key的内容

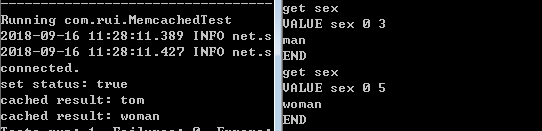
replace,替换已存在的key的内容
gets,可以获得带有cas令牌的value
注意:"VALUE sex 0 1 8”的8是64位整型值,名称叫CAS令牌(check and set token)

cas,检查并设置
注意:通过gets获得key的令牌,然后使用"cas sex 0 0 1 8"指定令牌更新数据

stats,返回memcached的详细统计信息,进程号,版本号,事件库等

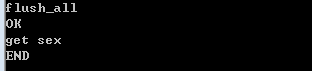
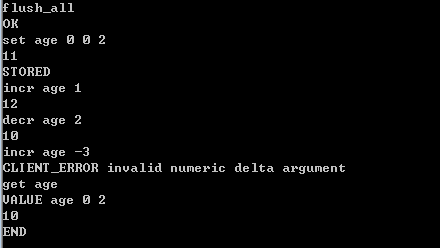
flush_all,清除所有缓存
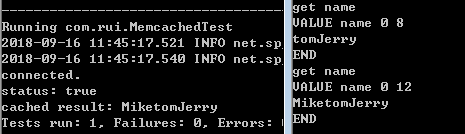
append,在指定的key的value上,在后面追加相应的内容(会返回总字节数)
prepend,在指定的key的value上,在前面追加相应的内容(会返回总字节数)
incr,增长某个指定的数值,不能是负数
decr,减少某个指定的数值,不能是负数
注意:
删除不存在的key,会报NOT_FOUND
替换不存在的key,会报NOT_FOUND(见replace指令)
不指定flag,expiretime,bytes会报ERROR
3、memcached的java客户端
maven依赖
 1 <dependency>
 2       <groupId>junit</groupId>
 3       <artifactId>junit</artifactId>
 4       <version>4.12</version>
 5       <scope>test</scope>
 6 </dependency>
 7
 8 <dependency>
 9     <groupId>net.spy</groupId>
10     <artifactId>spymemcached</artifactId>
11     <version>2.12.3</version>
12 </dependency>
测试代码:


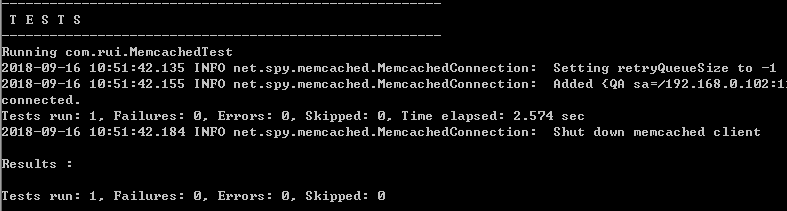
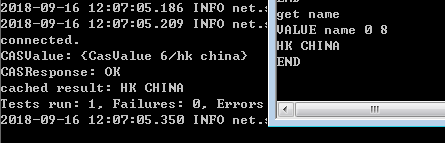
 1 package com.rui;
 2
 3 import org.junit.Test;
 4 import net.spy.memcached.MemcachedClient;
 5 import net.spy.memcached.CASValue;
 6 import net.spy.memcached.CASResponse;
 7
 8 import java.net.InetSocketAddress;
 9 import java.net.SocketAddress;
10
11 import java.util.concurrent.Future;
12 import java.util.Map;
13
14 public class MemcachedTest {
15
16     @Test
17     public void memcachedTest() throws Exception{
18
19     // connect Memcached
20     MemcachedClient mc = new MemcachedClient(new InetSocketAddress("192.168.0.102", 11211));
21     System.out.println("connected.");
22
23     // set operation
24     //Future future = mc.set("name", 0, "tom");
25
26     // add operation
27     //Future future = mc.add("sex", 0, "man");
28
29     // replace operation
30      //Future future = mc.replace("sex", 0, "woman");
31
32     //append operation
33     //Future future = mc.append("name", "Jerry");
34
35     //prepend operation
36     //Future future = mc.prepend("name", "Mike");
37
38     //cas operation
39      /*CASValue casValue = mc.gets("name");
40      System.out.println("CASValue: "+casValue); //gets operation
41      long cas = casValue.getCas(); //get cas token
42      CASResponse response = mc.cas("name", cas, 0, "HK CHINA");
43
44     System.out.println("CASResponse: "+response);*/
45
46     // delete operation
47     //Future future = mc.delete("name");
48
49      // incr/decr operation
50     //Future future = mc.set("number", 0, "2");
51
52      // check status
53      //System.out.println("status: " + future.get());
54
55      //incr/decr output
56      /*long incrRes = mc.incr("number", 1);
57     System.out.println("cached incrRes result: " + incrRes);*/
58
59     /*long decrRes = mc.decr("number", 2);
60     System.out.println("cached decrRes result: " + decrRes);*/
61
62     //stats
63      /*Map<SocketAddress, Map<String, String>> stats = mc.getStats();
64
65     for(SocketAddress sa : stats.keySet()){
66
67          for(String str : stats.get(sa).keySet()){
68              System.out.println("str1: "+str + " str2: " + stats.get(sa).get(str));
69
70              }
71     }*/
72
73       // set output
74      //System.out.println("cached result: " + mc.get("name"));
75
76      // add output
77      //System.out.println("cached result: " + mc.get("sex"));
78      // disconnect
79       mc.shutdown();
80
81     }
82 }
connect:
set
get
add
replace
append

prepend
cas
gets
delete

decr
incr

stats

4、和spring 整合
SpyMemcachedUtil.java
 1 package com.rui.util;
 2
 3 import java.util.concurrent.Future;
 4 import net.spy.memcached.MemcachedClient;
 5 import org.springframework.beans.factory.annotation.Autowired;
 6
 7 public class SpyMemcachedUtil {
 8
 9     //@Autowired ?????
10     private MemcachedClient memcachedClient;
11
12     public void setMemcachedClient(MemcachedClient memcachedClient){
13         this.memcachedClient = memcachedClient;
14     }
15
16      public String set(String str1, int i ,String str2) throws Exception{
17
18         Future future = memcachedClient.set(str1, i, str2);
19         return future.get()+"";
20     }
21
22     public String get(String str1) throws Exception{
23
24         String str = memcachedClient.get(str1)+"";
25         return str;
26     }
27
28 }
applicationContext-memcached.xml
 1 <?xml version="1.0" encoding="UTF-8"?>
 2 <beans xmlns="http://www.springframework.org/schema/beans"
 3        xmlns:xsi="http://www.w3.org/2001/XMLSchema-instance"       xmlns:context="http://www.springframework.org/schema/context"   xsi:schemaLocation="http://www.springframework.org/schema/beans
 4        http://www.springframework.org/schema/beans/spring-beans.xsd
 5        http://www.springframework.org/schema/context
 6        http://www.springframework.org/schema/context/spring-context.xsd">
 7
 8  <!--<context:component-scan base-package="com.rui"/>-->
 9
10     <!-- properties config   -->
11     <bean class="org.springframework.beans.factory.config.PropertyPlaceholderConfigurer">
12       <property name="order" value="1"/>
13       <property name="ignoreUnresolvablePlaceholders" value="true"/>
14       <property name="locations">
15         <list>
16             <value>classpath*:spyMemcached.properties</value>
17         </list>
18       </property>
19     </bean>
20    <!-- Memcached配置 -->
21    <!--
22         枚举类型要想注入到类中,一定要先使用org.springframework.beans.factory.config.FieldRetrievingFactoryBean类将枚举类型进行转换
23         将DefaultHashAlgorithm.KETAMA_HASH转换为KETAMA_HASH这个bean,
24         然后在要注入的bean中使用<property name="hashAlg" ref="KETAMA_HASH" />引用即可。
25      -->
26     <bean id="KETAMA_HASH" class="org.springframework.beans.factory.config.FieldRetrievingFactoryBean">
27         <property name="staticField" value="net.spy.memcached.DefaultHashAlgorithm.KETAMA_HASH" />
28 </bean>
29
30 <bean id="memcachedClient" class="net.spy.memcached.spring.MemcachedClientFactoryBean">
31 <!-- 一个字符串,包括由空格或逗号分隔的主机或IP地址与端口号 -->
32     <property name="servers" value="${memcached.servers}" />
33         <!-- 指定要使用的协议(BINARY,TEXT),默认是TEXT -->
34         <property name="protocol" value="${memcached.protocol}" />
35         <!-- 设置默认的转码器(默认以net.spy.memcached.transcoders.SerializingTranscoder) -->
36         <property name="transcoder">
37             <bean class="net.spy.memcached.transcoders.SerializingTranscoder">
38                 <property name="compressionThreshold" value="1024" />
39  </bean>
40         </property>
41         <!-- 以毫秒为单位设置默认的操作超时时间 -->
42         <property name="opTimeout" value="${memcached.opTimeout}" />
43         <property name="timeoutExceptionThreshold" value="${memcached.timeoutExceptionThreshold}" />
44         <!-- 设置哈希算法 -->
45         <property name="hashAlg" ref="KETAMA_HASH" />
46         <!-- 设置定位器类型(ARRAY_MOD,CONSISTENT),默认是ARRAY_MOD -->
47         <property name="locatorType" value="${memcached.locatorType}" />
48         <!-- 设置故障模式(取消,重新分配,重试),默认是重新分配 -->
49         <property name="failureMode" value="${memcached.failureMode}" />
50         <!-- 想使用Nagle算法,设置为true -->
51         <property name="useNagleAlgorithm" value="${memcached.useNagleAlgorithm}" />
52     </bean>
53     <bean id="memcachedManager" class="com.rui.util.SpyMemcachedUtil">
54         <property name="memcachedClient" ref="memcachedClient" />
55     </bean>
56 </beans>
spyMemcached.properties
memcached.servers=192.168.0.102:11211
memcached.protocol=BINARY
memcached.opTimeout=1000
memcached.timeoutExceptionThreshold=1998
memcached.locatorType=CONSISTENT
memcached.failureMode=Redistribute
memcached.useNagleAlgorithm=false
SpyMemcachedTest.java
 1 package com.rui;
 2
 3 import org.junit.Before;
 4 import org.junit.Test;
 5 import org.springframework.context.ApplicationContext;
 6 import org.springframework.context.support.ClassPathXmlApplicationContext;
 7 import com.rui.util.SpyMemcachedUtil;
 8
 9 public class SpyMemcachedTest{
10
11     private ApplicationContext app;
12     private SpyMemcachedUtil memcachedUtil;
13     @Before
14     public void init() {
15         app = new ClassPathXmlApplicationContext("applicationContext-spyMemcached.xml");
16         memcachedUtil = (SpyMemcachedUtil) app.getBean("memcachedManager");
17     }
18     @Test
19  public void test() {
20         try {
21             System.out.println("set:"+memcachedUtil.set("SpyMemcached", 0, "1234"));          System.out.println("get:"+memcachedUtil.get("SpyMemcached"));
22         } catch (Exception e) {
23             e.printStackTrace();
24         }
25     }
26 }
参考:https://blog.csdn.net/u013725455/article/details/52102170