版权声明:如需转载,请备注出处 https://blog.csdn.net/u013783065/article/details/81184417
简介:
Swagger的目标是为REST APIs 定义一个标准的,与语言无关的接口,使人和计算机在看不到源码或者看不到文档或者不能通过网络流量检测的情况下能发现和理解各种服务的功能。当服务通过Swagger定义,消费者就能与远程的服务互动通过少量的实现逻辑。类似于低级编程接口,Swagger去掉了调用服务时的很多猜测。
我觉得把Swagger当成一种开发工具就好,省去了手写文档的步骤,生成文档并能测试,注解的方式让其他人看代码也更加清楚方便。想了解更多请自己查看官方文档!
创建工程:
其完整的pom文件如下:
<?xml version="1.0" encoding="UTF-8"?>
<project xmlns="http://maven.apache.org/POM/4.0.0" xmlns:xsi="http://www.w3.org/2001/XMLSchema-instance"
         xsi:schemaLocation="http://maven.apache.org/POM/4.0.0 http://maven.apache.org/xsd/maven-4.0.0.xsd">
    <modelVersion>4.0.0</modelVersion>

    <groupId>com.wujie</groupId>
    <artifactId>springboot-swagger</artifactId>
    <version>0.0.1-SNAPSHOT</version>
    <packaging>jar</packaging>

    <name>springboot-swagger</name>
    <description>Demo project for Spring Boot</description>

    <parent>
        <groupId>org.springframework.boot</groupId>
        <artifactId>spring-boot-starter-parent</artifactId>
        <version>2.0.3.RELEASE</version>
        <relativePath/> <!-- lookup parent from repository -->
    </parent>

    <properties>
        <project.build.sourceEncoding>UTF-8</project.build.sourceEncoding>
        <project.reporting.outputEncoding>UTF-8</project.reporting.outputEncoding>
        <java.version>1.8</java.version>
    </properties>

    <dependencies>
        <dependency>
            <groupId>org.springframework.boot</groupId>
            <artifactId>spring-boot-starter-web</artifactId>
        </dependency>

        <dependency>
            <groupId>org.springframework.boot</groupId>
            <artifactId>spring-boot-starter-test</artifactId>
            <scope>test</scope>
        </dependency>
        <!-- https://mvnrepository.com/artifact/io.springfox/springfox-swagger2 -->
        <dependency>
            <groupId>io.springfox</groupId>
            <artifactId>springfox-swagger2</artifactId>
            <version>2.9.2</version>
        </dependency>
        <!-- https://mvnrepository.com/artifact/io.springfox/springfox-swagger-ui -->
        <dependency>
            <groupId>io.springfox</groupId>
            <artifactId>springfox-swagger-ui</artifactId>
            <version>2.9.2</version>
        </dependency>
    </dependencies>

    <build>
        <plugins>
            <plugin>
                <groupId>org.springframework.boot</groupId>
                <artifactId>spring-boot-maven-plugin</artifactId>
            </plugin>
        </plugins>
    </build>


</project>
新建一个配置类:
@Configuration
@EnableSwagger2
public class Swagger2 {
    @Bean
    public Docket createRestApi(){
        return new Docket(DocumentationType.SWAGGER_2)
                .apiInfo(apiInfo())
                .select()
                .apis(RequestHandlerSelectors.basePackage("com.wujie.springbootswagger.controller"))
                .paths(PathSelectors.any())
                .build();
    }

    private ApiInfo apiInfo() {
        return new ApiInfoBuilder().title("springboot 整合swaager2 构建api文档")
                .description("springboot 学习 ,https://blog.csdn.net/u013783065")
                .termsOfServiceUrl("https://blog.csdn.net/u013783065")
                .version("1.0")
                .build();
    }
}
新建一个测试controller:
@Api(description = "swagger测试")
@RestController
public class HelloController {
    @ApiOperation(value = "test1",notes = "测试swagger")
    @ApiImplicitParams({
            @ApiImplicitParam(name = "name",value="姓名",required = true,dataType = "string"),
            @ApiImplicitParam(name = "sex",value = "性别",required = true,dataType = "string")})
    @RequestMapping(value = "test1",method = RequestMethod.POST)
    public String test1(@RequestParam String name ,@RequestParam String sex){
        return name+" : "+sex;
    }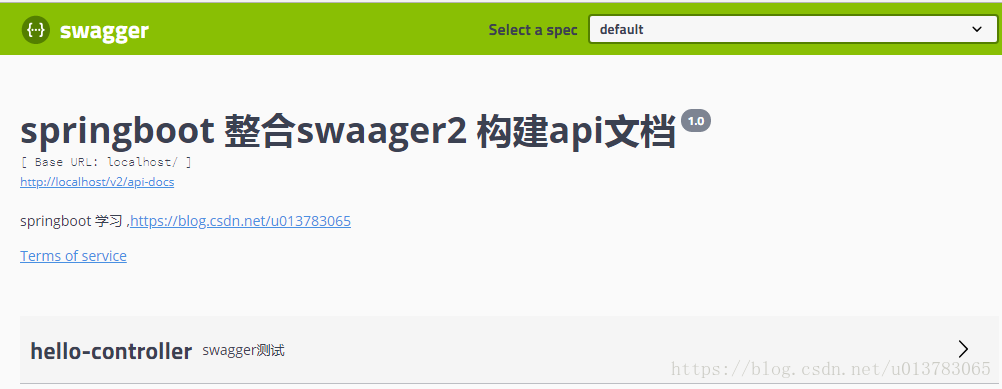
}最后运行项目,访问http://localhost/swagger-ui.html#/,即可进入页面:
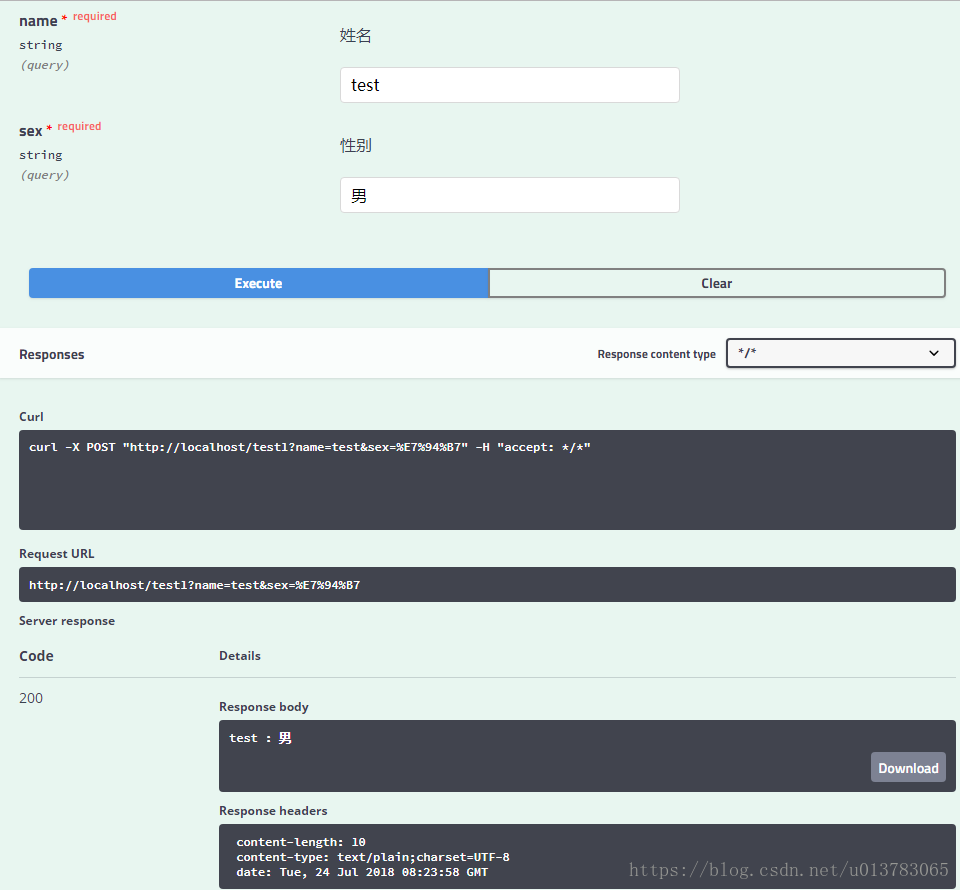
最后我们还可以进行测试:
到此我们整合swagger也就算完成,我之前也在ssm上进行过整合,整体来说还是没有springboot来的简单轻松方便。
最后附上一些swagger常用的注解以及解释:
@Api:修饰整个类,描述Controller的作用
@ApiOperation:描述一个类的一个方法,或者说一个接口
@ApiParam:单个参数描述
@ApiModel:用对象来接收参数
@ApiProperty:用对象接收参数时,描述对象的一个字段
@ApiResponse:HTTP响应其中1个描述
@ApiResponses:HTTP响应整体描述
@ApiIgnore:使用该注解忽略这个API
@ApiError :发生错误返回的信息
@ApiParamImplicitL:一个请求参数
@ApiParamsImplicit 多个请求参数
源码地址
欢迎关注我的公众号我们一起学习: