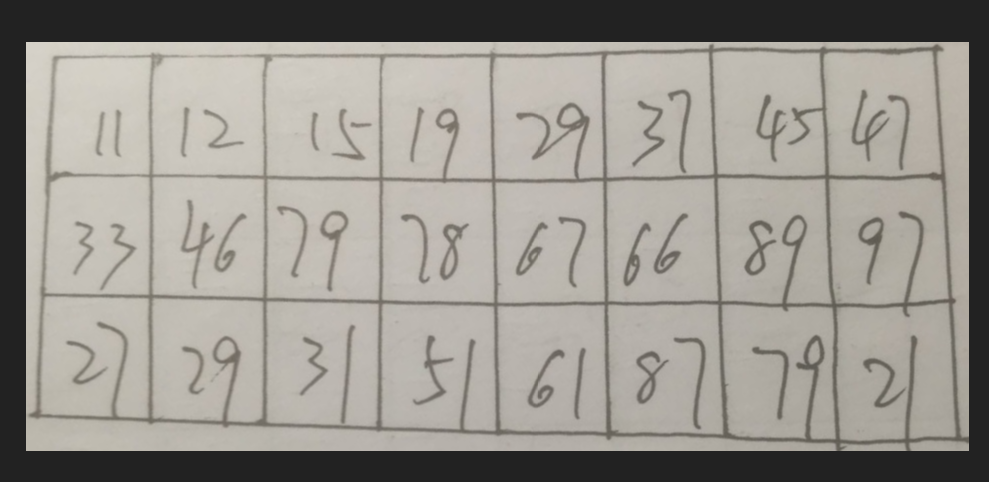
更多的时候,我们得到的图像不可能是正的,多少都会有一定的倾斜,就比如下面的
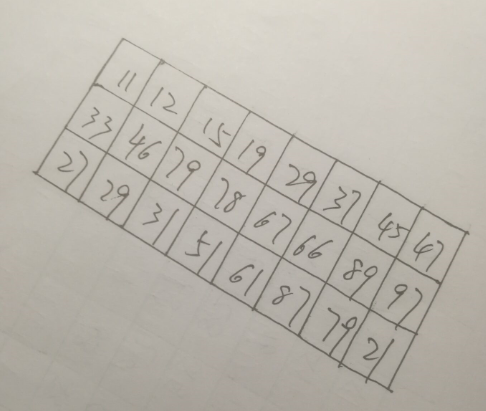
我们要做的就是把它们变成下面这样的
我们采用的是寻找轮廓的思路,来矫正图片;只要有明显的轮廓都可以采用这种思路
具体思路:
1、先用opencv提供的canny函数,进行一次边缘检测
2、再用opencv提供的findContours函数,寻找图像的轮廓,从中间结果种,找到最大的轮廓,就是我们图像的最外面的轮廓
3、得到最终轮廓后,计算矩形轮廓与水平的夹角,然后旋转图像
4、最后我们在从旋转后的图像中,把我们感兴趣的切割出来,就可以了
我们实际的实现一下
先用opencv提供的canny函数,进行一次边缘检测;具体的函数就不再讲解,百度上非常多
/**
     * canny算法,边缘检测
     *
     * @param src
     * @return
     */
    public static Mat canny(Mat src) {
        Mat mat = src.clone();
        Imgproc.Canny(src, mat, 60, 200);
        HandleImgUtils.saveImg(mat , "C:/Users/admin/Desktop/opencv/open/x/canny.jpg");
        return mat;
    }
再用opencv提供的findContours函数,寻找图像的轮廓,从中间结果种,找到最大的轮廓,就是我们图像的最外面的轮廓
/**
     * 返回边缘检测之后的最大矩形,并返回
     *
     * @param cannyMat
     *            Canny之后的mat矩阵
     * @return
     */
    public static RotatedRect findMaxRect(Mat cannyMat) {

        List<MatOfPoint> contours = new ArrayList<MatOfPoint>();
        Mat hierarchy = new Mat();

        // 寻找轮廓
        Imgproc.findContours(cannyMat, contours, hierarchy, Imgproc.RETR_EXTERNAL, Imgproc.CHAIN_APPROX_NONE,
                new Point(0, 0));

        // 找出匹配到的最大轮廓
        double area = Imgproc.boundingRect(contours.get(0)).area();
        int index = 0;

        // 找出匹配到的最大轮廓
        for (int i = 0; i < contours.size(); i++) {
            double tempArea = Imgproc.boundingRect(contours.get(i)).area();
            if (tempArea > area) {
                area = tempArea;
                index = i;
            }
        }

        MatOfPoint2f matOfPoint2f = new MatOfPoint2f(contours.get(index).toArray());

        RotatedRect rect = Imgproc.minAreaRect(matOfPoint2f);

        return rect;
    }
得到最终轮廓后,计算矩形轮廓与水平的夹角,然后旋转图像
/**
     * 旋转矩形
     *
     * @param src
     *            mat矩阵
     * @param rect
     *            矩形
     * @return
     */
    public static Mat rotation(Mat cannyMat, RotatedRect rect) {
        // 获取矩形的四个顶点
        Point[] rectPoint = new Point[4];
        rect.points(rectPoint);

        double angle = rect.angle + 90;

        Point center = rect.center;

        Mat CorrectImg = new Mat(cannyMat.size(), cannyMat.type());

        cannyMat.copyTo(CorrectImg);

        // 得到旋转矩阵算子
        Mat matrix = Imgproc.getRotationMatrix2D(center, angle, 0.8);

        Imgproc.warpAffine(CorrectImg, CorrectImg, matrix, CorrectImg.size(), 1, 0, new Scalar(0, 0, 0));

        return CorrectImg;
    }
最后我们在从旋转后的图像中,把我们感兴趣的切割出来,就可以了
/**
     * 把矫正后的图像切割出来
     *
     * @param correctMat
     *            图像矫正后的Mat矩阵
     */
    public static void cutRect(Mat correctMat , Mat nativeCorrectMat) {
        // 获取最大矩形
        RotatedRect rect = findMaxRect(correctMat);

        Point[] rectPoint = new Point[4];
        rect.points(rectPoint);

        int startLeft = (int)Math.abs(rectPoint[0].x);
        int startUp = (int)Math.abs(rectPoint[0].y < rectPoint[1].y ? rectPoint[0].y : rectPoint[1].y);
        int width = (int)Math.abs(rectPoint[2].x - rectPoint[0].x);
        int height = (int)Math.abs(rectPoint[1].y - rectPoint[0].y);

        System.out.println("startLeft = " + startLeft);
        System.out.println("startUp = " + startUp);
        System.out.println("width = " + width);
        System.out.println("height = " + height);

        for(Point p : rectPoint) {
            System.out.println(p.x + " , " + p.y);
        }

        Mat temp = new Mat(nativeCorrectMat , new Rect(startLeft , startUp , width , height ));
        Mat t = new Mat();
        temp.copyTo(t);

        HandleImgUtils.saveImg(t , "C:/Users/admin/Desktop/opencv/open/x/cutRect.jpg");
    }
整合整个过程
/**
     * 矫正图像
     *
     * @param src
     * @return
     */
    public static void correct(Mat src) {
        // Canny
        Mat cannyMat = canny(src);

        // 获取最大矩形
        RotatedRect rect = findMaxRect(cannyMat);

        // 旋转矩形
        Mat CorrectImg = rotation(cannyMat , rect);
        Mat NativeCorrectImg = rotation(src , rect);


        //裁剪矩形
        cutRect(CorrectImg , NativeCorrectImg);

        HandleImgUtils.saveImg(src, "C:/Users/admin/Desktop/opencv/open/x/srcImg.jpg");

        HandleImgUtils.saveImg(CorrectImg, "C:/Users/admin/Desktop/opencv/open/x/correct.jpg");
    }
测试代码
/**
     * 测试矫正图像
     */
    public void testCorrect() {
        System.loadLibrary(Core.NATIVE_LIBRARY_NAME);
        Mat src = HandleImgUtils.matFactory("C:/Users/admin/Desktop/opencv/open/x/x7.jpg");
        HandleImgUtils.correct(src);
    }
Java方面opencv的例子还是蛮少的,代码都是自己参考博客写的,照顾不周的地方,请见谅
本项目的所有代码地址:https://github.com/YLDarren/opencvHandleImg