版权声明:本文为Jaiky_杰哥原创,转载请注明出处。This blog is written by Jaiky, reproduced please indicate. https://blog.csdn.net/jaikydota163/article/details/78549345
前文
上篇介绍了Android Studio中的单元测试和自动化测试的基础,这篇我们来看看如何部署和运用测试实例。
--------------------------------------------------------------------------------------------------------------------
Android测试,Android Studio中的单元测试、UI测试和自动化测试使用说明第一篇
--------------------------------------------------------------------------------------------------------------------
5、运行你的测试实例
现在是时候运行你的测试实例了! 右键单击CalculatorTest类并选择Run> CalculatorTest。 您还可以通过在项目目录中发出以下命令来从命令行运行测试:
./gradlew test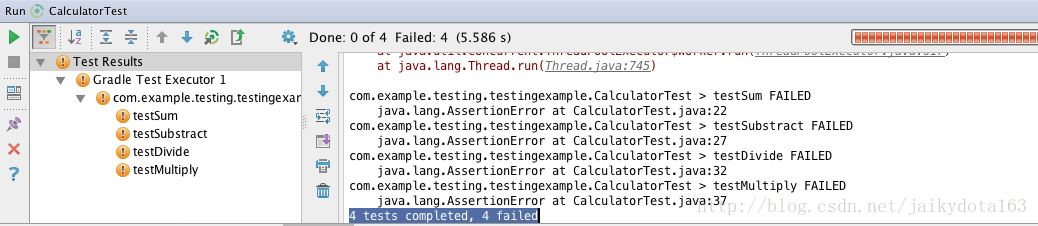
让我们修改Calculator类中的sum(double a,double b)方法,返回正确的结果并重新运行测试。 你应该看到只有3个测试失败了。
Calculator.java
public double sum(double a, double b){
    return a + b;
}
您可能已经注意到,Android Studio从未要求您连接设备或启动模拟器来运行测试。 这是因为驻留在src / tests文件夹中的测试是在您的计算机上的Java VM上运行的本地单元测试。 这样可以在编写测试的时候实现一个非常快速的迭代流程,然后实现通过这些测试的功能,然后添加更多的测试...这就是所谓的测试驱动开发。
在本地运行测试时需要注意的一件事就是Gradle为包含Android框架类的类路径提供了一个android.jar,但是它们不是完全可用的(所以你不应该仅仅调用Activity的方法,并期望它们正常运行)。 你应该使用像Mockito这样的模拟框架来模拟任何你需要使用的Android方法调用。 对于在设备上运行并使用完整Android框架的测试,请继续阅读此代码实验的下一部分。
在本地运行测试时需要注意的一件事就是Gradle为包含Android框架类的类路径提供了一个android.jar,但是它们不是完全可用的(所以你不应该仅仅调用Activity的方法,并期望它们正常运行)。 你应该使用像Mockito这样的模拟框架来模拟任何你需要使用的Android方法调用。 对于在设备上运行并使用完整Android框架的测试,请继续阅读此代码实验的下一部分。
6、配置您的项目进行仪器测试
虽然支持在Android框架中运行检测测试,但目前的开发工作主要围绕作为Android测试支持库的一部分发布的新的AndroidJUnitRunner。 该库还包含一个运行功能性UI测试的框架Espresso。 我们通过编辑模块的build.gradle文件中的相关部分来添加到我们的项目中:
build.gradle
apply plugin: 'com.android.application'

android {
    compileSdkVersion 22
    buildToolsVersion "22.0.1"

    defaultConfig {
        applicationId "com.example.testing.testingexample"
        minSdkVersion 15
        targetSdkVersion 22
        versionCode 1
        versionName "1.0"

        //ADD THIS LINE:
        testInstrumentationRunner "android.support.test.runner.AndroidJUnitRunner"
    }

    buildTypes {
        release {
            minifyEnabled false
            proguardFiles getDefaultProguardFile('proguard-android.txt'), 'proguard-rules.pro'
        }
    }

    //ADD THESE LINES:
    packagingOptions {
        exclude 'LICENSE.txt'
    }
}

dependencies {
    compile fileTree(dir: 'libs', include: ['*.jar'])
    compile 'com.android.support:appcompat-v7:22.0.0' //← MAKE SURE IT’S 22.0.0
    testCompile 'junit:junit:4.12'

    //ADD THESE LINES:
    androidTestCompile 'com.android.support.test:runner:0.2'
    androidTestCompile 'com.android.support.test:rules:0.2'
    androidTestCompile 'com.android.support.test.espresso:espresso-core:2.1'
}此外,Android Studio可能会通知您未安装Build Tools 22.0.1。 您应该接受建议的修补程序,Studio将为您安装相应的构建工具,或者将此行更改为build.gradle以指向您已安装在您计算机上的版本。
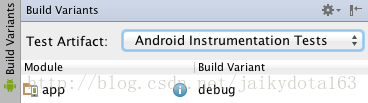
剩下的就是在Build Variants窗格中切换到Android Instrumentation测试。 你的项目应该在这一点上自动同步。 如果不是,请按Gradle的“同步”按钮。
7、添加一个简单的交互
在我们开始使用Espresso测试来测试UI之前,让我们在应用程序中添加一些Views和一个简单的行为。 我们将使用一个EditText,用户可以输入他的名字,一个Button使用TextView来输出。 打开res / layout / activity_main.xml并粘贴下面的代码:
<RelativeLayout xmlns:android="http://schemas.android.com/apk/res/android"
    xmlns:tools="http://schemas.android.com/tools" android:layout_width="match_parent"
    android:layout_height="match_parent" android:paddingLeft="@dimen/activity_horizontal_margin"
    android:paddingRight="@dimen/activity_horizontal_margin"
    android:paddingTop="@dimen/activity_vertical_margin"
    android:paddingBottom="@dimen/activity_vertical_margin" tools:context=".MainActivity">

    <TextView
        android:id="@+id/textView"
        android:text="@string/hello_world" android:layout_width="wrap_content"
        android:layout_height="wrap_content" />
    <EditText
        android:hint="Enter your name here"
        android:id="@+id/editText"
        android:layout_width="match_parent"
        android:layout_height="wrap_content"
        android:layout_below="@+id/textView"/>
    <Button
        android:layout_width="match_parent"
        android:layout_height="wrap_content"
        android:text="Say hello!"
        android:layout_below="@+id/editText"
        android:onClick="sayHello"/>
</RelativeLayout>
您还需要在MainActivity.java中添加onClick处理程序:
MainActivity.java
public void sayHello(View v){
    TextView textView = (TextView) findViewById(R.id.textView);
    EditText editText = (EditText) findViewById(R.id.editText);
    textView.setText("Hello, " + editText.getText().toString() + "!");
}
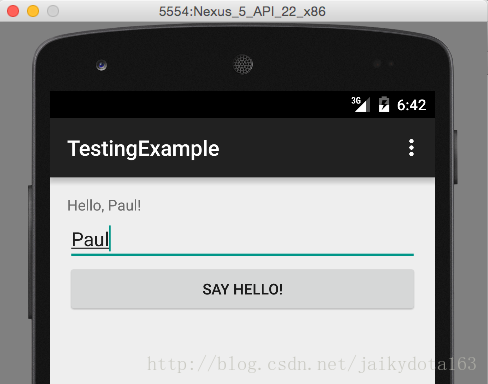
您现在可以运行应用程序来查看它的行动,并确保一切正常。 在按下运行按钮之前,请确保您的运行配置未设置为运行上一部分的测试类。 使用下拉菜单并选择app,点击运行。
8、创建并运行Espresso测试

在项目总览中,找到以(androidTest)后缀结尾的包名,并在那里创建一个新的Java类。 您可以将其命名为MainActivityInstrumentationTest。 粘贴以下代码作为其内容:
MainActivityInstrumentationTest.java
package com.example.testing.testingexample;

import android.support.test.InstrumentationRegistry;
import android.support.test.espresso.action.ViewActions;
import android.support.test.rule.ActivityTestRule;
import android.support.test.runner.AndroidJUnit4;
import android.test.ActivityInstrumentationTestCase2;
import android.test.suitebuilder.annotation.LargeTest;

import org.junit.After;
import org.junit.Before;
import org.junit.Rule;
import org.junit.Test;
import org.junit.runner.RunWith;

import static android.support.test.espresso.Espresso.onView;
import static android.support.test.espresso.action.ViewActions.click;
import static android.support.test.espresso.action.ViewActions.closeSoftKeyboard;
import static android.support.test.espresso.action.ViewActions.typeText;
import static android.support.test.espresso.assertion.ViewAssertions.matches;
import static android.support.test.espresso.matcher.ViewMatchers.withId;
import static android.support.test.espresso.matcher.ViewMatchers.withText;

@RunWith(AndroidJUnit4.class)
@LargeTest
public class MainActivityInstrumentationTest {

    private static final String STRING_TO_BE_TYPED = "Peter";

    @Rule
    public ActivityTestRule<MainActivity> mActivityRule = new ActivityTestRule<>(
            MainActivity.class);

    @Test
    public void sayHello(){
        onView(withId(R.id.editText)).perform(typeText(STRING_TO_BE_TYPED), closeSoftKeyboard()); //line 1

        onView(withText("Say hello!")).perform(click()); //line 2

        String expectedText = "Hello, " + STRING_TO_BE_TYPED + "!";
        onView(withId(R.id.textView)).check(matches(withText(expectedText))); //line 3
    }

}1、首先,它使用ID editText查找视图,并输入字符串“Peter”,然后关闭屏幕上的键盘。
2、接下来,查找文本“Say hello!”的视图并进行了click事件。 这是我们的Button,为此我们没有在布局XML中设置一个id,因此我们通过搜索它的文本来引用它。
3、最后,将TextView的文本内容与预期结果进行比较,如果匹配,测试通过。
您可以通过右键单击该 类 并选择Run> MainActivityInstrume ...(第二个包含Android图标)来运行测试。

这将在模拟器或连接的设备上运行测试,如果您观看屏幕,则可以看到Runner正在执行的操作(如在EditText输入文本,并点击Button执行操作代码)。 查看Android Studio中的输出以获取有关通过和失败测试的报告。
恭喜,Android Studio中的单元测试、UI测试和自动化测试基础你已经基本入门了!