版权声明:本文为博主原创文章,未经博主允许不得转载。 https://blog.csdn.net/wrongyao/article/details/82194316
资源贴 https://blog.csdn.net/z69183787/article/details/73850417
githup项目 https://github.com/wenrongyao/springboot_freemarker master分支是最基础的整合,dev分支是freemarker的标签学习
目录结构

1、pom.xml中添加freemarker依赖
<dependency>
     <groupId>org.springframework.boot</groupId>
     <artifactId>spring-boot-starter-freemarker</artifactId>
</dependency>
2、配置application.properties,springboot项目有默认的配置,自己写了以后可以替代默认的配置。
spring.freemarker.allow-request-override=false
spring.freemarker.cache=true
spring.freemarker.check-template-location=true
spring.freemarker.charset=UTF-8
spring.freemarker.content-type=text/html
spring.freemarker.expose-request-attributes=false
spring.freemarker.expose-session-attributes=false
spring.freemarker.expose-spring-macro-helpers=false
server.port = 8090
3、HelloController,映射配置和数据填充
import org.springframework.stereotype.Controller;
import org.springframework.ui.Model;
import org.springframework.web.bind.annotation.RequestMapping;


/**
 * @author rongyaowen
 */
@Controller
public class HelloController {

    @RequestMapping("/hello")
    public String hello(Model model) {
        model.addAttribute("name", "kangkang");
        return "hello";
    }

}
4、模板文件,htllo.ftl
<!DOCTYPE html>
<html lang="en">
<head>
    <meta charset="UTF-8">
    <title>Title</title>
</head>
<body>
    Hello ${name}
</body>
</html>
5、springboot启动类
import org.springframework.boot.SpringApplication;
import org.springframework.boot.autoconfigure.SpringBootApplication;
import org.springframework.context.annotation.ComponentScan;
/**
* @author rongyaowen
*/
@SpringBootApplication
@ComponentScan("com.wry.controller")
public class SpringBootSampleApplication {
public static void main(String[] args) {
SpringApplication.run(SpringBootSampleApplication.class, args);
}
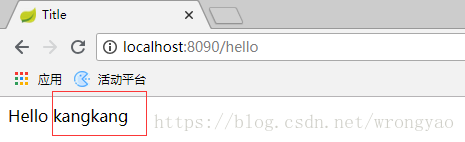
}结果展示,模板中的${name}已经被替换