背景
随着项目工程的数量越来越多,项目的接口也越来越多,编写接口的API文档的工作量逐渐增大,同时当接口出现变动的时候,文档往往有时无法实时同步,因此考虑采用自动生成API文档的方式管理项目。
工具选择
目前市面上比较主流的API文档生成工具是Swagger与Spring rest doc,下面对这个工具的使用方式进行一下比较。
Swagger
Swagger是一种Rest API的 简单但强大的表示方式,标准的,语言无关,这种 表示方式不但人可读,而且机器可读。 可以作为Rest API的交互式文档,也可以作为Rest API的形式化的接口描述,生成客户端和服务端的代码。
Swagger对Java有很好的支持,可以集成于Spring boot中。
通过Swagger的注解,在controller的方法上进行标注,项目启动后,即可通过静态页面访问的方式,获取到API接口的文档信息。
目录结构
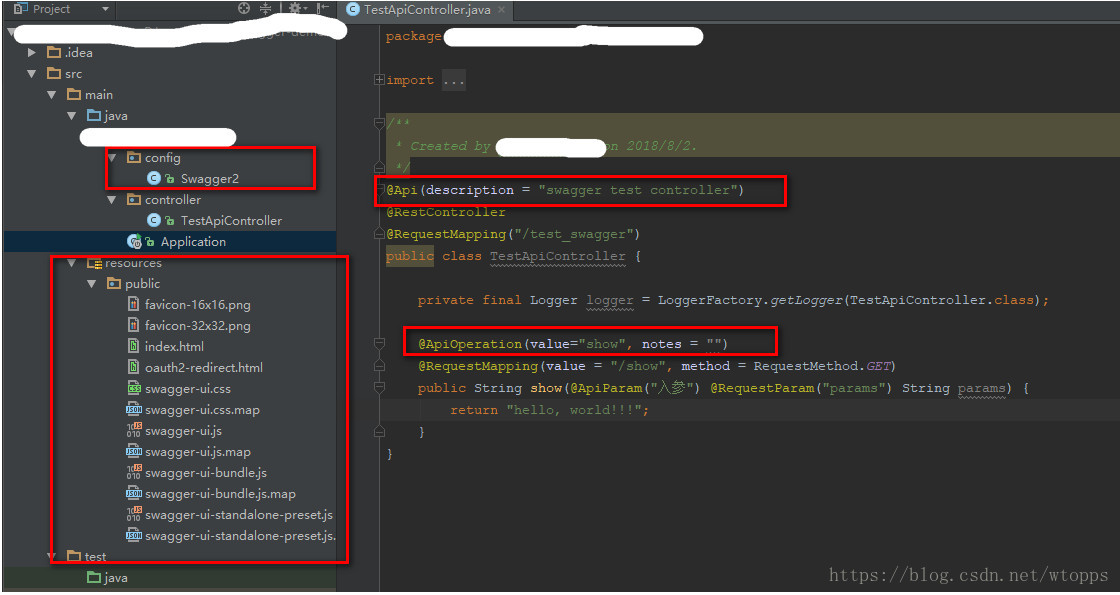
示例中使用的Swagger2,我们需要在项目中引入swagger-ui的静态文件包,用于静态页显示API文档,在controller层,需要生产文档说明的方法上加入@ApiOperation的注解,
说明该方法的用途,在方法入参前,加入@ApiParam注解,说明该参数的名称,通过这些Swagger的注解,在项目启动时,Swagger会扫描指定的包中的注解,最终生产一个大的JSON串,
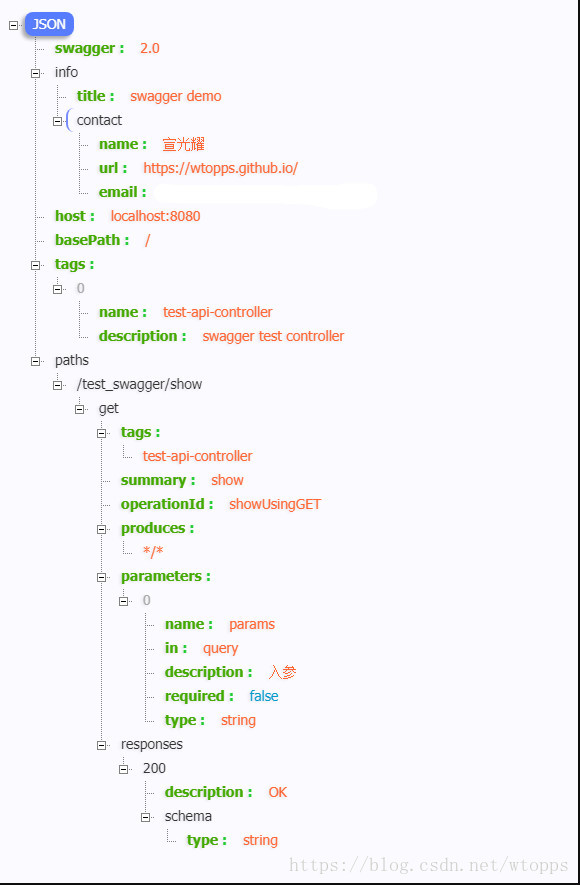
项目启动后访问:http://localhost:8080/v2/api-docs即可看到,引入swagger-ui后,需要修改index.html中的URL访问地址,获取到这个JSON串,进行静态图形化页面的展示。
生成效果
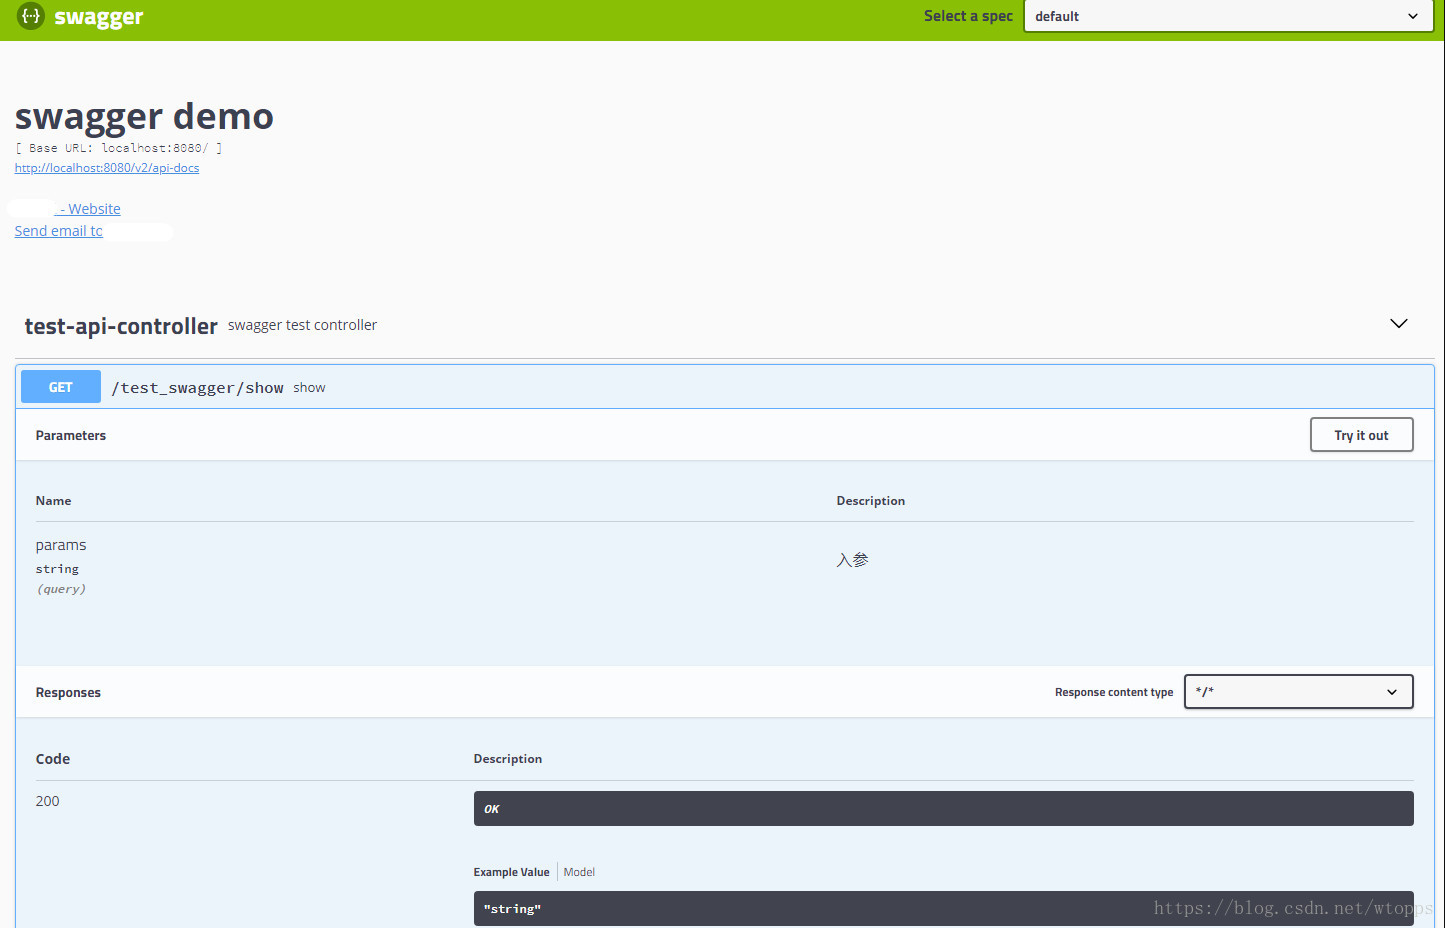
项目启动后,访问:http://localhost:8080/swagger-ui.html,即可出现API文档的界面。
Spring Rest doc
Spring rest doc是基于swagger的一个工具,对Swagger进行了扩展,基本注解来自于Swagger,只不过在生成文档的方式上有所不同,Spring rest doc是通过maven构建的方式来生成文档静态页面,不需要手动引入swagger的静态文件库,
这一点上比swagger会方便一些,但是需要在maven中进行配置。
目录结构
Spring rest doc需要在maven打包时引入一些配置,
<build>
    <plugins>
        <plugin>
            <groupId>org.springframework.boot</groupId>
            <artifactId>spring-boot-maven-plugin</artifactId>
        </plugin>
        <plugin>
            <groupId>org.apache.maven.plugins</groupId>
            <artifactId>maven-surefire-plugin</artifactId>
            <configuration>
                <includes>
                    <include>**/*Documentation.java</include>
                </includes>
            </configuration>
        </plugin>
        <plugin>
            <groupId>org.asciidoctor</groupId>
            <artifactId>asciidoctor-maven-plugin</artifactId>
            <version>1.5.3</version>

            <!-- Configure generic document generation settings -->
            <configuration>
                <sourceDirectory>${project.basedir}/docs/asciidoc</sourceDirectory>
                <sourceDocumentName>index.adoc</sourceDocumentName>
                <attributes>
                    <doctype>book</doctype>
                    <toc>left</toc>
                    <toclevels>3</toclevels>
                    <numbered></numbered>
                    <hardbreaks></hardbreaks>
                    <sectlinks></sectlinks>
                    <sectanchors></sectanchors>
                    <generated>${project.build.directory}/asciidoc</generated>
                </attributes>
            </configuration>
            <!-- Since each execution can only handle one backend, run
                 separate executions for each desired output type -->
            <executions>
                <execution>
                    <id>output-html</id>
                    <phase>test</phase>
                    <goals>
                        <goal>process-asciidoc</goal>
                    </goals>
                    <configuration>
                        <backend>html5</backend>
                        <!--<outputDirectory>${project.basedir}/docs/asciidoc/html</outputDirectory>-->
                    </configuration>
                </execution>
            </executions>
        </plugin>
    </plugins>
</build>
同时在单元测试中,增加使用mock,对controller层的方法进行调用:
/**
* Created by xuangy on 2018/8/3.
*/
@AutoConfigureMockMvc
@AutoConfigureRestDocs(outputDir = "target/generated-snippets")
@RunWith(SpringRunner.class)
@SpringBootTest
public class Documentation {
private String snippetDir = "target/generated-snippets";
private String outputDir = "target/asciidoc";
//private String indexDoc = "docs/asciidoc/index.adoc";
@Autowired
private MockMvc mockMvc;
@After
public void Test() throws Exception{
// 得到swagger.json,写入outputDir目录中
mockMvc.perform(get("/v2/api-docs").accept(MediaType.APPLICATION_JSON))
.andDo(SwaggerResultHandler.outputDirectory(outputDir).build())
.andExpect(status().isOk())
.andReturn();
// 读取上一步生成的swagger.json转成asciiDoc,写入到outputDir
// 这个outputDir必须和插件里面<generated></generated>标签配置一致
Swagger2MarkupConverter.from(outputDir + "/swagger.json")
.withPathsGroupedBy(GroupBy.TAGS)// 按tag排序
.withMarkupLanguage(MarkupLanguage.ASCIIDOC)// 格式
.withExamples(snippetDir)
.build()
.intoFolder(outputDir);// 输出
}
@Test
public void TestApi() throws Exception{
mockMvc.perform(get("/student").param("name", "szl")
.accept(MediaType.APPLICATION_JSON))
.andExpect(status().isOk())
.andDo(MockMvcRestDocumentation.document("getStudent", preprocessResponse(prettyPrint())));
Student student = new Student();
student.setName("宣");
student.setAge(2);
student.setAddress("北京");
student.setCls("ss");
student.setSex("男");
mockMvc.perform(post("/student").contentType(MediaType.APPLICATION_JSON)
.content(JSON.toJSONString(student))
.accept(MediaType.APPLICATION_JSON))
.andExpect(status().is2xxSuccessful())
.andDo(MockMvcRestDocumentation.document("addStudent", preprocessResponse(prettyPrint())));
}
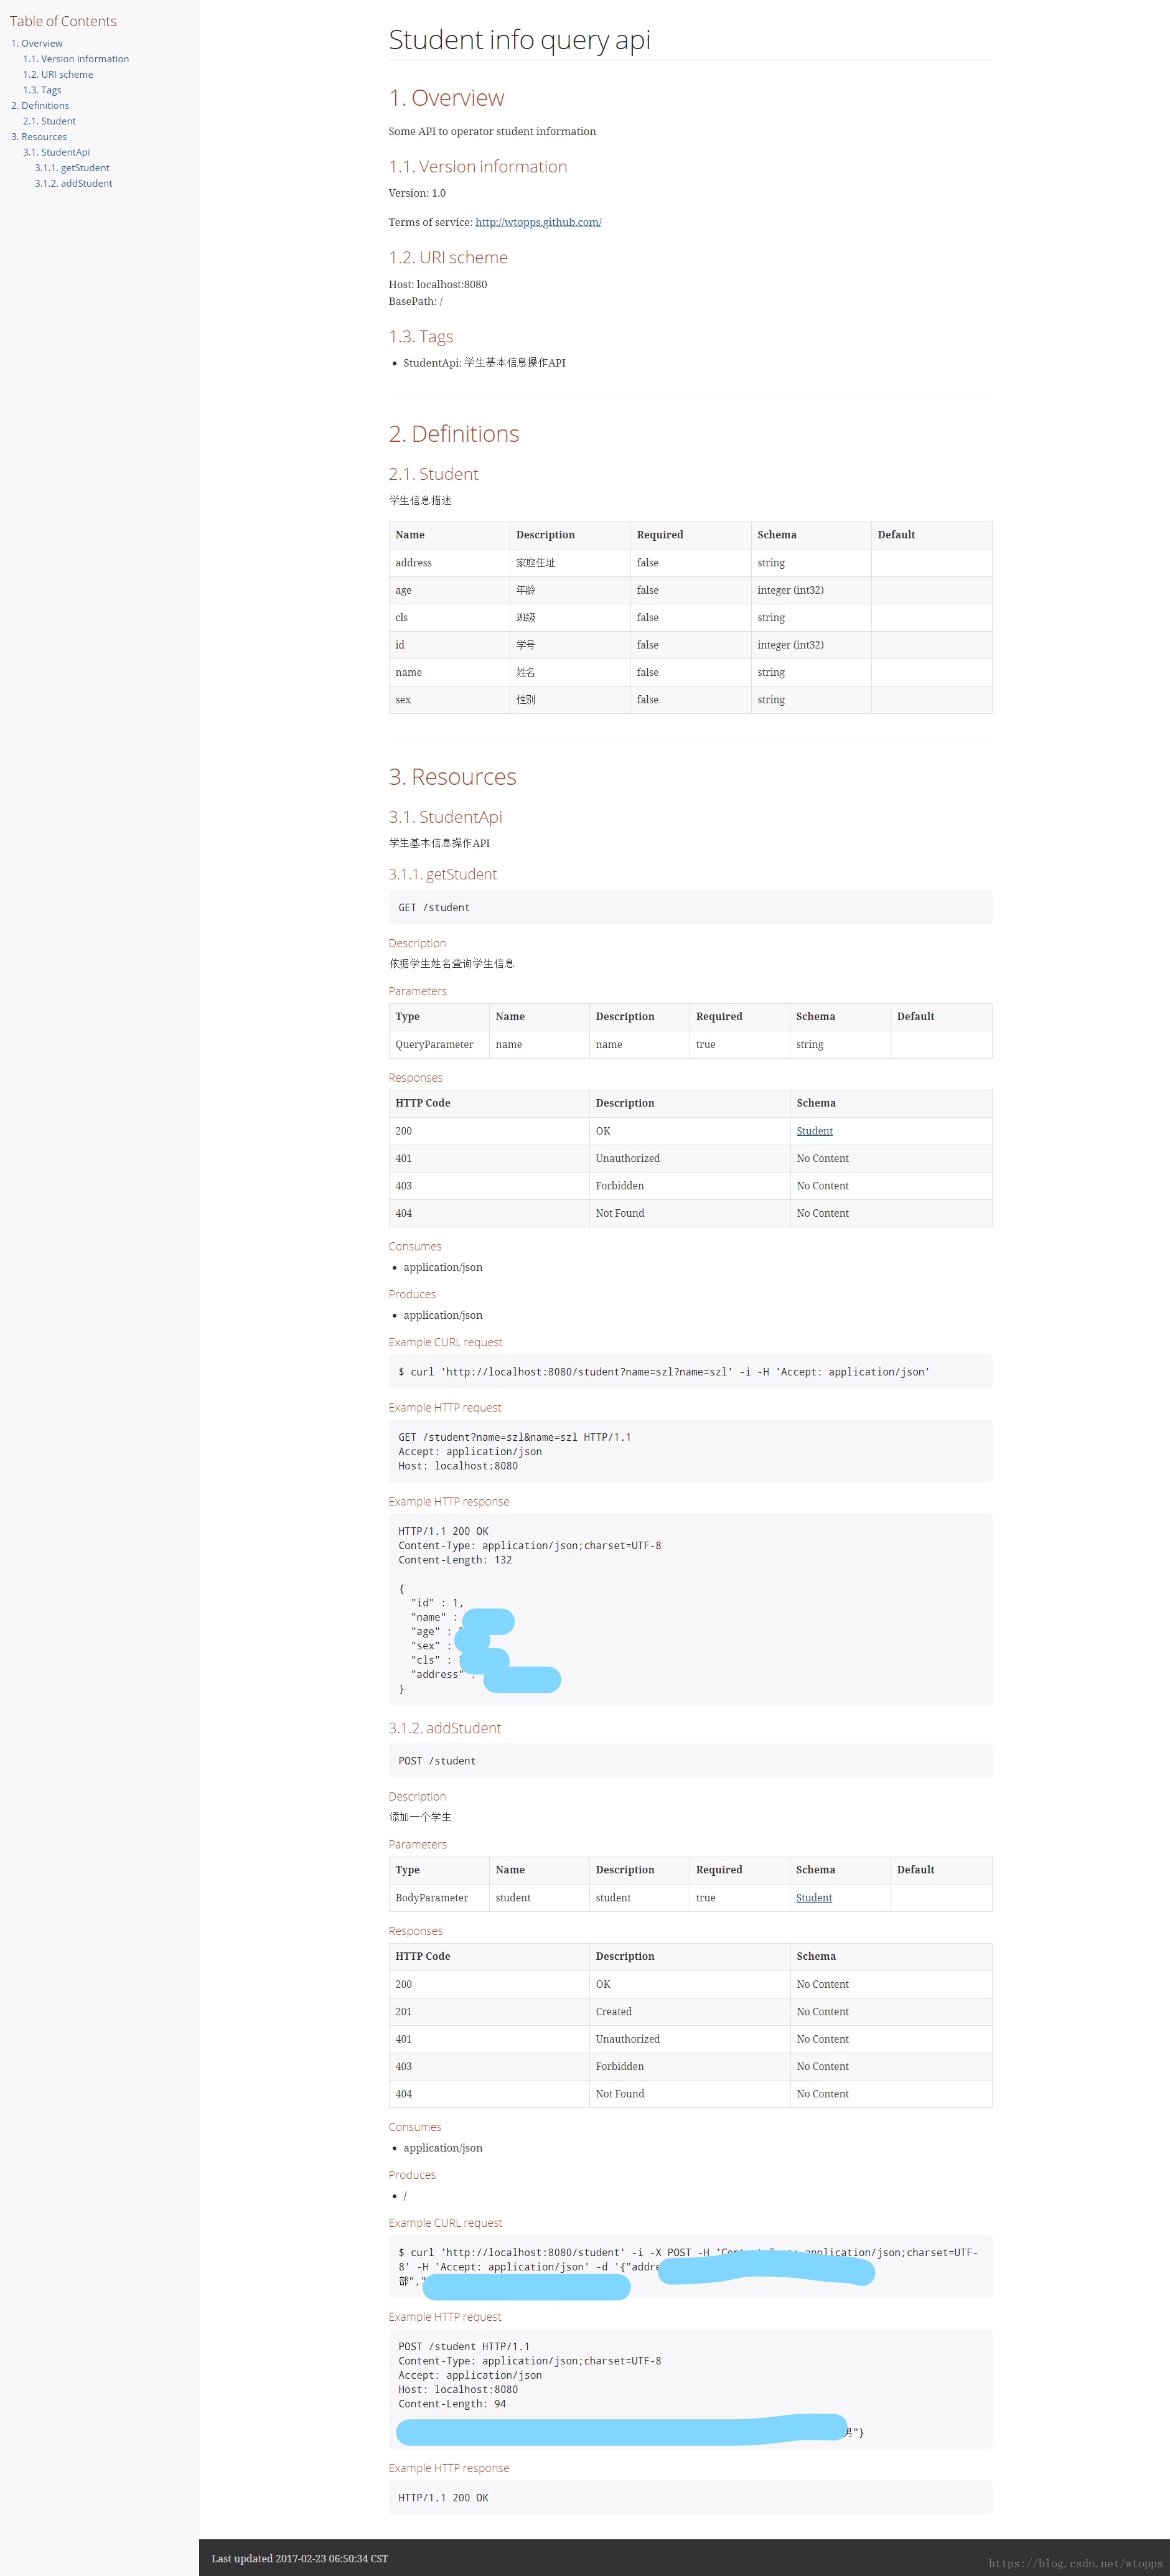
}生成效果
执行maven install,会在我们在pom文件中指定的位置生成一个index.html文件,访问该文件:
总结
上面展示了两种工具生成API文档的效果,现在对比一下两个文档。
两个工具都是采用扫描注解的方式,来生成静态页面文档,其中Spring rest doc我可以理解为Swagger的Spring增强版,本质上也是基于Swagger的,两种方式都会对代码有一定的侵入,
需要在controller层(还有entity实体层,如果你希望生成实体的注释的话)加入注解,Spring rest doc的侵入更大一些,需要maven的打包方式加入支持,相对来讲,swagger会更轻量级一些,
不需要对maven的打包方式进行修改,也不需要使用mock生成静态页,但是需要在项目中引入swagger-ui的静态文件包。
Spring Rest Doc会更加强大一些,生成的文档界面会更加的漂亮,但是也更加的笨重。