If you are already a vim and git master and you are impatient, please jump to theQuick start section at the end of this article.
1 Set up vimdiff
The vimdiff as a merge tool will display several buffers to show the yours/theirs/original changes.
The key point is to set up the vimdiff so that the buffer number in the vimdiff status line is visible.
First, add following code into your ~/.vimrc
set laststatus=2 "show the status line
set statusline=%-10.3n  "buffer number
Second, if you know the buffer number, you can use hot key like ",2" (press comma first, then press two as quickly as possible) to pull change from buffer number two.Add below code into your ~/.vimrc to set up hot keys:
map <silent> <leader>1 :diffget 1<CR> :diffupdate<CR>
map <silent> <leader>2 :diffget 2<CR> :diffupdate<CR>
map <silent> <leader>3 :diffget 3<CR> :diffupdate<CR>
map <silent> <leader>4 :diffget 4<CR> :diffupdate<CR>
2 Set up git
To use vimdiff as default merge tool:
git config --global merge.tool vimdiff
git config --global mergetool.prompt false
3 Create a git project which has conflicting merges
I already set up a "hello world" project at https://github.com/redguardtoo/test-git-mergetool for your practice.
It has three branches "master", "bob", and "chen".
git clone git://github.com/redguardtoo/test-git-mergetool.git
cd test-git-mergetool
git checkout -b bob origin/bob # create local mirror of bob branch
git checkout -b chen origin/chen # create local mirror of chen branch
Bob and Chen has edited same files. So please merge branch "bob" into "master" at first. Then merge from "chen". The merge conflicts will be created.
git branch # double check that we got three local branches: master, bob, chen
git checkout master # set master branch as main branch
git merge bob #this is ok, because bob is the first one to merge changes
git merge chen # now some conflicts created because Bob has already edited and merged same files
4 Resolve merge conflict
Now start merge tool:
git mergtool
Git will invoke vimdiff with the following window layout. There are four buffers in this layout:
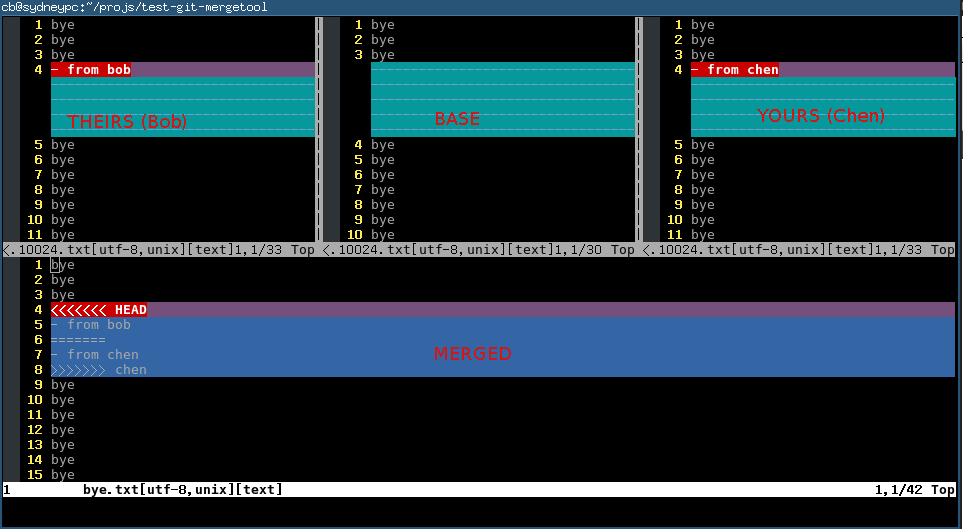
Here is the explanation of each buffer:
| Buffer | Explanation | Buffer Number |
|---|---|---|
| THEIRS | contents of the file on the current branch | 2 |
| BASE | common base for the merge | 3 |
| YOURS | contents of the file to be merged. | 4 |
| MERGED | The file containing the conflict markers. You need edit and commit this file. | 1 |
You could use hot key ",2" (comma + two) ",3" (comma+three) ",4" (comma+four) to pick the content you want to use (either THEIRS or BASE or YOURS) to replace the marked conflict in MERGED buffer whose buffer number is one.
Or you can edit the content directly in MERGED buffer. Anyway, git only care about the the file binding to MERGED buffer. Any other buffer will be ignored by git.
You can use hot key "[c" and "]c" to navigate to previous/next conflict (including the conflict resolved by git automatically) in current file which is binding to MERGED buffer.
After finishing editing of the conflicting file in MERGED buffer, you can use hot key ":xa" to exit vimdiff. Git will open next conflicting file with vimdiff automatically.
When you have resolved all the conflicts, follow the hint of git to commit your changes.
5 Tips
- A vim plugin called fugitive.vim (https://github.com/tpope/vim-fugitive) call do this too. I cannot write this article without reading its code.
- You can use Emacs to do the similar job (http://stackoverflow.com/questions/1817370/using-ediff-as-git-mergetool). For me, Emacs start up time is too much for this task. Some people use emacsclient which has other overhead which I don't like.
- If you prefer merge tool with GUI, you can use command line `git mergetool -t gvimdiff` instead.
6 Quick start
You can use command line like "git mergetool -t vimdiff" to start vimdiff from git.
So the minimum set up is adding three lines of code into your ~/.vimrc:
map <silent> <leader>2 :diffget 2<CR> :diffupdate<CR>
map <silent> <leader>3 :diffget 3<CR> :diffupdate<CR>
map <silent> <leader>4 :diffget 4<CR> :diffupdate<CR>
",2" ",3" ",4" to pull change from top three buffer. The bottom buffer is for editing the code with markers which is actually your only work space.
":help vimdiff" for other hot keys.