版权声明:本文为博主原创文章,未经博主允许不得转载。 https://blog.csdn.net/Phapha1996/article/details/78712597
一、SpringData JPA是什么
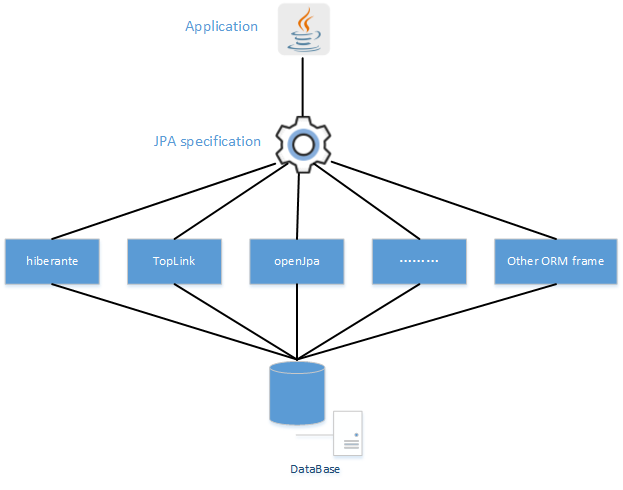
上一节学习了如何入门SpringBoot,本篇章介绍springboot对数据库是如何进行访问的。在介绍之前,有必要了解一下SpringDataJPA,这是SpringCore中的一个项目,致力于简化对数据库的访问,增强了ORM的操作。对于JPA(Java persisten API),全称为Java持久化API,是JAVAEE中的一套规范API。它推出的目的是对ORM框架进行大统一,它提供一套接口,让厂商们(如hibernate)对JPA提供实现。JPA与hibernate的关系就像JDBC与Mysql驱动、Oracle驱动一样的关系,只是它更加高度抽象,可以称之为ORM框架的接口,它的层递关系是这样的:
而SpringDataJPA是什么样子的呢?相信学过hibernate的同学一定也学过hibernate template,甚至自己实现过hibernate template。没错,SpringData JPA就很像这样一款template,把该有的东西都给你封装好,当然,其强大不止这一点点。相信学过mybatis的同学也知道,我们只需要一个mapper接口与一些mapper.xml,就可以让其代理实现的持久层。SpringDataJPA在使用的时候,也只需要声明一个接口,让其Spring以代理的形式生成Dao。对于SpringDataJPA与hibernate等ORM框架、JPA的关系是这样子的:

SpringDataJPA对类似hibernate这样的框架又做了一层封装,以便于我们编程的时候使用更方便。好了,说了那么多理论,下面就开始实践吧。
二、开始实践
1.创建maven web项目,名称为springboot-jpa,在pom.xml中导入以下依赖:
	<parent>
		<groupId>org.springframework.boot</groupId>
		<artifactId>spring-boot-starter-parent</artifactId>
		<version>1.4.1.RELEASE</version>
	</parent>

	<properties>
		<project.build.sourceEncoding>UTF-8</project.build.sourceEncoding>
		<java.version>1.8</java.version>
		<springBoot.groupId>org.springframework.boot</springBoot.groupId>
	</properties>

	<dependencies>
		<!-- SpringBoot Start -->
		<dependency>
			<groupId>${springBoot.groupId}</groupId>
			<artifactId>spring-boot-starter-web</artifactId>
		</dependency>
		<!-- jpa -->
		<dependency>
			<groupId>${springBoot.groupId}</groupId>
			<artifactId>spring-boot-starter-data-jpa</artifactId>
		</dependency>
		<dependency>
			<groupId>${springBoot.groupId}</groupId>
			<artifactId>spring-boot-starter-test</artifactId>
		</dependency>
		<!-- mysql -->
		<dependency>
			<groupId>mysql</groupId>
			<artifactId>mysql-connector-java</artifactId>
		</dependency>
		<dependency>
			<groupId>junit</groupId>
			<artifactId>junit</artifactId>
			<version>4.12</version>
		</dependency>
	</dependencies>
其中SpringDataJPA核心支持依赖是spring-boot-starter-data-jpa。
2.编辑配置
待maven构建导包完成后,请在mysql中创建好数据库springboot_test,在src/main/resources中添加application.yml配置,代码如下所示:
server:
  port: 8080
  tomcat:
    uri-encoding: UTF-8
spring:
  datasource:
    url: jdbc:mysql://127.0.0.1:3306/springboot_test?characterEncoding=utf8
    username: root
    password: root
  jpa:
    database: MYSQL
    show-sql: true
    #hibernate ddl auto(validate,create,update,create-drop)
    hibernate:
      ddl-auto: update
      naming:
        strategy: org.hibernate.cfg.ImprovedNamingStrategy
    properties:
      hibernate:
        dialect: org.hibernate.dialect.MySQL5Dialect
包结构组织如下图:

在src/main/java中新建org.fage包,在其中创建一个Jpa的Java配置类:
package org.fage;

import org.springframework.boot.autoconfigure.domain.EntityScan;
import org.springframework.context.annotation.Bean;
import org.springframework.context.annotation.Configuration;
import org.springframework.core.Ordered;
import org.springframework.core.annotation.Order;
import org.springframework.dao.annotation.PersistenceExceptionTranslationPostProcessor;
import org.springframework.data.jpa.repository.config.EnableJpaRepositories;
import org.springframework.transaction.annotation.EnableTransactionManagement;

/**
 *
 * @author Caizhfy
 * @email [email protected]
 * @createTime 2017年10月30日
 * @description JPA基础配置类
 *
 */
@Order(Ordered.HIGHEST_PRECEDENCE)
@Configuration
@EnableTransactionManagement(proxyTargetClass=true)
@EnableJpaRepositories(basePackages={"org.fage.**.repository"})
@EntityScan(basePackages={"org.fage.**.domain"})
public class JpaConfiguration {
	@Bean
	PersistenceExceptionTranslationPostProcessor persistenceExceptionTranslationPostProcessor(){
		return new  PersistenceExceptionTranslationPostProcessor();
	}
}
@Configuration声明了这是一个配置类,该注解中包含有@Component注解,可以让SpringBoot自动扫描加载;@EnableTransactionManagement声明了开启事务管理器代理;
@EnableJpaRepositories声明repository(也就是原来的dao,SpringData中称其为Repository)所在位置,值中的两个星号是通配符,代表org.fage.任何路径下的.repository包中都是repository;
@EntityScan是对实体组件位置的声明与扫描,两个星号依旧是通配符。
在根包中创建入口类App.java:
package org.fage;

import org.springframework.boot.SpringApplication;
import org.springframework.boot.autoconfigure.ImportAutoConfiguration;
import org.springframework.boot.autoconfigure.SpringBootApplication;
/**
 *
 * @author Caizhfy
 * @email [email protected]
 * @createTime 2017年10月30日
 * @description Springboot-jpa学习创建步骤:
 * 						1.创建项目
 *						2.添加依赖,填写配置类
 *						3.配置application.yml
 *						4.配置实体jpa关系
 *						5.继承jpaRepository
 *						6.编写测试用例
 */

@SpringBootApplication
@ImportAutoConfiguration(value=JpaConfiguration.class)
public class App {
	public static void main(String[] args) {
		SpringApplication.run(App.class, args);
	}
}
3.创建实体建模:
建模关系是有部门、用户、角色三个实体;部门与用户是一对多的关系,用户与角色是多对多的关系,在org.fage.domain包中创建三个实体,建模代码如下
部门实体:
@Entity
@Table(name = "department")
public class Department implements Serializable {


	private static final long serialVersionUID = 159714803901985366L;
	@Id
	@GeneratedValue(strategy=GenerationType.IDENTITY)
	private Long id;
	private String name;
	@OneToMany(mappedBy="department",fetch=FetchType.LAZY)
	private List<User> users;

//getter and setter
...
}
@Entity
@Table(name = "user")
public class User implements Serializable{

	@Id
	@GeneratedValue(strategy = GenerationType.IDENTITY)
	private Long id;
	private String username;
	@Column(name = "create_date")
	@DateTimeFormat(pattern = "yyyy-MM-dd HH:mm:ss")
	@Temporal(TemporalType.TIMESTAMP)
	private Date createDate;
	//一对多映射
	@ManyToOne
	@JoinColumn(name = "department_id")
	@JsonBackReference // 防止对象的递归访问
	private Department department;
	//多对多映射
	@ManyToMany(fetch=FetchType.EAGER)
	@JoinTable(name = "user_role",
			joinColumns = {@JoinColumn(name="user_id")},
			inverseJoinColumns = {@JoinColumn(name = "role_id")}
			)

//getter and setter
}
@Entity
@Table(name="role")
public class Role implements Serializable{

	@Id
	@GeneratedValue(strategy=GenerationType.IDENTITY)
	private Long id;
	private String name;


//getter and setter

}
实体映射关系建立完成,解释一下其中的注解,这些注解其实大多数都是在学JPA与hibernate的时候学会的:@Entity声明这是一个实体类;@Table声明该实体在表中对应的表名是什么;@Id声明该属性为实体对应表的主键;@GeneratedValue声明了主键策略是什么,这里使用的是自动增长主键策略;@ManyToOne与@OneToMany声明了该实体与对应属性的实体是多对一或者一对多的关系,其中如果设立双向关系记得设置mappedBy,fetch的值声明了加载方式是懒加载还是立即加载;@ManyToMany是实体间多对多的关系,@JoinTable设置了两个多对多的实体的中间表外键。
4.创建持久层Dao
在SpringDataJPA中,我们不在称其为mapper或者dao,而是称为repository,我们来为三个实体分别创建自己的repository。在org.fage.repository中创建如下三个接口,继承自JpaRepository,泛型左边为实体类型,右边为该实体的主键类型:
部门repository:
package org.fage.repository;

import org.fage.domain.Department;
import org.springframework.data.jpa.repository.JpaRepository;
import org.springframework.stereotype.Repository;

@Repository
public interface DepartmentRepository extends JpaRepository<Department, Long>{}
@Repository
public interface UserRepository extends JpaRepository<User, Long>{
	//And用法
	User findById(long id);

	User findByIdAndUsername(long id, String username);

	//Or用法
	User findByIdOrUsername(long id, String name);

	//Between用法
	User findByCreateDateBetween(Date start, Date end);

	//LessThan用法
	List<User> findByCreateDateLessThan(Date start);

	//GreaterThan用法
	List<User> findByCreateDateGreaterThan(Date start);

	//IsNull/IsNutNull用法
	List<User> findByUsernameIsNull();

	//Like/NotLike用法
	List<User> findByUsernameLike(String username);

	//OrderBy用法
	List<User> findByUsernameOrderByIdAsc(String username);

	//Not用法
	List<User> findByUsernameNot(String username);

	//In/NotIn用法
	List<User> findByUsernameIn(Collection<String> nameList);


}
角色repository:
@Repository
public interface RoleRepository extends JpaRepository<Role, Long>{}
至此,我们可以创建Junit程序,测试使用这三个持久层接口了,在src/test/java中可以创建测试程序进行测试了,hibernate实现会自动帮我们生成表,SpringDataJPA提供了常用的CRUD操作:
@RunWith(SpringRunner.class)
@SpringBootTest
public class RepositoryTest {
	private final Logger log = LoggerFactory.getLogger(RepositoryTest.class);


	@Autowired
	UserRepository userRepository;
	@Autowired
	RoleRepository roleRepository;
	@Autowired
	DepartmentRepository departmentRepository;

	@Before
	public void initData() {
		departmentRepository.deleteAll();
		roleRepository.deleteAll();
		userRepository.deleteAll();

		Department d = new Department();
		d.setName("开发部");
		departmentRepository.save(d);
		Assert.assertNotNull(d.getId());

		Role r = new Role();
		r.setName("部门经理");
		roleRepository.save(r);
		Assert.assertNotNull(r.getId());
		List<Role> roles = new ArrayList<Role>();
		roles.add(r);

		User u = new User();
		u.setUsername("蔡智法");
		u.setCreateDate(new Date());
		u.setDepartment(d);
		u.setRoles(roles);
		userRepository.save(u);
		Assert.assertNotNull(u.getId());
	}

	@Test
	public void testGeneralMethod(){
		System.out.println(userRepository.findByUsernameLike("蔡智法"));
	}


	@Test
	public void testFindPage() {
		//hibernate一对多分页原理:先分页,然后在将id作为引子查询(效率低)
		Pageable pageable = new PageRequest(0, 5, new Sort(Sort.Direction.ASC, "id"));
		Page<Department> page = departmentRepository.findAll(pageable);
		System.out.println(page.getNumberOfElements());
	}

}
没搞错吧?这些接口甚至一行业务代码都不用写(UserRepository中的代码待会儿解释),就能实现增删改查、分页操作??没错,确实就是这么简单。不难发现,我们获得支持的最重要一点是继承了JpaRepository(该接口提供了上层接口更多的查询操作)接口,跟踪源码发现JpaRepository接口继承了上层的PageAndSortingRepository(该接口提供了分页以及排序的支持),PageAndSortingRepository继承自CrudRepository(该接口提供基础的增删改查操作),而CrudRepository又继承自Repository。我们知道,他们都是接口,本身没有实现方法,但是SpringDataJPA帮我们提供了一套实现,在运行的时候会以代理的形式给我们生成实现类,只要你继承了Spring给你的这些Repository接口,那么你就能获得这些方法支持。
问题又来了,UserRepository接口中自定义声明的方法我们也没有实现,为什么也能正常使用呢?
问题又来了,UserRepository接口中自定义声明的方法我们也没有实现,为什么也能正常使用呢?
那是因为在SpringDataJPA中,自定义的方法一般有两种,第一种就是这种“约定命名”法,这种方法一定要查询命名规范,比如findByXXX,SpringData会根据前缀、中间连接词(Or、And、Like、NotNull等等类似Sql中的关键词),详情使用请看下表,内部会自己转换成JPQL使用:


内部帮我们拼接sql代理生成方法的实现,不得不感叹,真的太方便了。
第二种方法就是使用@Query注解使用JPQL(类似SQL与EL的组合)语句查询,这种查询一般不使用代理,是直接内部转化成SQL进行执行,这种方法比前一种灵活一些,后面章节会提到(还有一种方法,就是自定义增强Repository实现),使用原生SQL查询,这样方便优化SQL。自定义增强Repository与框架原理解析,在后续文章中会陆续更新。
以上源码在https://github.com/Phapha1996/springboot-jpa能检出。
在本文中,最重要的词就是代理了,如果不了解代理模式的同学,希望能恶补一波代理,这是一组非常值得学习而有用的模式。