之前在maven-war-plugin根据环境打包资源中提介绍过 maven-war-plugin 插件,此处不再多说。此篇还是归类到翻译,毕竟参考了很多网上资料。
assembly可以翻阅 dubbo + assembly 整理 中的介绍。
以后此类插件都会汇总在本文中。
maven-antrun-plugin (20151228)
官方文档中有两个地方值得注意,The maven-antrun-plugin has only one goal, run.和To do so, there must be an existing project and maven-antrun-plugin must have its <target> tag configured (although it would still execute without the <target> tag, it would not do anything).
前者明确说明了goal只有run,不用再纠结;至于target,我在使用的时候并没有配置。
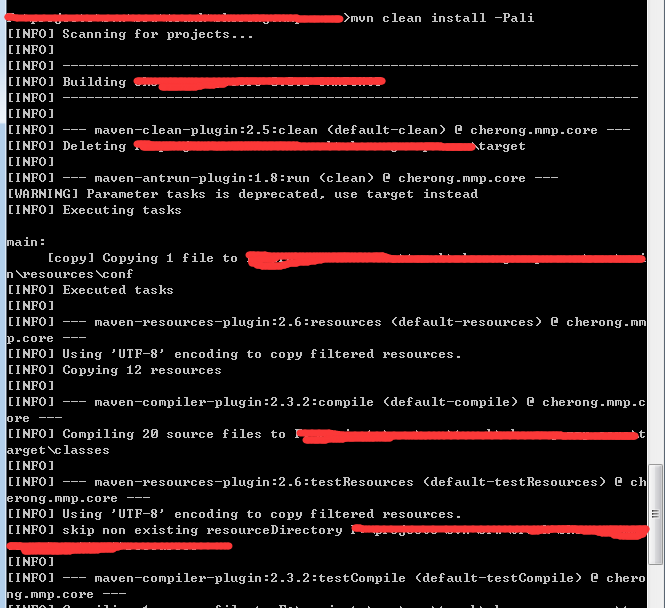
antrun与前面两个插件在机制上是有差别的,它是通过脚本的方式,做一些编译外的操作。比如多环境可以通过copy对应的environment配置来实现打包,但是自己发现可以看到脚本改变了文件源码,因为进行了copy等操作。用起来比较简单,官方也有demo代码。
<plugin>
				<groupId>org.apache.maven.plugins</groupId>
				<artifactId>maven-antrun-plugin</artifactId>
				<version>1.8</version>
				<executions>
					<execution>
						<id>clean</id>
						<phase>clean</phase>
						<goals>
                 			<goal>run</goal>
               			</goals>
               			<configuration>
               				<tasks>
               					<copy file="${enviroment.path}/xxx.properties"
                         			tofile="src/main/resources/conf/xxx.properties"
                         			overwrite="true"/>
               				</tasks>
               			</configuration>
					</execution>
				</executions>
			</plugin>
这个例子中,我copy环境${enviroment.path}对应的properties文件到资源目录,实现多环境打包,${enviroment.path}在profile中配置,此处不详解。
请注意这里的phase是clean,也就是说clean结束后就操作了。如果改成package,那么使用 mvn clean package -Pprofile时,会在package操作结束后才执行ant脚本,打包出来的jar并不是我们想要的。
****************************** logback 日志路径多环境配置|2016-01-20 ******************************
参考官方 Chapter 3: Logback configuration 文档,可以通过
<property resource="xxx.properties" />
或者
<property file="xxx.properties" />
的方式加载properties文件里定义的变量,达到多环境支持。resource会读取classpath下的文件,file需要指定文件物理路径。
****************************** ant多环境配置|2016-01-22 ******************************
接手了一个非maven项目,为了避免程序员用类似IDE Export的方式打包,增加了ant脚本来打包,自然也要支持多环境。
与Maven profile不同的是,ant可以通过 -Dxxx=xxx 的方式注入打包时参数。具体demo如下。
文件目录如下,通过build.xml打包,build/env控制打包环境。
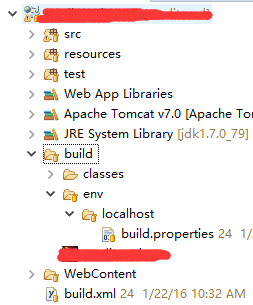
build.properties 配置如下,仅供参考,根据实际项目情况配置。
#build
build.root.dir=build
build.classes.dir=build/classes
build.encoding=UTF-8

#lib
project.root.dir=WebContent
project.lib.dir=lib
project.web.dir=WEB-INF
tomcat.lib.dir=xxx/apache-tomcat-7.0.63

#project
war.name=xxx
resource.dir=src
build.xml 配置如下,仅供参考,根据实际项目情况配置。
<?xml version="1.0" encoding="UTF-8"?>

<project default="package" basedir=".">

	<!-- 默认使用localhost -->
	<property name="env" value="localhost" />

	<property file="build/env/${env}/build.properties"/>

	<!-- includes all dependency jars -->
	<path id="build_classpath_libs">
		<fileset dir="${project.root.dir}/${project.web.dir}/${project.lib.dir}">
            <include name="*.jar"/>
        </fileset>
        <fileset dir="${tomcat.lib.dir}/lib">
        	<include name="*.jar"/>
    	</fileset>
	</path>

	<!-- delete exist class and war files -->
    <target name="init" description="clear exist files">
    	<echo>********** init **********</echo>
    	<echo>********** clear exist classes files **********</echo>
        <delete dir="${build.classes.dir}"></delete>
        <echo>********** clear exist war file **********</echo>
        <delete dir="${build.root.dir}/${war.name}.war"></delete>
        <echo>********** init complete **********</echo>
    </target>

    <!-- copy resources files to class folder -->
    <target name="copy" depends="init" description="copy resources to class folder">
    	<echo>********** copy reources files **********</echo>
    	<copy todir="${build.classes.dir}">
    		<fileset dir="${resource.dir}" id="resources_files">
    			<include name="**/*.*" />
    			<!-- <include name="*.xml"/>
                <include name="*.properties"/> -->
    			<exclude name="**/*.java"/>
    		</fileset>
    	</copy>

    	<echo>********** copy env files **********</echo>
    	<copy todir="${build.classes.dir}">
    		<fileset dir="${build.env.root}/${env}" id="env_resources_files">
    			<include name="**/*.*" />
    			<exclude name="build.properties"/>
    		</fileset>
    	</copy>

    	<echo>********** copy reources files complete **********</echo>
    </target>

    <!-- compile java files -->
    <target name="compile" depends="copy" description="compile java files">
    	<echo>********** compile start **********</echo>
    	<mkdir dir="${build.classes.dir}"/>
    	<javac srcdir="${resource.dir}" destdir="${build.classes.dir}" encoding="${build.encoding}" includeantruntime="on"
    	executable="${build.jdk.root}" source="${build.jdk.version}" target="${build.jdk.version}"
    	>
    		<classpath refid="build_classpath_libs"></classpath>
    	</javac>
    	<echo>********** compile complete **********</echo>
    </target>

    <!-- package war -->
    <target name="package" depends="compile" description="package war">
    	<echo>********** package start **********</echo>
    	<war destfile="${build.root.dir}/${war.name}.war" webxml="${project.root.dir}/${project.web.dir}/web.xml"
    		duplicate="preserve">
    		<lib dir="${project.root.dir}/${project.web.dir}/${project.lib.dir}"/>
            <classes dir="${build.classes.dir}"/>
            <fileset dir="${project.root.dir}"/>
    	</war>
    	<echo>********** package complete **********</echo>
    </target>

    <echo>********** build complete **********</echo>

</project>
ant打包命令 ant -Denv=localhost,打包后文件放在build下。