Shior 框架进阶(七)
----------整合到Spring,注解实现授权
在之前的博文当中,我们介绍了shiro的基本的使用,包括认证以及ini授权,再到自定义的授权,但是在实际的应用当中,我们不会将我们的角色及其对应的权限写在ini文件当中,而是将其存储在数据当中,在授权的时候,根据用户的名称在数据库当中找到对应的角色及其权限,之后shiro框架根据从数据库遍历出的权限与方法被要求的权限进行比对,从而确定该用户能不能访问这个方法;
在这篇文章当中将会对我们的权限存储在数据库当中,在根据shiro的注解以及基本的过滤链来完成比对,那么下面我们就开始:
以下只是小编的拙见,希望大拿指点;
一 表结构的设计
首先我们需要五张表:
1用户表
2角色表
3用户角色对应表(是用户与角色的关联表)
4权限表
5角色权限对应表(是角色与权限的关联表)
所以说再表结构上来说,3和5 是联合主键
对于数据库结构的设计,是有详细的过程的,再具体的开发当中也会有详细的数据库开发文档,数据库设计的基本步骤就是:
1.需求分析:
2.概念结构设计
3.逻辑结构设计
4.物理结构设计
5.数据库实施
6.数据库的运行和维护
简单的说就是,先做需求,确定需要那些表,表内部需要那些字段能够满足需求,然后就是确定各个表之间的关联关系,然后就是具体再存储上用怎么样的类型来存储,最后就是实施,
这就是一个简单过程;
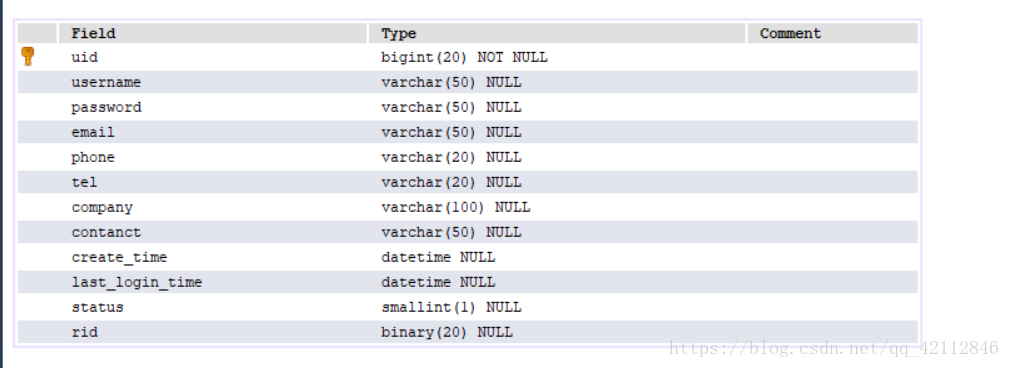
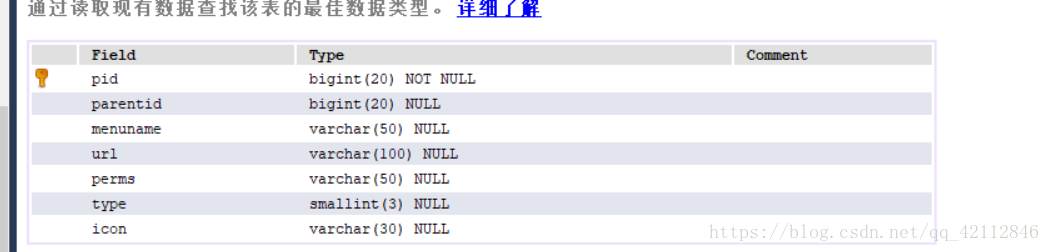
这五张表的结构如下:
用户表:
角色表:

用户角色表:

权限表:
角色权限表:

以上就是表结构的设计,但是只是展示一下需求,在这里测试的时候只是用到当中的一部分字段;
二 环境的配置
在准备好数据库之后,我们就开是环境的搭建,在之前的SSM框架当中以及逐步展示了各个框架的配置,以及最后整合的配置,在这里直接上代码:
首先是核心配置文件:即Spring Mybatis的整合
<?xml version="1.0" encoding="UTF-8"?>
<beans xmlns="http://www.springframework.org/schema/beans"
xmlns:xsi="http://www.w3.org/2001/XMLSchema-instance"
xmlns:aop="http://www.springframework.org/schema/aop"
xmlns:tx="http://www.springframework.org/schema/tx"
xmlns:context="http://www.springframework.org/schema/context"
xmlns:mvc="http://www.springframework.org/schema/mvc"
xsi:schemaLocation="http://www.springframework.org/schema/beans
http://www.springframework.org/schema/beans/spring-beans.xsd
http://www.springframework.org/schema/aop
http://www.springframework.org/schema/aop/spring-aop.xsd
http://www.springframework.org/schema/tx
http://www.springframework.org/schema/tx/spring-tx.xsd
http://www.springframework.org/schema/context
http://www.springframework.org/schema/context/spring-context.xsd
http://www.springframework.org/schema/mvc
http://www.springframework.org/schema/mvc/spring-mvc.xsd">
用户是德鲁伊连接池,以便于进行sql的测试
<bean id="dataSource" class="com.alibaba.druid.pool.DruidDataSource">
<property name="url" value="jdbc:mysql://localhost:3306/aaa?characterEncoding=utf-8"></property>
<property name="driverClassName" value="com.mysql.jdbc.Driver"></property>
<property name="username" value="root"></property>
<property name="password" value="root2"></property>
<property name="maxActive" value="20"></property>
<property name="filters" value="wall,stat"></property>
</bean>
<bean id="SqlSessionFactory" class="org.mybatis.spring.SqlSessionFactoryBean">
<property name="dataSource" ref="dataSource"></property>
<property name="mapperLocations" value="classpath:com/ww/mapper/*Mapper.xml"></property>
这个是分页的配置,大家可以不见
<property name="plugins">
<array>
<bean class="com.github.pagehelper.PageInterceptor">
<property name="properties">
<props>
<prop key="helperDialect">mysql</prop>
</props>
</property>
</bean>
</array>
</property>
</bean>
<bean class="org.mybatis.spring.mapper.MapperScannerConfigurer">
<property name="basePackage" value="com.ww.dao"></property>
</bean>
<context:component-scan base-package="com.ww.service,com.ww.controller,com.ww.utils"></context:component-scan>
事务管理对象
<bean id="transactionManager" class="org.springframework.jdbc.datasource.DataSourceTransactionManager">
<property name="dataSource" ref="dataSource"></property>
</bean>
声明事务
<tx:advice id="myadvice" transaction-manager="transactionManager">
<tx:attributes>
<tx:method name="add*" propagation="REQUIRED"/>
<tx:method name="delUser" propagation="REQUIRED"/>
<tx:method name="updateUser" propagation="REQUIRED"/>
<tx:method name="find*" read-only="true"/>
</tx:attributes>
</tx:advice>
关联形成切面
<aop:config>
<aop:pointcut id="mypoint" expression="execution(* com.qf.service.*.*(..))"></aop:pointcut>
<aop:advisor advice-ref="myadvice" pointcut-ref="mypoint"></aop:advisor>
</aop:config>
</beans>
接下来就是shiro得配置文件
<?xml version="1.0" encoding="UTF-8"?>

<beans xmlns="http://www.springframework.org/schema/beans"

       xmlns:xsi="http://www.w3.org/2001/XMLSchema-instance"

       xmlns:aop="http://www.springframework.org/schema/aop"

       xmlns:context="http://www.springframework.org/schema/context"

       xsi:schemaLocation="

        http://www.springframework.org/schema/beans

        http://www.springframework.org/schema/beans/spring-beans.xsd

        http://www.springframework.org/schema/aop

        http://www.springframework.org/schema/aop/spring-aop.xsd

        http://www.springframework.org/schema/context

        http://www.springframework.org/schema/context/spring-context.xsd">

此处就是之前博文提到得我们得自定义realm

    <bean id="secondRealm" class="com.ww.realm.SecondRealm">

        <!--配置密码的匹配规则-->

        <property name="credentialsMatcher">

            <bean class="org.apache.shiro.authc.credential.HashedCredentialsMatcher">

                <!--配置"加密"算法的格式 是MD5-->

                <property name="hashAlgorithmName" value="MD5"></property>

                <!--一次"加密"不够,将"加密"的结果继续按照相同方式加1024次-->

                <property name="hashIterations" value="1024"/>

            </bean>

        </property>

    </bean>

    <!-- =========================================================

         Shiro Core Components - Not Spring Specific

         ========================================================= -->

    <!-- Shiro's main business-tier object for web-enabled applications

         (use DefaultSecurityManager instead when there is no web environment)-->

    <bean id="securityManager" class="org.apache.shiro.web.mgt.DefaultWebSecurityManager">

        <property name="cacheManager" ref="cacheManager"/>

        <!-- Single realm app.  If you have multiple realms, use the 'realms' property instead. -->

        <property name="realm" ref="secondRealm"/>

    </bean>

    <!-- Let's use some enterprise caching support for better performance.  You can replace this with any enterprise

         caching framework implementation that you like (Terracotta+Ehcache, Coherence, GigaSpaces, etc -->

    <bean id="cacheManager" class="org.apache.shiro.cache.ehcache.EhCacheManager">

        <!-- Set a net.sf.ehcache.CacheManager instance here if you already have one.  If not, a new one

             will be creaed with a default config:

             <property name="cacheManager" ref="ehCacheManager"/> -->

        <!-- If you don't have a pre-built net.sf.ehcache.CacheManager instance to inject, but you want

             a specific Ehcache configuration to be used, specify that here.  If you don't, a default

             will be used.: -->

        <property name="cacheManagerConfigFile" value="classpath:ehcache.xml"/>

    </bean>

    <!-- Used by the SecurityManager to access security data (users, roles, etc).

         Many other realm implementations can be used too (PropertiesRealm,

         LdapRealm, etc. -->

    <!-- =========================================================

         Shiro Spring-specific integration

         ========================================================= -->

    <!-- Post processor that automatically invokes init() and destroy() methods

         for Spring-configured Shiro objects so you don't have to

         1) specify an init-method and destroy-method attributes for every bean

            definition and

         2) even know which Shiro objects require these methods to be

            called. -->

    <bean id="lifecycleBeanPostProcessor" class="org.apache.shiro.spring.LifecycleBeanPostProcessor"/>

    <!-- Enable Shiro Annotations for Spring-configured beans.  Only run after

         the lifecycleBeanProcessor has run: -->

    <bean class="org.springframework.aop.framework.autoproxy.DefaultAdvisorAutoProxyCreator"

          depends-on="lifecycleBeanPostProcessor"/>

    <bean class="org.apache.shiro.spring.security.interceptor.AuthorizationAttributeSourceAdvisor">

        <property name="securityManager" ref="securityManager"/>

    </bean>

 <!-- Secure Spring remoting:  Ensure any Spring Remoting method invocations can be associated

         with a Subject for security checks. -->

    <bean id="secureRemoteInvocationExecutor" class="org.apache.shiro.spring.remoting.SecureRemoteInvocationExecutor">

        <property name="securityManager" ref="securityManager"/>

    </bean>
    <!-- Define the Shiro Filter here (as a FactoryBean) instead of directly in web.xml -

         web.xml uses the DelegatingFilterProxy to access this bean.  This allows us

         to wire things with more control as well utilize nice Spring things such as

         PropertiesPlaceholderConfigurer and abstract beans or anything else we might need: -->
这个是我们自定义是实现添加过滤链得类,当然过滤连也是可以在配置文件当中配置得,这里我们演示得前者,然后定义初始化得方法是initmap

    <bean id="shiroFilter" class="com.qf.Handler.MyShiroFilterFactoryBean" init-method="initMap" >

        <property name="securityManager" ref="securityManager"/>

        <!--如果用户没有登录,则跳转到该页面-->

        <property name="loginUrl" value="/login.html"/>

        <!--如果登录成,则跳转到这个页面-->

        <property name="successUrl" value="/index.jsp"/>

        <!--未授权的页面,代表已经登录(认证) 但是没有权限访问的页面-->

        <property name="unauthorizedUrl" value="/unauthorized.jsp"/>

    </bean>

</beans>
我们自己实现得类如下:
public class MyShiroFilterFactoryBean extends ShiroFilterFactoryBean {


    void initMap(){

        Map<String,String> map=new LinkedHashMap<>();

        map.put("/index.jsp","anon");

        map.put(" /unauthorized.html","authc");

        map.put("/login.html","anon");

        map.put("/loginout.json","logout");

        map.put("/activiti/deploy.json","authc");

        setFilterChainDefinitionMap(map);

    }

}
此处定义得是基本得过滤链,当然你也可以将数据库当中得权限全部遍历出来,然后将其添加在map当中,在初始化得时候就将所有得权限初始化完成,这样就不用再方法上面声明权限注解了,这时候只需要得就是,在数据库当中将权限遍历出来,有shiro内部去比较,这样也是可以得,但是在这里介绍shiro注解得方式;
在基本的过滤连定义好了时候就来配置我们的web层,即SpringMvc得配置:
<?xml version="1.0" encoding="UTF-8"?>

<beans xmlns="http://www.springframework.org/schema/beans"

       xmlns:xsi="http://www.w3.org/2001/XMLSchema-instance"

       xmlns:aop="http://www.springframework.org/schema/aop"

       xmlns:tx="http://www.springframework.org/schema/tx"

       xmlns:context="http://www.springframework.org/schema/context"

       xmlns:mvc="http://www.springframework.org/schema/mvc"

       xsi:schemaLocation="http://www.springframework.org/schema/beans

        http://www.springframework.org/schema/beans/spring-beans.xsd

        http://www.springframework.org/schema/aop

        http://www.springframework.org/schema/aop/spring-aop.xsd

        http://www.springframework.org/schema/tx

        http://www.springframework.org/schema/tx/spring-tx.xsd

        http://www.springframework.org/schema/context

        http://www.springframework.org/schema/context/spring-context.xsd

        http://www.springframework.org/schema/mvc

        http://www.springframework.org/schema/mvc/spring-mvc.xsd">
自动注解扫描

    <mvc:annotation-driven></mvc:annotation-driven>

    <bean class="org.springframework.web.servlet.view.InternalResourceViewResolver">

        <!--<property name="prefix" value="/"></property>-->

        <!--<property name="suffix" value=".jsp"></property>-->

    </bean>
扫描controller

    <context:component-scan base-package="com.ww.controller"></context:component-scan>

静态资源放行

    <mvc:resources mapping="/script/**" location="/script/"></mvc:resources>

    <mvc:resources mapping="/css/**" location="/css/"></mvc:resources>

    <mvc:resources mapping="/img/**" location="/img/"></mvc:resources>

    <mvc:resources mapping="/lib/**" location="/lib/"></mvc:resources>

    <mvc:resources mapping="/user/**" location="/user/"></mvc:resources>

    <mvc:resources mapping="/view/**" location="/view/"></mvc:resources>


 <!-- 启动对@AspectJ注解的支持  -->

    <aop:aspectj-autoproxy proxy-target-class="true"/>

开启切面代理

    <aop:config proxy-target-class="true"></aop:config>
授权管理器

    <bean class="

org.apache.shiro.spring.security.interceptor.AuthorizationAttributeSourceAdvisor">
关联shiro配置文件当中得securityManager

        <property name="securityManager" ref="securityManager"/>

    </bean>

</beans>
在完成了以上三个配置之后,就是最后得web.xml得配置了:
<!DOCTYPE web-app PUBLIC

 "-//Sun Microsystems, Inc.//DTD Web Application 2.3//EN"

 "http://java.sun.com/dtd/web-app_2_3.dtd" >


<web-app>

  <display-name>Archetype Created Web Application</display-name>


  <context-param>

    <param-name>contextConfigLocation</param-name>

    <param-value>classpath:applicationContext*.xml</param-value>

  </context-param>

此为shiro得过滤器

  <filter>

    <filter-name>shiroFilter</filter-name>

    <filter-class>org.springframework.web.filter.DelegatingFilterProxy</filter-class>

    <init-param>

      <param-name>targetFilterLifecycle</param-name>

      <param-value>true</param-value>

    </init-param>

  </filter>


编码过滤器

  <filter>

    <filter-name>myfilter</filter-name>

    <filter-class>org.springframework.web.filter.CharacterEncodingFilter</filter-class>

    <init-param>

      <param-name>encoding</param-name>

      <param-value>utf-8</param-value>

    </init-param>

    <init-param>

      <param-name>forceEncoding</param-name>

      <param-value>true</param-value>

    </init-param>

  </filter>

编码过滤拦截所有

  <filter-mapping>

    <filter-name>myfilter</filter-name>

    <url-pattern>/*</url-pattern>

  </filter-mapping>

shiro也是拦截所有

  <filter-mapping>

    <filter-name>shiroFilter</filter-name>

    <url-pattern>/*</url-pattern>

  </filter-mapping>
监听器监听上下文

  <listener>

    <listener-class>org.springframework.web.context.ContextLoaderListener</listener-class>

  </listener>
Servlet配置

  <servlet>

    <servlet-name>springmvc</servlet-name>

    <servlet-class>org.springframework.web.servlet.DispatcherServlet</servlet-class>

    <init-param>

      <param-name>contextConfigLocation</param-name>

      <param-value>classpath:applicationContext-Springmvc.xml</param-value>

    </init-param>

  </servlet>

德鲁伊得配置

  <servlet>

    <servlet-name>statViewServlet</servlet-name>

    <servlet-class>com.alibaba.druid.support.http.StatViewServlet</servlet-class>

    <!--  初始化参数-->

    <init-param>

      <param-name>resetEnable</param-name>

      <param-value>false</param-value>

    </init-param>

    <!-- 用户名和密码配置 -->

    <init-param>

      <param-name>loginUsername</param-name>

      <param-value>admin</param-value>

    </init-param>

    <init-param>

      <param-name>loginPassword</param-name>

      <param-value>admin</param-value>

    </init-param>

  </servlet>
前端控制器拦截。Json得请求

  <servlet-mapping>

    <servlet-name>springmvc</servlet-name>

    <url-pattern>*.json</url-pattern>

  </servlet-mapping>


德鲁伊得拦截

  <servlet-mapping>

    <servlet-name>statViewServlet</servlet-name>

    <url-pattern>/druid/*</url-pattern>

  </servlet-mapping>

</web-app>
以我们得环境得准备搭建就基本完成,大家只需要加入相应得依赖包,在之前得博文也可以找到;
三 代码得编写
(1)首先我们根据mybatis来生成相应得pojo以及mapper映射文件这里就不再演示了
在SSM进阶有具体得生成过程;
然后我们定义service层,里面有两个方法,因为我们是授权,所以在这里我们只是去定义,查找角色与查找权限得方法,一遍再自定义得Raem当中调用授权;
下面是认证和授权得代码:
public class SecondRealm extends AuthorizingRealm {
首先我们得声明用到的mapper对象

    @Autowired
    private UUserMapper uUserMapper;
   @Autowired
    private UserService userService;
授权得方法
  @Override

    protected AuthorizationInfo doGetAuthorizationInfo
(PrincipalCollection principalCollection) {

拿到认证得时候传递过来得用户名称

        String  principal =(String)
principalCollection.getPrimaryPrincipal()
SimpleAuthorizationInfo simpleAuthorizationInfo=new
SimpleAuthorizationInfo();
将角色以及对应得权限遍历出来,加入  simpleAuthorizationInfo最后返还给shiro处理      simpleAuthorizationInfo.setRoles(userService.findRoles(principal));

        simpleAuthorizationInfo.setStringPermissions(userService.findPermissions(principal));

        return simpleAuthorizationInfo;

    }
认证得方法

    @Override

    protected AuthenticationInfo doGetAuthenticationInfo(AuthenticationToken authenticationToken) throws YunErrorHandler {

        UUserExample example=new UUserExample();

        UUserExample.Criteria criteria = example.createCriteria();
得到用户输入得用户名

        UsernamePasswordToken Token = (UsernamePasswordToken) authenticationToken;

        criteria.andUsernameEqualTo(Token.getUsername());
再数据库当中查询该用户

        List<UUser> uUsers = uUserMapper.selectByExample(example);

        if(uUsers.size()==0){

            throw  new YunException("账号不匹配");

        }
将得到得盐转化为ByteSource类型

        ByteSource byteSource =
ByteSource.Util.bytes(Token.getUsername());
最后将用户名,遍历得到得密码,转换好得盐,以及所用得Realm得名称封装起来交给shiro去认证:
 SimpleAuthenticationInfo simpleAuthenticationInfo=new SimpleAuthenticationInfo(Token.getUsername(),uUsers.get(0).getPassword(),byteSource,getName());


        return simpleAuthenticationInfo;

    }
以上就是授权认证得Realm得实现,
(2)service 得编写
因为再给simpleAuthorizationInfo设置角色和权限得时候,参数得要求都是set集合,所以我们方法得返回值就是set集合
@Override

public Set<String> findRoles(String username) {
首先根据传递过来得username来得到用户得uid(用户id)
    UUserExample example1=new UUserExample();

    UUserExample.Criteria criteria1 = example1.createCriteria();

    criteria1.andUsernameEqualTo(username);

    List<UUser> uUsers = uUserMapper.selectByExample(example1);

    Long uid=0L;

    for (UUser uUser : uUsers) {
这样做的前提是我们得用户名是不能重复得

        uid=uUser.getUid();

    }
再根据得带得uid去用户角色表当中得到rid(角色id)

    UUserRoleExample example3=new UUserRoleExample();

    UUserRoleExample.Criteria criteria2 = example3.createCriteria();

    criteria2.andUidEqualTo(uid);

    List<UUserRoleKey> uUserRoleKeys = uUserRoleMapper.selectByExample(example3);

    Long rid=0L;

    for (UUserRoleKey uUserRoleKey : uUserRoleKeys) {

        rid=uUserRoleKey.getRid();

    }
最后根据得到得rid得到用户相应得橘色来返回,当然这里只是添加了root和admin两个用户来测试;

    URoleExample example=new URoleExample();

    URoleExample.Criteria criteria = example.createCriteria();

    criteria.andRidEqualTo(rid);

    List<URole> uRoles = uRoleMapper.selectByExample(example);

    Set<String> set=new HashSet<>();

    for (URole uRole : uRoles) {

        set.add(uRole.getRolename());

    }
最后将我们得到得角色set集合返回

    return set;

}

查询权限得方法

@Override

public Set<String> findPermissions(String username) {
大家可以将相同功能得带么封装成工具类这样会方便开发
同样首先根据用户名获得uid

    UUserExample example1=new UUserExample();

    UUserExample.Criteria criteria1 = example1.createCriteria();

    criteria1.andUsernameEqualTo(username);

    List<UUser> uUsers = uUserMapper.selectByExample(example1);

    Long uid=0L;

    for (UUser uUser : uUsers) {

        uid=uUser.getUid();

    }
再根据uid得到rid

    UUserRoleExample example3=new UUserRoleExample();

    UUserRoleExample.Criteria criteria2 = example3.createCriteria();

    criteria2.andUidEqualTo(uid);

    List<UUserRoleKey> uUserRoleKeys = uUserRoleMapper.selectByExample(example3);

    Long rid=0L;

    for (UUserRoleKey uUserRoleKey : uUserRoleKeys) {

        rid=uUserRoleKey.getRid();

    }
根据rid得到我们得pid(权限id),实在角色权限对应表当中去查询得

    URolePermissionExample example=new URolePermissionExample();

    URolePermissionExample.Criteria criteria = example.createCriteria();

    criteria.andRidEqualTo(rid);

    List<URolePermissionKey> uRolePermissionKeys = uRolePermissionMapper.selectByExample(example);

    Set<String> set=new HashSet<>();

    for (URolePermissionKey rolePermissionKey : uRolePermissionKeys) {

        Long pid = rolePermissionKey.getPid();

        UPermission r = uPermissionMapper.selectByPrimaryKey(pid);

        set.add(r.getPerms());

    }

最后讲的到得权限set集合返回;

    return set;

}
四 controller得开发
再这里我们以列表得方法为例,具体得列表得service得方法大家可以自己去写,随便查询一个列表就好哦;
在写这个控制器之前,我我们首先来了解一下shiro得五个注解:
Shiro共有5个注解,主要说的就是 RequiresPermissions,RequiresRoles
- RequiresAuthentication:
使用该注解标注的类,实例,方法在访问或调用时,当前Subject必须在当前session中已经过认证。
- RequiresGuest:
使用该注解标注的类,实例,方法在访问或调用时,当前Subject可以是“gust”身份,不需要经过认证或者在原先的session中存在记录。
- RequiresPermissions:
当前Subject需要拥有某些特定的权限时,才能执行被该注解标注的方法。如果当前Subject不具有这样的权限,则方法不会被执行。
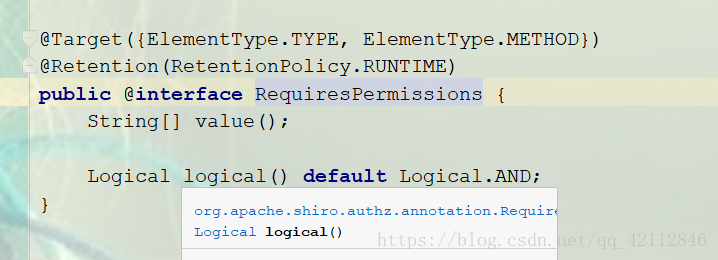
这是这个注解的源码,里面value是一个数组,也就是说是可以放多个角色的
下面是一个辅助属性,值为and的时候表示数组内的成员之间是并列的,当值为or的时候就是或的关系
- RequiresRoles:
当前Subject必须拥有所有指定的角色时,才能访问被该注解标注的方法。如果当天Subject不同时拥有所有指定角色,则方法不会执行还会抛出AuthorizationException异常。

与之前的RequiresPermissions的用法是一样的,当然具体用那种根据具体的应用场景
- RequiresUser
当前Subject必须是应用的用户,才能访问或调用被该注解标注的类,实例,方法。
以上就是五个注解:controller的代码:
@ResponseBody
@RequestMapping("/GetBalancerList.json")
表示列表这个方法拥有root,admin两个角色的其中之一就可以,并且有权限list即可访问
@RequiresRoles( value = {"root","admin"},logical = Logical.OR)
@RequiresPermissions("list")
public respDto GetBalancerList(HttpServletRequest request){
respDto all = balaceService.findAll();
return all;
}
这就是整个框架以及代码的变
下面来说一下具体的流程:
首先你登录认证成功之后
点击查询列表的按钮的时候,因为查询列表是需要权限的
所以这时候shiro回去数据库当中去遍历你的权限,然后给你授权
在确认你有两个之一的角色,并且有list权限,这时候就证明你是有资格查询列表的
所以在你的页面上会显示列表;
当然你也可以将在RequiresRoles当中的一个角色去掉,然后用只拥有你去掉这个去角色的用户去访问列表,这时候因为你没有角色即使你有list的权限也是访问不了的
当中你只拥有角色没有权限也是一样访问不了
当然你也可以去掉角色的限制,这样只要是拥有list权限的用户就都可以访问列表的
这是比较灵活的可以根据具体的应用场景去变化的;
有的读者可能会问到:那么多权限,难到要用手全部敲进去吗?
可以用反射加自定义注解+切面的方式将所有的权限写入到数据库当中去;
后面会有博文来写这个反射入库,其实原理和之前博文当中的记录日志写入数据库是一样的;
以上只是小编的拙见,希望大拿指点;
敬请期待!!!
版权声明:本文为博主原创文章,未经博主允许不得转载。 https://blog.csdn.net/qq_42112846;