这次我们以inputPassword组件为例,将编译配置环境 从webpack3迁移至webpack4,新装的webpack版本是4.14,但是配置文件还是用的webpack3的配置。
git地址:https://github.com/jean0218/react-inputPassword
先来看看pack.json文件:
{
  "name": "react-inputpassword",
  "version": "1.0.0",
  "description": "",
  "main": "index.js",
  "scripts": {
    "test": "echo \"Error: no test specified\" && exit 1",
    "webpack": "webpack --config ./build/webpack.config.js",
    "start": "webpack-dev-server --config ./build/webpack.config.js",
    "dev": "webpack --config ./build/webpack.dev.config.js",
    "build": "webpack --progress --profile --colors --config ./build/webpack.pro.config.js"
  },
  "repository": {
    "type": "git",
    "url": "git+https://github.com/jean0218/react-inputPassword.git"
  },
  "author": "",
  "license": "ISC",
  "bugs": {
    "url": "https://github.com/jean0218/react-inputPassword/issues"
  },
  "homepage": "https://github.com/jean0218/react-inputPassword#readme",
  "dependencies": {
    "babel-core": "^6.26.3",
    "babel-loader": "^7.1.4",
    "babel-polyfill": "^6.26.0",
    "babel-preset-env": "^1.7.0",
    "babel-preset-es2015": "^6.24.1",
    "babel-preset-react": "^6.24.1",
    "babel-preset-stage-0": "^6.24.1",
    "css-loader": "^0.28.11",
    "enzyme-adapter-inferno": "^1.3.0",
    "extract-text-webpack-plugin": "^3.0.2",
    "file-loader": "^1.1.11",
    "html-webpack-plugin": "^3.2.0",
    "react": "^16.4.1",
    "react-dom": "^16.4.1",
    "react-test-renderer": "^16.4.1",
    "style-loader": "^0.21.0",
    "webpack": "^4.14.0",
    "webpack-dev-server": "^3.1.4",
    "webpack-merge": "^4.1.3"
  },
  "devDependencies": {
    "babel-jest": "^23.2.0",
    "enzyme": "^3.3.0",
    "enzyme-adapter-react-16": "^1.1.1",
    "jest": "^23.3.0"
  }
}
找到webpack配置文件,放在build目录下,原有webpack文件配置如下:
webpack.base.config.js(webpack基础配置)
const webpack = require('webpack');
const path = require('path');
const HtmlWebpackPlugin = require('html-webpack-plugin');
const fileEntry = require('./fileEntry.js');

const webpackBaseConfig = {
    resolve: {
        extensions: [".js", ".json", ".jsx"],
        alias: {
            images: path.resolve(__dirname, '../examples/static/images'),
        }
    },

    entry: {
        examples:path.resolve(__dirname, '../examples/index.js'),
        demo01:path.resolve(__dirname, '../examples/demo01.js')
    },

    module: {
        noParse: /node_modules\/(jquey\.js)/,
        rules: [{
            test: /\.(js|jsx)$/,
            use: [{
                loader: 'babel-loader',
                options: {
                    "presets": [
                        "es2015", 'stage-0', 'react'
                    ]
                }
            }]
        },{
            test: /\.(png|jpg|gif)$/,
            use: [{
                loader: 'file-loader',
                options: {
                    limit: 25000,
                    name: 'images/[name][hash:6].[ext]',
                    // 我们选择加载的图片格式为png,jpg,jpeg,gif,并限定当文件小于25kb,转换为base64编码。
                    // 优势:将一些小并且不常更新的图片转换base64编码后,可以减少一次或多次http请求。
                    // 但这个limit应该定义成一个合适的值,因为如果将稍大些的图片转为base64后,会生成大量字符,
                    // 反而降低我们的加载速度。
                }
            }]
        },{
            test: /\.(woff|woff2|eot|ttf|svg|otf)$/,
            loader: 'file-loader',
            options: {
                name: 'fonts/[name].[ext]'
            }
        }]
    },

    plugins: [
        new webpack.optimize.ModuleConcatenationPlugin(),
    ],
}

fileEntry.map(function(item) {//新文件输出
    webpackBaseConfig.entry[item.fileName] =  path.resolve(__dirname, item.sourceFile);
    const chunksSort = item.chunks
    const htmlPackage = new HtmlWebpackPlugin({
        //favicon: 'path/to/yourfile.ico',//给生成的 html 文件生成一个 favicon
        title: item.title, //生成的html文档的标题
        template: path.resolve(__dirname, item.template),
        filename: item.targetFile, //输出文件的文件名称,默认为index.html,可以配置输出文件指定目录位置,例如'html/index.html'
        //filename配置的html文件目录是相对于webpackConfig.output.path路径而言的,不是相对于当前项目目录结构的。
        //指定生成的html文件内容中的link和script路径是相对于生成目录下的,写路径的时候请写生成目录下的相对路径。
        //hash: false,//true|false,是否为所有注入的静态资源添加webpack每次编译产生的唯一hash值
        showErrors: true, //是否将错误信息输出到html页面中,便于调试
        //inject: 'body', //所有JavaScript资源插入到body元素的底部
        chunks: item.chunks,
        //允许插入到模板中的一些chunk,不配置此项默认会将entry中所有的thunk注入到模板中。
        //在配置多个页面时,每个页面注入的thunk应该是不相同的,需要通过该配置为不同页面注入不同的thunk;
        //excludeChunks: ,//这个与chunks配置项正好相反,用来配置不允许注入的thunk。
        chunksSortMode: (argument, argument2) =>{
            //none | auto| function,默认auto; 允许指定的thunk在插入到html文档前进行排序。
            //function值可以指定具体排序规则;auto基于thunk的id进行排序; none就是不排序
            var aIndex = chunksSort.indexOf(argument.names[0]);
            var bIndex = chunksSort.indexOf(argument2.names[0]);
            aIndex = aIndex < 0 ? chunksSort.length + 1 : aIndex;
            bIndex = bIndex < 0 ? chunksSort.length + 1 : bIndex;
            return aIndex - bIndex;
        }
    });
    webpackBaseConfig.plugins.push(htmlPackage);
});

module.exports = webpackBaseConfig;
其中的fileEntry.js文件主要用于生成html文件,这里就不再贴出来了。
webpack.config.js(本地运行环境配置)
const webpack = require('webpack');
const path = require('path');
const webpackBaseConfig = require('./wepback.base.config.js');
const merge = require('webpack-merge');
const outputDir = 'dist';


const webpackConfig = merge(webpackBaseConfig, {
    devtool: 'cheap-module-eval-source-map',
    output: {
        path: path.resolve(__dirname, '../' + outputDir + '/'),
        filename: 'js/[name].js',
        chunkFilename: 'js/[name].chunks.js',
    },
    module: {
        rules: [
            {
                test: /\.css$/,
                use:[
                    'style-loader',
                    'css-loader'
                ]
            }
        ],
    },
    plugins: [
        new webpack.HotModuleReplacementPlugin(),
    ],
});


module.exports = webpackConfig;
我们来看看webpack4相对于3新增了哪些内容:
1、不止需要安装webpack,还需要安装webpack-cli
在webpack3中,webpack本身和它的cli以前都在同一个包中,但在第4版中,它们两者已经分开,所以我们的webpack需要安装两个包,全局安装webpack
npm install webpack -g再全局安装webpack-cli
npm install webpack-cli -g安装完成后出现版本提示,就说明该包已经安装成功。

(这个安装是在配置react-loadList组件时截图的,除了项目不同其它都是一样的)
2、新增了mode参数来表示生产还是开发
按照以上配置,我们运行 npm run start,文件能正常编译,但会看到如下警告:
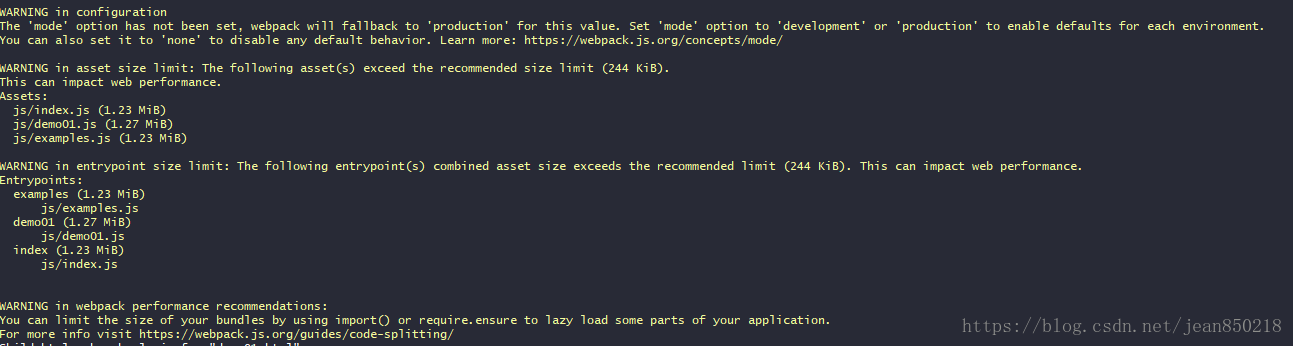
这个警告告诉我们,'mode'选项没有被设置,必须设置'mode'选项。webpack4新增了mode参数来表示生产还是开发,新增的参数有两个可选值:development和production。不可缺省,缺省就会像上图一样报警告,其中
production 模式:
-
默认提供所有可能的优化,如代码压缩/作用域提升等
-
不支持 watching
-
process.env.NODE_ENV 的值不需要再定义,默认是 production
development 模式:
-
主要优化了增量构建速度和开发体验
-
process.env.NODE_ENV 的值不需要再定义,默认是 development
-
开发模式下支持注释和提示,并且支持 eval 下的 source maps
可以在pack.json中配置
webpak --mode development也可以配置文件中配置:
mode:'development',
devtool: 'cheap-module-eval-source-map',
如果原有的文件中有new webpack.DefinePlugin,加上mode选项后,则需要删除
new webpack.DefinePlugin({ "process.env.NODE_ENV": JSON.stringify("production") })再运行npm run start,这个时候警告已经没有了。
3、rules中需要增加type类型,指定模块类型
webpack 4之前,js 是 webpack 中的唯一模块类型,因而不能有效地打包其它类型的文件。而 webpack 4 则提供了 5 种模块类型:
- javascript/auto: (webpack 3中的默认类型)支持所有的JS模块系统:CommonJS、AMD、ESM
- javascript/esm: EcmaScript 模块,在其他的模块系统中不可用(默认 .mjs 文件)
- 相较于javascript/auto模式更严格,导入的名称必须存在于导入的模块中
- 动态的模块(非ESM, 如CommonJs)只能通过import导入,其它方式的导入都会报错
- javascript/dynamic: 仅支持 CommonJS & AMD,EcmaScript 模块不可用
- json: 可通过 require 和 import 导入的 JSON 格式的数据(默认为 .json 的文件)
- webassembly/experimental: WebAssembly 模块(处于试验阶段,默认为 .wasm 的文件)
(我在看到这块时,产生了一个疑问,这些都是js的模型,图片、字体类的不需要增加type类型么?待以后有机会再补充)
5、CommonsChunkPlugin需要替换
本次更新内容中没有这一项,暂时不编写,以后更新。
这样,我们的webpack3成功迁移至4了,相对于2迁移至3是不是简单了很多。
参考: