一、开发前准备
1、开发环境准备
基础准备(win10)
- 参考:python2与python3共存安装
- 参考: pycharm安装及永久激活
- 参考: mysql及navicat安装与使用及navicat破解
- 参考:安装cmder替代cmd 推荐
虚拟环境搭建
- 进入到想要存放虚拟环境的目录下,安装virtualenvwrapper:
pip install virtualenvwrapper-win - 创建虚拟环境:
mkvirtualenv -p C:\Python35\python.exe myenv # myenv为虚拟环境名 - 虚拟环境常用命令:workon、deactivate
- 进入到想要存放虚拟环境的目录下,安装virtualenvwrapper:
通常需要安装的包
- pip install scrapy # scrapy包,可能需要从 https://www.lfd.uci.edu/~gohlke/pythonlibs/,分别安装twisted及scrapy。如:
pip install Twisted-17.9.0-cp36-cp36m-win_amd64.whl
piip install Scrapy-1.5.0-py2.py3-none-any.whl - pip install pypiwin32
# 如果出现win32api错误,尝试 python pywin32_postinstall.py -install - pip install Pillow # 处理图片
- pip install mysqlclient # MySQLdb包
- pip install fake-useragent # 随机user-agent
- pip install requests # 安装requests
- pip install selenium # 安装selenium
- pip install pyvirtualdisplay # chrome无界面运行(linux环境下可用)
- pip install scrapy # scrapy包,可能需要从 https://www.lfd.uci.edu/~gohlke/pythonlibs/,分别安装twisted及scrapy。如:
如果有问题,可到 https://www.lfd.uci.edu/~gohlke/pythonlibs/ 寻找解决办法
- 利用豆瓣源可加速安装
pip install -i https://pypi.douban.com/simple mywrap # mywrap为包名
2、新建爬虫
创建爬虫项目:
进入cmd,进入项目想要存放的目录;
进入到拟创建项目的虚拟环境;
执行命令:scrapy startproject <project_name> [project_dir]创建爬虫模板:
cd project_name# project_name为项目名,需要进入到项目目录下面
scrapy genspider [options] <name> <domain># 生成爬虫模板- 常用爬虫命令:输入scrapy ,可查看帮助
- 进入pycharm,设置项目解释器为项目的虚拟环境
3、写main.py文件,便于调试
便于直接使用pycharm调试,需要配置main.py文件如下,当运行main.py时,可通过断点进行调试
# main.py # 已存在,需要复制下面内容到文件中
from scrapy.cmdline import execute
import sys
import os

sys.path.append(os.path.dirname(os.path.abspath(__file__))) # 添加默认路径

execute(["scrapy", "crawl", "jobbole"]) # 根据实际爬虫进行修改
# execute(["scrapy", "crawl", "zhihu"])
# execute(["scrapy", "crawl", "lagou"])
4、创建自动生成部分代码的函数
- 分析网页及需求,规划需要哪些字段及字段属性
编写自动生成数据库创建、插入数据、更新数据、item赋值语句等代码的函数
# gen_item_sql.py # 用于自动生成部分代码,减少手工输入,其中字段要视具体情况进行修改

def gen_item_sql(item_list, table_name, class_item):
    '''
    自动生成代码辅助函数
    '''

    # 创建mysql表
    print('-' * 50, 'sql 表的创建', '-' * 30)
    item_p = []
    for item in item_list:
        if item[-4:] == 'nums':
            item_p.append("%s int(11) DEFAULT 0 NOT NULL" % (item,))
        elif item[-4:] == "date":
            item_p.append("%s date DEFAULT NULL" % (item,))
        elif item[-8:] == "datetime":
            item_p.append("%s datetime DEFAULT NULL" % (item,))
        elif item[-7:] == "content":
            item_p.append("%s longtext DEFAULT NULL" % (item,))
        elif item[-2:] == "id":
            item_p.append("%s varchar(50) NOT NULL" % (item,))
        else:
            item_p.append("%s varchar(300) DEFAULT NULL" % (item,))

    print("CREATE TABLE  %s (" % (table_name,))
    print(",".join(item_p))
    print(") ENGINE=InnoDB DEFAULT CHARSET=utf8;")

    # 在spider文件中,定义类解析item:------------------------------
    print('-' * 50, '在spider中,定义def parse_item(self, response):', '-' * 30)
    print('def parse_item(self, response):')
    print("\titem_loader=MyItemLoader(item={0}(),response=response)".format(class_item))
    for item in item_list:
        print('\titem_loader.add_xpath(\'%s\',\'\')' % (item,))
    print("\titem = item_loader.load_item()")
    print("\tyield item")

    # 在items.py文件中,定义Item类:------------------------------

    print('-' * 50, '在items.p文件中,定义Item类:', '-' * 30)
    print("class {0}(scrapy.Item):".format(class_item))

    for item in item_list:
        print("\t%s =scrapy.Field()" % (item,))
    print()
    print("\tdef get_insert_sql(self):")
    print("\t# 获取插入的sql语句及需要传递的参数")
    sql_str = '\t\tinsert_sql = \'\'\''
    sql_str += '\ninsert into %s ( %s )' % (table_name, ','.join(item_list))
    sql_str += '\nVALUES ( %s )' % (','.join(['%s' for _ in item_list]),)
    sql_str += '\nON DUPLICATE KEY UPDATE %s' % (','.join(['%s= VALUES(%s)' % (x, x) for x in item_list]),)
    sql_str += '\n\'\'\''
    print(sql_str)
    print('\t\tparams = ( %s )' % (','.join(['self["%s"]' % (x,) for x in item_list]),))
    print("\t\treturn insert_sql,params")

    # 在items.py文件中,定义Item类:------------------------------

    print('-' * 50, '对item赋值', '-' * 30)
    for item in item_list:
        print('\titem["%s"] =' % (item,))

if __name__ == "__main__":
    jobbole_fields = ['title', 'create_datetime', 'url', 'url_object_id', 'tags', 'content', 'front_image_url',
                      'front_image_path', 'praise_nums', 'comment_nums', 'fav_nums']
    gen_item_sql(jobbole_fields, 'jobbole_article',class_item = "JobboleArticleItem")
5、创建数据库(如:mysql)
- 通过复制上面自动生成的创建数据表的sql代码,到navicat中自动生成相应的数据表;
- 如果字段内容中有moji表情图标,数据库中数据表对应字段应设为utf8mb4
二、scrapy架构烂熟于心
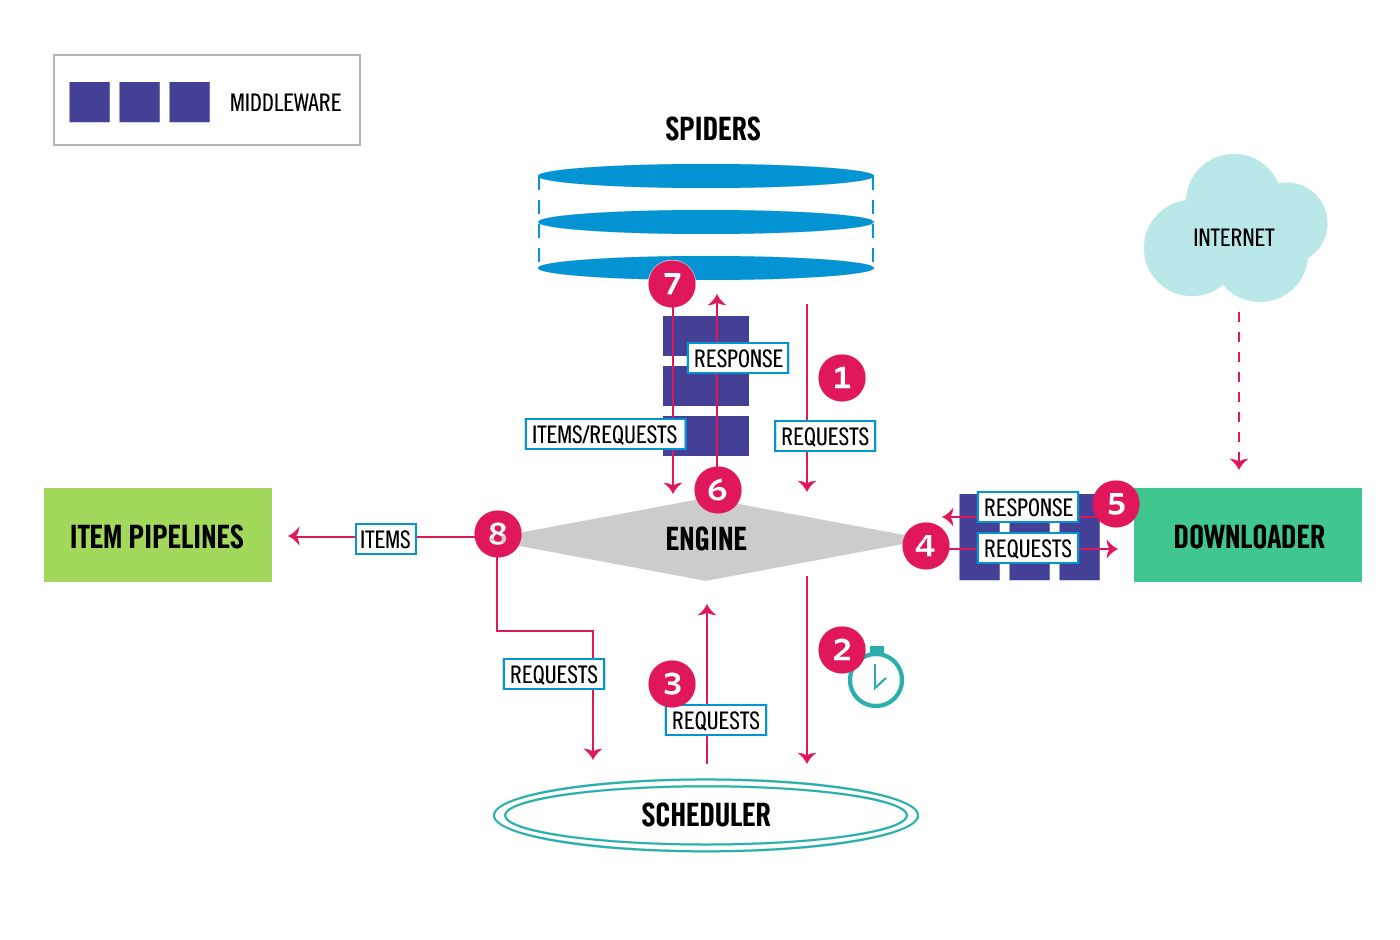
- The Engine gets the initial Requests to crawl from the Spider.
- The Engine schedules the Requests in the Scheduler and asks for the next Requests to crawl.
- The Scheduler returns the next Requests to the Engine.
- The Engine sends the Requests to the Downloader, passing through the Downloader Middlewares (see process_request()).
- Once the page finishes downloading the Downloader generates a Response (with that page) and sends it to the Engine, passing through the Downloader Middlewares (see process_response()).
- The Engine receives the Response from the Downloader and sends it to the Spider for processing, passing through the Spider Middleware (see process_spider_input()).
- The Spider processes the Response and returns scraped items and new Requests (to follow) to the Engine, passing through the Spider Middleware (see process_spider_output()).
- The Engine sends processed items to Item Pipelines, then send processed Requests to the Scheduler and asks for possible next Requests to crawl.
- The process repeats (from step 1) until there are no more requests from the Scheduler.
三、爬取数据
1、基于base生成的爬虫模板
即通过scrapy genspider -t base <name> <domain> # 生成的爬虫模板
关键是要重载两个函数:
定义
def parse(self, response):,实现:- 从起始网页开始,获取页面中符合条件(正则匹配)的url链接
- yield scrapy.Request()相应的url,通过回调函数parse_item,完成进行字段解析;
- 如有下一页面的url,则获取其url,yield scrapy.Request(),回调函数为parse,进一步遍历;
定义
def parse_item(self, response):实现- 对页面的解析,提取出页面中需要的信信息,存入到item中;
- 如解析中发现有新的可进一步爬取的url,yield scrapy.Request(),回调函数为parse,进一步遍历;
spider原码解读参看: https://blog.csdn.net/qd_ltf/article/details/79792957
2、基于crawl生成的爬虫模板
即通过scrapy genspider -t crawl <name> <domain> # 生成的爬虫模板
关键是要重载def parse_item(self, response):实现页面的解析;
可以重载以下函数:
def parse_start_url(self, response):
    return []
def process_results(self, response, results):
    return results
crawlspider原码解读参看: https://blog.csdn.net/qd_ltf/article/details/79782005
3、字段解析时,shell调试
解析页面时,通常用css或xpath实现字段解析,也通常可以在shell下调试,如:
scrapy shell http://blog.jobbole.com/112744/  # shell命令调试
re2 = response.xpath('//*[@id="post-112744"]/div[1]/h1/text()').extract()
四、保存数据(pipline)
可以根据需要,可以直接把下面部分代码拷贝到相应的文件中
1、保存到mysql
# settings.py  # 需要在setting.py文件中添加以下内容
MYSQL_HOST = '127.0.0.1'
MYSQL_DB_NAME = 'spider'    # 数据库名称
MYSQL_USER = 'root'
MYSQL_PASSWORD = 'root'
SQL_DATETIME_FORMAT = "%Y-%m-%d %H:%M:%S"  # 时间格式
SQL_DATE_FORMAT = "%Y-%m-%d"  # 日期格式

ITEM_PIPELINES = {
    'ltfspider.pipelines.MysqlTwistedPipline': 300, #根据具体的项目调整
}

# ------------------------------------
# pipelines.py # 需要在pipelines.py文件中添加以下内容

import MySQLdb
import MySQLdb.cursors
from twisted.enterprise import adbapi


class MysqlTwistedPipline(object):
    '''
    使用twisted将mysql插入变成异步操作
    '''

    def __init__(self, db_pool):
        self.db_pool = db_pool

    @classmethod
    def from_settings(cls, settings):
        # 从settings中获取数据库设置,并返回一个pipline的实例
        return cls(adbapi.ConnectionPool(
            "MySQLdb",
            host=settings['MYSQL_HOST'],
            db=settings['MYSQL_DB_NAME'],
            user=settings['MYSQL_USER'],
            password=settings['MYSQL_PASSWORD'],
            charset='utf8',
            cursorclass=MySQLdb.cursors.DictCursor,
            use_unicode=True,
        ))

    def process_item(self, item, spider):
        query = self.db_pool.runInteraction(self.do_insert, item)
        query.addErrback(self.handle_error, item, spider)

    def handle_error(self, failure, item, spider):
        print(failure)

    def do_insert(self, cursor, item):
        insert_sql, params = item.get_insert_sql()  # get_insert_sql中定义insert_sql与params
        cursor.execute(insert_sql, params)
2、保存图片
# settings.py  # 需要在setting.py文件中添加以下内容
ITEM_PIPELINES = {
    'ltfspider.pipelines.MyImagePipeline': 1,
}
IMAGES_URLS_FIELD = "front_image_url"
IMAGES_STORE = os.path.join(BASE_DIR, 'images')
# IMAGES_RESULT_FIELD = "front_image_path"  # 默认将result{url,checknum,path} 存入到item[IMAGES_RESULT_FIELD]中,可用下面的类替换默认类的item_completed方法

# ------------------------------------
# pipelines.py # 需要在pipelines.py文件中添加以下内容

from scrapy.pipelines.images import ImagesPipeline
from scrapy.exceptions import DropItem
class MyImagePipeline(ImagesPipeline):
    '''
    将图片的本地存储路径保存到item中
    '''

    def item_completed(self, results, item, info):
        image_paths = [value["path"] for ok, value in results if ok]
        if not image_paths:
            raise DropItem("Item contains no images ")
        item['front_image_path'] = ",".join(image_paths)
        item['front_image_url'] = ",".join(item['front_image_url'])
        return item
3、导出到json文件
# pipelines.py # 需要在pipelines.py文件中添加以下内容

from scrapy.exporters import JsonItemExporter

class JsonExporterPipeline(object):
    '''
    调用scrapy提供的json export导出到json文件
    '''

    def __init__(self):
        self.file = open('articleexporter.json', 'wb')
        self.exporter = JsonItemExporter(self.file, encoding='utf-8', ensure_ascii=False)
        self.exporter.start_exporting()

    def process_item(self, item, spider):
        self.exporter.export_item(item)
        return item

    def close_spider(self, spider):
        self.exporter.finish_exporting()
        self.file.close()
4、导出到es
# pipelines.py # 需要在pipelines.py文件中添加以下内容

class ElasticsearchPipeline(object):
    # 将数据写入到es中
    def process_item(self,item,spider):
        # 将item转换为es的数据
        item.save_to_cs()
        return item
五、反爬技术的应用
1. 随机更换User-Agent
# settings.py----------------------------------------------------------------------
DOWNLOADER_MIDDLEWARES = {
    'ltfspider.middlewares.UserAgentMiddleware': 543,
    'scrapy.downloadermiddlewares.useragent.UserAgentMiddleware': None # 让默认的失效
}
USER_AGENT_TYPE = "random"  # 可设置成chrome\safi\ie\firefox等

# middlewares.py---------------------------------------------------------------------
class UserAgentMiddleware(object):
    """通过引入fake_useragent包,实现useagent随机切换"""

    def __init__(self, ua_type):
        self.ua = UserAgent()
        self.ua_type = ua_type

    @classmethod
    def from_crawler(cls, crawler):
        ua_type = crawler.settings.get("USER_AGENT_TYPE", "random")  # 可以在settings中配置为random、chrome、firefox等
        return cls(ua_type)

    def process_request(self, request, spider):
        ua_random = getattr(self.ua, self.ua_type)
        request.headers.setdefault(b"User-Agent", ua_random)
        print(ua_random)
2. 随机更换IP
# settings.py文件设置-------------------------------------------------
# 数据库基本设置
MYSQL_HOST = '127.0.0.1'
MYSQL_DB_NAME = 'ltfspider'  # 数据库名称
MYSQL_USER = 'root'
MYSQL_PASSWORD = 'root'
SQL_DATETIME_FORMAT = "%Y-%m-%d %H:%M:%S"  # 时间格式
SQL_DATE_FORMAT = "%Y-%m-%d"  # 日期格式

PROXIES_TABLE = "proxy_ip"
PROXY_MODE = 1  # 0 每次请求更换proxy,1 有请求用一个ip,2 用自定义的ip,其值为下面PROXY_CUSTOM
PROXY_CUSTOM = "http://221.233.164.82:808"  # 定义一个可用的proxy

# Middleware -------------------------------------------------

import MySQLdb
import requests
from scrapy.selector import Selector
import time
from random import randint

PROXY_FROM_WEB = "daxiang"  # 从大象代理上获取收费的ip代理
# PROXY_FROM_WEB = "xici"  # 从西刺网站爬取免费的ip代理


class Mode:
    RANDOMIZE_PROXY_EVERY_REQUESTS, RANDOMIZE_PROXY_ONCE, SET_CUSTOM_PROXY = range(3)


class RandomProxyMiddleware(object):
    '''
    随机生成ip代理,使用方法 RandomProxy.random_proxy(),返回如:http://221.233.164.82:808
    先从数据库中随机取数,成功返回,失败删除无效的ip代理,再取
    如果数据库中代理不足100条,重新从网站爬取
    '''

    def __init__(self, settings):
        self.mode = settings.get('PROXY_MODE')
        self.conn = MySQLdb.connect(
            host=settings.get("MYSQL_HOST"),
            user=settings.get("MYSQL_USER"),
            password=settings.get("MYSQL_PASSWORD"),
            db=settings.get("MYSQL_DB_NAME"),
            charset="utf8"
        )
        self.cursor = self.conn.cursor()
        self.table = settings.get("PROXIES_TABLE")
        self.url = "http://www.xicidaili.com/nn/{0}"
        self.headers = {
            "User-Agent": 'Mozilla/5.0 (Windows NT 10.0; Win64; x64; rv:56.0) Gecko/20100101 Firefox/56.0'
        }
        self.random_proxy = None
        self.selected_proxy = None
        self.custom_proxy = settings.get('PROXY_CUSTOM', None)
        self.run_get_ip_times = 0

    def __del__(self):
        self.cursor.close()
        self.conn.close()

    @classmethod
    def from_crawler(cls, crawler):
        return cls(crawler.settings)

    def process_request(self, request, spider):
        proxy = self._get_proxy()
        request.meta["proxy"] = proxy

    def _get_proxy(self):
        '''如果数据表中的ip资源不足300个,重新从网站爬取数据进行补充,如果连续爬两次仍失败,返回None'''

        # 判断模式,用代理IP的频度
        if self.mode == Mode.SET_CUSTOM_PROXY:
            return self.custom_proxy

        if self.mode == Mode.RANDOMIZE_PROXY_ONCE:
            if self.selected_proxy:
                return self.selected_proxy

        # 数据表中ip代理资源不足100条时,重新爬取
        rows = self.cursor.execute("select * from {0}".format(self.table))
        if rows <= 50:
            if self.run_get_ip_times >= 1:
                return None
            else:
                if PROXY_FROM_WEB == "daxiang":
                    proxy_list = self._get_ip_from_daxiang(60)  # 从大象代理里取收费的代理
                else:
                    proxy_list = self._get_ip_from_xici(1000)  # 从西刺里爬取免费代理
                self._insert_mysql(proxy_list)
                self.run_get_ip_times += 1

        # 如果为每次请求都用ip代理  或者每次请求用同样的ip代理,且是第一次请求
        random_sql = "select ip, port,ip_type from {0} order by rand() limit 1".format(self.table)
        self.cursor.execute(random_sql)

        for ip_info in self.cursor.fetchall():
            ip = ip_info[0]
            port = ip_info[1]
            ip_type = ip_info[2]
            if self.proxy_is_valid(ip, port, ip_type):  # 检查ip是否有效
                self.selected_proxy = "{0}://{1}:{2}".format(ip_type.lower(), ip, port)
                self.run_get_ip_times = 0
                return self.selected_proxy
            else:
                self.delete_ip(ip)
                return self._get_proxy()  # 如果ip无效,重新获取ip

    def proxy_is_valid(self, ip, port, ip_type):
        http_url = "https://www.baidu.com"
        proxy_dict = {"{0}".format(ip_type.lower()): "{0}://{1}:{2}".format(ip_type.lower(), ip, port)}
        try:
            response = requests.get(http_url, proxies=proxy_dict, timeout=2.5)
        except Exception as e:
            print("ip:{0} is not valid".format(ip))
            # print(e)
            return False
        else:
            if response.status_code != 200:
                print("ip:{0} is not valid".format(ip))
                return False
            else:
                print("ip:{0} is effective".format(ip))
                return True

    def delete_ip(self, ip):
        delete_sql = "delete from {0} WHERE ip='{1}'".format(self.table, ip)
        self.cursor.execute(delete_sql)
        self.conn.commit()

    def _get_ip_from_daxiang(self, num):
        tid = "55xxxxxxx65"
        # num = num
        area = "广东"
        exclude_ports = "8088,18186"
        filter = "on"
        protcol = "http"
        category = 2
        delay = 3
        sortby = "time"
        operator = "1,2,3"
        url = "http://tvp.daxiangdaili.com/ip/?tid={0}&num={1}&area={2}&exclude_ports={3}&filter={4}&protcol={5}&category={6}&delay={7}&sortby={8}&operator={9}"
        url = url.format(tid, num, area, exclude_ports, filter, protcol, category, delay, sortby, operator)
        response = requests.get(url)
        proxy_list = []
        for proxy in response.text.split("\r\n"):
            ip_type = protcol
            proxy_split = proxy.split(":")
            ip = proxy_split[0]
            port = proxy_split[1]
            proxy_list.append((ip, port, ip_type, 0.0))
        return proxy_list

    def _get_ip_from_xici(self, num):
        proxy_list = []
        item_sum = 0
        for i in range(1, 20):  # 只取前20页
            url = self.url.format(i)
            response = requests.get(url=url, headers=self.headers)
            sel = Selector(text=response.text)
            nodes = sel.xpath('//table[@id="ip_list"]//tr')
            for node in nodes[1:]:
                speed = node.xpath('./td[7]/div/@title').extract_first()
                speed = float(speed.split("秒")[0])
                if speed > 2.5:
                    continue
                ip = node.xpath('./td[2]/text()').extract_first()
                port = node.xpath('./td[3]/text()').extract_first()
                ip_type = node.xpath('./td[6]/text()').extract_first()
                if not ip or not port or not ip_type:
                    continue
                proxy_list.append((ip, port, ip_type, speed))
                item_sum += 1
                if item_sum > num:
                    return proxy_list  # 取到足够的数据后返回
            time.sleep(randint(100, 300) / 100)  # 处理完一页,随机停几秒,再爬取
        return proxy_list

    def _insert_mysql(self, proxy_list):
        # 插入数据库存
        insert_sql = """
        insert {0} (ip,port,ip_type,speed) VALUES('{1}','{2}','{3}','{4}')
        ON DUPLICATE KEY UPDATE port=VALUES(port),speed=VALUES(speed),ip_type=VALUES(ip_type)
        """
        for proxy in proxy_list:
            self.cursor.execute(insert_sql.format(self.table, proxy[0], proxy[1], proxy[2], proxy[3]))
            self.conn.commit()
3. 爬虫限速
参考:http://scrapy-chs.readthedocs.io/zh_CN/1.0/topics/autothrottle.html#autothrottle-enabled
# settings.py文件设置
AUTOTHROTTLE_ENABLED = True
4. selium应用
准备:
- pip install selium
- 查看selenium 文档: http://selenium-python.readthedocs.io/installation.html
- 安装selenium的drive。效率最高的是chromedriver,下载地址:http://chromedriver.storage.googleapis.com/index.html?path=2.33
a、常规用法:
# -*- coding: utf-8 -*-
# @Time    : 2017/12/5 9:58
# @Author  : litaifa

from selenium import webdriver
import time

chrome = webdriver.Chrome("E:/linuxShare/source/chromedriver_win32/chromedriver.exe")

# selenium 进行知乎登录
chrome.get("https://www.zhihu.com/#signin")
chrome.find_element_by_xpath("//div[@class='view view-signin']//span[@class='signin-switch-password']").click()
chrome.find_element_by_xpath('//div[@class="view view-signin"]//input[@name="account"]').send_keys("18026961760")
chrome.find_element_by_xpath('//div[@class="view view-signin"]//input[@name="password"]').send_keys("Ljhao@1020")

# 开源中国 下拉条的拉动显示更多
chrome.get("https://www.oschina.net/blog")
for i in range(3):
    chrome.execute_script("window.scrollTo(0,document.body.scrollHeight); var lenOfPage=document.body.scrollHeight; return lenOfPage")
    time.sleep(3)

# 设置selelium不加载图片
chrome_opt = webdriver.ChromeOptions()
prefs = {"profile.managed_default_content_settings.images": 2}
chrome_opt.add_experimental_option("prefs", prefs)
chrome = webdriver.Chrome("E:/linuxShare/source/chromedriver_win32/chromedriver.exe", chrome_options=chrome_opt)
chrome.get("https://taobao.com/")


# print(chrome.page_source)
chrome.quit()

# linux 下无界面调用chrome
# from pyvirtualdisplay import Display
# display = Display(visible=0,size=(800,600))
# display.start()
#
# browser =webdriver.Chrome("E:/linuxShare/source/chromedriver_win32/chromedriver.exe")
# browser.get("https://www.baidu.com")
b、scrapy中的用法
# middlewares.py--------------------------
from scrapy.http import HtmlResponse
import time

class JSPageMiddleware(object):
    '''通过chrome 动态请求网页'''

    def process_request(self, request, spider):
        if hasattr(spider,"browser"):
            spider.browser.get(request.url)
            time.sleep(3)
            print("访问:{0}".format(request.url))
            return HtmlResponse(url=spider.browser.current_url, body=spider.browser.page_source, encoding="utf-8", request=request)

# spider ------------------------------------
class JobboleSpider(scrapy.Spider):
        # ....

    def __init__(self):
        super(JobboleSpider,self).__init__()
        self.browser = webdriver.Chrome("E:/linuxShare/source/chromedriver_win32/chromedriver.exe")
        dispatcher.connect(receiver=self.spider_closed,signal=signals.spider_closed)

    def spider_closed(self):
        print("spider closed")
        self.browser.quit()
c、其它类似可参考的解决方案:scrapy-splash、selenium-grid、splinter
5. 模拟登录&验证码识别
知乎倒立汉字的模拟登录
  def start_requests(self):
      yield scrapy.Request(url="https://www.zhihu.com/#signin", callback=self.login)
      # for url in self.start_urls:
      #     yield scrapy.Request(url, dont_filter=True)

  def login(self, response):
      # 登录知乎
      s = Selector(text=response.text)
      xsrf = s.xpath('//input[@name="_xsrf"]/@value').extract()[0]
      if not xsrf:
          return None
      post_data = {
          "_xsrf": xsrf,
          "phone_num": "18026961760",
          "password": "Ljhao@1020",
          "captcha_type": "cn",
          "captcha": "",
      }
      random_num = str(int(datetime.datetime.now().timestamp() * 1000))
      captcha_url = "https://www.zhihu.com/captcha.gif?r={0}&type=login&lang=cn".format(random_num)
      yield scrapy.Request(url=captcha_url, meta={"post_data": post_data},
                           callback=self.login_after_captcha)

  def login_after_captcha(self, response):
      # 识别倒立汉字
      with open("pic_captcha.gif", "wb") as f:
          f.write(response.body)
          f.close()

      z = zheye()
      pos = z.Recognize("pic_captcha.gif")
      print(pos)

      if len(pos) == 1:
          captcha_str = "[[%.2f,%f]]" % (pos[0][1] / 2, pos[0][0] / 2)
      elif pos[0][1] < pos[1][1]:
          captcha_str = "[[%.2f,%f],[%.2f,%f]]" % (pos[0][1] / 2, pos[0][0] / 2, pos[1][1] / 2, pos[1][0] / 2)
      else:
          captcha_str = "[[%.2f,%f],[%.2f,%f]]" % (pos[1][1] / 2, pos[1][0] / 2, pos[0][1] / 2, pos[0][0] / 2)

      post_data = response.meta.get('post_data', {})
      post_data["captcha"] = '{"img_size":[200,44],"input_points":%s}' % (captcha_str,)
      yield scrapy.FormRequest(url='https://www.zhihu.com/login/phone_num', formdata=post_data,
                               callback=self.check_login)

  def check_login(self, response):
      # 判断是否登录
      import json
      re_text = json.loads(response.text)
      if "msg" in re_text and re_text["msg"] == "登录成功":
          # self.cookies.save()
          for url in self.start_urls:
              yield scrapy.Request(url, dont_filter=True, callback=self.parse)
云打码
参考:http://www.yundama.com/price.htmlimport json import time import requests class YDMHttp: apiurl = 'http://api.yundama.com/api.php' def __init__(self, username='litaifa001', password='Ljhao1020', appid=4196, appkey='07be716bae30cb946e5faa6fbf984087'): self.username = username self.password = password self.appid = str(appid) self.appkey = appkey def request(self, fields, files=[]): response = self.post_url(self.apiurl, fields, files) response = json.loads(response) return response def balance(self): data = {'method': 'balance', 'username': self.username, 'password': self.password, 'appid': self.appid, 'appkey': self.appkey} response = self.request(data) if (response): if (response['ret'] and response['ret'] < 0): return response['ret'] else: return response['balance'] else: return -9001 def login(self): data = {'method': 'login', 'username': self.username, 'password': self.password, 'appid': self.appid, 'appkey': self.appkey} response = self.request(data) if (response): if (response['ret'] and response['ret'] < 0): return response['ret'] else: return response['uid'] else: return -9001 def upload(self, filename, codetype, timeout): data = {'method': 'upload', 'username': self.username, 'password': self.password, 'appid': self.appid, 'appkey': self.appkey, 'codetype': str(codetype), 'timeout': str(timeout)} file = {'file': filename} response = self.request(data, file) if (response): if (response['ret'] and response['ret'] < 0): return response['ret'] else: return response['cid'] else: return -9001 def result(self, cid): data = {'method': 'result', 'username': self.username, 'password': self.password, 'appid': self.appid, 'appkey': self.appkey, 'cid': str(cid)} response = self.request(data) return response and response.get("text", "") or '' def decode(self, filename, codetype, timeout): cid = self.upload(filename, codetype, timeout) if (cid > 0): for i in range(0, timeout): result = self.result(cid) if (result != ''): return cid, result else: time.sleep(1) return -3003, '' else: return cid, '' def report(self, cid): data = {'method': 'report', 'username': self.username, 'password': self.password, 'appid': self.appid, 'appkey': self.appkey, 'cid': str(cid), 'flag': '0'} response = self.request(data) if (response): return response['ret'] else: return -9001 def post_url(self, url, fields, files=[]): for key in files: files[key] = open(files[key], 'rb'); res = requests.post(url, files=files, data=fields) return res.text if __name__ == "__main__": yundama = YDMHttp() # 登陆云打码 # uid = yundama.login(); # print('uid: %s' % uid) # 查询余额 balance = yundama.balance(); print('balance: %s' % balance) # 开始识别,图片路径,验证码类型ID,超时时间(秒),识别结果 cid, result = yundama.decode(filename='getimage.jpg', codetype=1004, timeout=60) print('cid: %s, result: %s' % (cid, result))
6. request登录zhihu,自动添加cookie
# -*- coding: utf-8 -*-
import requests
try:
    import cookielib
except:
    import http.cookiejar as cookielib

import re

session = requests.session()
session.cookies = cookielib.LWPCookieJar(filename="cookies.txt")
try:
    session.cookies.load(ignore_discard=True)
except:
    print ("cookie未能加载")

agent = "Mozilla/5.0 (Windows NT 6.1; WOW64; rv:51.0) Gecko/20100101 Firefox/51.0"
header = {
    "HOST":"www.zhihu.com",
    "Referer": "https://www.zhizhu.com",
    'User-Agent': agent
}

def is_login():
    #通过个人中心页面返回状态码来判断是否为登录状态
    inbox_url = "https://www.zhihu.com/question/56250357/answer/148534773"
    response = session.get(inbox_url, headers=header, allow_redirects=False)
    if response.status_code != 200:
        return False
    else:
        return True

def get_xsrf():
    #获取xsrf code
    response = session.get("https://www.zhihu.com", headers=header)
    match_obj = re.match('.*name="_xsrf" value="(.*?)"', response.text)
    if match_obj:
        return (match_obj.group(1))
    else:
        return ""


def get_index():
    response = session.get("https://www.zhihu.com", headers=header)
    with open("index_page.html", "wb") as f:
        f.write(response.text.encode("utf-8"))
    print ("ok")

def get_captcha():
    import time
    t = str(int(time.time()*1000))
    captcha_url = "https://www.zhihu.com/captcha.gif?r={0}&type=login".format(t)
    t = session.get(captcha_url, headers=header)
    with open("captcha.jpg","wb") as f:
        f.write(t.content)
        f.close()

    from PIL import Image
    try:
        im = Image.open('captcha.jpg')
        im.show()
        im.close()
    except:
        pass

    captcha = input("输入验证码\n>")
    return captcha

def zhihu_login(account, password):
    #知乎登录
    if re.match("^1\d{10}",account):
        print ("手机号码登录")
        post_url = "https://www.zhihu.com/login/phone_num"
        post_data = {
            "_xsrf": get_xsrf(),
            "phone_num": account,
            "password": password,
            "captcha":get_captcha()
        }
    else:
        if "@" in account:
            #判断用户名是否为邮箱
            print("邮箱方式登录")
            post_url = "https://www.zhihu.com/login/email"
            post_data = {
                "_xsrf": get_xsrf(),
                "email": account,
                "password": password
            }

    response_text = session.post(post_url, data=post_data, headers=header)
    session.cookies.save()

# zhihu_login("18782902568", "admin123")

# get_index()
# is_login()
# get_captcha()
-
-
六、scrapy进阶
1. scrapy的暂停与重启
- 启动:
scrapy crawl lagou -s JOBDIR=job_info/001 # job_info/001为空文件夹暂停:ctrl+c # 按一次,会将爬取取地状态数据存到001目录下;按两次,强制退出,不保存中间过程
重新启动:
scrapy crawl lagou -s JOBDIR=job_info/001 # 同启动命令,会读取文件夹下的中间过程,继续爬取2. 信号基础
Scrapy使用信号来通知事情发生。您可以在您的Scrapy项目中捕捉一些信号(使用 extension)来完成额外的工作或添加额外的功能,扩展Scrapy。应用举例:
from scrapy import signals

class JobboleSpider(scrapy.Spider):
    name = "jobbole"
    allowed_domains = ["blog.jobbole.com"]
    start_urls = ['http://blog.jobbole.com/all-posts/']

    def __init__(self):
        self.browser = webdriver.Chrome(executable_path="D:/Temp/chromedriver.exe")
        super(JobboleSpider, self).__init__()
        dispatcher.connect(self.spider_closed, signals.spider_closed)  # 将信号与函数绑定

    def spider_closed(self, spider):  # 与信号绑定的函数
        #当爬虫退出的时候关闭chrome
        print ("spider closed")
        self.browser.quit()
3.数据收集
数据收集应用举例
    #收集伯乐在线所有404的url以及404页面数
    handle_httpstatus_list = [404]

    def __init__(self, **kwargs):
        self.fail_urls = []
        dispatcher.connect(self.handle_spider_closed, signals.spider_closed)

    def handle_spider_closed(self, spider, reason):
        self.crawler.stats.set_value("failed_urls", ",".join(self.fail_urls))
七、scrapy-redis分布式爬虫(待完善)
八、elasticsearch搜索引擎的使用(待完善)
九、scrapyd部署scrapy爬虫 (待完善)
参考资料
- scrapy中文文档:http://scrapy-chs.readthedocs.io/zh_CN/1.0/intro/tutorial.html
- scrapy英文文档 https://doc.scrapy.org/en/latest/
- Python Twisted文档 http://blog.csdn.net/hanhuili/article/details/9389433
selenium 文档 http://selenium-python.readthedocs.io/installation.html
知乎倒立文字识别:https://github.com/muchrooms/zheye
- 云打码 http://www.yundama.com/
- 随机user-agent [ fake-useragent ] https://github.com/hellysmile/fake-useragent
- scrapy-proxies https://github.com/aivarsk/scrapy-proxies(ip代理)
- scrapy-crawlera https://github.com/scrapy-plugins/scrapy-crawlera (ip代理)
- WebDriver API http://selenium-python.readthedocs.io/api.html#webdriver-api
- chromedriver http://chromedriver.storage.googleapis.com/index.html?path=2.33
- scrapy-splash https://github.com/scrapy-plugins/scrapy-splash
- redis-windows https://github.com/ServiceStack/redis-windows/blob/master/downloads/redis-latest.zip
- scrapy-djangoitem https://github.com/scrapy-plugins/scrapy-djangoitem
- django-dynamic-scraper https://github.com/holgerd77/django-dynamic-scraper