本人原本是想做微信公众号菜单的创建修改删除等操作的,但是发现需要access_token,通过阅读文档,发现文档要求有以下几点:
1.access_token 获取后有效期是2小时
2.access_token 占用512个字符空间
3.获取access_token 的url 为(get请求) : https://api.weixin.qq.com/cgi-bin/token?grant_type=client_credential&appid=APPID&secret=APPSECRET
4.请求成功返回的格式为:{"access_token":"ACCESS_TOKEN","expires_in":7200}
思路:
1.前提必须是成功获取到 access_token
2. 项目里需要配置一个定时器,用来定期获取 access_token
3.成功获取后应该把access_token妥善保存,比如保存在 数据库、缓存(本人所选,redis)、配置文件中都可以
步骤一:获取access_token


 1 package com.encore.util;
 2
 3 import org.json.JSONObject;
 4
 5 import java.io.BufferedReader;
 6 import java.io.InputStreamReader;
 7 import java.net.HttpURLConnection;
 8 import java.net.URL;
 9 import java.util.List;
10 import java.util.Map;
11
12 public class WeChatTokenUtil {
13     //获取access_token的url
14     private static final String BASE_TOKEN_URL = "https://api.weixin.qq.com/cgi-bin/token?";
15     //固定值
16     private static final String GRANT_TYPE = "client_credential";
17     //自己的AppID
18     private static final String APP_ID = "**********";
19     //自己的AppSecret
20     private static final String SECRET = "***********";
21
22     public static String getToken(){
23         String url = BASE_TOKEN_URL + "grant_type="+GRANT_TYPE+"&appid="+APP_ID+"&secret="+SECRET;
24         try{
25             URL realUrl = new URL(url);
26             // 打开和URL之间的连接
27             HttpURLConnection connection = (HttpURLConnection) realUrl.openConnection();
28             connection.setRequestMethod("GET");
29             connection.connect();
30             // 获取所有响应头字段
31             Map<String, List<String>> map = connection.getHeaderFields();
32             // 遍历所有的响应头字段
33             for (String key : map.keySet()) {
34                 System.err.println(key + "--->" + map.get(key));
35             }
36             // 定义 BufferedReader输入流来读取URL的响应
37             BufferedReader in = new BufferedReader(new InputStreamReader(connection.getInputStream()));
38             String result = "";
39             String line;
40             while ((line = in.readLine()) != null) {
41                 result += line;
42             }
43             JSONObject jsonObject = new JSONObject(result);
44             return jsonObject.getString("access_token");
45         } catch (Exception e) {
46             System.err.printf("获取token失败!");
47             e.printStackTrace(System.err);
48             return "";
49         }
50     }
51
52 }
步骤二:配置定时器:
在spring的xml中配置:
1 <!-- 定时器配置 -->
2     <task:annotation-driven scheduler="myScheduler"/>
3     <task:scheduler id="myScheduler" pool-size="5"/>
注意:写定时方法的类必须在spring能够扫描的到的包下
步骤三:配置redis(如果不用redis可以跳过此步骤,直接把access_token保存到数据库或者配置文件中就可以了)
1.前提是本机装了redis,网上有很多教程,本文不做过多介绍,并不复杂
2.引入项目需要的redis依赖
1 <!-- redis 依赖 -->
2       <dependency>
3           <groupId>redis.clients</groupId>
4           <artifactId>jedis</artifactId>
5           <version>2.9.0</version>
6           <type>jar</type>
7       </dependency>
3.配置reids连接(跟配置jdbc连接类似)
1 redis.host=127.0.0.1
2 redis.port=6379
3 redis.timeout=3000
4.新建一个reids.xml
 1 <?xml version="1.0" encoding="UTF-8"?>
 2 <beans xmlns="http://www.springframework.org/schema/beans"
 3        xmlns:xsi="http://www.w3.org/2001/XMLSchema-instance"
 4        xmlns:context="http://www.springframework.org/schema/context"
 5        xsi:schemaLocation="http://www.springframework.org/schema/beans http://www.springframework.org/schema/beans/spring-beans.xsd http://www.springframework.org/schema/context http://www.springframework.org/schema/context/spring-context.xsd">
 6
 7     <context:property-placeholder location="classpath:redis.properties" />
 8
 9     <bean id="jedisPoolConfig" class="redis.clients.jedis.JedisPoolConfig" />
10
11     <bean id="shardedJedisPool" class="redis.clients.jedis.ShardedJedisPool" scope="singleton" >
12         <constructor-arg index="0" ref="jedisPoolConfig" />
13         <constructor-arg index="1">
14             <list>
15                 <bean class="redis.clients.jedis.JedisShardInfo">
16                     <constructor-arg name="host" value="${redis.host}"/>
17                     <constructor-arg name="port" value="${redis.port}"/>
18                     <constructor-arg name="timeout" value="${redis.timeout}"/>
19                 </bean>
20             </list>
21         </constructor-arg>
22     </bean>
23
24 </beans>
5.将redis.xml引入到spring的xml中
1 <import resource="redis.xml"/>
6.编写一个redis连接池的类,包含安全关闭连接池的方法,同样也要使这个类能够被spring所扫描到
 1 package com.encore.service;
 2
 3 import lombok.extern.slf4j.Slf4j;
 4 import org.springframework.stereotype.Service;
 5 import redis.clients.jedis.ShardedJedis;
 6 import redis.clients.jedis.ShardedJedisPool;
 7
 8 import javax.annotation.Resource;
 9
10 @Service("redisPool")
11 @Slf4j
12 public class RedisPool {
13
14     @Resource(name = "shardedJedisPool")
15     private ShardedJedisPool shardedJedisPool;
16
17     public ShardedJedis instance(){
18         return shardedJedisPool.getResource();
19     }
20
21     public void safeClose(ShardedJedis shardedJedis){
22         try {
23             if (shardedJedis != null){
24                 shardedJedis.close();
25             }
26         }catch (Exception e){
27             log.error("redis 关闭异常", e);
28         }
29     }
30 }
7.封装一个类,提供把数据写入redis和从redis中读取数据的方法,也要让这个类被spring所管理
 1 package com.encore.service;
 2
 3 import org.springframework.stereotype.Service;
 4 import redis.clients.jedis.ShardedJedis;
 5
 6 import javax.annotation.Resource;
 7
 8 @Service("redisCacheService")
 9 public class RedisCacheService {
10
11     // 注入RedisPool
12     @Resource(name = "redisPool")
13     private RedisPool redisPool;
14
15
16     /**
17      *  把要存储的值放进缓存
18      * @param cacheKey 键值,可以用来获取要存储的值
19      * @param toSavedValue 要存储的值
20      * @param timeOutSeconds 过期时间 单位为秒
21      */
22     public void saveCache(String cacheKey, String toSavedValue, int timeOutSeconds){
23         if (toSavedValue == null){
24             return;
25         }
26         ShardedJedis shardedJedis =  null;
27         try {
28             shardedJedis = redisPool.instance();
29             shardedJedis.setex(cacheKey, timeOutSeconds, toSavedValue);
30         }catch (Exception e){
31             e.printStackTrace();
32         }finally {
33             redisPool.safeClose(shardedJedis);
34         }
35     }
36
37     /**
38      * 根据键值从缓存中获取数据
39      * @param cacheKey 缓存的键值
40      * @return
41      */
42     public String getFromCache(String cacheKey){
43         ShardedJedis shardedJedis = null;
44         try {
45             shardedJedis = redisPool.instance();
46             String value = shardedJedis.get(cacheKey);
47             return value;
48         }catch (Exception e){
49             return null;
50         }finally {
51             redisPool.safeClose(shardedJedis);
52         }
53     }
54
55
56 }
步骤四:实现定时器的方法(这个类要可以被spring扫描的到),实现每1.5小时获取一次access_token,并将其放到redis,同时保证可以从redis中读取出来
 1 package com.encore.service;
 2
 3 import com.encore.util.WeChatTokenUtil;
 4 import org.springframework.scheduling.annotation.Scheduled;
 5 import org.springframework.stereotype.Component;
 6
 7 import javax.annotation.Resource;
 8
 9 @Component
10 public class TaskService {
11
12     @Resource
13     private RedisCacheService redisCacheService;
14
15     private static final String TOKEN_KEY = "my_wechat_token";
16
17     @Scheduled(fixedRate= 1000*60*90, initialDelay = 2000)//项目启动2秒中之后执行一次,然后每90min执行一次,单位都为ms
18     public void getToken(){
19         //1. 获取token
20         String access_token = WeChatTokenUtil.getToken();
21         System.out.println("从微信服务器获取的token======"+access_token);
22         redisCacheService.saveCache(TOKEN_KEY, access_token ,60*120);
23         String getToken = redisCacheService.getFromCache(TOKEN_KEY);
24         System.out.println("从redis中获取的token === "+getToken);
25     }
26 }
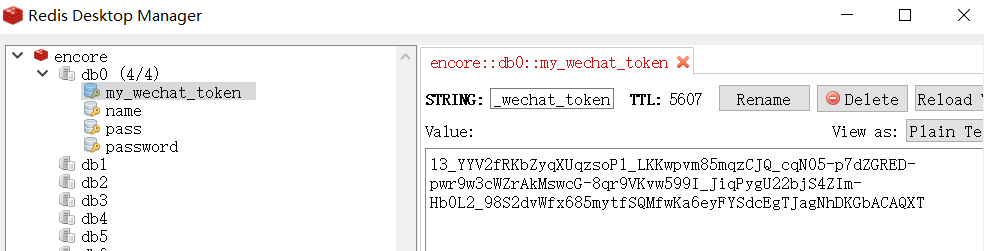
最后,在开启项目进行测试的时候,先把redis服务器打开,经测试,可以正常获取access_token,也可以存放到redis中,同时也可以从redis中读取出来,如图所示,可以从Redis Desktop Manager中看得到存放进去的access_token: