1. Linux16.04 with nvidia drive for GTX1080Ti
Install Linux system 16.04.2. When reboot, remember to unplug the intsallation usb before reboot. I didn't unplug before reboot, and it stuck at a loading page with nonthing useful that I had to shud down the computer in force.
As the nvidia driver hasn't been installed, the text on screen looks extremely big.
Install the nvidia driver for GTX 1080ti this way:
open "system settings", click on "software &updates", go to the "additional drivers" tab, choose the following, then lick apply change.

This will help you to shut down the Nouveau, and install the tested version of nvidia driver.
May take couple of minutes depending on your internet speed.
2. cuda8.0
download "cuda_8.0.61_375.26_linux.run" and its bug fix package "cuda_8.0.61.2_linux-run" install pack.
https://developer.nvidia.com/cuda-80-ga2-download-archive
(1). Use the following way to install the dependencies
yexin@yexin-Precision-Tower-7910:~$ sudo apt-get install freeglut3-dev build-essential libx11-dev libxmu-dev libgl1-mesa-dev libglu1-mesa libglu1-mesa-dev libxi-dev
ps: if use the sudo ./cuda...run, it would go wrong like:
yexin@yexin-Precision-Tower-7910:~$ sudo sh cuda_8.0.61_375.26_linux.run
sh: 0: Can't open cuda_8.0.61_375.26_linux.run
yexin@yexin-Precision-Tower-7910:~$ sudo ./cuda_8.0.61_375.26_linux.run
sudo: ./cuda_8.0.61_375.26_linux.run: command not found
(2) install cuda
yexin@yexin-Precision-Tower-7910:~$ stop lightdm
stop: Unknown job: lightdm
yexin@yexin-Precision-Tower-7910:~$ chmod a+x cuda_8.0.61_375.26_linux-run
yexin@yexin-Precision-Tower-7910:~$ sudo ./cuda_8.0.61_375.26_linux-run
Logging to /tmp/cuda_install_9215.log
Using more to view the EULA.
End User License Agreement
--------------------------
ps: what is lightdm? and it doesn't even work....
then the process will show you the agreement, press "enter" untill you finish all of it.
After finish reading, answer the questions, like the following:
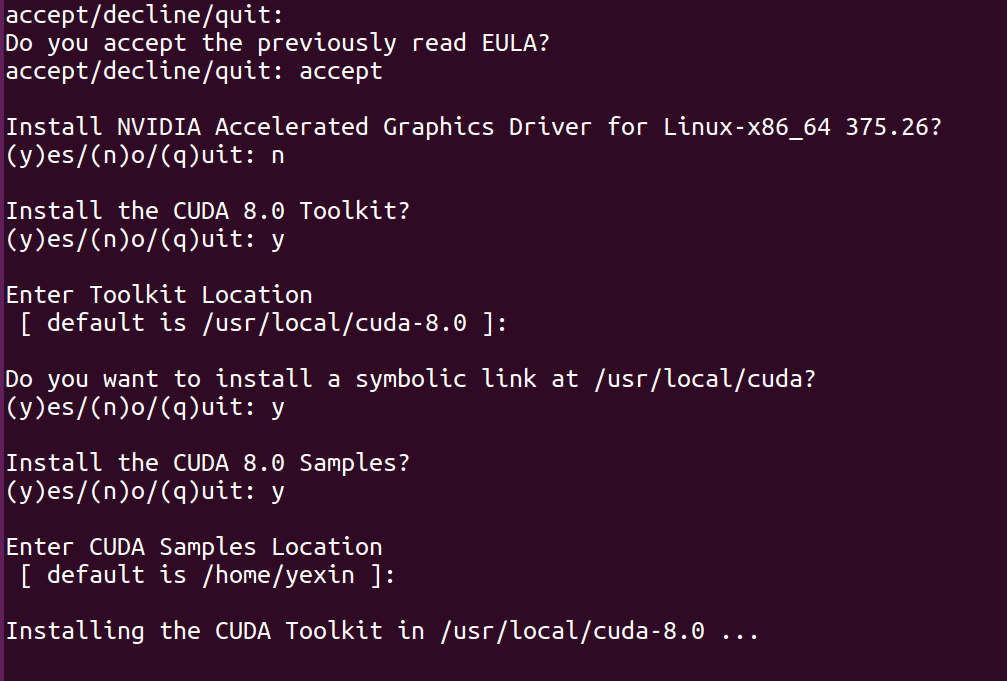
...
(3) install cuda bug-fix-package "cuda_8.0.61.2_linux-run", like this:
yexin@yexin-Precision-Tower-7910:~$ chmod a+x cuda_8.0.61.2_linux.run
yexin@yexin-Precision-Tower-7910:~$ sudo ./cuda_8.0.61.2_linux.run
go on pressing "enter" to finish reading the agreement once more.
Answering the questions like:
Do you accept the previously read EULA?
accept/decline/quit: accept
Enter CUDA Toolkit installation directory
[ default is /usr/local/cuda-8.0 ]:
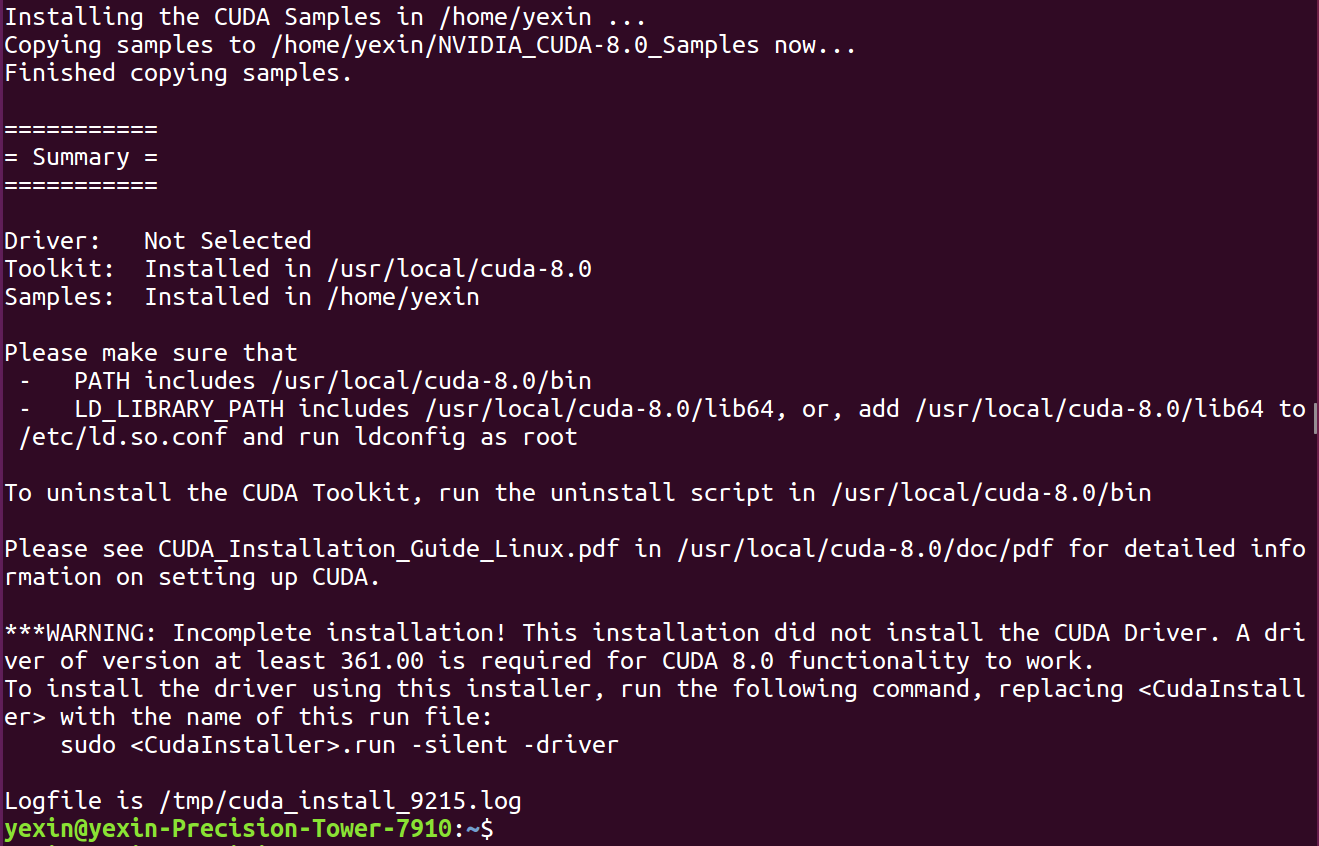
Installation complete!
Installation directory: /usr/local/cuda-8.0
At this time , when checking the cuda version, it went wrong, it's because it hasn't been registered, like:
yexin@yexin-Precision-Tower-7910:~$ nvcc --version
The program 'nvcc' is currently not installed. You can install it by typing:
sudo apt install nvidia-cuda-toolkit
(4) register cuda
yexin@yexin-Precision-Tower-7910:~$ sudo gedit /etc/profile
put these two lines at the back of the file, such as:
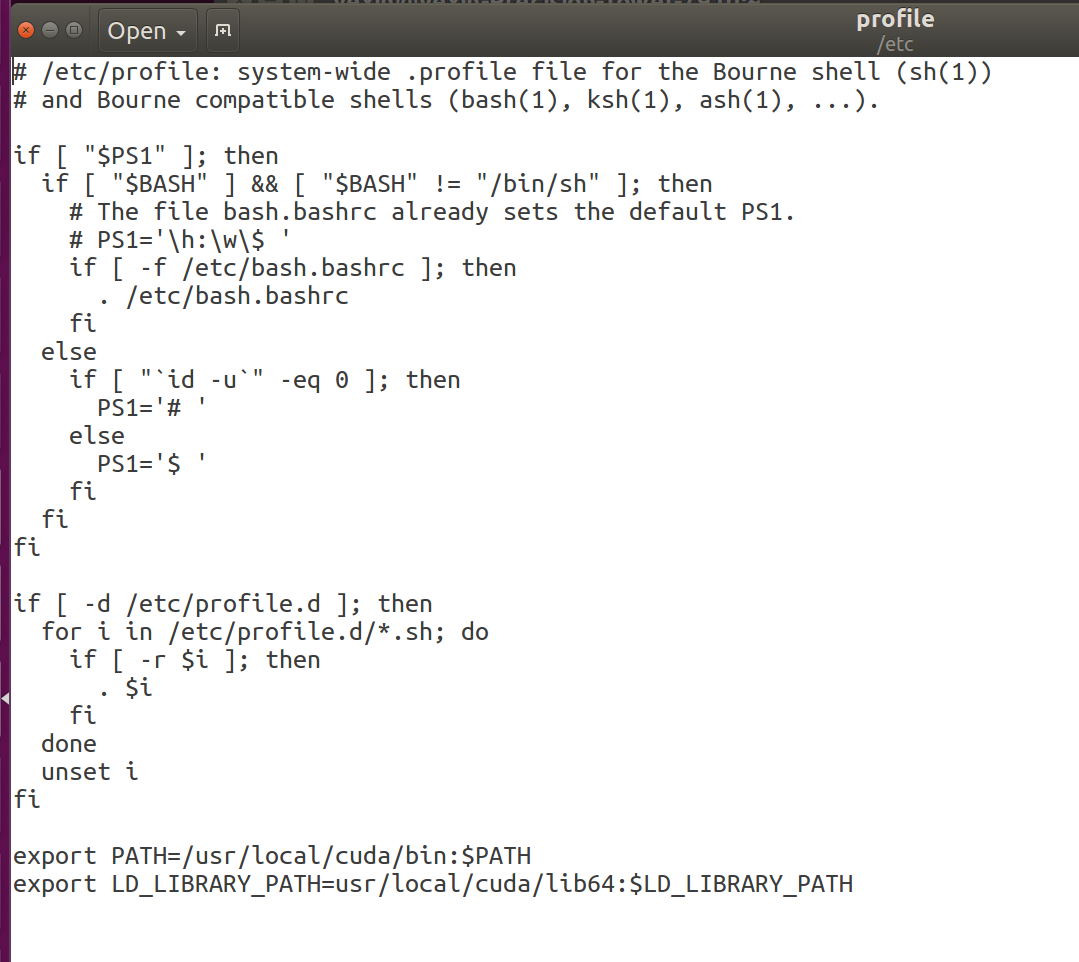
save and close it.
then :
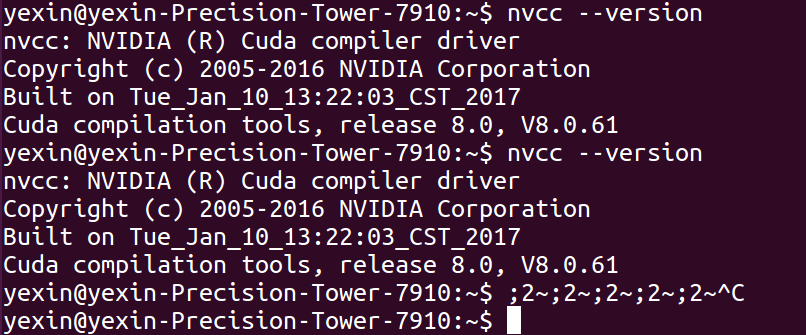
yexin@yexin-Precision-Tower-7910:~$ source /etc/profile
Now we finished installing cuda 8.0. You will see the cuda version now:
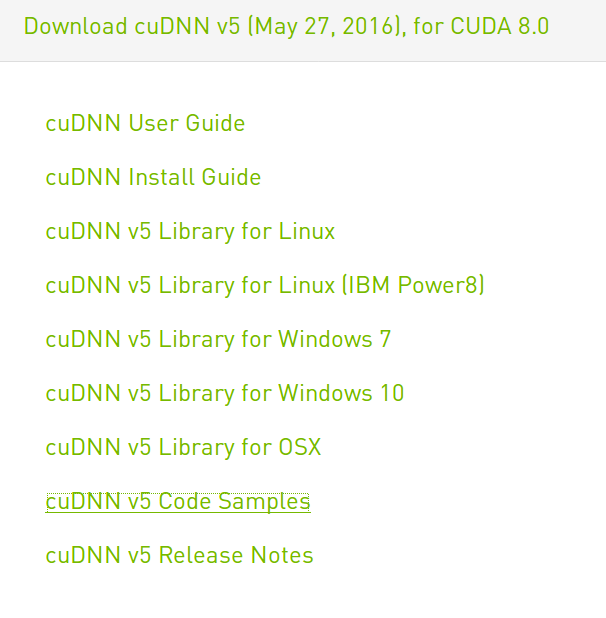
3. cudnn 5.0
Download cudnn 5.0 for cuda8.0, like below. Choose "cudnn v5 library for Linux", and also "cudnn v5 code samples" for later testing.
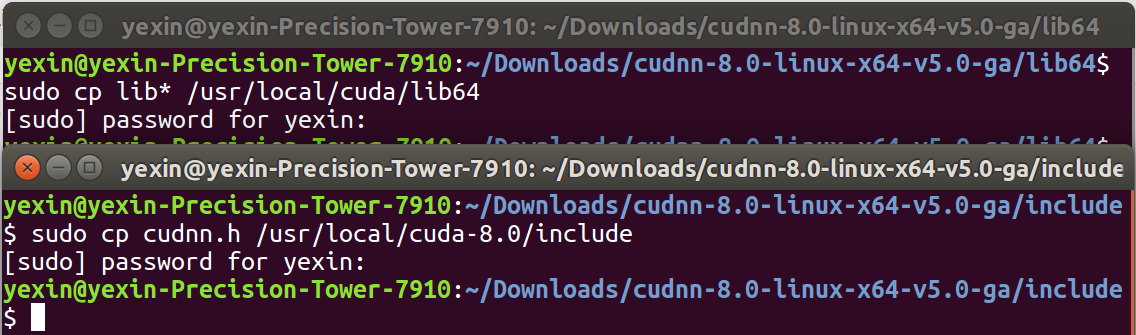
You only need to copy the files in the cuda directories, such as:
yexin@yexin-Precision-Tower-7910:~/Downloads$ tar -zxvf cudnn-8.0-linux-x64-v5.0-ga.tgz
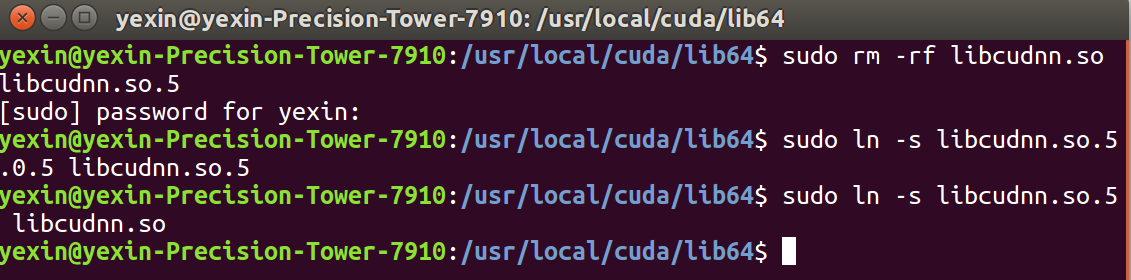
Then update soft connection(?)
Register using either way of the following:
(A) in terminal window at the example directory, execute:
export LD_LIBRARY_PATH=$LD_LIBRARY_PATH:/usr/local/cuda/lib64or (B)
Add the following at the end of /etc/profile
export LD_LIBRARY_PATH=$LD_LIBRARY_PATH:/usr/local/cuda/lib64and then execute the following in terminal:
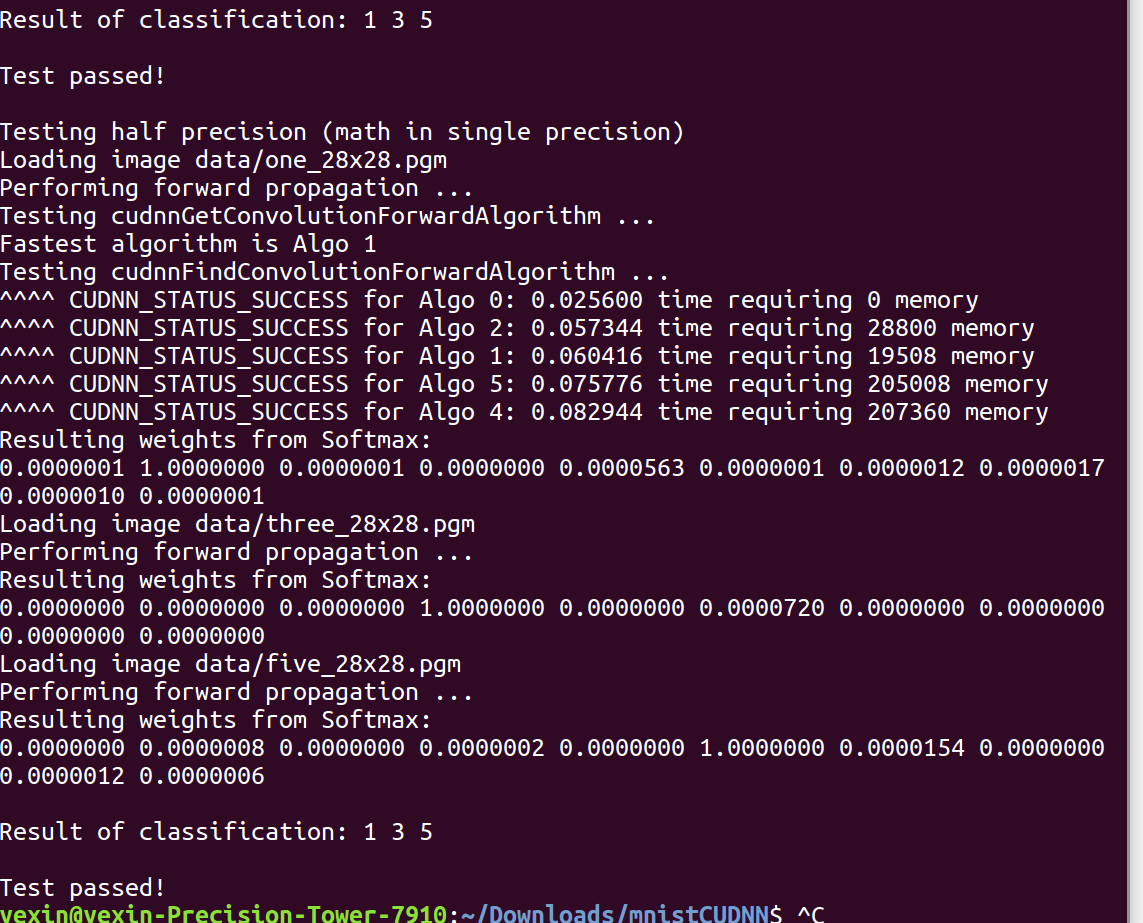
source /etc/profileNow cudnn has been installed. To test it :
yexin@yexin-Precision-Tower-7910:~/Downloads$ tar -zxvf cudnn-8.0-linux-x64-v5.0-ga.tgz
yexin@yexin-Precision-Tower-7910:~/Downloads/mnistCUDNN$ make
yexin@yexin-Precision-Tower-7910:~/Downloads/mnistCUDNN$ ./mnistCUDNN
it shows:

4. opencv
Don't use 3.1.0, for it doesn't support 8.0, but accturaly you are able to use it by modify some cuda source code, which I would no risk for.
I use opencv 3.3.0 version.
https://github.com/opencv/opencv/releases/tag/3.3.0
download the source code. Go to the directory where you download it, and open an terminal.
(1) install some dependencies.
sudo apt-get install build-essential
sudo apt-get install cmake git libgtk2.0-dev pkg-config libavcodec-dev libavformat-dev libswscale-dev
sudo apt-get install python-dev python-numpy libtbb2 libtbb-dev libjpeg-dev libpng-dev libtiff-dev libtiff4-dev
libjasper-dev libdc1394-22-dev
(2) install opencv
cmake -D WITH_CUDA=ON -D WITH_GSTREAMER=ON -D BUILD_TESTS=OFF -D BUILD_PERF_TESTS=OFF -D BUILD_EXAMPLES=OFF
-D BUILD_TIFF=ON -D CMAKE_BUILD_TYPE=RELEASE/DEBUG -D CMAKE_INSTALL_PREFIX=/usr/local ..
make -j8
sudo make install
(3)check if opencv installed right.
You can simply check it by showing its version:
pkg-config --modversion opencv
Another way is to write an example:
Choose or create a foler to put your testing example. This example is to open and show an image.
Create a cpp file named "Display.cpp" like below:
#include<stdio.h>
#include<opencv2/opencv.hpp>
using namespace cv;

int main(int argc, char ** argv)
{
   if(argc!=2)
   {
      printf("usage:DisplayImg.out<Image_Path>\n");
      return -1;
   }

   Mat img;
   img = imread(argv[1],1);

   if(!img.data)
   {
      printf("No image data!\n");
      return -1;
   }
   namedWindow("DisplayImage",WINDOW_AUTOSIZE);
   imshow("Display Image",img);
   waitKey(0);
   return 0;
}
And create a "CMakeLists.txt" file like below:
cmake_minimum_required(VERSION 3.5)
project( Display )
find_package( OpenCV REQUIRED)
add_executable(Display Display.cpp)
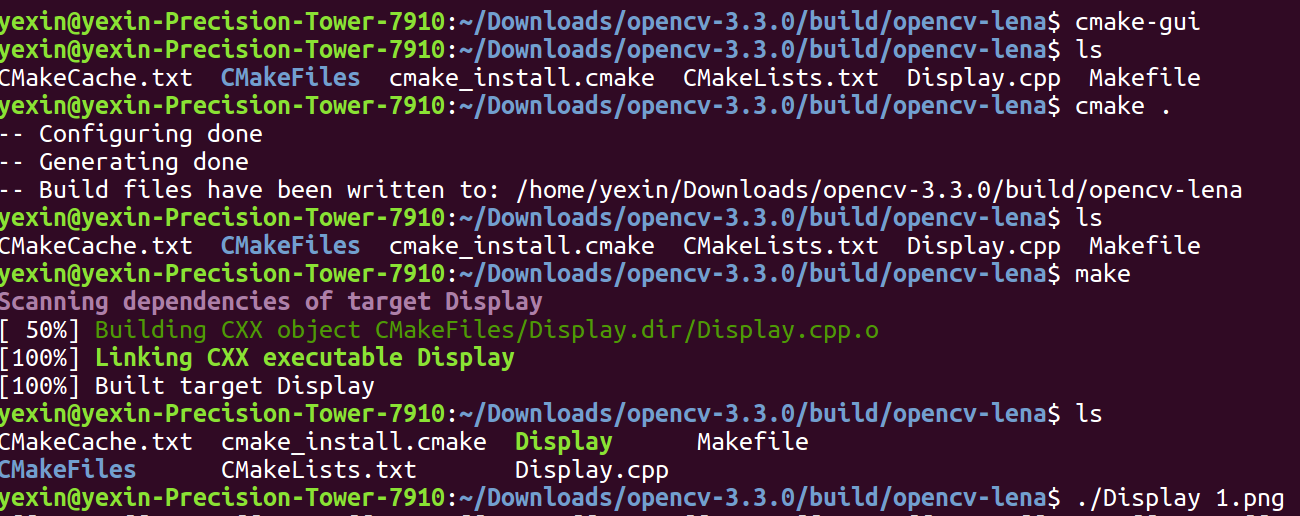
target_link_libraries(Display ${OpenCV_LIBS})If you use terminal to type" cmake . " then "make", you may find lib link problem like this:

The solution is to add entry to our example. See http://www.cnblogs.com/Crysaty/p/6638152.html
Open cmake-gui, choose build and source directories, then click "Add Entry", and add the opencv build directory as an entry named "OpenCV_DIR" as Type "PATH". Then configure and generate, and make again. it worked!
5. Finally, py-faster-rcnn
(1) install denpendencies:
sudo apt-get install libprotobuf-dev libleveldb-dev libsnappy-dev libhdf5-serial-dev protobuf-compiler libatlas-base-dev
libgflags-dev libgoogle-glog-dev liblmdb-dev libopencv-dev
sudo apt-get install --no-install-recommends libboost-all-dev
sudo apt-get install -y python-numpy python-scipy python-matplotlib python-sklearn python-skimage python-h5py
python-protobuf python-leveldb python-networkx python-nose python-pandas python-gflags cython ipython
sudo apt install python-pip
sudo apt install python-opencv
sudo pip install easydict
ps: install python-pip will solve the "ImportError: No module named setuptools" issue when "make" py-caffe-rcnn.
(2) download py-faster-rcnn
git clone --recursive http://github.com/rbgirshick/py-faster-rcnn.git
(3) replace some files with the master branch caffe to avoid cudnn5.1 errer.
The py-caffe-rcnn is a bit old and doesn't surport cudnn that version >5, so what we do is to use some of the updated master branch caffe files to replace the ones in py-caffe-rcnn.
One can merge by git, and also replace manually. The following shows how to manually replace the files:
Download the master branch caffe from: https://github.com/BVLC/caffe
Replace the following files with the master caffe (https://blog.csdn.net/hongbin_xu/article/details/76100132):
include/caffe/layers/cudnn_relu_layer.hpp,
src/caffe/layers/cudnn_relu_layer.cpp,
src/caffe/layers/cudnn_relu_layer.cu

include/caffe/layers/cudnn_sigmoid_layer.hpp,
src/caffe/layers/cudnn_sigmoid_layer.cpp,
src/caffe/layers/cudnn_sigmoid_layer.cu

include/caffe/layers/cudnn_tanh_layer.hpp,
src/caffe/layers/cudnn_tanh_layer.cpp,
src/caffe/layers/cudnn_tanh_layer.cu

include/caffe/util/cudnn.hpp
Open "src/caffe/layers/cudnn_conv_layer.cu" from "py-faster-rcnn/caffe-fast-rcnn" , and make the following change:
(4) change makefiles (see https://blog.csdn.net/hongbin_xu/article/details/76100132)Change: cudnnConvolutionBackwardData_v3 To: cudnnConvolutionBackwardData Change: cudnnConvolutionBackwardFilter_v3 To: cudnnConvolutionBackwardFilter
The setup of how you are about to build the project is in makefiles, and there are something need to be changed:
First, generate the cython and open the generated "Makefile.config", like:
yexin@yexin-Precision-Tower-7910:~/py-faster-rcnn$ cd caffe-fast-rcnn
yexin@yexin-Precision-Tower-7910:~/py-faster-rcnn/caffe-fast-rcnn$ cp Makefile.config.example Makefile.config
yexin@yexin-Precision-Tower-7910:~/py-faster-rcnn/caffe-fast-rcnn$ sudo gedit Makefile.config
Second, make these changes in the opened "Makefile.config":
USE_CUDNN := 1
PYTHON_INCLUDE := /usr/include/python2.7 \
        /usr/lib/python2.7/dist-packages/numpy/core/include
PYTHON_LIB := /usr/lib
WITH_PYTHON_LAYER := 1
INCLUDE_DIRS := $(PYTHON_INCLUDE) /usr/local/include  /usr/include/hdf5/serial/
LIBRARY_DIRS := $(PYTHON_LIB) /usr/local/lib /usr/lib
To avoid "hdf5" missing issue as well as "opencv" missing issue, you also need to make the following change in "Makefile" (around Line173):
LIBRARIES += glog gflags protobuf boost_system boost_filesystem m hdf5_serial_hl hdf5_serial opencv_core
opencv_highgui opencv_imgproc opencv_imgcodecs
(5) build py-caffe-rcnn
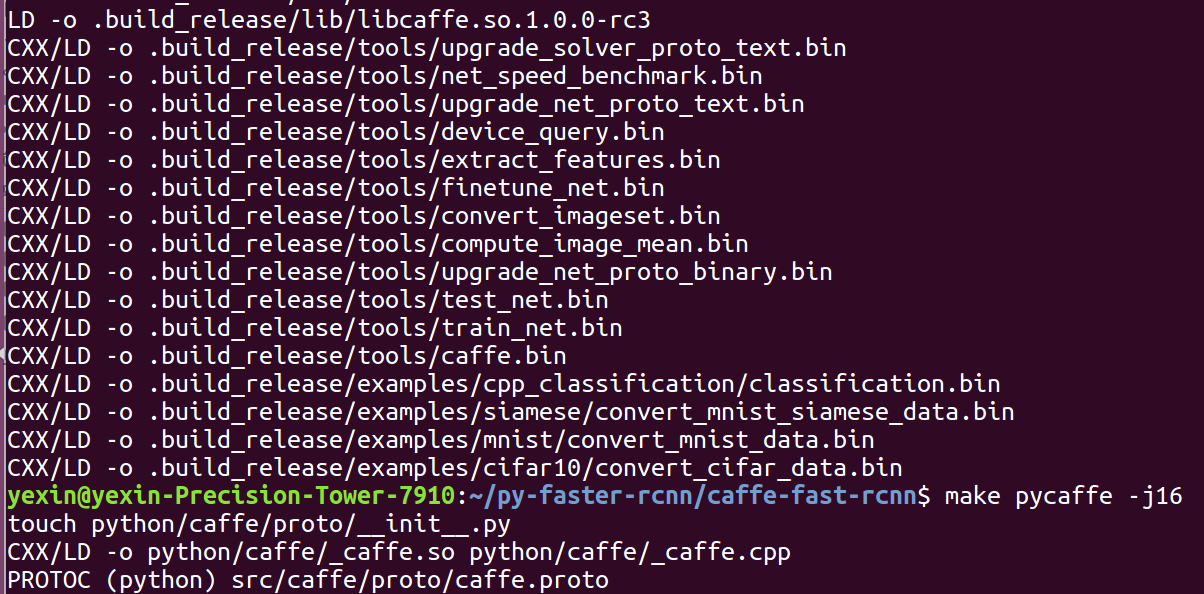
Caution: if it occurs errors, use "make clean" before re-making.
yexin@yexin-Precision-Tower-7910:~/py-faster-rcnn/caffe-fast-rcnn$ make clean
yexin@yexin-Precision-Tower-7910:~/py-faster-rcnn/caffe-fast-rcnn$ make -j16
yexin@yexin-Precision-Tower-7910:~/py-faster-rcnn/caffe-fast-rcnn$ make pycaffe -j16
Finished like this:
6. Demo
The demo script is at: py-faster-rcnn/tools/demo.py.
The images for testing are at:py-faster-rcnn/data/demo.
This demo shows how to identify a couple of new images by loading a trained model. The model could be downloaded by running the scipt: faster/data/scripts/fetch_faster_rcnn_models.sh. But it can't work, U know why..... I downloaded from baiduyun in the following references:
https://blog.csdn.net/zhs233/article/details/78319891
https://blog.csdn.net/what_lei/article/details/77870689
Download and unzip, put the folder under data folder, and then run the demo:
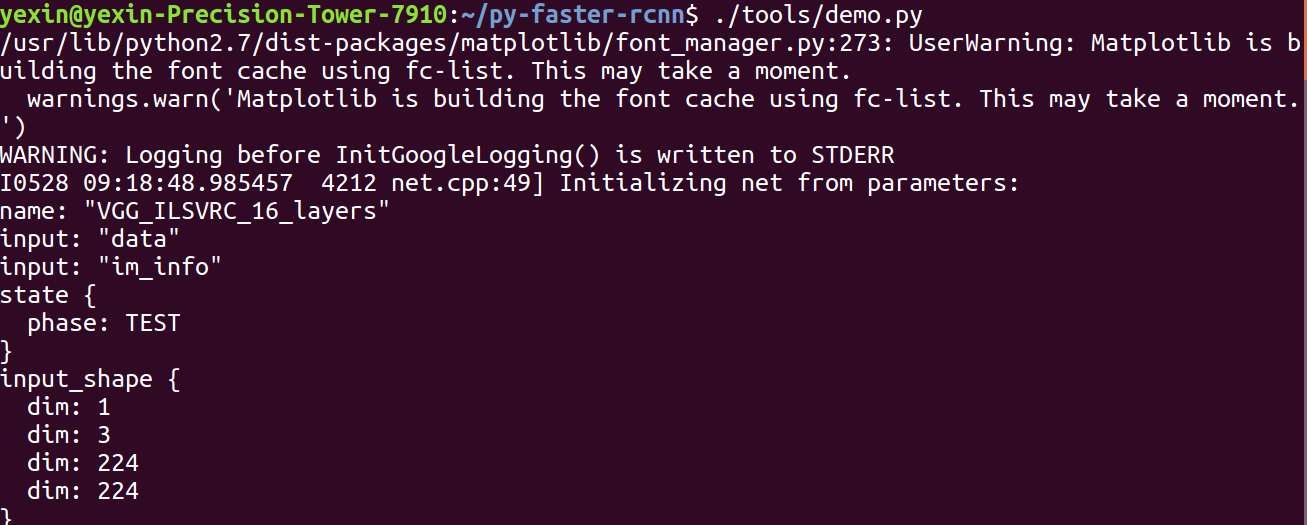
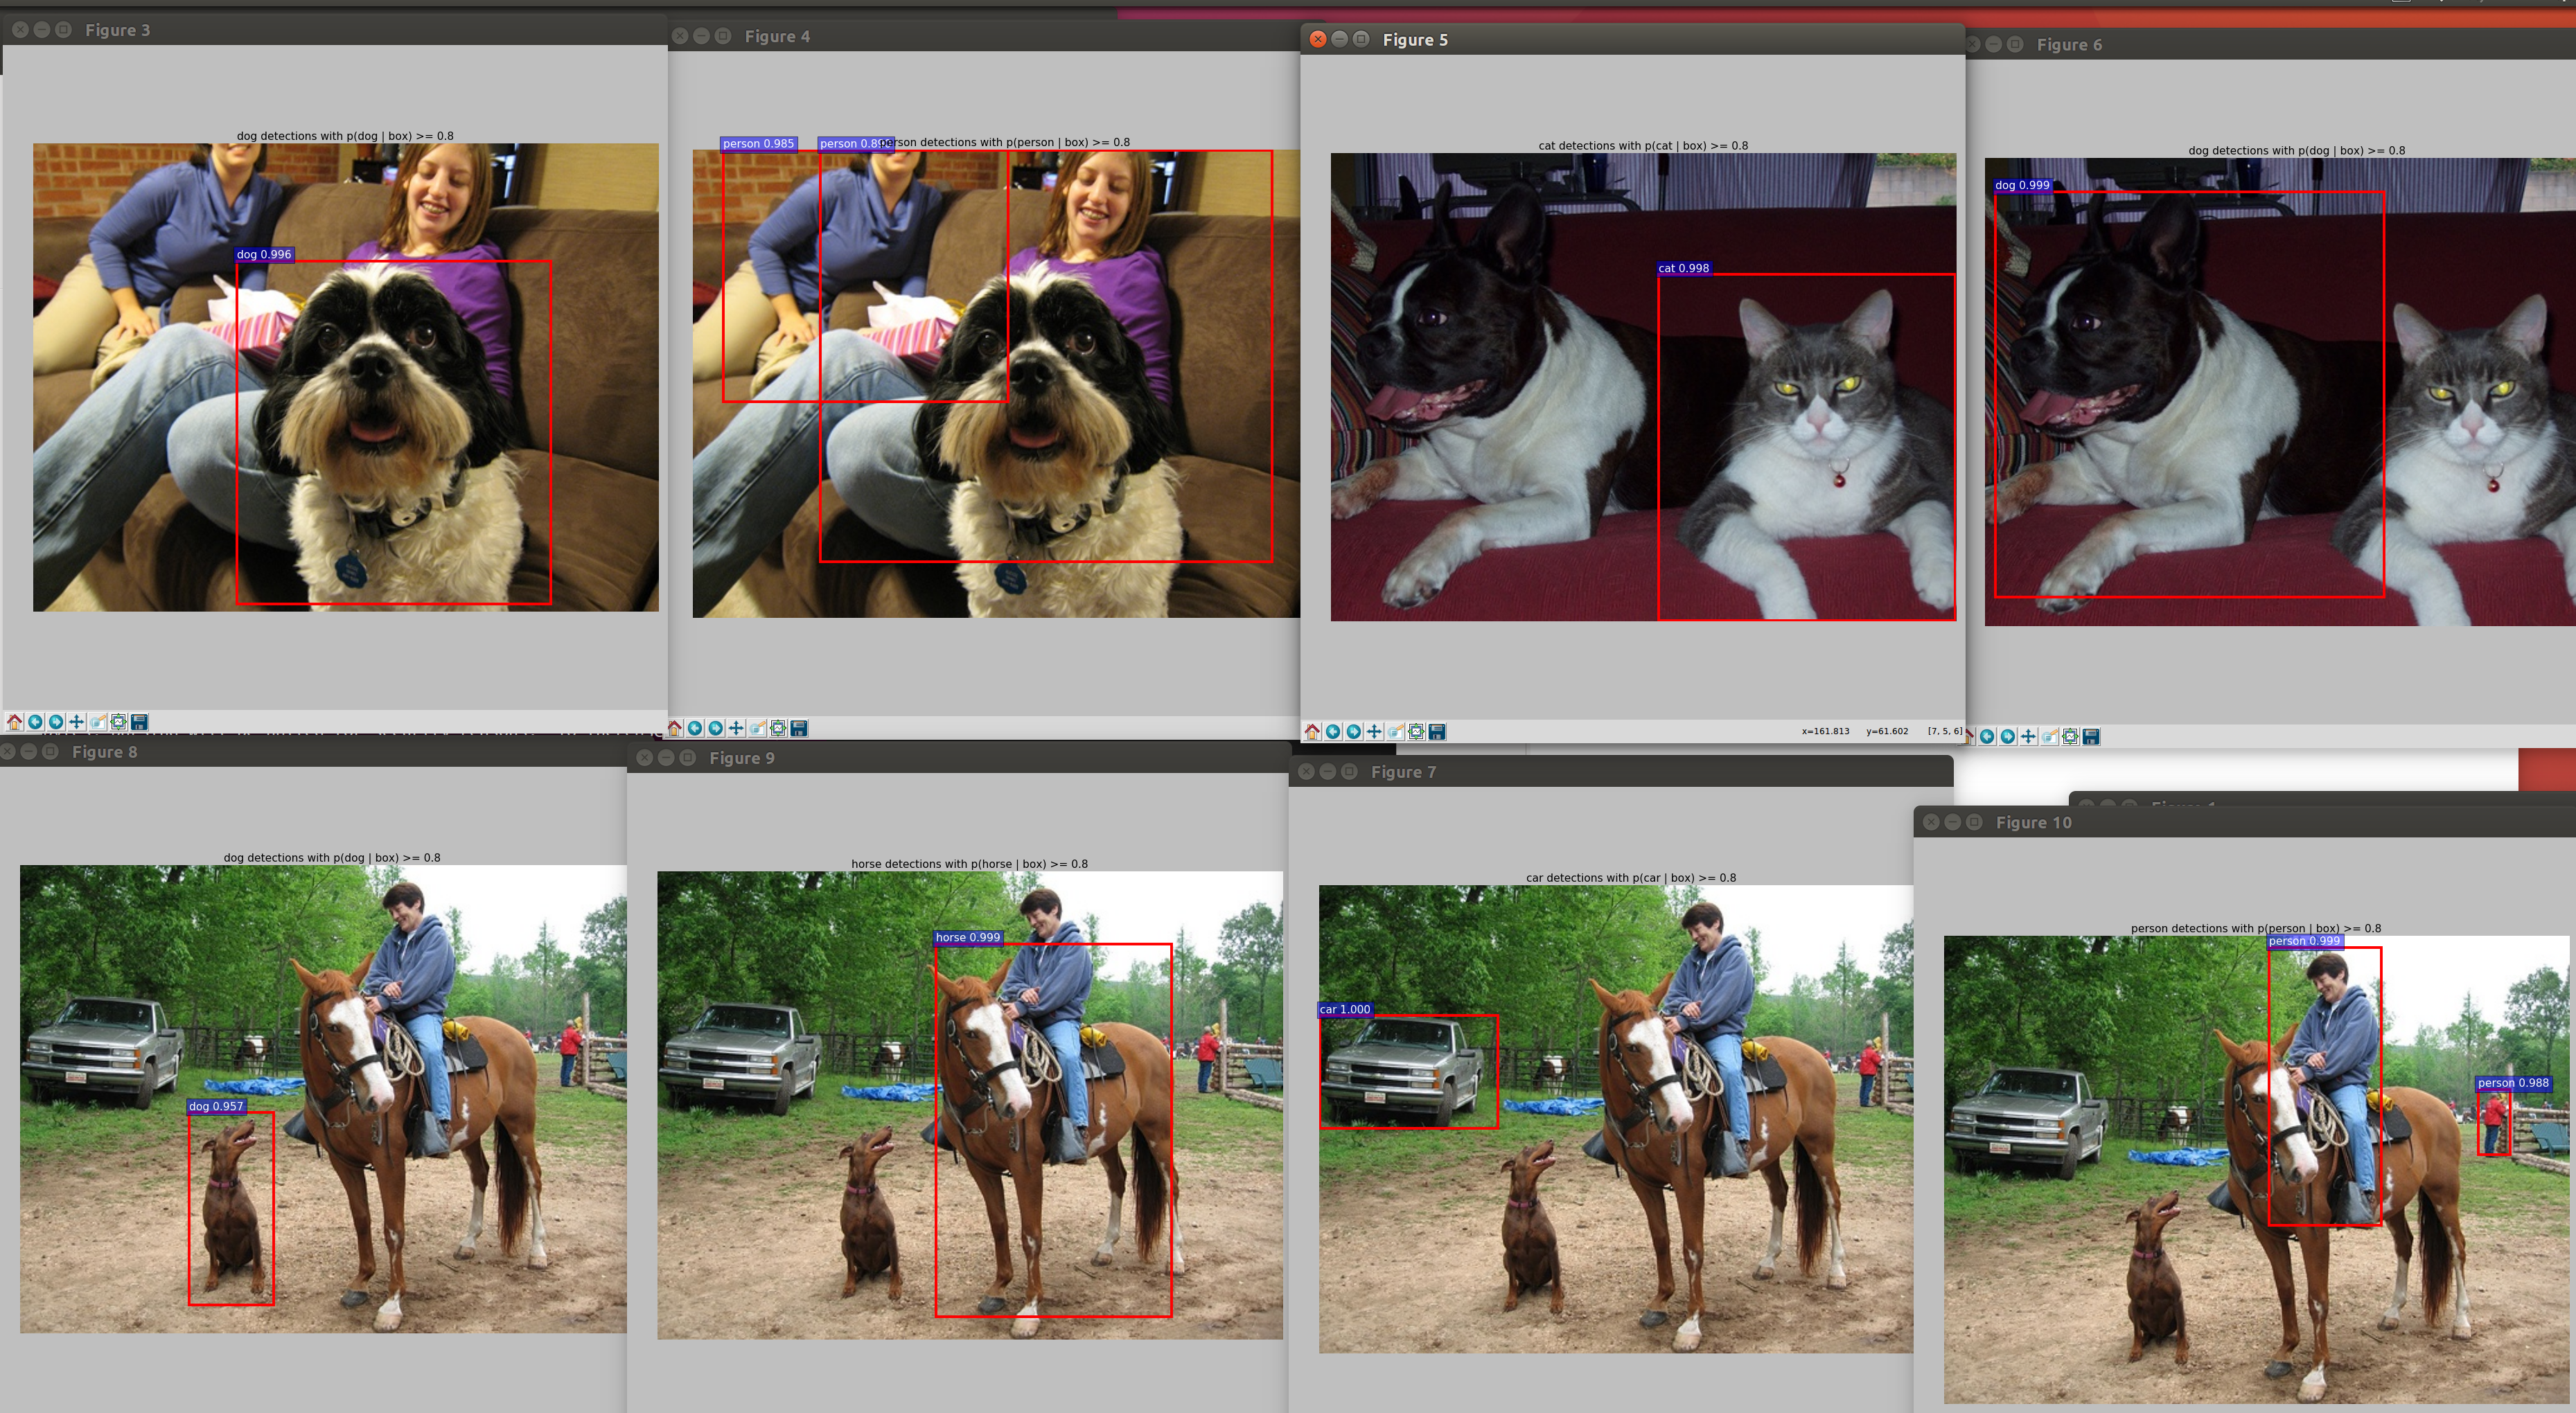
After loading the net and the weights, read the test image and show the results:
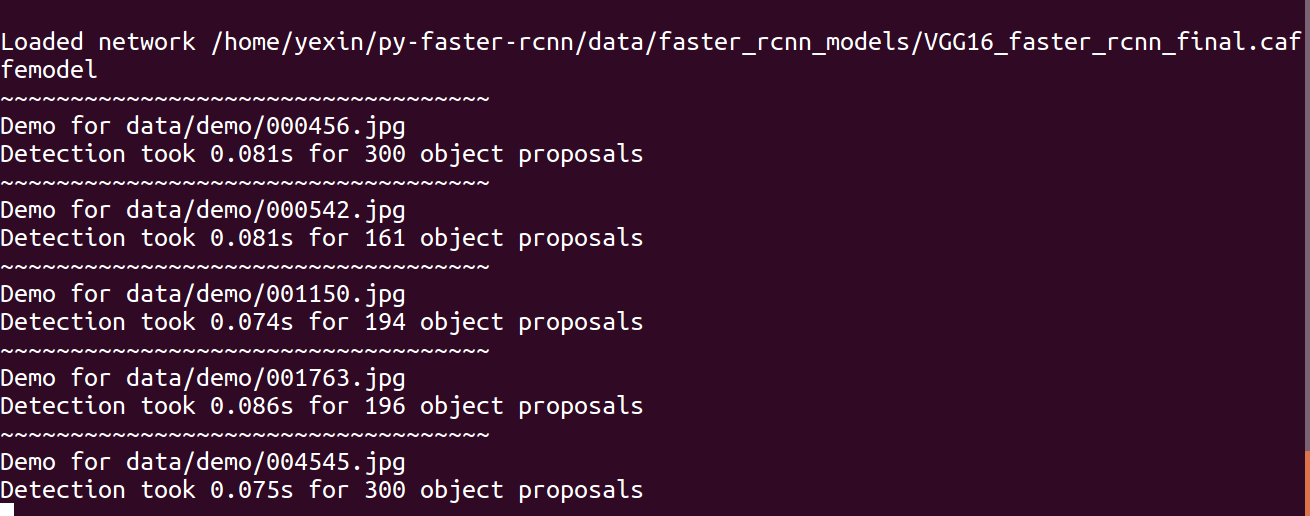
Some of the results:
下一篇:py-faster-rcnn 运行VOC2007例子 加入自己的新数据新类别重新训练