版权声明: https://blog.csdn.net/qq_40962416/article/details/82114063
(个人学习理解,如有不同,请在下方留言哦)
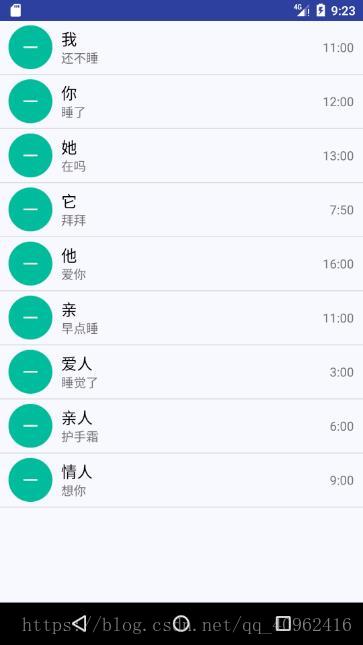
不管是在移动端还是PC端,对于ListView控件也就是列表的使用是非常普遍的,列表的使用弥补了显示器定量化的缺陷,由于ListView是一个可以上下滑动的控件,这样具有滑动效果的控件可以可以加载比较多的数据内容。具体的效果就是这样的。
做一个类似QQ消息的列表,作为学习事例。在开始Android开发中,拥有熟练的Java使用功底的技能,绝对是满满的优势。
一.定义一个实体类 LinkMain,作为 ListView 适配器的适配类型。打开QQ消息中我们可以看到列表中每项都有着四个属性:头像、备注名,聊天内容和时间。
所以在实体类中我们也将有着四个属性 headPortrait , name ,news , time
/**
 * Created by Administrator-Liu on 2018/8/27.
 */
public class LinkMain {

    private int headPortrait;
    private String name;
    private String news;
    private String time;

    public LinkMain(int headPortrait, String name, String news, String time){

        this.headPortrait = headPortrait;
        this.name = name;
        this.news = news;
        this.time = time;
    }

    public int getHeadPortrait() {
        return headPortrait;
    }

    public String getName() {
        return name;
    }

    public String getNews() {
        return news;
    }

    public String getTime() {
        return time;
    }
}
二.为 ListView 的子项指定一个我们自定义的布局 linkmain_item.xml。
<?xml version="1.0" encoding="utf-8"?>
<LinearLayout xmlns:android="http://schemas.android.com/apk/res/android"
    android:orientation="horizontal" android:layout_width="match_parent"
    android:layout_height="match_parent">

    <LinearLayout
        android:layout_width="match_parent"
        android:layout_height="60dp"
        android:orientation="horizontal"
        android:gravity="center_vertical">

        <ImageView
            android:id="@+id/headPortrait"
            android:layout_width="50dp"
            android:layout_height="50dp"
            android:src="@drawable/t01d7de9ec9fd9ce918"
            android:layout_marginLeft="10dp"/>
        <LinearLayout
            android:layout_width="wrap_content"
            android:layout_height="match_parent"
            android:orientation="vertical"
            android:gravity="center_vertical"
            android:layout_marginLeft="10dp"
            android:layout_weight="1.0">

            <TextView
                android:id="@+id/name"
                android:layout_width="wrap_content"
                android:layout_height="wrap_content"
                android:text="@string/app_name"
                android:textColor="	#000000"
                android:textSize="18dp"/>
            <TextView
                android:id="@+id/news"
                android:layout_width="wrap_content"
                android:layout_height="wrap_content"
                android:text="@string/app_name"/></LinearLayout>

        <TextView
            android:id="@+id/time"
            android:layout_width="wrap_content"
            android:layout_height="wrap_content"
            android:text="15:28"
            android:layout_marginRight="10dp"/>

    </LinearLayout>
</LinearLayout>
三.创建一个自定义的适配器 MyAdapter,这个适配器继承自 ArrayAdapter。重写构造方法和 getView 方法。
/**
 * Created by Administrator-Liu on 2018/8/27.
 */
public class MyAdapter extends ArrayAdapter{


    public MyAdapter(Context context, int resource, List<LinkMain> objects) {
        super(context, resource, objects);
    }

    @Override
    public View getView(int position, View convertView, ViewGroup parent) {

        LinkMain linkeMain = (LinkMain)getItem(position);
        View view = LayoutInflater.from(getContext()).inflate(R.layout.linkmain_item, null);

        ImageView headPortrait = (ImageView)view.findViewById(R.id.headPortrait);
        TextView name = (TextView)view.findViewById(R.id.name);
        TextView news = (TextView)view.findViewById(R.id.news);
        TextView time = (TextView)view.findViewById(R.id.time);

        headPortrait.setImageResource(linkeMain.getHeadPortrait());
        name.setText(linkeMain.getName());
        news.setText(linkeMain.getNews());
        time.setText(linkeMain.getTime());


        return view;
    }
}
四.在MainActivity中编写,初始化水果数据
public class MainActivity extends Activity {

    private List<LinkMain> linkMains = new ArrayList<>();
    private ListView listView;

    @Override
    protected void onCreate(Bundle savedInstanceState) {
        super.onCreate(savedInstanceState);
        setContentView(R.layout.activity_main);

        this.init();

        MyAdapter myAdapter = new MyAdapter(this,R.layout.linkmain_item,linkMains);

        listView = (ListView)this.findViewById(R.id.mylistlist);
        listView.setAdapter(myAdapter);
    }
    /*初始化数据*/
    private void init(){

        linkMains.add(new LinkMain(R.drawable.popup_icon_minus_pres,"我","还不睡","11:00"));
        linkMains.add(new LinkMain(R.drawable.popup_icon_minus_pres,"你","睡了","12:00"));
        linkMains.add(new LinkMain(R.drawable.popup_icon_minus_pres,"她","在吗","13:00"));
        linkMains.add(new LinkMain(R.drawable.popup_icon_minus_pres,"它","拜拜","7:50"));
        linkMains.add(new LinkMain(R.drawable.popup_icon_minus_pres,"他","爱你","16:00"));
        linkMains.add(new LinkMain(R.drawable.popup_icon_minus_pres,"亲","早点睡","11:00"));
        linkMains.add(new LinkMain(R.drawable.popup_icon_minus_pres,"爱人","睡觉了","3:00"));
        linkMains.add(new LinkMain(R.drawable.popup_icon_minus_pres,"亲人","护手霜","6:00"));
        linkMains.add(new LinkMain(R.drawable.popup_icon_minus_pres,"情人","想你","9:00"));
    }

}
ListView的简单使用,运行结果如下。头像直接使用的是圆角图片,未进行ImageView的圆角处理。
做自己的一个学习心得笔记。