之前有看过SpringBoot,惊叹于它的简洁快速无需配置XML文件.
抛去Spring那些繁琐的XML配置文件,SpringBoot无需部署,内置tomcat
SpringBoot让你迅速开发.
试着配置一下吧
环境:JDK 1.8 , IDEA 2018.1.5
项目结构
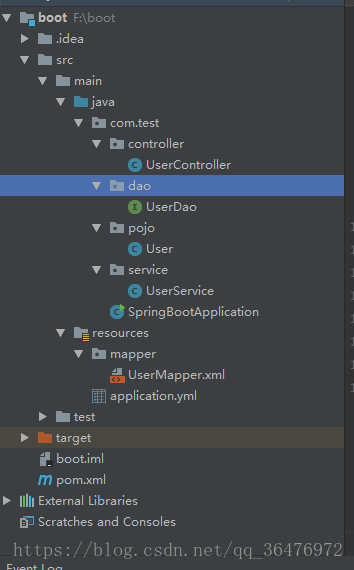
首先 新建项目 File –> New –> Project 选择左边的Maven 右边Maven的骨架无需勾选,一路Next.
首先打开pom.xml 导入SpringBoot、Mybatis 需要的jar包.
<parent>
        <groupId>org.springframework.boot</groupId>
        <artifactId>spring-boot-starter-parent</artifactId>
        <version>1.5.1.RELEASE</version>
    </parent>
    <dependencies>
        <dependency>
            <groupId>org.springframework.boot</groupId>
            <artifactId>spring-boot-starter-web</artifactId>
        </dependency>


        <!-- https://mvnrepository.com/artifact/mysql/mysql-connector-java -->
        <dependency>
            <groupId>mysql</groupId>
            <artifactId>mysql-connector-java</artifactId>
            <version>5.1.39</version>
        </dependency>
        <!-- https://mvnrepository.com/artifact/org.springframework.boot/spring-boot-starter-thymeleaf -->
        <dependency>
            <groupId>org.springframework.boot</groupId>
            <artifactId>spring-boot-starter-thymeleaf</artifactId>
            <version>1.4.0.RELEASE</version>
        </dependency>
        <!-- https://mvnrepository.com/artifact/org.springframework.data/spring-data-jpa -->
        <dependency>
            <groupId>org.springframework.boot</groupId>
            <artifactId>spring-boot-starter-data-jpa</artifactId>
            <version>1.5.1.RELEASE</version>
        </dependency>


        <!-- https://mvnrepository.com/artifact/org.mybatis.spring.boot/mybatis-spring-boot-starter -->
        <dependency>
            <groupId>org.mybatis.spring.boot</groupId>
            <artifactId>mybatis-spring-boot-starter</artifactId>
            <version>1.3.1</version>
        </dependency>

        <!-- https://mvnrepository.com/artifact/com.alibaba/druid -->
        <dependency>
            <groupId>com.alibaba</groupId>
            <artifactId>druid</artifactId>
            <version>1.1.10</version>
        </dependency>

    </dependencies>
SpringBoot的配置文件可以用properties和yml文件,第一次使用没有怎么了解,这里使用yml配置,这配置一目了然的感觉,就是看惯了XML有点不太习惯这样的配置。
application.yml
server:
  port: 8080

spring:
 # druid数据源
    datasource:
        name: test
        url: jdbc:mysql://127.0.0.1:3306/test
        username: root
        password: root
        type: com.alibaba.druid.pool.DruidDataSource
        driver-class-name: com.mysql.jdbc.Driver
        filters: stat
        maxActive: 20
        initialSize: 1
        maxWait: 60000
        minIdle: 1
        timeBetweenEvictionRunsMillis: 60000
        minEvictableIdleTimeMillis: 300000
        validationQuery: select 'x'
        testWhileIdle: true
        testOnBorrow: false
        testOnReturn: false
        poolPreparedStatements: true
        maxOpenPreparedStatements: 20


# mybatis配置
mybatis:
  mapperLocations: classpath:mapper/*.xml  # 对应mapper映射xml文件的所在路径
  type-aliases-package: com.test.pojo  #  对应实体类的路径
Mybatis这里有个大坑 mapperLocations就是这个属性,很多帖子上写的是mapper-locations,导致请求出错,org.apache.ibatis.binding.BindingException: Invalid bound statement (not found):com.test.dao.UserMapper.queryAllUser(); 至于什么原因还不知道,注意一下这个问题。
mapper的配置文件放在resources的mapper下,yml好像只能放在resources下。
User实体类:
public class User {

    private Integer id;
    private String username;
    private String password;
    private String workNo;
    private Integer age;
    private Integer state;

    getter/setter略.
}
UserDao
package com.test.dao;

import com.test.pojo.User;

import java.util.List;


public interface UserDao {

    List<User> queryAllUser();

}
UserMapper.xml

<?xml version="1.0" encoding="UTF-8" ?>
<!DOCTYPE mapper  PUBLIC "-//mybatis.org//DTD Mapper 3.0//EN" "http://mybatis.org/dtd/mybatis-3-mapper.dtd">

<mapper namespace="com.test.dao.UserDao">

    <select id="queryAllUser" resultType="com.test.pojo.User">
      SELECT * FROM sys_user
    </select>

</mapper>
UserService
package com.test.service;

import com.test.dao.UserDao;
import com.test.pojo.User;
import org.springframework.stereotype.Service;

import javax.annotation.Resource;
import java.util.List;

/**
 * userService
 */
@Service
public class UserService {

    @Resource
    private UserDao mapper;

    public List<User> queryAllUser(){
        return mapper.queryAllUser();
    }

}
UserController
package com.test.controller;

import com.test.service.UserService;
import com.test.pojo.User;
import org.springframework.stereotype.Controller;
import org.springframework.web.bind.annotation.RequestMapping;
import org.springframework.web.bind.annotation.ResponseBody;

import javax.annotation.Resource;
import java.util.List;

@Controller
@RequestMapping("user")
public class UserController {

    @Resource
    private UserService service;

    @RequestMapping("query")
    @ResponseBody
    public List<User> queryAllUser(){
        List<User> list = service.queryAllUser();
        for (int i=0;i<list.size();i++){
            System.out.println(list);
        }
        return list;
    }
}
这些最基本的模块已经写完了,接下来是SpringBoot的启动入口
SpringBootApplication
package com.test;

import org.mybatis.spring.annotation.MapperScan;
import org.springframework.boot.SpringApplication;
import org.springframework.boot.web.support.SpringBootServletInitializer;


@org.springframework.boot.autoconfigure.SpringBootApplication
@MapperScan("com.test.dao")
public class SpringBootApplication extends SpringBootServletInitializer {

    public static void main(String[] args) {
        SpringApplication.run(SpringBootApplication.class, args);
    }

}
@MapperScan(“com.test.dao”) 注解就是扫描dao包下的接口 这样就不用每个dao上都写注解,很方便。
这样已经配置完毕了,关于JSP页面的解析未配置,当前的项目骨架可能还需要加一些文件,比如
WEB-INF 这里只简单的写了一个方法 。
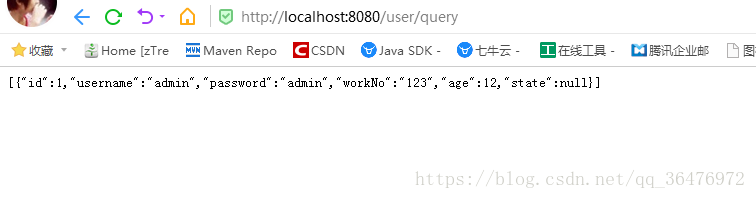
直接运行 Ctrl+Shift+F10
还有可能出现的问题:启动时报错 找不到项目 路径显示错误

选择Edit Configuration , 修改Working Directory选择项目的本地位置,保存。
完成。