学习背景:
闲来无事,自己想捣鼓点东西。反手就去”spring套餐”中看看有没有比较流行的框架。找到这个地址:
https://spring.io/projects。排在第一个就是springboot。(建议有点ssm基础的人阅读此文)
SpringBoot介绍:
这里我们引用官方介绍的一段话:
Spring Boot makes it easy to create stand-alone, production-grade Spring-based Applications that you can run.
We take an opinionated view of the Spring platform and third-party libraries,so that you can get started with minimum fuss.
Most Spring Boot applications need very little Spring configuration
大概意思就是:
我很简单、很容易就能创建一个单独的应用。
我们提供一些第三方的库能够让你很容易的开始项目。
大多数的springboot 需要少许的spring配置。(原谅我这四级的水平-。-)
我们在学习一个新的框架的时候,首先得问自己几个问题:学这个框架有什么用?这个框架相比较ssm而言有什么优点?我们为什么要学习这个框架?
SpringBoot的优点:
- 简化繁琐复杂的配置文件:ssm中最重要的是什么,是一大推的xml配置文件,每次构建新的项目时都需要复制这些配置文件。而springboot中基本没有xml配置文件,只需要一些必要配置。
- 简化maven中各种包之间的依赖关系:SpringBoot通过一系类Starter POMs的定义,让我们在整合各项功能的时候,不需要在Maven的pom.xml维护错综复杂的依赖关系,而是通过类似模块化的Starter模块来定义引用。
- 简化部署操作:通过ssm开发的项目,需打包成war包。部署需要容器的支持,那么在服务器上需要安装容器(Tomcat Jetty),而对于SpringBoot开发的项目而言 ,内置Tomcat容器。打包jar,通过
java -jar直接运行就可以启动一个标准化的Web应用。
SpringBoot的出现不是为了取代Spring,而是希望通过设计大量的自动化配置来简化Spring原有样本化配置,使开发者能够快速开发。
快速入门
笔者使用的开发工具是 IDEA。
FIle->new Project
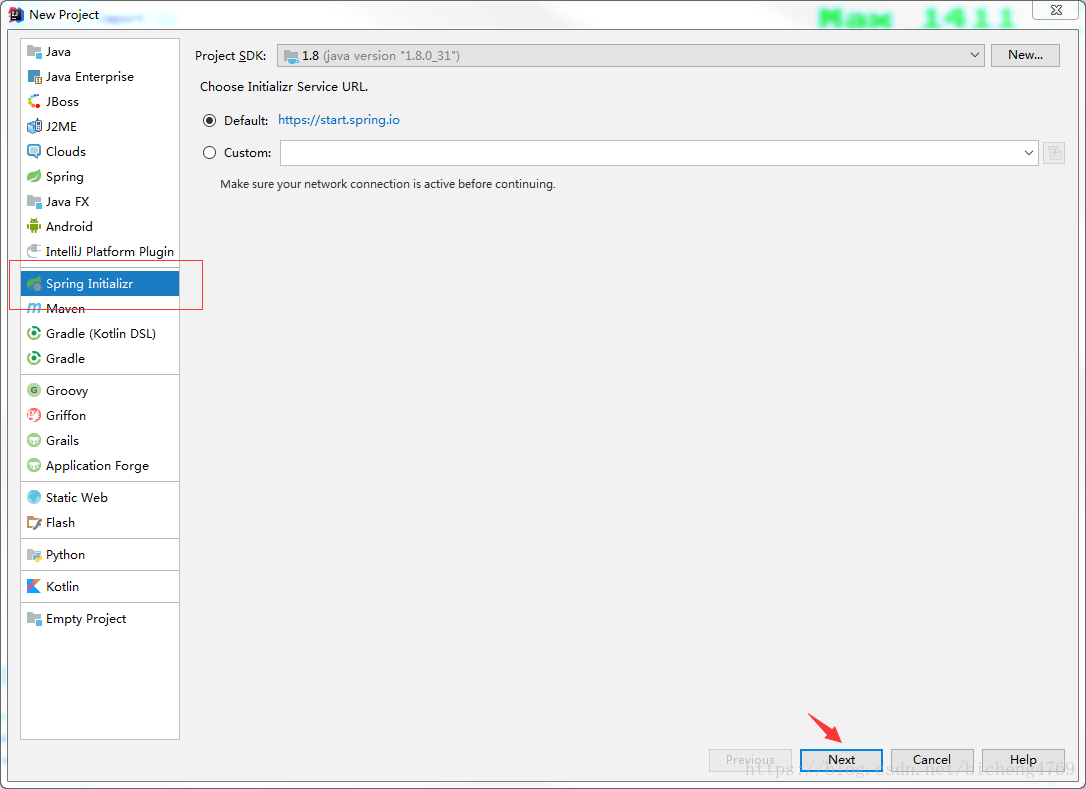
一直点Next,到这里需要注意下
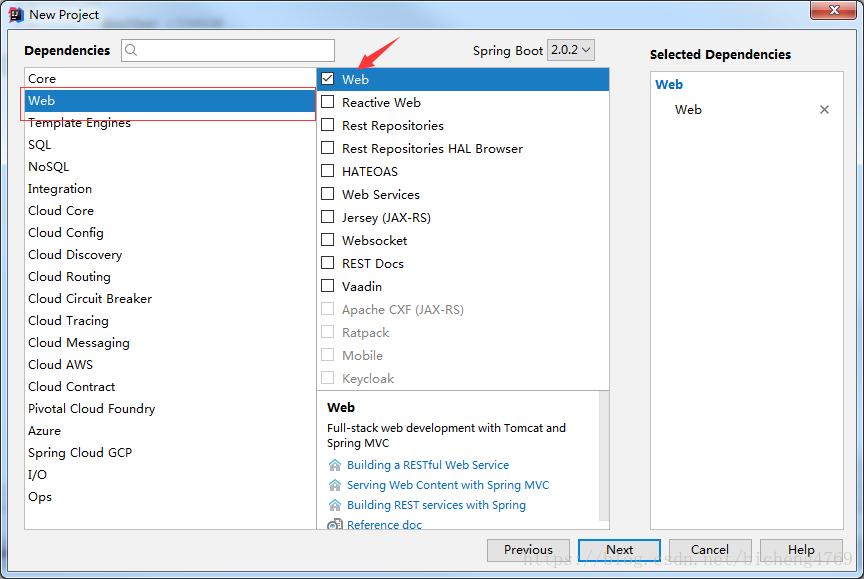
需要勾上Web中的 web模块,这边也可以选择springBoot的版本。下面就是跟着提示走,直接next完成创建项目。
创建项目之后。看一下项目结构:
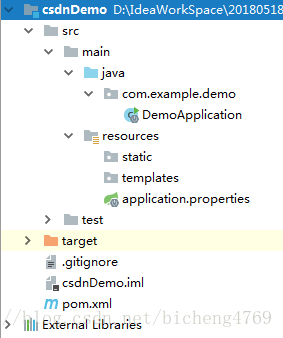
这个截图中我已经把.mvn mvnw mvn.cmd 删掉。
src/main/java  程序开发以及主程序入口
src/main/resources/application.properties 配置文件
src/main/resources/static 静态页面以及js、css
src/main/resources/templates 动态页面 thymeleaf模版所在位置
src/test/java  测试程序
这里需要注意的是,这边结构不像之前的web开发,有WebContent(webApp),这里只有src文件。
到现在为止,这个框架已经集成了springmvc和tomcat。也就是我们在现在主要写个controller,启动项目就可以在浏览器中访问到数据。
新建一个controller 很简单附上代码:
@Controller
public class IndexController {

    @RequestMapping("/index")
    @ResponseBody
    public String index(Model model) {
        return "Hello World";
    }

}
@RequestMapping + @ResponseBody =@Restcontroller
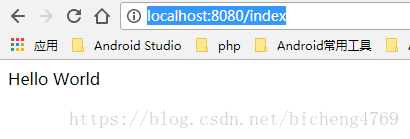
启动项目,如图所示:
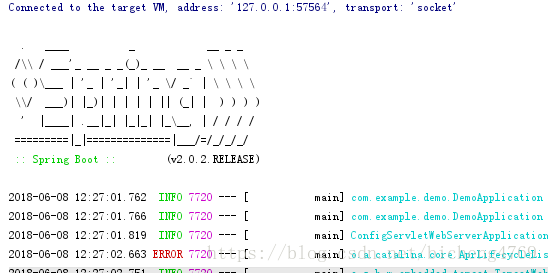
浏览器输入 http://localhost:8080/index
相对于ssm而言,到这里已经实现了controller层,还有dao层以及web该如何展示?
SpringBoot集成Mybatis
我们可以先思考一下,之前ssm集成Mybatis无非就是在pom文件中加入依赖包,然后在配置文件中进行配置。
springboot也是相同的步骤:
1 引入依赖包:
<dependency>
    <groupId>mysql</groupId>
    <artifactId>mysql-connector-java</artifactId>
    <scope>runtime</scope>
</dependency>

<dependency>
    <groupId>org.mybatis.spring.boot</groupId>
    <artifactId>mybatis-spring-boot-starter</artifactId>
    <version>1.3.1</version>
</dependency>
2 配置文件是application.properties,但笔者把这个配置文件改了下后缀名变成了 application.yml 。(yml格式和properties格式使用并没有多大的区别,但是从视觉角度上,yml格式的更有层次感,看的更清楚)
mybatis:
  type-aliases-package: com.house.bean
  mapper-locations: classpath:mapper/*.xml
spring:
  datasource:
    url: jdbc:mysql://127.0.0.1:3306/spiderhouse?useUnicode=true&characterEncoding=utf8&allowMultiQueries=true
    username: ****
    password: *****
    driver-class-name: com.mysql.jdbc.Driver
type-aliases-package :ssm中对mybatis所映射的实体类简写就是通过指定typeAlias来实现,这里也是一样,后面值就是实体类的包名。
mapper-locations: ssm中对mapper映射 通过 <property name="mapperLocations" value="classpath:mapper/*.xml"/>来指定mapper位置。在springboot中,我们同样是通过 mapper-locations指定mapper位置。
到这里,mybatis就已经集成完毕,下面就是和ssm一样的:建立mapper****.xml,指定dao层,编写service层。
这边差点忘了,我们如何将mapper.xml和dao层进行绑定,ssm中是通过
<bean class="org.mybatis.spring.mapper.MapperScannerConfigurer">
        <property name="basePackage" value="com.perf.dao"/>
        <property name="sqlSessionFactoryBeanName" value="sqlSessionFactory"/>
</bean>
来绑定。SpringBoot呢?我们可以查看下启动类。
@SpringBootApplication
@MapperScan("com.house.dao")
public class HouseinfoApplication {

    public static void main(String[] args) {
        SpringApplication.run(HouseinfoApplication.class, args);
}通过@MapperScan("com.house.dao")来绑定dao层。
SpringBoot集成thymeleaf
springboot对于前端展示这一块推荐我们使用thymeleaf模版来展示。
<dependency>
    <groupId>org.springframework.boot</groupId>
    <artifactId>spring-boot-starter-thymeleaf</artifactId>
</dependency>
直接导入。
这边我们再回头看一下 resources这个文件夹下面的内容:
static: 静态文件 css、js
template:动态页面,thymeleaf模版。
下面我们写一些简单的代码测试一下
controller层:
  @RequestMapping("/index")
  public String index(Model model) {
      model.addAttribute("info", "Hello World");
      return "index";
  }
index.html
<!DOCTYPE html>
<html>
<head>
<meta charset="UTF-8"/>
<title>Insert title here</title>
</head>
<body>
<span th:text="${info}"></span>
</body>
</html>
通过 ${info}来获取值,具体对thymeleaf的操作可以查看官方文档附上地址:
https://www.thymeleaf.org/doc/tutorials/2.1/usingthymeleaf.html#using-texts
结束语
至此,springboot已经集成了springmvc、mybatis、thymeleaf。达到了和ssm框架相同的效果。
我们可以发现,springboot在配置方面确实比ssm简单很多,所有的配置都在application.yml文件中,只需要配置一些必要的(数据库连接)的配置,其他的事情,springboot已经都帮我们搞定。这样大大的提升了我们的开发效率,让我们有更多的精力在业务逻辑和代码优化上面。