版权声明:欢迎评论,转载请声明出处 https://blog.csdn.net/larger5/article/details/82026862
一、前言
1、前端三大 JS 框架 Vue、React、Angular 都用了一段时间了,最后还是回归于 Vue
| JS | demo |
|---|---|
| Vue | [增删改查] 使用 Vue2.x + LayUI 做后台管理 CRUD 界面和 REST 交互 |
| React | [增删改查] 使用 React + LayUI 做后台管理 CRUD 界面和 RESTful 交互 |
| Angular | 使用 AngularJS + Echart 进行大数据可视化分析 |
Vue,思路清晰,代码简洁,学习成本低,功能强大,生态繁荣。
而 Vue + ElementUI + Webpack + VueRouter 的 pc 端组合,较大程度发挥其各大优点
2、UI 方面的框架,最后还是归于 ElementUI
经历了 EasyUI(丑) -> BootStrap(弱)-> LayUI(和 Vue 等冲突) -> ElementUI
本文要点:
- Vue 中绑定 moment 进行时间格式化
- Vue 中绑定 vue-resource 发送 ajax
- Vue 组件化编程思想
- Vue 路由传参问题
- ElementUI table 的常见操作
二、功能演示
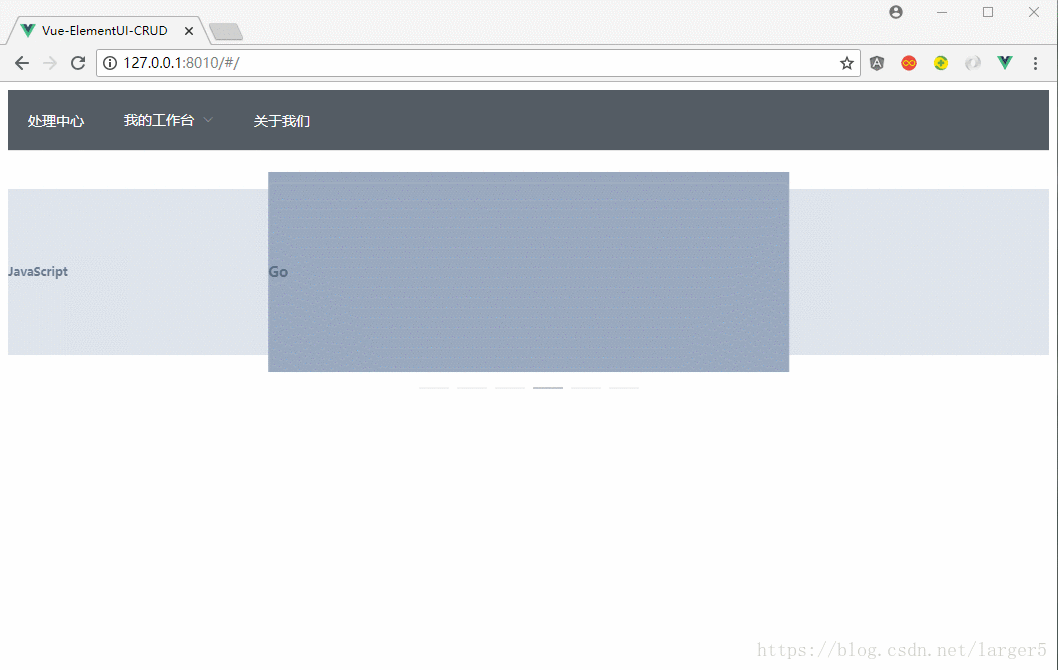
1、首页
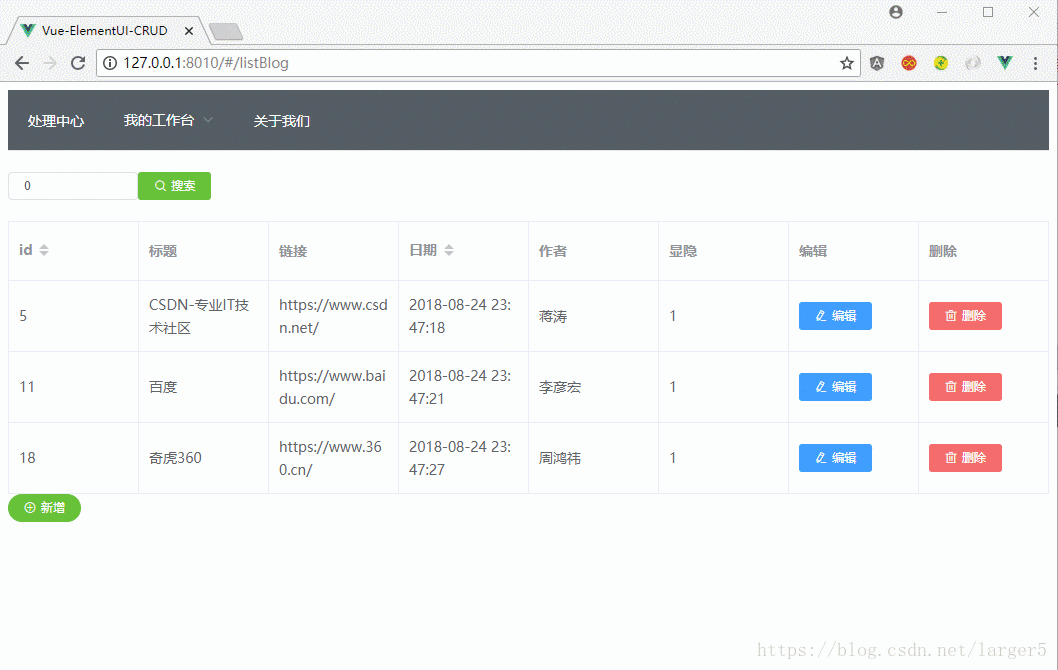
2、查

3、增
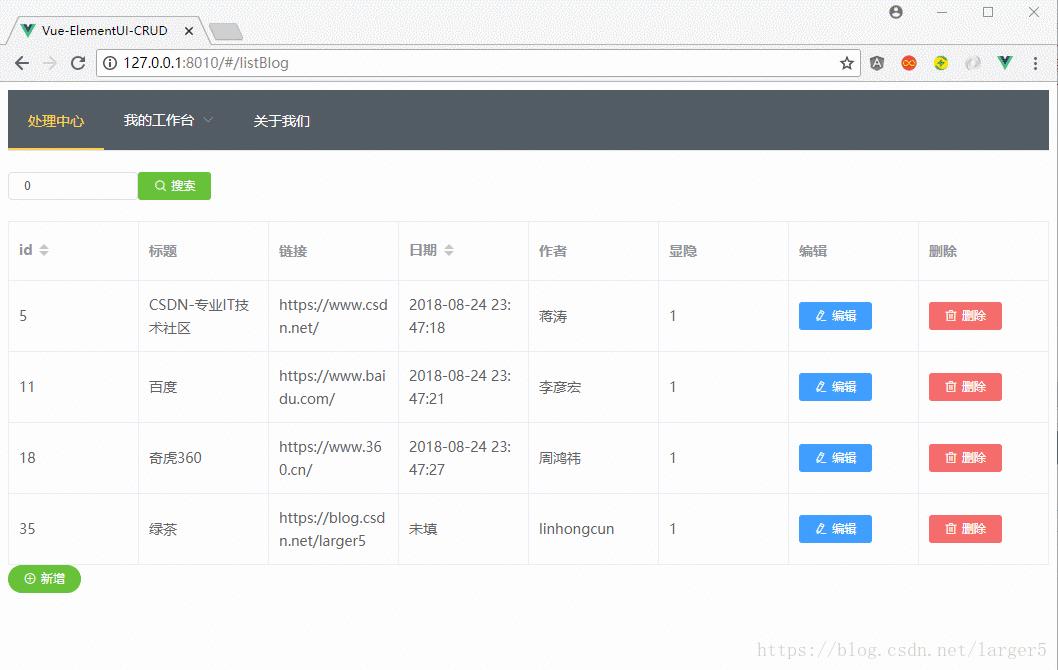
4、改
5、删
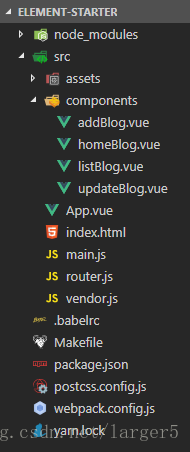
三、代码与结构
本案例的构建基于 ElementUI 的 Starter,使用方法详见:
使用 vue-cli + element-ui 快速搭建项目
代码已经放到 github 上了:
https://github.com/larger5/vue_elementui_webpack_vuerouter
首先,下面的文件,都是与核心业务无关的,先搁在一旁
- .babelrc
- Makefile
- package.json
- postcss.config.js
- yarn.lock
- webpack.config.js
1、主文件
下面的文件都是元老级别的,不可或缺。
①.index.html
也就放一个 div,标个 id,即放了个坑
让下面的 App.vue 朝着来填满
<!DOCTYPE html>
<html lang="en">
<head>
  <meta charset="utf-8">
  <title>Vue-ElementUI-CRUD</title>
  <link rel="icon" href="https://vuejs.org/images/logo.png">
</head>

<body>
  <div id="app"></div>
</body>

</html>
② App.vue
而单单由 App.vue 来填坑,显然力不从心,通过 <router-view></router-view>又埋下坑,让其子孙(子路由)接着填坑
<template>
    <div id="app">
        <!--导航条-->
        <el-menu class="el-menu-demo" mode="horizontal"
                 background-color="#545c64" text-color="#fff" active-text-color="#ffd04b">
            <el-menu-item index="1"><router-link to="/listBlog">处理中心</router-link></el-menu-item>
            <el-submenu index="2">
                <template slot="title">我的工作台</template>
            </el-submenu>
            <el-menu-item index="3"><a href="https://www.ele.me" target="_blank">关于我们</a></el-menu-item>
        </el-menu>
        <br>
        <router-view></router-view>

    </div>
</template>

<style>
a {
  text-decoration: none;
}
</style>
③ main.js
填坑,需要一些必要的工具,如第三方 js 库、路由
通通放在这里
import Vue from 'vue'
import ElementUI from 'element-ui'
import 'element-ui/lib/theme-chalk/index.css'
import App from './App.vue'
import VueRouter from 'vue-router'
import router from './router.js'
import VueResource from 'vue-resource'
import Moment from 'moment'

// 安装 ElementUI(ui)
Vue.use(ElementUI)

// 安装 路由(url)
Vue.use(VueRouter)

// 绑定 vue-resource(ajax)
Vue.use(VueResource)

// 绑定 moment 进行时间格式化 ✔
Vue.prototype.$moment = Moment;//赋值使用

// 如果我们通过全局配置了,请求的数据接口 根域名,则 ,在每次单独发起 http 请求的时候,请求的 url 路径,应该以相对路径开头,前面不能带 /  ,否则 不会启用根路径做拼接;
Vue.http.options.root = 'http://120.79.197.130:8080/';

// 全局启用 emulateJSON 选项:如果Web服务器无法处理编码为application/json的请求,你可以启用emulateJSON选项。
Vue.http.options.emulateJSON = true;

new Vue({
  el: '#app',
  render: h => h(App),
  // 挂在路由对象到 VM 实例上
  router
})
④ router.js
子孙齐聚一堂
import VueRouter from 'vue-router'
import AddBlog from './components/addBlog'
import UpdateBlog from './components/updateBlog'
import ListBlog from './components/ListBlog'
import HomeBlog from './components/HomeBlog'

// 1、创建路由对象
var router = new VueRouter({
    routes: [
        { path: '/listBlog', component: ListBlog },
        { path: '/addBlog', component: AddBlog },
        { path: '/updateBlog/:id', component: UpdateBlog },
        { path: '/', component: HomeBlog }
    ]
})

// 2、把路由对象暴露出去
export default router
2、路由组件
子孙
① homeBlog.vue 首页
<template>
  <el-carousel :interval="2000" type="card" height="200px">
    <el-carousel-item v-for="item in showCard" :key="item.content">
      <h3>{{ item.content }}</h3>
    </el-carousel-item>
  </el-carousel>
</template>

<style>
.el-carousel__item h3 {
  color: #475669;
  font-size: 14px;
  opacity: 0.75;
  line-height: 200px;
  margin: 0;
}

.el-carousel__item:nth-child(2n) {
  background-color: #99a9bf;
}

.el-carousel__item:nth-child(2n + 1) {
  background-color: #d3dce6;
}
</style>
<script>
export default {
  data() {
    return {
      //表格数据
      showCard: [
        {
          content: "Java"
        },
        {
          content: "Python"
        },
        {
          content: "JavaScript"
        },
        {
          content: "Go"
        },
        {
          content: "Php"
        },
        {
          content: "Scala"
        }
      ],
    };
  },
  created(){

  },
  methods: {}
};
</script>
② 查
包括查询全部、查询一个,
还有进入新增页面、修改页面的 router-link
<template>
    <div>
        <!--搜索框-->
        <el-row>
            <el-col :span="3" class="grid">
                <el-input v-model="input" placeholder="请输入id" size="mini"></el-input>
            </el-col>
            <el-col :span="1" class="grid">
                <el-button type="success" icon="el-icon-search" size="mini" @click.prevent="search()">搜索</el-button>
            </el-col>
        </el-row>
        <br>
        <!--表格数据及操作-->
        <!-- 加载设置 -->
        <el-table
            element-loading-text="拼命加载中"
            element-loading-spinner="el-icon-loading"
            element-loading-background="rgba(0, 0, 0, 0.8)"
            fit
            :data="list" border style="width: 100%" ref="multipleTable" tooltip-effect="dark">
            <!--勾选框-->
            <!-- <el-table-column type="selection" width="55"></el-table-column> -->
            <!--索引-->
            <!-- <el-table-column type="index" :index="indexMethod"></el-table-column> -->
            <el-table-column prop="id" label="id" sortable></el-table-column>
            <el-table-column prop="title" label="标题" ></el-table-column>
            <el-table-column prop="link" label="链接" ></el-table-column>
            <el-table-column prop="date" label="日期" :formatter="dateFormat" sortable></el-table-column>
            <el-table-column prop="author" label="作者" ></el-table-column>
            <el-table-column prop="tag" label="显隐" ></el-table-column>
            <el-table-column label="编辑">
                <template slot-scope="scope">
                    <router-link to="/updateBlog">
                      <el-button type="primary" icon="el-icon-edit" size="mini" @click.prevent="updateBlog(scope.$index, scope.row)">编辑</el-button>
                    </router-link>
                </template>
            </el-table-column>
            <el-table-column label="删除">
                <template slot-scope="scope">
                    <el-button type="danger" icon="el-icon-delete" size="mini" @click.prevent="deleteBlog(scope.$index, scope.row)">删除</el-button>
                </template>
            </el-table-column>
        </el-table>
        <!--新增按钮-->
        <el-col :span="1" class="grid">
            <router-link to="/addBlog">
                 <el-button type="success" icon="el-icon-circle-plus-outline" size="mini" round>新增</el-button>
            </router-link>
        </el-col>
    </div>
</template>
<script>
export default {
  created() {
    this.listAllBlog();
  },
  data() {
    return {
      //查询输入框数据
      input: 0,
      list: [] // 存放列表数据
    };
  },
  methods: {
    listAllBlog() {
      // 由于已经导入了 Vue-resource这个包,所以 ,可以直接通过  this.$http 来发起数据请求
      this.$http.get("getAllBlogs").then(result => {
        // 注意: 通过 $http 获取到的数据,都在 result.body 中放着
        var result = result.body;
        if (result.code === 200) {
          // 成功了
          this.list = result.data;
          console.log(result.data);
        } else {
          // 失败了
          alert("获取数据失败!");
        }
      });
    },
    //时间格式化
    dateFormat: function(row, column) {
      var date = row[column.property];
      if (date == undefined) {
        return "未填";
      }
      return this.$moment(date).format("YYYY-MM-DD HH:mm:ss");
    },
    deleteBlog(index, row) {
      this.$http.delete("deleteBlogById/" + row.id).then(result => {
        if (result.body.code === 200) {
          // 删除成功
          this.listAllBlog();
        } else {
          alert("删除失败!");
        }
      });
    },
    search() {
      this.$http.get("getBlogById/" + this.input).then(result => {
        var result = result.body;
        if (result.code === 200) {
          this.list = [];
          this.list.push(result.data);
        } else {
          alert("查找失败!");
        }
      });
    },
    updateBlog(index, row) {
      this.$router.push({
        path: `/updateBlog/${row.id}`
      });
    }
  }
};
</script>
③ 增 addBlog.vue
<template>
    <div>
        <el-form ref="form" label-width="80px">
            <el-form-item label="标题">
                <el-input v-model="title1"></el-input>
            </el-form-item>
            <el-form-item label="链接">
                <el-input v-model="link1"></el-input>
            </el-form-item>
            <el-form-item label="作者">
                <el-input v-model="author1"></el-input>
            </el-form-item>
            <el-form-item label="显隐">
                <el-select v-model="tag1" placeholder="请选择">
                <el-option label="显示" value="1"></el-option>
                <el-option label="隐藏" value="0"></el-option>
                </el-select>
            </el-form-item>
            <el-form-item>
                <el-button type="primary" @click="updateBlog">立即添加</el-button>
            </el-form-item>
        </el-form>
    </div>
</template>
<script>
export default {
  data() {
    return {
      title1: "",
      link1: "",
      author1: "",
      tag1: ""
    };
  },
  methods: {
    addBlog() {
      this.$http
        .post("insertBlog", {
          title: this.title1,
          link: this.link1,
          author: this.author1,
          tag: this.tag1
        })
        .then(result => {
          var result = result.body;
          if (result.code === 200) {
            alert("添加成功!");
            this.title1 = "";
            this.link1 = "";
            this.author1 = "";
            this.tag1 = "";
          } else {
            // 失败了
            alert("添加失败!");
          }
        });
    }
  }
};
</script>
④ 更新页面
<template>
    <div>
        <el-form ref="form" label-width="80px">
            <el-form-item label="id">
                <el-input v-model="id" disabled></el-input>
            </el-form-item>
            <el-form-item label="标题">
                <el-input v-model="title"></el-input>
            </el-form-item>
            <el-form-item label="链接">
                <el-input v-model="link"></el-input>
            </el-form-item>
            <el-form-item label="作者">
                <el-input v-model="author"></el-input>
            </el-form-item>
            <el-form-item label="显隐">
                <el-select v-model="tag" placeholder="请选择">
                <el-option label="显示" value="1"></el-option>
                <el-option label="隐藏" value="0"></el-option>
                </el-select>
            </el-form-item>
            <el-form-item>
                <el-button type="primary" @click="updateBlog">立即修改</el-button>
            </el-form-item>
        </el-form>
    </div>
</template>
<script>
export default {
  data() {
    return {
      id: "",
      title: "",
      link: "",
      author: "",
      tag: ""
    };
  },
  created() {
    this.$http.get("getBlogById/" + this.$route.params.id).then(result => {
      // 注意: 通过 $http 获取到的数据,都在 result.body 中放着
      var result = result.body;
      if (result.code === 200) {
        // 成功了
        this.id = result.data.id;
        this.title = result.data.title;
        this.link = result.data.link;
        this.author = result.data.author;
        this.tag = result.data.tag;
      } else {
        // 失败了
        alert("获取数据失败!");
      }
    });
  },
  methods: {
    updateBlog() {
      this.$http
        .put("updateBlog", {
          id: this.id,
          title: this.title,
          link: this.link,
          author: this.author,
          tag: this.tag
        })
        .then(result => {
          var result = result.body;
          if (result.code === 200) {
            alert("修改成功!");
          } else {
            // 失败了
            alert("修改失败!");
          }
        });
    }
  }
};
</script>
四、小结
注意:
1、json 文件不能写注释