这篇博文主要用于新手学习Spring Boot,同时也记录自己学习的过程…
文章内容主要来源于易百教程
Spring Boot @ConfigurationProperties是让开发人员比较容易地将整个文件映射成一个对象。
1.简单属性文件
通常,我们使用@Value注释来逐个逐入.properties值,这对于小而简单的结构.properties文件很有用。
文件:global.properties
email=[email protected]
threadPool=12
@Value示例
文件:GlobalProperties.java
package com.th;

import org.springframework.beans.factory.annotation.Value;
import org.springframework.context.annotation.PropertySource;
import org.springframework.stereotype.Component;

@Component
@PropertySource("classpath:global.properties")
public class GlobalProperties {

    @Value("${threadPool}")
    private int threadPoll;

    @Value("${email}")
    private String email;

    public int getThreadPoll() {
        return threadPoll;
    }

    public void setThreadPoll(int threadPoll) {
        this.threadPoll = threadPoll;
    }

    public String getEmail() {
        return email;
    }

    public void setEmail(String email) {
        this.email = email;
    }

    @Override
    public String toString() {
        return "GlobalProperties [threadPoll=" + threadPoll + ", email=" + email + "]";
    }

}
@ConfigurationProperties示例
文件:GlobalProperties.java
import org.springframework.boot.context.properties.ConfigurationProperties;

@Component
@PropertySource("classpath:global.properties")
@ConfigurationProperties
public class GlobalProperties {

    private int threadPool;
    private String email;

    public int getThreadPool() {
        return threadPool;
    }
    public void setThreadPool(int threadPool) {
        this.threadPool = threadPool;
    }
    public String getEmail() {
        return email;
    }
    public void setEmail(String email) {
        this.email = email;
    }
    @Override
    public String toString() {
        return "GlobalConfigProperties [threadPool=" + threadPool + ", email=" + email + "]";
    }

}
2.复杂属性文件
2.1.查看复杂的结构 .properties文件,如何通过@Value注释映射值。
文件:application.properties
spring.mvc.view.prefix=/WEB-INF/jsp/
spring.mvc.view.suffix=.jsp

#Logging
logging.level.org.springframework.web=ERROR
logging.level.com.yiibai=DEBUG

#Global
email=test@th.com
threadPool=10

#App
app.menus[0].title=Home
app.menus[0].name=Home
app.menus[0].path=/
app.menus[1].title=Login
app.menus[1].name=Login
app.menus[1].path=/login

app.compiler.timeout=5
app.compiler.output-folder=/temp/s

app.error=/error/或YAML中的下面配置,文件:application.yml
logging:
  level:
    org.springframework.web: ERROR
    com.th: DEBUG
email: test@th.com
threadPool: 10
app:
  menus:
    - title: Home
      name: Home
      path: /
    - title: Login
      name: Login
      path: /login
  compiler:
    timeout: 5
    output-folder: /temp/
error: /error/注意:@ConfigurationProperties支持.properties和.yml文件。
下面可使用@ConfigurationProperties来配置完成,创建一个@ConfigurationProperties bean,如下所示:
文件:AppProperties.java
package com.th;

import org.springframework.boot.context.properties.ConfigurationProperties;
import org.springframework.stereotype.Component;

import java.util.ArrayList;
import java.util.List;

@Component
@ConfigurationProperties("app")
public class AppProperties {

    private String error;
    private List<Menu> menus = new ArrayList<>();
    private Compiler compiler = new Compiler();

    public static class Menu {
        private String name;
        private String path;
        private String title;

        public String getName() {
            return name;
        }

        public void setName(String name) {
            this.name = name;
        }

        public String getPath() {
            return path;
        }

        public void setPath(String path) {
            this.path = path;
        }

        public String getTitle() {
            return title;
        }

        public void setTitle(String title) {
            this.title = title;
        }

        @Override
        public String toString() {
            return "Menu{" + "name='" + name + '\'' + ", path='" + path + '\'' + ", title='" + title + '\'' + '}';
        }
    }

    public static class Compiler {
        private String timeout;
        private String outputFolder;

        public String getTimeout() {
            return timeout;
        }

        public void setTimeout(String timeout) {
            this.timeout = timeout;
        }

        public String getOutputFolder() {
            return outputFolder;
        }

        public void setOutputFolder(String outputFolder) {
            this.outputFolder = outputFolder;
        }

        @Override
        public String toString() {
            return "Compiler{" + "timeout='" + timeout + '\'' + ", outputFolder='" + outputFolder + '\'' + '}';
        }
    }

    public String getError() {
        return error;
    }

    public void setError(String error) {
        this.error = error;
    }

    public List<Menu> getMenus() {
        return menus;
    }

    public void setMenus(List<Menu> menus) {
        this.menus = menus;
    }

    public Compiler getCompiler() {
        return compiler;
    }

    public void setCompiler(Compiler compiler) {
        this.compiler = compiler;
    }

    @Override
    public String toString() {
        return "AppProperties [error=" + error + ", menus=" + menus + ", compiler=" + compiler + "]";
    }

}
文件:GlobalProperties.java
package com.th;

import javax.validation.constraints.Max;
import javax.validation.constraints.Min;
import javax.validation.constraints.NotEmpty;

import org.springframework.beans.factory.annotation.Value;
import org.springframework.boot.context.properties.ConfigurationProperties;
import org.springframework.stereotype.Component;

@Component
@ConfigurationProperties
public class GlobalProperties {

    @Max(20)
    @Min(0)
    @Value("${threadPool}")
    private int threadPoll;

    @NotEmpty
    @Value("${email}")
    private String email;

    public int getThreadPoll() {
        return threadPoll;
    }

    public void setThreadPoll(int threadPoll) {
        this.threadPoll = threadPoll;
    }

    public String getEmail() {
        return email;
    }

    public void setEmail(String email) {
        this.email = email;
    }

    @Override
    public String toString() {
        return "GlobalProperties [threadPoll=" + threadPoll + ", email=" + email + "]";
    }

}
演示实例
测试以确保 .properties值正确映射到对象。文件:WelcomController.java -
package com.th;
import org.slf4j.Logger;
import org.slf4j.LoggerFactory;
import org.springframework.beans.factory.annotation.Autowired;
import org.springframework.stereotype.Controller;
import org.springframework.web.bind.annotation.RequestMapping;
import java.util.Map;

@Controller
public class WelcomeController {
    private static final Logger logger = LoggerFactory.getLogger(WelcomeController.class);

    private AppProperties app;
    private GlobalProperties global;

    @Autowired
    public void setApp(AppProperties app) {
        this.app = app;
    }

    @Autowired
    public void setGlobal(GlobalProperties global) {
        this.global = global;
    }

    @RequestMapping("/")
    public String welcome(Map<String, Object> model) {

        String appProperties = app.toString();
        String globalProperties = global.toString();

        logger.debug("Welcome {}, {}", app, global);


        model.put("message", appProperties + globalProperties);
        return "welcom";
    }


}
文件:SpringBootWebApplication.java
package com.th;
import org.springframework.boot.SpringApplication;
import org.springframework.boot.autoconfigure.SpringBootApplication;
@SpringBootApplication
public class SpringBootWebApplication {
public static void main(String[] args) {
SpringApplication.run(SpringBootWebApplication.class, args);
}
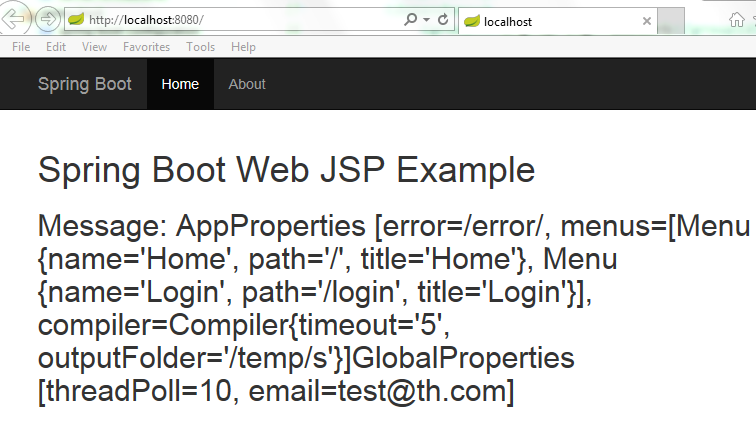
}使用Maven命令 mvn spring-boot:run 启动Spring Boot,打开浏览器访问http://localhost:8080
相关文章:
- Spring Boot教程(一)
- Spring Boot是什么?(二)
- Spring Boot主要目标(三)
- 新项目为什么需要Spring Boot?(四)
- Spring Boot核心和限制(五)
- Spring Boot优点和缺点(六)
- Spring Boot入门(七)
- Spring Boot安装(八)
- Spring Boot应用程序开发入门(九)
- Spring Boot JSP应用实例(十)
- Spring Boot将WAR文件部署到Tomcat(十一)
- Spring Boot Hello World(Thymeleaf)示例(十二)
- Spring Boot非web应用程序实例(十三)
- Spring Boot SLF4J日志实例(十五)
- Spring Boot Ajax实例(十六)