使用ignite的一个常见思路就是将现有的关系型数据库中的数据导入到ignite中,然后直接使用ignite中的数据,相当于将ignite作为一个缓存服务,当然ignite的功能远不止于此,下面以将ignite集成进java服务的方式进行演示ignite的数据存储和查询相关的功能。由于个人习惯,示例演示没有使用测试代码,而是使用rest接口演示。
在讲数据加载之前,ignite中存储的几种模式(LOCAL, REPLICATED, PARTITIONED):
LOCAL:本地模式,数据都存储在本地,无数据再平衡,类似常见的存储服务;
PARTITIONED:分区模式,数据分散到集群中的各个节点,分区模式适合存储数量庞大的数据
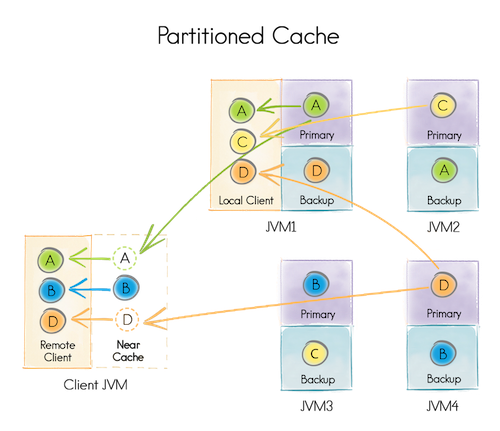
如图所示是设置了Backup备份数的,默认备份数是0,如果分区模式下不设置备份数的话则会存在丢失数据的风险。
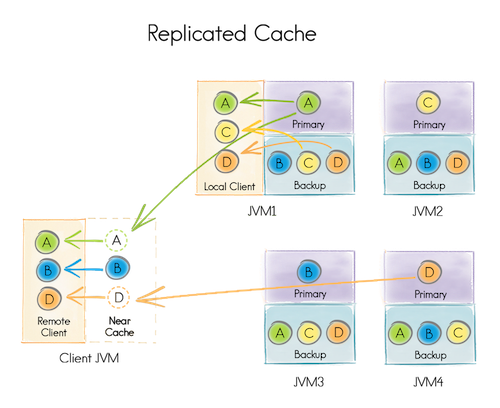
REPLICATED:复制模式,有数据再平衡过程,主节点(Primary)数据与分区模式的一致,只是复制模式默认备份了除主节点数据外的其余数据。复制模式适合存储数据量小,增长不快的数据。
分区模式和复制模式各有优点和缺点,具体选择要根据实际场景的特点去权衡:
| 模式 | 优点 | 缺点 |
|---|---|---|
| 分区模式(PARTITIONED) | 能存储海量数据,频繁更新对其影响不大 | 查询缓存涉及到数据移动,对查询性能有影响 |
| 复制模式(REPLICATED) | 适合存储数据量不大的数据,数据查询性能稳定 | 频繁更新对其影响较大 |
1,数据加载
这里使用mybatis查询MYSQL里的数据然后存入ignite,完整代码可以参考:
https://github.com/cording/ignite-example
为了演示,需要先在MYSQL中生成样本数据,相关sql脚本为ignite-example\src\main\resources\import.sql,执行该SQL脚本即可完成表的创建和测试数据的初始化。
在配置文件中定义缓存
                <bean class="org.apache.ignite.configuration.CacheConfiguration">
                    <property name="name" value="student"/>
                    <property name="cacheMode" value="REPLICATED"/>
                    <property name="backups" value="1"/>
                    <property name="atomicityMode" value="ATOMIC"/>
                    <property name="copyOnRead" value="false"/>
                    <property name="dataRegionName" value="Default_Region"/>
                    <property name="indexedTypes">
                        <list>
                            <value>java.lang.Long</value>
                            <value>org.cord.ignite.data.domain.Student</value>
                        </list>
                    </property>
                </bean>
添加相关依赖
<dependency>
    <groupId>org.apache.ignite</groupId>
    <artifactId>ignite-core</artifactId>
    <version>${ignite.version}</version>
</dependency>
<dependency>
    <groupId>org.apache.ignite</groupId>
    <artifactId>ignite-spring</artifactId>
    <version>${ignite.version}</version>
</dependency>
<!-- 使用索引的话需要用到ignite-indexing这个模块 -->
<dependency>
    <groupId>org.apache.ignite</groupId>
    <artifactId>ignite-indexing</artifactId>
    <version>${ignite.version}</version>
</dependency> 一般将数据导入ignite集群的方式是使用cache.put(...)方法,但是当有大量的数据需要导入的时候,put的效率已经无法满足了,针对大量数据导入可以使用ignite的流处理器:
DataLoader.java
......
    /**导入数据到ignite*/
    public void loadData(){
        //查询student集合
        List<Student> result = studentDao.findAllStudents();
        //分布式id生成器
        IgniteAtomicSequence sequence = ignite.atomicSequence("studentPk", 0, true);
        //根据缓存名获取流处理器,并往流处理器中添加数据
        try(IgniteDataStreamer<Long, Student> streamer = ignite.dataStreamer(CacheKeyConstant.STUDENT)) {
            result.stream().forEach(r -> streamer.addData(sequence.incrementAndGet(), r));
            //将流里面的剩余数据压进ignite
            streamer.flush();
        }
    }
......
导入数据之后,可以在监控程序中看到数据存储情况:

流之所以能提高加载数据的速度,是因为流本质就是一个批处理。ignite是通过一致性哈希保证一致性的,每往集群中存入一条cache记录,ignite会先根据一致性哈希算法计算出这条cache映射到哪个节点,然后会将这条记录存储在该节点。而在流处理器中,流处理器会将映射到相同节点的数据批量存储到对应节点,这样会显著提升数据加载的效率。
2,数据查询
最直接的查询缓存方式是使用cache.get(...)方法,这种方式只能应对简单的key-value缓存,如果是设置了索引类型(indexedTypes),则缓存就会变成SQL table,这个时候就需要使用SQL方式查询,当使用SQL方式查询的时候,一般会有各种查询条件,这些查询条件对应的字段均需要预先设置索引。ignite里面有两种索引,一种是普通索引,一种是组合索引,要用到@QuerySqlField注解。而查询用到的api主要是SqlFieldsQuery和SqlQuery,前者是域查询,也就是查询部分字段结果集,而后者是普通查询。
所以,如果想使用SQL查询,就需要在加载数据之前在缓存定义中设置索引类型(indexedTypes),并对查询中可能用到的字段在对应实体类中相关属性添加注解,有必要的情况下还要设置索引。当定义缓存的时候设置了索引类型,则缓存不再是普通的KV形式的缓存了,而是具有数据库表的特性,这时候ignite就变成了分布式的内存数据库了,其sql相关功能是基于h2的sql引擎实现的。
1) 设置缓存索引类型
- JAVA代码定义缓存时设置索引类型
这里以long为主键,String为实体类作为示例:
使用CacheConfiguration.setIndexedTypes(Long.class, String.class)即可设置索引
- XML配置中设置索引类型
同样也是设置indexedTypes属性即可
<bean class="org.apache.ignite.configuration.CacheConfiguration">
......
    <property name="indexedTypes">
        <list>
            <value>java.lang.Long</value>
            <value>org.cord.ignite.data.domain.Student</value>
        </list>
    </property>
......
</bean>
2) 注解@QuerySqlField的三种用法
- 启用实体类属性为查询域
    @QuerySqlField
private String test;加上该注解后,test字段才可以在sql语句中访问,这种形式不对该属性列创建索引。
- 启用查询域并为该列设置普通索引
    @QuerySqlField(index = true)
private String test;- 启用查询域并设置组合索引
    @QuerySqlField(orderedGroups = {@QuerySqlField.Group(
            name = "student", order = 0)})
    private String name;

    @QuerySqlField(orderedGroups = {@QuerySqlField.Group(
            name = "student", order = 1)})
    private String email;
其中name属性指定了组合索引的名字,order表示该字段在组合索引中的顺序。
该组合索引与普通数据库类似,同样遵循最左原则,即组合索引是否会用到会受到最左原则的限制。
3) 使用 SqlFieldsQuery进行域查询
SQL语法中有两个预定义字段_key和_val:
_key : 表示缓存中的所有键
_val: 表示缓存中的所有值对象
List<List<?>> res = cache.query(new SqlFieldsQuery("select _VAL,name from \"Test\".student")).getAll();
System.out.format("The name is %s.\n", res.get(0).get(0));
4) 使用SqlQuery进行普通查询
NormalController.class
    @RequestMapping("/sqlQuery")
    public @ResponseBody
    String sqlQuery(HttpServletRequest request, HttpServletResponse response) {
        IgniteCache<Long, Student> tempCache = ignite.cache(CacheKeyConstant.STUDENT);

        /**普通查询*/
        String sql_query = "name = ? and email = ?";
        SqlQuery<Long, Student> cSqlQuery = new SqlQuery<>(Student.class, sql_query);
        cSqlQuery.setReplicatedOnly(true).setArgs("student_44", "student_44gmail.com");

        List<Cache.Entry<Long, Student>> tempResult = tempCache.query(cSqlQuery).getAll();

        if (CollectionUtils.isEmpty(tempResult)) {
            return "result is Empty!";
        }
        Student student = tempResult.stream().map(t -> t.getValue()).findFirst().get();
        System.out.format("the beginning of student[student_44] is %s\n", student.getDob());

        /**聚合函数查询*/
        /**[count]*/
        String sql_count = "select count(1) from student";
        SqlFieldsQuery countQuery = new SqlFieldsQuery(sql_count);
        countQuery.setReplicatedOnly(true);
        List<List<?>> countList =  tempCache.query(countQuery).getAll();

        long count = 0;
        if(!CollectionUtils.isEmpty(countList)) {
            count = (Long)countList.get(0).get(0);
        }
        System.out.format("count of cache[student] is %s\n", count);

        /**[sum]*/
        String sql_sum = "select sum(studId) from student";
        SqlFieldsQuery sumQuery = new SqlFieldsQuery(sql_sum);
        sumQuery.setReplicatedOnly(true);
        List<List<?>> sumList = tempCache.query(sumQuery).getAll();
        long sum = 0;
        if(!CollectionUtils.isEmpty(sumList)) {
            sum = (Long)sumList.get(0).get(0);
        }
        System.out.format("sum of cache[student.id] is %s\n", sum);

        return "all executed!";
    }
运行结果如下:
the beginning of student[student_44] is Thu Sep 28 00:00:00 GMT+08:00 2017
count of cache[student] is 500
sum of cache[student.id] is 125250
3,数据并置与关联查询
数据的并置主要是针对采用分区模式存储的数据,所谓的数据并置,就是提供一种约束,将相关连的数据存储在相同的网格节点上,这样在数据查询或者分布式计算的时候就不需要数据移动了,这样会提升整体的性能。
以下以X,Y,Z三个cache的并置作为示例,完整代码请查看示例工程ignite-example。

其中X,Y,Z为三个分区模式的cache,Y与X并置,也就是说,Y的数据在存储的时候,会根据其XId属性,将数据存储在对应的X所在的节点上,同理,Z与Y并置,也就是将Z的数据存储在其YId属性对应的Y所在的节点上。以此形成一种约束,使得数据的分配可以人为控制。
要使用数据并置,就不得不提到一个API了,也就是AffinityKey,当一个cache与另外一个cache并置的时候,其cache的Key就得是AffinityKey类型了。
首先进行数据初始化:
CollocatedController.java
    private String init(){
        if(init.get()){
            return "already execute init.";
        }
        //定义三个缓存
        CacheConfiguration<Long, X>  xcf = new CacheConfiguration<Long, X>("X")
                .setCacheMode(CacheMode.PARTITIONED)
                .setIndexedTypes(Long.class, X.class);
        CacheConfiguration<AffinityKey<Long>, Y>  ycf = new CacheConfiguration<AffinityKey<Long>, Y>("Y")
                .setCacheMode(CacheMode.PARTITIONED)
                .setIndexedTypes(Affinity.class, Y.class);
        CacheConfiguration<AffinityKey<Long>, Z>  zcf = new CacheConfiguration<AffinityKey<Long>, Z>("Z")
                .setCacheMode(CacheMode.PARTITIONED)
                .setIndexedTypes(Affinity.class, Z.class);

        ignite.destroyCache("X");
        ignite.destroyCache("Y");
        ignite.destroyCache("Z");
        ignite.getOrCreateCache(xcf);
        ignite.getOrCreateCache(ycf);
        ignite.getOrCreateCache(zcf);

        IgniteCache<Long, X> xc = ignite.cache("X");
        IgniteCache<AffinityKey<Long>, Y> yc = ignite.cache("Y");
        IgniteCache<AffinityKey<Long>, Z> zc = ignite.cache("Z");
        //加载数据
        Y y;
        Z z;
        for (long i = 0; i < 100; i++) {
            xc.put(i, new X(i, String.valueOf(i)));
            y = new Y(i, String.valueOf(i), i);
            yc.put(y.key(), y);
            z = new Z(i, String.valueOf(i), i);
            zc.put(z.key(), z);
        }

        init.set(true);
        return "all executed.";
}而cache并置之后怎么校验并置是否成功呢?这就要用到Affinity.class的mapKeyToNode()方法了,其作用是根据给定的key,找到存储该key的节点信息,具体使用方法如下:
@RequestMapping("/verify")
public @ResponseBody
String verifyCollocate(HttpServletRequest request, HttpServletResponse response) throws Exception {
    if(!init.get()){
        init();
    }

    Affinity<Long> affinityX = ignite.affinity("X");
    Affinity<Long> affinityY = ignite.affinity("Y");
    Affinity<Long> affinityZ = ignite.affinity("Z");

    for (long i = 0; i < 100; i++) {
        ClusterNode nodeX = affinityX.mapKeyToNode(i);
        ClusterNode nodeY = affinityY.mapKeyToNode(i);
        ClusterNode nodeZ = affinityZ.mapKeyToNode(i);

        if(nodeX.id() != nodeY.id() || nodeY.id() != nodeZ.id() || nodeX.id() != nodeZ.id()){
            throw new Exception("cache collocated is error!");
        }
    }
    System.out.println("cache collocated is right!");

    return "all executed.";
}执行/verify之后,无异常抛出,在监控程序中查看一下存储情况:
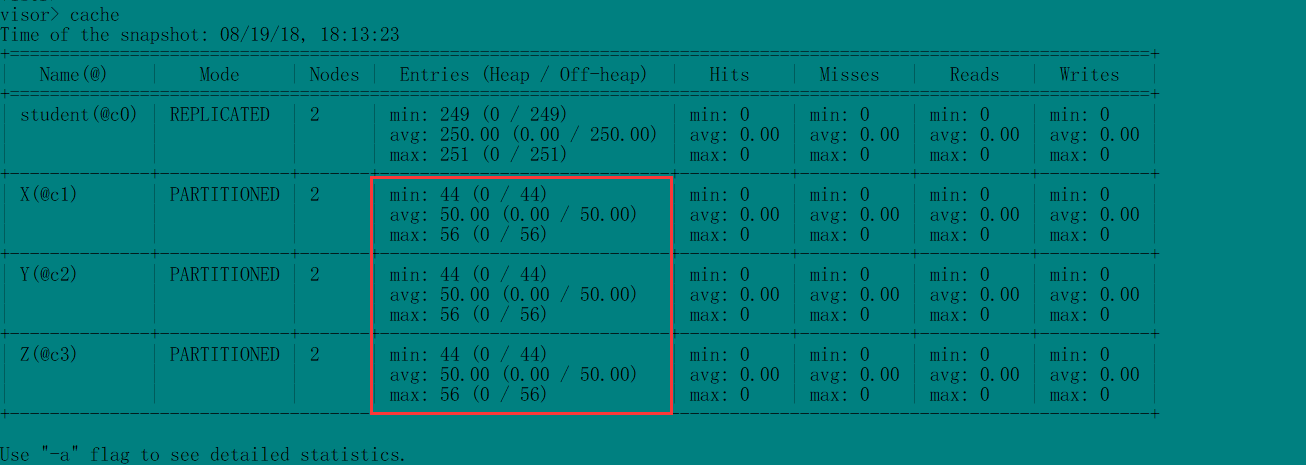
会发现三个cache的数据分布完全一致,这与验证程序的结果(无异常抛出)保持一致,说明cache并置成功。
当数据并置成功后,就可以使用关联查询了,可以类比数据库中的多表联查:
@RequestMapping("/query")
public @ResponseBody
String query(HttpServletRequest request, HttpServletResponse response){
    if(!init.get()){
        init();
    }
    IgniteCache<Long, X> xc = ignite.cache("X");
    IgniteCache<AffinityKey<Long>, Y> yc = ignite.cache("Y");
    IgniteCache<AffinityKey<Long>, Z> zc = ignite.cache("Z");

    String sql1 = "from Y,\"X\".X " +
            "where Y.XId = X.id " +
            "and Y.info = ?";
    String sql2 = "from Z,\"Y\".Y " +
            "where Z.YId = Y.id " +
            "and Z.info = ?";
    String sql3 = "from Z,\"Y\".Y,\"X\".X " +
            "where Z.YId = Y.id and Y.XId = X.id " +
            "and Z.info = ?";

    int i = IntStream.range(1, 100).skip((int)(100*Math.random())).findFirst().getAsInt();

    System.out.println("query X and Y:");
    System.out.println(yc.query(new SqlQuery<AffinityKey<Long>, Y>(Y.class, sql1).setArgs(i)).getAll());
    System.out.println("**************************************************************************************");

    System.out.println("query Y and Z:");
    System.out.println(zc.query(new SqlQuery<AffinityKey<Long>, Z>(Z.class, sql2).setArgs(i)).getAll());
    System.out.println("**************************************************************************************");

    System.out.println("query X and Y and Z:");
    System.out.println(zc.query(new SqlQuery<AffinityKey<Long>, Z>(Z.class, sql3).setArgs(i)).getAll());
    System.out.println("**************************************************************************************");

    return "all executed.";
}
执行结果如下:
query X and Y:
[Entry [key=AffinityKey [key=83, affKey=83], val=org.cord.ignite.example.collocated.Y@605e8969]]
**************************************************************************************
query Y and Z:
[Entry [key=AffinityKey [key=83, affKey=83], val=org.cord.ignite.example.collocated.Z@562dbd4]]
**************************************************************************************
query X and Y and Z:
[Entry [key=AffinityKey [key=83, affKey=83], val=org.cord.ignite.example.collocated.Z@7ff851ce]]
**************************************************************************************如果是没有并置的缓存,在关联查询的时候就需要启用非并置的分布式关联:SqlQuery.setDistributedJoins(true)
数据并置还可以使用注解@AffinityKeyMapped注解,其用法与使用AffinityKey .class类似,完整示例可参看AffinityMappedController.class
至此,ignite的数据处理相关内容结束。