1.传统的数据库连接:
1.注册驱动程序,生成Driver.class对象2.调用DriverManager.getConnection()得到数据库连接
3.通过连接操作数据库
4.回收资源
编写工具类:
package org.zh.util;

import java.sql.Connection;
import java.sql.DriverManager;
import java.sql.ResultSet;
import java.sql.Statement;

public class DbManager  {
      private static final String username="root";
      private static final String password="123456";
      private static final String driver="com.mysql.jdbc.Driver";
      private static final String url="jdbc:mysql://localhost:3306/xiaozhou";

      public static Connection getConnection(){
    	  Connection con=null;
    	  try{
    	  //1.注册驱动
    	  Class.forName(driver);
    	  //2.连接数据库
    	  con=DriverManager.getConnection(url,username,password);
    	  }catch(Exception e){
    		  e.printStackTrace();
    	  }
    	  return con;
      }
      public void closeAll(Connection con,Statement s,ResultSet res){
    	  try{
    	  if(con!=null){
    		  con.close();
    	  }
    	  if(s!=null){
    		  s.close();
    	  }
    	  if(res!=null){
    		  res.close();
    	  }
    	  }catch(Exception e){
    		  e.printStackTrace();
    	  }
      }
}
package org.zh.test;

import org.junit.Test;
import org.zh.util.DBManager;

import com.mysql.jdbc.Connection;
import com.mysql.jdbc.PreparedStatement;

public class DBTest {
     @Test
	public void testName() throws Exception {
    	 //插入一条数据
		//1.得到数据库连接
    	String sql="insert into person(name,age) values(?,?)";
    	Connection con=DBManager.getConnection();
    	//2.得到程序对象
        PreparedStatement pre=(PreparedStatement) con.prepareStatement(sql);
        pre.setString(1,"xiaozhang");
        pre.setInt(2,22);
    	//3.执行
        pre.execute();
        DBManager.closeAll(con, pre, null);
	}
}
2.用数据库连接池连接数据库(dbcp(tomcate自己实现的连接池))
介绍: 数据库连接池就是在系统启动的时候创建一定数量的连接,当用户要访问数据库的时候,将从连接池中拿连接。这样就避免了用户在访问数据库的时候,避免了创建连接的开销,访问数据库的速度将大大提高
操作
1.在tomcate的安装目录conf文件夹中找到Contex.xml文件(注意:dbcp是由tomcate自己携带的api,因此测试时建立一个web应用)
   <Context>
    <!-- Default set of monitored resources -->
    <WatchedResource>WEB-INF/web.xml</WatchedResource>

    <!-- Uncomment this to disable session persistence across Tomcat restarts -->
    <!--
    <Manager pathname="" />
    -->


    <!-- Uncomment this to enable Comet connection tacking (provides events
         on session expiration as well as webapp lifecycle) -->
    <!--
    <Valve className="org.apache.catalina.valves.CometConnectionManagerValve" />
    -->
     <Resource
           name="jdbc/data"
           auth="Container"
           type="javax.sql.DataSource"
           maxActive="10"
           maxIdle="4"
           maxWait="3000"
           logAbandoned="true"
           username="root"
           password="123456"
           driverClassName="com.mysql.jdbc.Driver"
           url="jdbc:mysql://localhost:3306/xiaozhou"/>
</Context>
说明:tomcate实现的数据库连接池采用了jndi技术(java对象名称绑定技术,就是通过给对象起一个名字,之后通过名字找到需要的对象的技术)
name:绑定对象的名字
auth:可选值为Contaner 和Application,Container表示由容器来创建和管理对象,Application标示由web创建和管理对象。
type:指定java对象的类
maxActive:表示连接池中创建的最大连接的数目
maxIdle:表示空闲时最大的连接数
logAbandoned:表示连接丢弃时是否记录日志
username:数据库用户名
password:数据库密码
driverClassName:数据库驱动类的名字
url:连接数据库的路径
2.建立工具类(获取数据库连接池)
package org.zh.util;

import java.sql.Connection;
import java.sql.ResultSet;
import java.sql.SQLException;
import java.sql.Statement;

import javax.naming.Context;
import javax.naming.InitialContext;
import javax.naming.NamingException;
import javax.sql.DataSource;

public class DataPool_jndi {
	private static DataSource dataSource;
	static {
		try {
			// 初始化jndi容器
			Context ctx = new InitialContext();
			dataSource = (DataSource) ctx.lookup("java:comp/env/jdbc/data");
			System.out.println(dataSource);
		} catch (NamingException e) {
			e.printStackTrace();
		}
	}

	// 得到数据库连接
	public static Connection getConnection() throws SQLException {
		return dataSource.getConnection();
	}
        //回收资源
	public void closeAll(Connection con, Statement s, ResultSet res) {
		try {
			if (con != null) {
				con.close();
			}
			if (s != null) {
				s.close();
			}
			if (res != null) {
				res.close();
			}
		} catch (Exception e) {
			e.printStackTrace();
		}
	}
}
for(int i=0;i<20;i++){
//创建多个线程
new Thread(){
public void run(){
try{
Connection con=DataPool_jndi.getConnection();
System.out.println(con);
//得到陈述对象
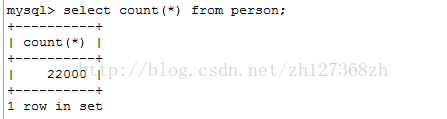
String sql="insert into person(name,age)values('xiaozhou',22)";
Statement st=con.createStatement();
st.execute(sql);
//阻塞2s
Thread.sleep(2000);
//回收连接
con.close();
}catch(Exception e){
e.printStackTrace();
}
}
}.start();
}总结:到此数据库连接池操作步骤已经完成了,那么数据库连接池和传统的数据库连接效率有什么样的差距呢,现在进行具体的分析
protected void doPost(HttpServletRequest req, HttpServletResponse resp)throws ServletException, IOException {
try {
/*1.通过连接池的方式*/
long tempTime=System.currentTimeMillis();
for(int i=0;i<count;i++){
exeuteSql(DataPool_jndi.getConnection());
}
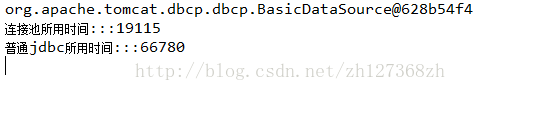
System.out.println("连接池所用时间:::"+(System.currentTimeMillis()-tempTime));
/*2.通过传统的方式连接*/
tempTime=System.currentTimeMillis();
for(int i=0;i<count;i++){
exeuteSql(DbManager.getConnection());
}
System.out.println("普通jdbc所用时间:::"+(System.currentTimeMillis()-tempTime));
} catch (SQLException e) {
e.printStackTrace();
}
} public boolean exeuteSql(Connection con){
boolean flag=false;
try{
//得到陈述对象
String sql="insert into person(name,age)values('xiaozhou',22)";
Statement st=con.createStatement();
flag=st.execute(sql);
//回收连接
con.close();
}catch(Exception e){
e.printStackTrace();
}
return flag;
}

将count改为10000的时候: