Linux系统下的firewalld服务管理
其他
2018-08-19 05:34:08
阅读次数: 0
##1.防火墙##
1.概述
动态防火墙后台程序 FireWalld 提供了一个动态管理的防火墙,用以支持网络的zones,以分配对一个网络及相关连接和界面一定程度的信任;它支持以太网桥,并有分离运行时间和永久行配置选择。
2.域
home(家庭):用于家庭网络,仅接受dhcpv6-client、ipp-client、mdns、samba-client、ssh服务
internal(内部):用于内部网络,仅接受dhcpv6-client、ipp-client、mdns、samba-client、ssh服务
public(公共):用于公共区域使用,仅接受dhcpv6-client、ssh服务
trusted(信任):接受所有网络连接
work(工作):用于工作区,仅接受dhcpv6-client、ipp-client、ssh服务
block(限制):拒绝所有网络连接
dmz(非军事区):仅接受ssh服务连接
drop(丢弃):任何接收的网络数据包都被丢弃,没有任何回复
external(外部):出去的ipv4网络连接通过此区域伪装和转发,仅接受ssh服务连接
##2.防火墙相关命令##
1.开启防火墙及查看状态
systemctl status firewalld
systemctl start firewaiid
2.查看火墙状态 firewall-cmd --state
3.查看火墙正在使用的域 firewall-cmd --get-active-zones
4.查看火墙的默认域 firewall-cmd --get-default-zone
5.查看火墙所有的域 firewall-cmd --get-zones

6.查看public域的信息 firewall-cmd --list-all --zone=ROL

7.查看通过火墙的服务 firewall-cmd --get-services

8.修改火墙的默认域


##3.接口控制##
1.接口访问控制


2.8080端口


在接口eth1上打开8080端口


修改http服务的配置文件 /etc/httpd/conf/httpd.conf
Listen 8080
重启http服务,网页访问8080端口,可以访问
3.实验:禁止主机链接

主机无法链接,但不会切断已连接的服务
服务端永久变更

complete-reload之后,已连接主机立即断开,无法操作
##4.防火墙访问控制##
Direct Rules
1.接口eth0不允许http服务
2.设置规则,允许225主机访问本机

主机可正常访问

但是其他主机无法访问

不让225主机访问


Rich Rules
1.地址转换
firewall-cmd --add-forward-port=port=22:proto=tcp:toport=22:toaddr=172.25.254.125
firewall-cmd --add-masquerade
firewall-cmd --list-all

2.连接125主机,将直接跳转到25主机


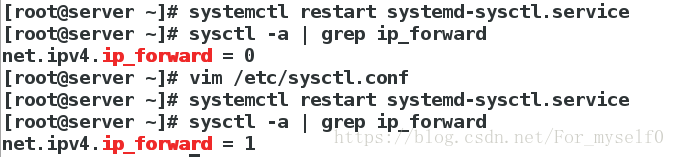
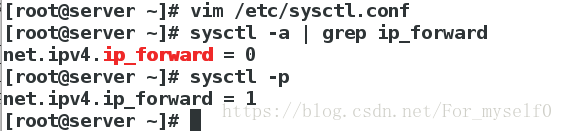
###注意:net.ipv4.ip_forward ####
[root@localhost ~]# sysctl -a | grep ip_forward
net.ipv4.ip_forward = 1
若net.ipv4.ip_forward = 0,编辑配置文件,重启服务即可
##5.ptables命令管理##
内核3个表,5条链
filter:经过本机内核的数据,input,forward,ouput
nat:不经过本机内核的数据,input,ouput,prerouting,postrouting
mangle:所有经过主机上的数据,prerouting,input,forward,ouput,postrouting
1.显示内核三张表的信息
iptables -nL ##默认为filter表

iptables -nL -t nat ##显示nat表
iptables -nL -t mangle ##显示mangle表,备用
2.表格命令编辑 ##默认filter表
iptables -F ##刷新(类似删除)配置,但是重启后配置依然存在
systemctl restart iptables.service

但是如果刷新之后输入命令service iptables save
刷新后之前的配置取消

配置文件为 /etc/sysconfig/iptables

iptables -A INPUT -i lo -j ACCEPT 添加

iptables -A INPUT -s 172.25.254.225 -j ACCEPT 添加172.25.254.225

iptables -I INPUT 2 -s 172.25.254.25 -p tcp --dport 2 -j REJECT 插入至第二条

iptables -R INPUT 2 -s 172.25.254.25 -p tcp --dport 22 -j DROP 将INPUT的第二条规则改为DROP

iptables -D INPUT 2 删除第二条

iptables -P INPUT DROP 将INPUT规则改为DROP

iptables -F

iptables -N westos 新建westos自定义链

iptables -E westos WESTOS 修改自定义链的名称

iptables -X WESTOS 删除自定义链

3.服务管理
iptables -A INPUT -p tcp --dport 22 -j ACCEPT ###允许所有主机链接ssh(22)
iptables -A INPUT -s 172.25.254.25 -p tcp --dport 80 -j ACCEPT ###只允许主25机链接http(80)
iptables -A INPUT ! -s 172.25.254.25 -p tcp --dport 53 -j REJECT ###除了主机25都拒链接DNS(53)
iptables -A INPUT -j REJECT ###读取以上规则后,其他所有访问拒绝 (从前到后,逐条读取)
##将修改后的配置保存在文件/etc/sysconfig/iptables中
iptables -A INPUT -m state --state RELATED,ESTEBLISHED -j ACCEPT

iptables -A INPUT -m state --state new -p tcp --dport 22 -j ACCEPT
iptables -A INPUT -m state --state new -p tcp --dport 80 -j ACCEPT
iptables -A INPUT -m state --state new -p tcp --dport 53 -j ACCEPT


##6.Iptables地址转换##
注意:
1.一定要刷新filter表 iptables -F
2.打开内核路由 ##若net.ipv4.ip_forward=0
sysctl -p == 【restart systemd-sysctl.service】
3.0.111主机配置网络
IPADDR = 192.168.0.111 (一块网卡主机)
GATEWAY = 192.168.0.1 (两块网卡主机)
服务端desktop
eth0 172.25.254.125
eth1 192.168.0.1
4.设定策略
[root@localhost ~]# iptables -t nat -A POSTROUTING -o eth0 -j SNAT --to-source 172.25.254.125
[root@localhost ~]# iptables -t nat -A PREROUTING -i eth0 -j DNAT --to-dest 192.168.0.1

5.当主机访问链接172主机时,转换到192主机上
转载自blog.csdn.net/j_1282937574/article/details/81750079