最近需要使用谷歌找一些技术文档,于是申请了亚马逊云aws ,搭建了一个vpn,搜了一些资料知道win能直接搭建vpn,openVPN和softEtherVPN 工具也能搭建,本次使用的是softEtherVPN
网上查看教程,最近比较忙就不自己一步一步的写在贴图了,就把自己查看的资料直接添在这里
softether server的安装配置(ubuntu、debian)
很多时候我们需要从外面访问公司或者家里的文件或者网络,这个时候就可以通过搭建vpn来实现,这里我推荐用softether来实现。
softether同时支持sslvpn,openvpn,ms-sstp,l2tp四种协议,可以实现对用户的单账号登录、限速、访问内容限制等功能。其中softether自己的sslvpn协议可以同时32链路连接,速度超过openvpn。
本文softether服务端配置基于Ubuntu12.04
1.配置softether安装环境:
apt-get install build-essential |
2.下载softether服务器端程序:
wget http://www.softether-download.com/files/softether/v4.06-9435-beta-2014.03.26-tree/Linux/SoftEther%20VPN%20Server/32bit%20-%20Intel%20x86/softether-vpnserver-v4.06-9435-beta-2014.03.26-linux-x86-32bit.tar.gz |
下载server包
3.解压程序:
tar zxf softether-vpnserver-v4.06-9435-beta-2014.03.26-linux-x86-32bit.tar.gz |
进入softether目录编译:
cd vpnserver/ make //安装过程用一路选择Y(yes) |
然后执行:
cd .. mv vpnserver /usr/local cd /usr/local/vpnserver/ chmod 600 * chmod 700 vpncmd chmod 700 vpnserver |
4.配置启动项:
新建启动项:
vim /etc/init.d/vpnserver |
在启动项中加入以下命令行:
#!/bin/sh ### BEGIN INIT INFO # Provides: vpnserver # Required-Start: $remote_fs $syslog # Required-Stop: $remote_fs $syslog # Default-Start: 2 3 4 5 # Default-Stop: 0 1 6 # Short-Description: Start daemon at boot time # Description: Enable Softether by daemon. ### END INIT INFO DAEMON=/usr/local/vpnserver/vpnserver LOCK=/var/lock/subsys/vpnserver test -x $DAEMON || exit 0 case "$1" in start) $DAEMON start touch $LOCK ;; stop) $DAEMON stop rm $LOCK ;; restart) $DAEMON stop sleep 3 $DAEMON start ;; *) echo "Usage: $0 {start|stop|restart}" exit 1 esac exit 0 |
5.其他配置:
chmod 755 /etc/init.d/vpnserver mkdir /var/lock/subsys update-rc.d vpnserver defaults /etc/init.d/vpnserver start |
6.softether服务端验证:
cd /usr/local/vpnserver/ ./vpncmd 3 check |
4个都是ok的话就表示安装成功。
7.softether服务端相关配置:
./vpncmd 1 回车 回车 VPN Server>ServerPasswordSet 设置管理员密码 |
这里服务器端就配置完成了,下面配置本地管理段。
8.本地管理端配置
下载本地客户端
安装完成后开始配置:
配置1
配置2
然后连接进入,第一次运行时会有个服务端初始化过程,按照图片的选项勾选就行了:
配置3
配置4
配置5
配置6
配置7
配置8
配置9
配置10
配置11
9.配置完成,赶紧用客户端连接服务器吧
客户端下载:
客户端
具体连接教程在这里就不说了。自己百度下,如果有时间我可以做个说明。
10.所在最后
-
linux上softether服务端的配置就结束了,Ubuntu外的linux系统操作方法大同小异。
-
softether比较吃cup,如果你连接上服务器后,发现网速很慢,你可以边上网边看服务器cpu,是不是100%。如果是100%那么说明你服务器的cpu运算能力不强(主机商超售了)。我搞了几天才把这个cpu占用率高的问题给解决了,方法在Softether server使用本地网桥中。
-
有问题大家可以探讨。
由于softether的官网已被墙,所以我在国内做了一个备用下载地址:
百度网盘,密码:v2cf;
注意区分cpu构架(intel或者ARM等),系统(linux或者win),和系统位数(32位 or 64位)!
softether的连接方法,博客中也有介绍,大家可以找一找。
---------------------------------分割线------------------------------------------------
SoftEther on VPS
I saw a post on lowendtalk last week introducing a new piece of vpn software call SoftEther.
What is SoftEther
A Free Cross-platform Multi-protocol VPN program, as an academic project from University of Tsukuba.
It is a single server which support SSL-VPN (HTTPS) and 6 major VPN protocols (OpenVPN, IPsec, L2TP, MS-SSTP, L2TPv3 and EtherIP).
I would like to also highlight the VPN over ICMP and VPN over DNS feature if you are inside a very strict network.
VPS Setup Guide
This post use SecureNAT. You may want to setup local bridge.
SoftEther author contacted me to highlight serveral points:
- On physical server, local bridge will perform better than SecureNAT
- DO NOT enable both local bridge and SecureNAT at the same time. Packets will loop infinitly and make your server
100%CPU usage.
Requirement: VPS
I am using vps from buyvm. I got from a year deal which is USD12/year. I would recommend Ramnode(affiliated) as a VPS provider. Their VPS is speedy and support is amazing.
- Spec:
- RAM: 128MB
- Burst: 256MB
- Disk Space: 15GB
- Bandwidth: 500GB
- Location: Buffalo, USA
- OS:
- Debian 6.0 64bit (minimal)
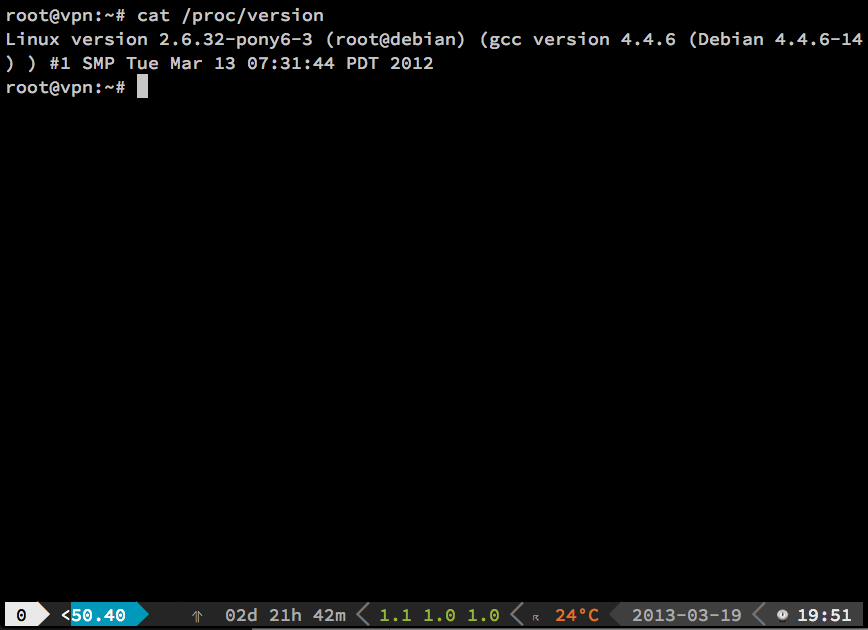
Make sure you login root as follow:
Before installing SoftEther Server let us install some prerequisite.
(build_tools.sh) download 1 2 |
|
Go to SoftEther to download the server binary.
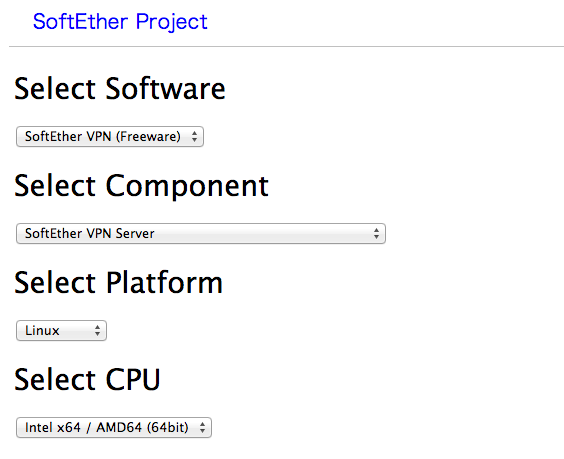
I am using Ver 1.00, Build 9029, rc2 in this tutorial.
After download, run
(make.sh) download 1 2 3 |
|
Read the Agreement and press 1 three times.
Then we move the dir to /usr/local/
(install.sh) download 1 2 3 4 5 6 7 |
|
paste the following content to nano
(vpnserver.sh) download 1 2 3 4 5 6 7 8 9 10 11 12 13 14 15 16 17 18 19 20 21 22 23 24 25 26 27 28 29 30 31 32 |
|
ctrl-o ret ctrl-x
After that we enable the service
(service.sh) download 1 2 3 4 5 |
|
Then we need to do a checking.
1 2 3 |
|
You should get 4 “Pass”.
We need to set the server admin password
1 2 3 4 5 |
|
Enter the admin password.
I do the setting on a windows client. It is running
Install it, run it, click New setting. Input ip and password.
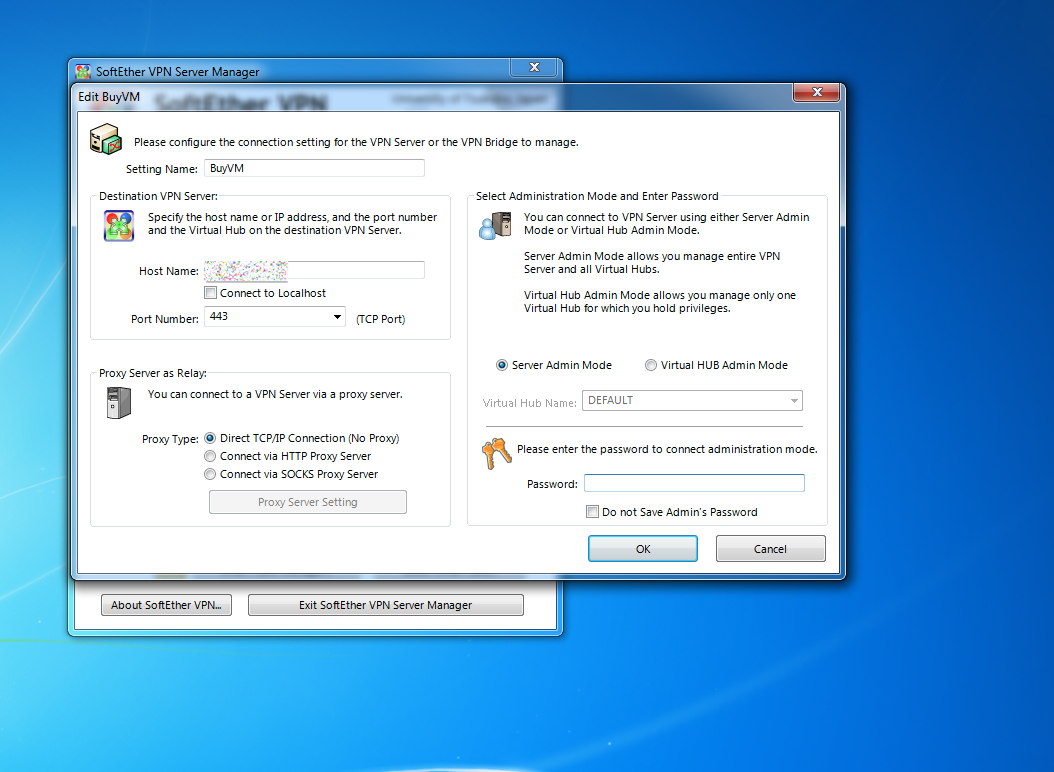
Then connect to it. On successful login, it will pop up Easy Setup
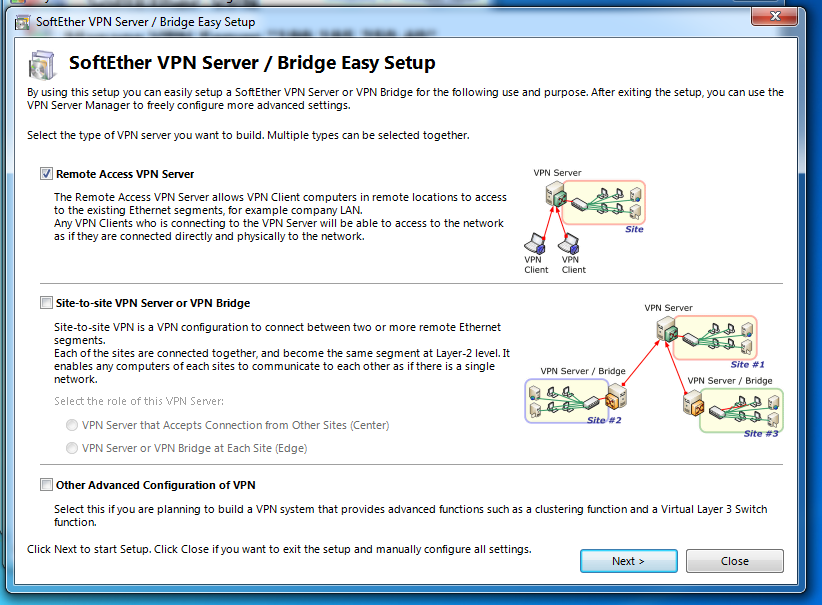 Check Remote Access Server and Next
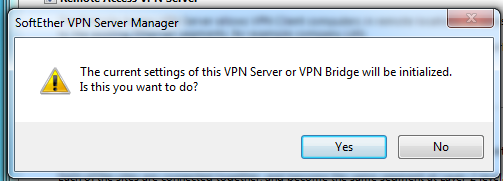
Yes

OK
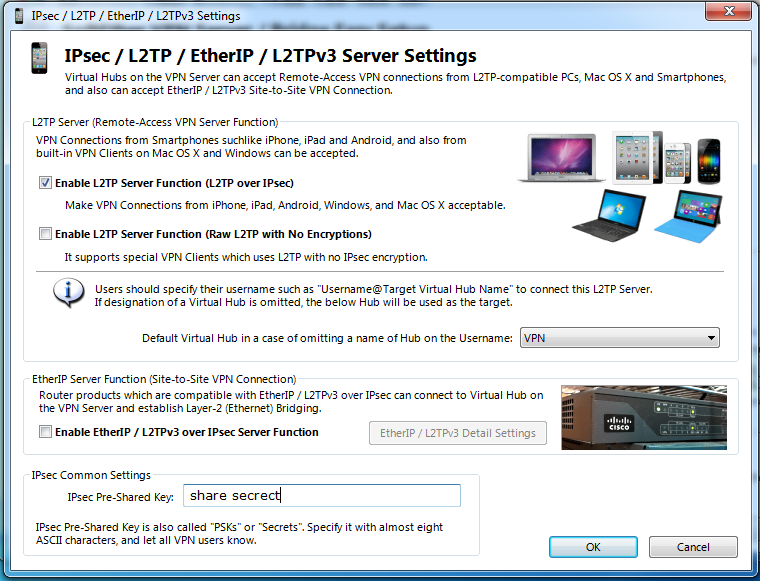 Check Enable L2TP Server Function and input your own pre-share key
OK
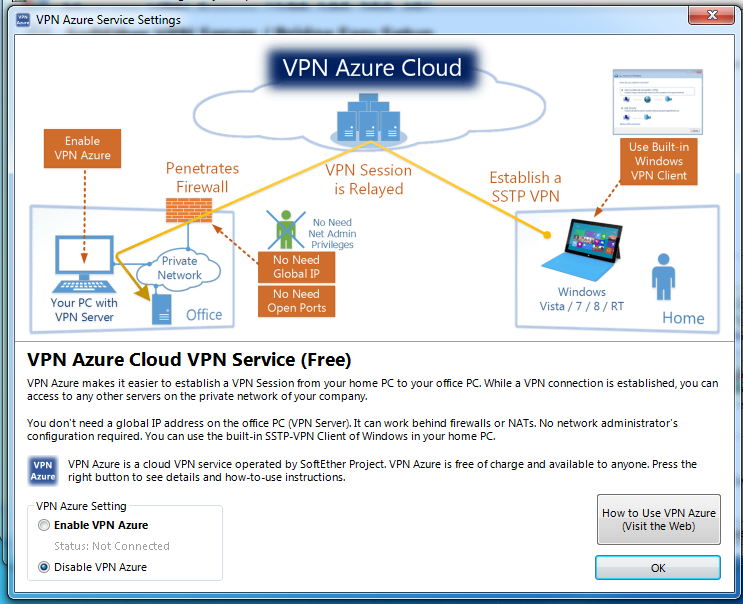 We disable Azure VPN
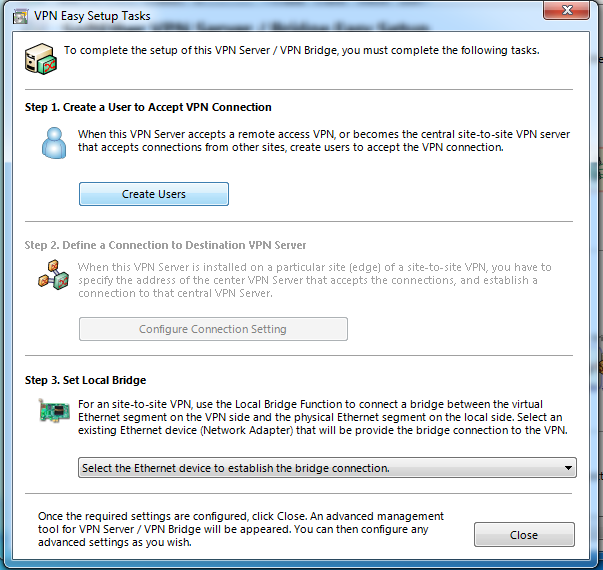
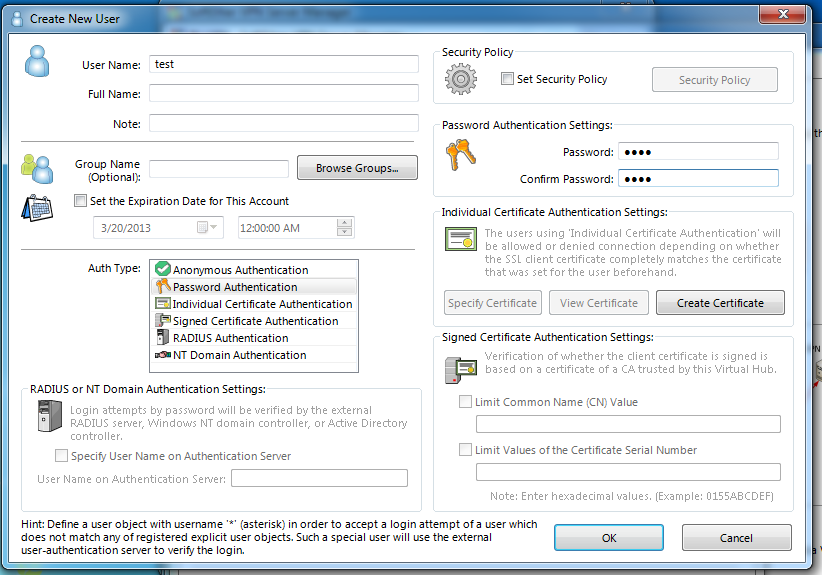
Then we need to create a new user. This is trivial.
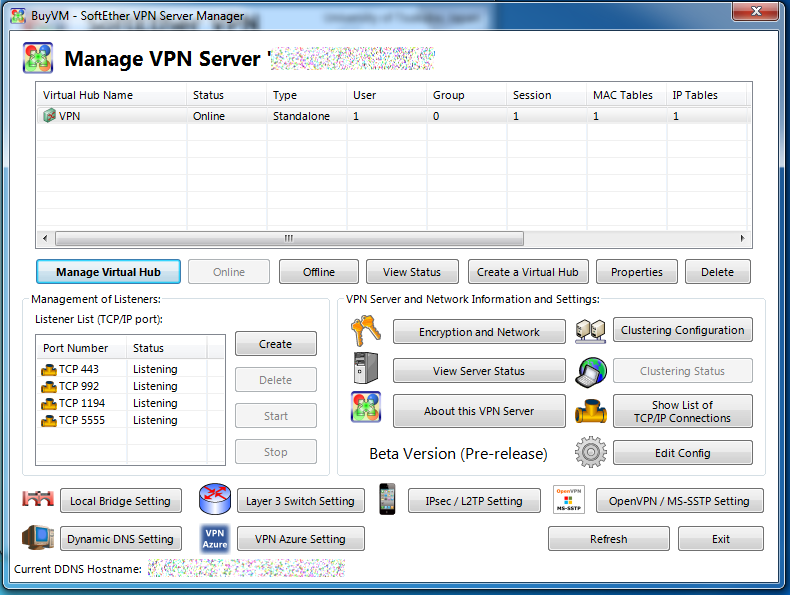 Click on “Manage Virtual Hub”
Click on “Secure NAT” (If you want a faster connection we can refer to my 2nd post on softether)
Enable the Virtual NAT
Again DO NOT enable SecureNAT and local bridge at the same time!
Done
You can try to connect to the vpn server through L2TP/IPSec.
----------------------------分割线---------------------------------------

SoftEther VPN一款开放源代码的软件,每个VPN Gate公共VPN中继服务器是分佈式的,并由许多志愿者托管,每个志愿者花費极少量的贷款成本和CPU时间在他的VPN服务器上,VPN Gate服务可以免费給大家使用。
本文只是纯技术交流,请勿做违法用途.
使用SoftEther VPN可以非常方便的建立和管理我们的虚拟专用网络。
环境
Ubuntu 12.10
安装
apt-get update
apt-get install build-essential
vpn server的下载地址和安装过程
wget -c http://www.softether-download.com/files/softether/v4.10-9473-beta-2014.07.12-tree/Linux/SoftEther_VPN_Server/64bit_-_Intel_x64_or_AMD64/softether-vpnserver-v4.10-9473-beta-2014.07.12-linux-x64-64bit.tar.gz
tar zxf softether-vpnserver-v1.00-9029-rc2-2013.03.16-linux-x64-64bit.tar.gz
cd vpnserver
sudo make i_read_and_agree_the_license_agreement
在目录下,执行
sudo ./vpnclient start
即打开了 softether vpn 服务。
设置
设置远程管理密码,开启远程管理,方便我们在远程用windows管理。
运行 ./vpncmd
root@server:~/vpnserver# ./vpncmd
vpncmd command - SoftEther VPN Command Line Management UtilitySoftEther VPN Command Line Management Utility (vpncmd command)Version 4.10 Build 9473   (English)Compiled 2014/07/12 02:33:15 by yagi at pc26
Copyright (c) SoftEther VPN Project. All Rights Reserved.By using vpncmd program, the following can be achieved.
1. Management of VPN Server or VPN Bridge
2. Management of VPN Client3. Use of VPN Tools (certificate creation and Network Traffic Speed Test Tool)Select 1, 2 or 3: [在这里输入1]Specify the host name or IP address of the computer that the destination VPN Server or VPN Bridge is operating on.
By specifying according to the format 'host name:port number', you can also specify the port number.
(When the port number is unspecified, 443 is used.)If nothing is input and the Enter key is pressed, the connection will be made to the port number 8888 of localhost (this computer).Hostname of IP Address of Destination:[在这里敲回车键]
If connecting to the server by Virtual Hub Admin Mode, please input the Virtual Hub name.
If connecting by server admin mode, please press Enter without inputting anything.Specify Virtual Hub Name: [在这里敲回车键]
Connection has been established with VPN Server "localhost" (port 443).You have administrator privileges for the entire VPN Server.
VPN Server>[输入ServerPasswordSet]ServerPasswordSet command - Set VPN Server Administrator PasswordPlease enter the password. To cancel press the Ctrl+D key.Password: [输入你的密码]Confirm input: [再次输入你的密码]
此时,可以进行远程管理了.
windows 上远程管理 softether vpn
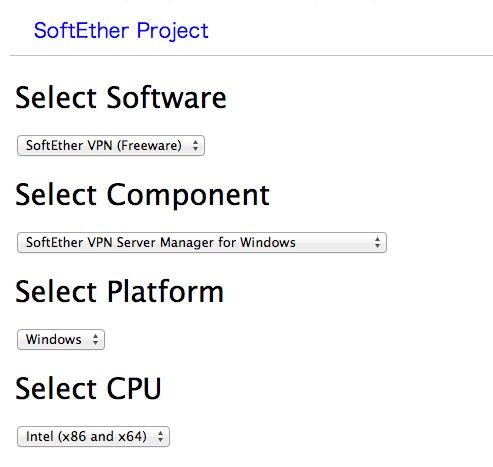
首先去 softether 下载 windows版本管理端.

下载好后,运行如下图,s.sadk.org 是我之前建立好的一个.
-
点击[新设置]进行配置,www.sadk.org是我的服务器.下面注意输入你刚才设置的管理密码.最后点击[确定]

-
在三个VPN Server类型中选择 [远程访问 VPN Server],点击[下一步].

-
提示虚拟 HUB 名,默认即可.点击[确定]
-
动态 DNS 功能,这里直接点[退出].因为我们的服务器基本上都是静态ip.ps:不清楚这域名有没有被墙掉.
-
IPsec / L2TP / EtherIP / L2TPv3 设置,这里可以安装你的需要进行设置.貌似l2tp已经可以被检测到了.我这里都没钩.直接点[确定]
-
VPN Azure,我这选择的禁用.貌似可以启用后,可以组建局域网?
-
接下来是创建用户.

-
用户名是必须的.注意选密码验证.接下来点[确定]就ok.

-
接下来可以看到已经建立好的账户.
-
最后回到www.sadk.org,这台服务器的管理界面.

-
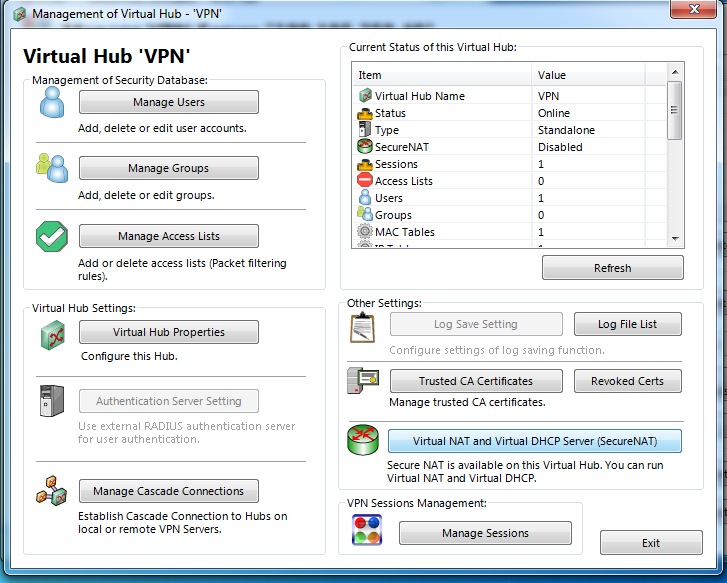
还没完,点击[管理虚拟 HUB]
-
点击[虚拟 NAT 和虚拟 DHCP 服务器],[启用 SecureNAT]

注意:如果你只是通过VPN Server做代理上网,你可以直接打开SecureNAT即可完成配置;如果你是通过VPN访问服务器所在的工作网络(其实这才是VPN的本来用途),而且服务器的IP地址是其所在网络的DHCP服务器所分配,那么不需要打开SecureNAT,而是要将Server的物理网卡桥接到虚拟HUB上;如果服务器所在网络属于静态IP,那么你要么手动配置客户端的虚拟网卡的IP,要么就需要配置SecureNAT,这需要你了解IPv4地址的配置方式。
文章地址:http://www.lichanglin.cn/softether%20server%E7%9A%84%E5%AE%89%E8%A3%85%E9%85%8D%E7%BD%AE%EF%BC%88ubuntu%E3%80%81debian%EF%BC%89/
http://blog.lincoln.hk/blog/2013/03/19/softether-on-vps/
http://www.freebuf.com/sectool/40418.html
http://download.csdn.net/detail/zhenwo89/6406365