1、MAVEN设置; 给maven 的settings.xml配置文件的profiles标签添加
<profile>
<id>jdk‐1.8</id>
<activation>
<activeByDefault>true</activeByDefault>
<jdk>1.8</jdk>
</activation>
<properties>
<maven.compiler.source>1.8</maven.compiler.source>
<maven.compiler.target>1.8</maven.compiler.target>
<maven.compiler.compilerVersion>1.8</maven.compiler.compilerVersion>
</properties>
</profile>
2 配置MAVEN:
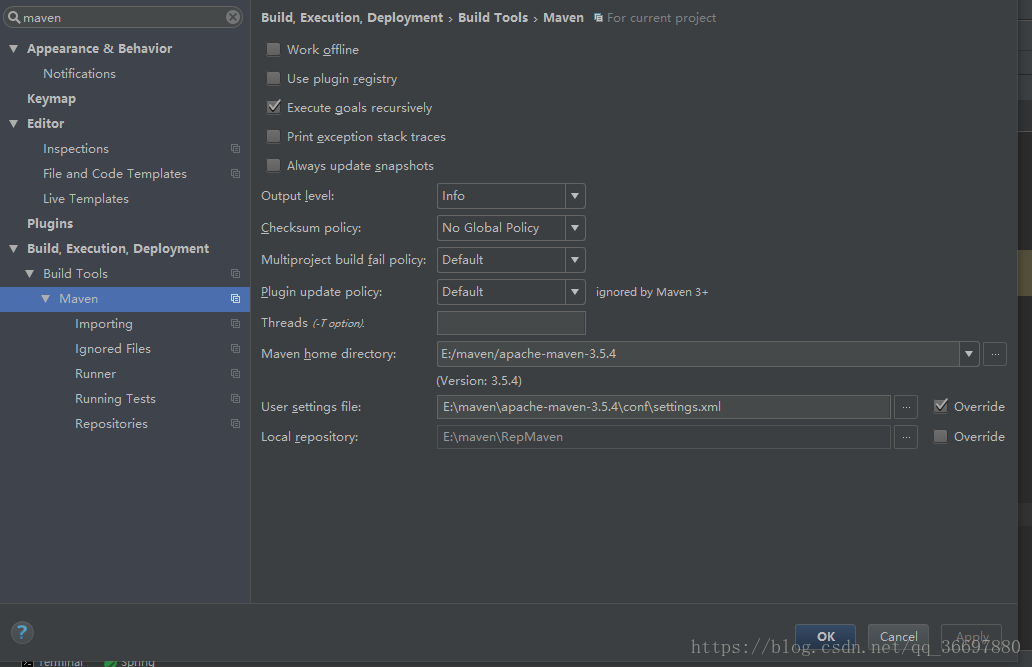
使用Spring Initializer快速创建Spring Boot项目
1、IDEA:使用 Spring Initializer快速创建项目 IDE都支持使用Spring的项目创建向导快速创建一个Spring Boot项目;
选择我们需要的模块;向导会联网创建Spring Boot项目; 默认生成的Spring Boot项目; 主程序已经生成好了,我们只需要我们自己的逻辑 .基本目录

java:java代码存放根节点
resources文件夹中目录结构
static:保存所有的静态资源; js css images;
templates:保存所有的模板页面;(Spring Boot默认jar包使用嵌入式的Tomcat,默认不支持JSP页 面);可以使用模板引擎(freemarker、thymeleaf);
application.properties:Spring Boot应用的配置文件;可以修改一些默认设置;
pom.xml:MAVEN的配置文件。
第一个springboot项目:
一)pom.xml配置文件相关内容
<parent>
		<groupId>org.springframework.boot</groupId>
		<artifactId>spring-boot-starter-parent</artifactId>
		<version>2.0.4.RELEASE</version>
		<relativePath/> <!-- lookup parent from repository -->
	</parent>

	<properties>
		<project.build.sourceEncoding>UTF-8</project.build.sourceEncoding>
		<project.reporting.outputEncoding>UTF-8</project.reporting.outputEncoding>
		<java.version>1.8</java.version>
	</properties>

	<dependencies>
		<dependency>
			<groupId>org.springframework.boot</groupId>
			<artifactId>spring-boot-starter-web</artifactId>
		</dependency>


	</dependencies>
二)编写一个主程序;启动Spring Boot应用
/**
* @SpringBootApplication 来标注一个主程序类,说明这是一个Spring Boot应用
*/
@SpringBootApplication
public class Springbootday01Application {

	public static void main(String[] args) {
		// Spring应用启动起来
		SpringApplication.run(Springbootday01Application.class, args);
	}
}
三)、编写相关的Controller、Service
@Controller
public class HelloWord {
    @ResponseBody
    @RequestMapping("/hello")
    public String hello(){
        return "Hello World!";
    }

}
Hello World探究(第一个项目解析)
一)POM文件
   本项目的父路径
     <parent>
		<groupId>org.springframework.boot</groupId>
		<artifactId>spring-boot-starter-parent</artifactId>
		<version>2.0.4.RELEASE</version>
		<relativePath/> <!-- lookup parent from repository -->
	</parent>

   spring-boot-starter-parent
  他的父项目是
 <parent>
        <groupId>org.springframework.boot</groupId>
        <artifactId>spring-boot-dependencies</artifactId>
        <version>2.0.4.RELEASE</version>
        <relativePath>../../spring-boot-dependencies</relativePath>
    </parent>
他来真正管理Spring Boot应用里面的所有依赖版本;
Spring Boot的版本仲裁中心;
以后我们导入依赖默认是不需要写版本;(没有在dependencies里面管理的依赖自然需要声明版本号)
二)启动器
      <dependency>
			<groupId>org.springframework.boot</groupId>
			<artifactId>spring-boot-starter-web</artifactId>
		</dependency>
spring-boot-starter-web: spring-boot-starter:spring-boot场景启动器;帮我们导入了web模块正常运行所依赖的组件; Spring Boot将所有的功能场景都抽取出来,做成一个个的starters(启动器),只需要在项目里面引入这些starter 相关场景的所有依赖都会导入进来。要用什么功能就导入什么场景的启动器
三)主程序类,主入口类
@SpringBootApplication
public class Springbootday01Application {

	public static void main(String[] args) {

		SpringApplication.run(Springbootday01Application.class, args);
	}
}
@SpringBootApplication: Spring Boot应用标注在某个类上说明这个类是SpringBoot的主配置类,SpringBoot 就应该运行这个类的main方法来启动SpringBoot应用;
对于@SpringBootApplication可以点击进去查看具体内容
@Target(ElementType.TYPE)
@Retention(RetentionPolicy.RUNTIME)
@Documented
@Inherited
@SpringBootConfiguration
@EnableAutoConfiguration
@ComponentScan(excludeFilters = {
		@Filter(type = FilterType.CUSTOM, classes = TypeExcludeFilter.class),
		@Filter(type = FilterType.CUSTOM, classes = AutoConfigurationExcludeFilter.class) })
public @interface SpringBootApplication {

	/**
	 * Exclude specific auto-configuration classes such that they will never be applied.
	 * @return the classes to exclude
	 */
	@AliasFor(annotation = EnableAutoConfiguration.class)
	Class<?>[] exclude() default {};
@SpringBootConfiguration 表示这个是一个springboot的配置类
标注在某个类上,表示这是一个Spring Boot的配置类;
继续点击@SpringBootConfiguration进去可以看到如下
@Configuration:配置类上来标注这个注解; 配置类 ----- 配置文件;配置类也是容器中的一个组件;@Component
@Target({ElementType.TYPE})
@Retention(RetentionPolicy.RUNTIME)
@Documented
@Configuration
public @interface SpringBootConfiguration {
}
@EnableAutoConfiguration:开启自动配置功能;
以前我们需要配置的东西,Spring Boot帮我们自动配置;
@EnableAutoConfiguration告诉SpringBoot开启自 动配置功能;这样自动配置才能生效;
点击 @EnableAutoConfiguration 继续可以查看
@Target(ElementType.TYPE)
@Retention(RetentionPolicy.RUNTIME)
@Documented
@Inherited
@AutoConfigurationPackage
@Import(AutoConfigurationImportSelector.class)
public @interface EnableAutoConfiguration {

	String ENABLED_OVERRIDE_PROPERTY = "spring.boot.enableautoconfiguration";

	/**
	 * Exclude specific auto-configuration classes such that they will never be applied.
	 * @return the classes to exclude
	 */
	Class<?>[] exclude() default {};

	/**
	 * Exclude specific auto-configuration class names such that they will never be
	 * applied.
	 * @return the class names to exclude
	 * @since 1.3.0
	 */
	String[] excludeName() default {};

}
@AutoConfigurationPackage:自动配置包
点击@AutoConfigurationPackage继续查看
@Target(ElementType.TYPE)
@Retention(RetentionPolicy.RUNTIME)
@Documented
@Inherited
@Import(AutoConfigurationPackages.Registrar.class)
public @interface AutoConfigurationPackage {

}
@Import(AutoConfigurationPackages.Registrar.class)
Spring的底层注解@Import,给容器中导入一个组件;导入的组件由 AutoConfigurationPackages.Registrar.class;
将主配置类(@SpringBootApplication标注的类)的所在包及下面所有子包里面的所有组件扫描到Spring容器;
@Import(AutoConfigurationImportSelector.class) 给容器中导入组件
点击 AutoConfigurationImportSelector.class继续查看 里面的代码
@Override
	public String[] selectImports(AnnotationMetadata annotationMetadata) {
		if (!isEnabled(annotationMetadata)) {
			return NO_IMPORTS;
		}
		AutoConfigurationMetadata autoConfigurationMetadata = AutoConfigurationMetadataLoader
				.loadMetadata(this.beanClassLoader);
		AnnotationAttributes attributes = getAttributes(annotationMetadata);
      //这里返回需要配置的组件
		List<String> configurations = getCandidateConfigurations(annotationMetadata,
				attributes);
		configurations = removeDuplicates(configurations);
		Set<String> exclusions = getExclusions(annotationMetadata, attributes);
		checkExcludedClasses(configurations, exclusions);
		configurations.removeAll(exclusions);
		configurations = filter(configurations, autoConfigurationMetadata);
		fireAutoConfigurationImportEvents(configurations, exclusions);
		return StringUtils.toStringArray(configurations);
	}
EnableAutoConfigurationImportSelector:导入哪些组件的选择器;
将所有需要导入的组件以全类名的方式返回;这些组件就会被添加到容器中;
会给容器中导入非常多的自动配置类(xxxAutoConfiguration);就是给容器中导入这个场景需要的所有组件, 并配置好这些组件;
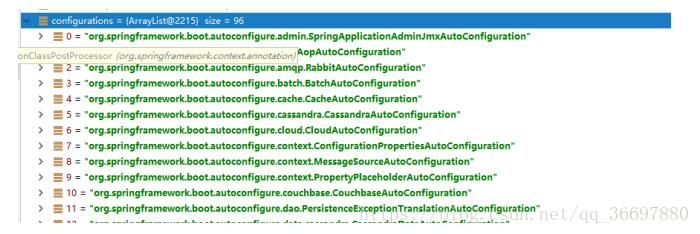
有了自动配置类,免去了我们手动编写配置注入功能组件等的工作; SpringFactoriesLoader.loadFactoryNames(EnableAutoConfiguration.class,classLoader);
Spring Boot在启动的时候从类路径下的META-INF/spring.factories中获取EnableAutoConfiguration指定的值,将 这些值作为自动配置类导入到容器中,自动配置类就生效,帮我们进行自动配置工作;以前我们需要自己配置的东 西,自动配置类都帮我们;
J2EE的整体整合解决方案和自动配置都在spring-boot-autoconfigure-2.0.4.RELEASE.jar;
