SSO :同一个帐号在同一个公司不同系统上登陆
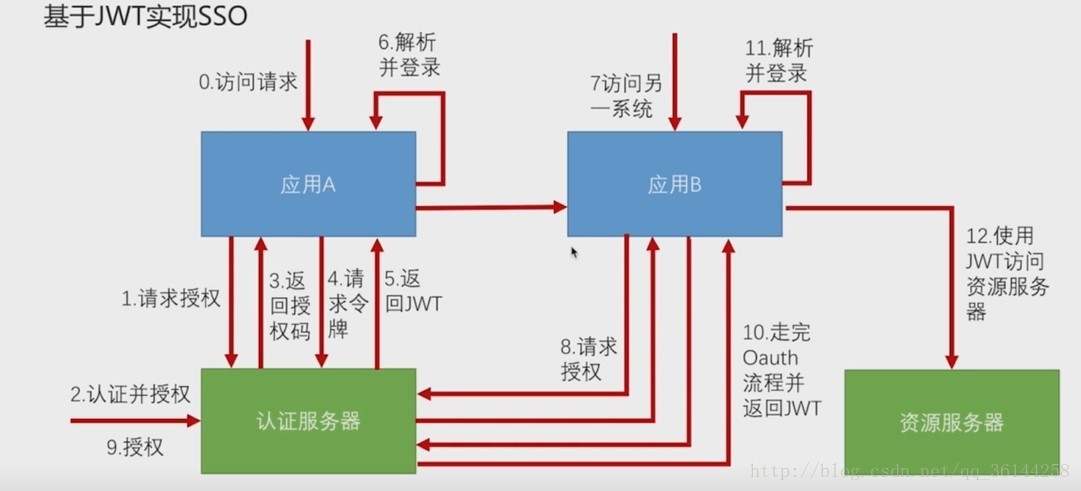
使用SpringSecurity实现类似于SSO登陆系统是十分简单的 下面我就搭建一个DEMO
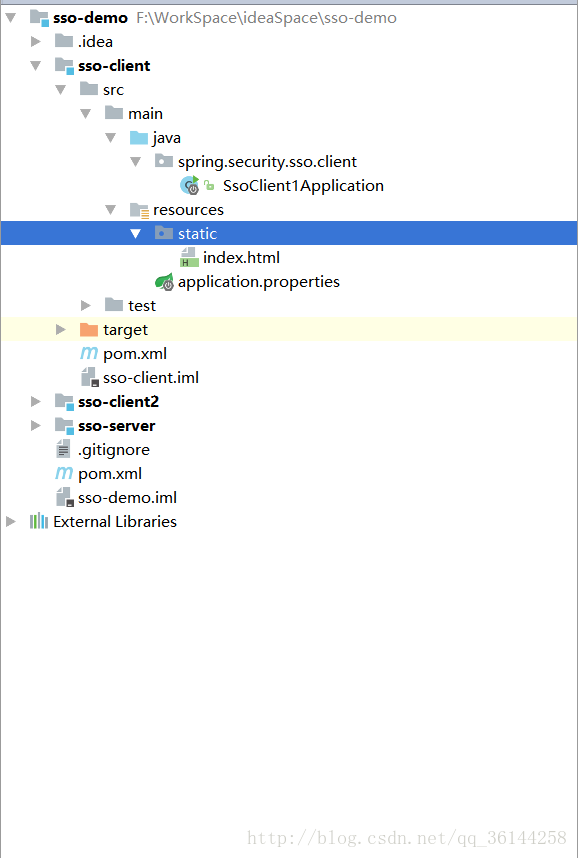
首先来看看目录的结构
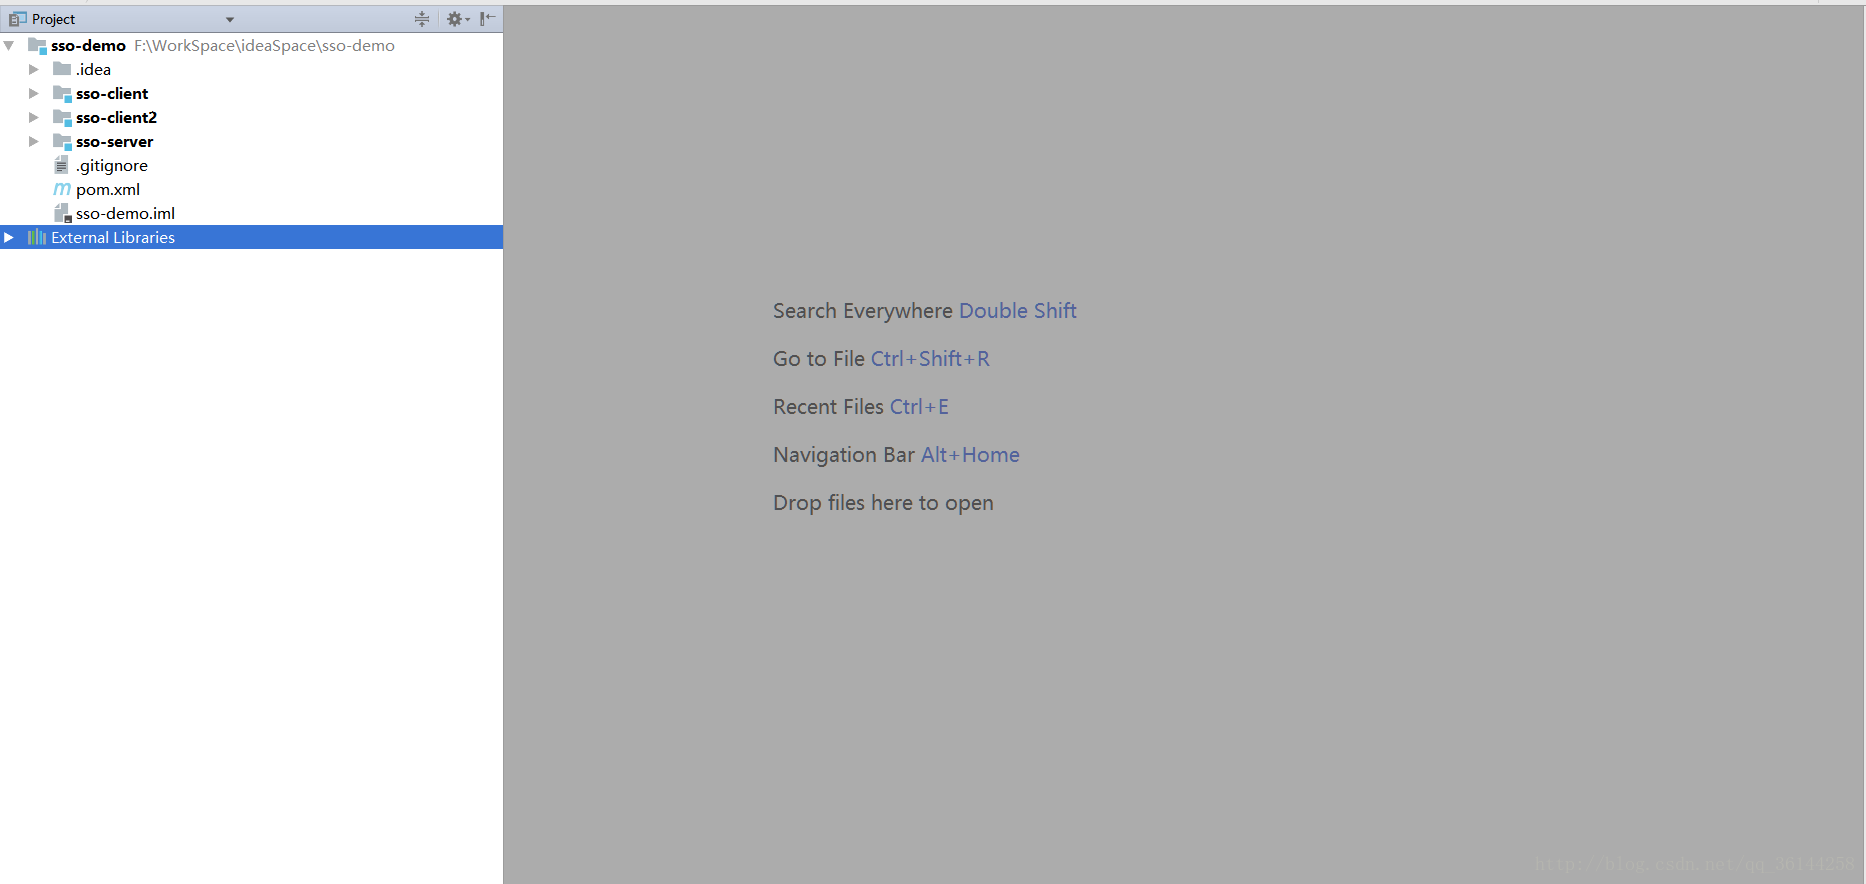
其中sso-demo是父工程项目 sso-client 、sso-client2分别对应2个资源服务器,sso-server是认证服务器
引入的pom文件
sso-demo
<?xml version="1.0" encoding="UTF-8"?>
<project xmlns="http://maven.apache.org/POM/4.0.0" xmlns:xsi="http://www.w3.org/2001/XMLSchema-instance"
         xsi:schemaLocation="http://maven.apache.org/POM/4.0.0 http://maven.apache.org/xsd/maven-4.0.0.xsd">
    <modelVersion>4.0.0</modelVersion>

    <groupId>study.security.sso</groupId>
    <artifactId>sso-demo</artifactId>
    <version>1.0.0-SNAPSHOT</version>
    <modules>
        <module>sso-server</module>
        <module>sso-client</module>
        <module>sso-client2</module>
    </modules>
    <packaging>pom</packaging>

    <dependencyManagement>
        <dependencies>
            <dependency>
                <groupId>io.spring.platform</groupId>
                <artifactId>platform-bom</artifactId>
                <version>Brussels-SR4</version>
                <type>pom</type>
                <scope>import</scope>
            </dependency>
            <dependency>
                <groupId>org.springframework.cloud</groupId>
                <artifactId>spring-cloud-dependencies</artifactId>
                <version>Dalston.SR2</version>
                <type>pom</type>
                <scope>import</scope>
            </dependency>
        </dependencies>
    </dependencyManagement>

    <build>
        <plugins>
            <plugin>
                <groupId>org.apache.maven.plugins</groupId>
                <artifactId>maven-compiler-plugin</artifactId>
                <version>2.3.2</version>
                <configuration>
                    <source>1.8</source>
                    <target>1.8</target>
                    <encoding>UTF-8</encoding>
                </configuration>
            </plugin>
        </plugins>
    </build>

</project>
sso-server
<?xml version="1.0" encoding="UTF-8"?>
<project xmlns="http://maven.apache.org/POM/4.0.0"
         xmlns:xsi="http://www.w3.org/2001/XMLSchema-instance"
         xsi:schemaLocation="http://maven.apache.org/POM/4.0.0 http://maven.apache.org/xsd/maven-4.0.0.xsd">
    <parent>
        <artifactId>sso-demo</artifactId>
        <groupId>study.security.sso</groupId>
        <version>1.0.0-SNAPSHOT</version>
    </parent>
    <modelVersion>4.0.0</modelVersion>

    <artifactId>sso-server</artifactId>

    <dependencies>
        <dependency>
            <groupId>org.springframework.boot</groupId>
            <artifactId>spring-boot-starter-security</artifactId>
        </dependency>
        <dependency>
            <groupId>org.springframework.boot</groupId>
            <artifactId>spring-boot-starter-web</artifactId>
        </dependency>
        <dependency>
            <groupId>org.springframework.security.oauth</groupId>
            <artifactId>spring-security-oauth2</artifactId>
        </dependency>
        <dependency>
            <groupId>org.springframework.security</groupId>
            <artifactId>spring-security-jwt</artifactId>
        </dependency>

    </dependencies>

</project>
sso-client与sso-client2 pom 中的 是一样的
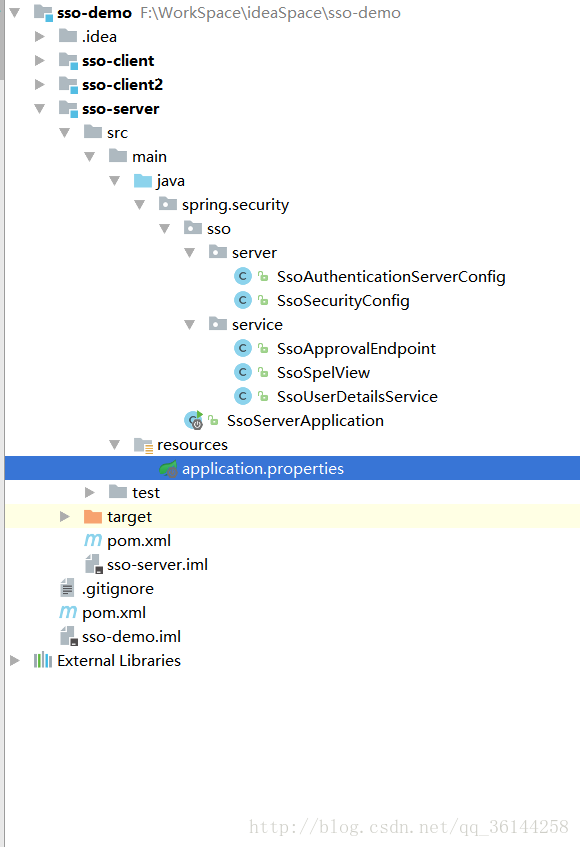
1.sso-server
现在开始搭建认证服务器
认证服务器的目录结构如下
/**
 * 认证服务器配置
 * Created by ZhuPengWei on 2018/1/11.
 */
@Configuration
@EnableAuthorizationServer
public class SsoAuthenticationServerConfig extends AuthorizationServerConfigurerAdapter {

    @Override
    public void configure(ClientDetailsServiceConfigurer clients) throws Exception {
        clients.inMemory()
                .withClient("client1")
                .secret("client1")
                .authorizedGrantTypes("authorization_code", "refresh_token")
                .scopes("all")
                .and()
                .withClient("client2")
                .secret("client2")
                .authorizedGrantTypes("authorization_code", "refresh_token")
                .scopes("all");
    }

    @Override
    public void configure(AuthorizationServerEndpointsConfigurer endpoints) throws Exception {
        endpoints.tokenStore(jwtTokenStore()).accessTokenConverter(jwtAccessTokenConverter());
    }


    /**
     * 认证服务器的安全配置
     *
     * @param security
     * @throws Exception
     */
    @Override
    public void configure(AuthorizationServerSecurityConfigurer security) throws Exception {
        // 要访问认证服务器tokenKey的时候需要经过身份认证
        security.tokenKeyAccess("isAuthenticated()");
    }

    @Bean
    public TokenStore jwtTokenStore() {
        return new JwtTokenStore(jwtAccessTokenConverter());
    }

    @Bean
    public JwtAccessTokenConverter jwtAccessTokenConverter() {
        JwtAccessTokenConverter jwtAccessTokenConverter = new JwtAccessTokenConverter();
        // 保证JWT安全的唯一方式
        jwtAccessTokenConverter.setSigningKey("ZPW");
        return jwtAccessTokenConverter;
    }
}
/**
* 自定义用户登陆逻辑配置
* Created by ZhuPengWei on 2018/1/13.
*/
@Configuration
public class SsoSecurityConfig extends WebSecurityConfigurerAdapter {
@Autowired
private UserDetailsService userDetailsService;
/**
* 加密解密逻辑
*/
@Bean
public PasswordEncoder passwordEncoder() {
return new BCryptPasswordEncoder();
}
@Override
protected void configure(HttpSecurity http) throws Exception {
// 改成表单登陆的方式 所有请求都需要认证
http.formLogin().and().authorizeRequests().anyRequest().authenticated();
}
@Override
protected void configure(AuthenticationManagerBuilder auth) throws Exception {
// 用自己的登陆逻辑以及加密器
auth.userDetailsService(userDetailsService).passwordEncoder(passwordEncoder());
}
}
/**
 * 自定义用户登陆
 * Created by ZhuPengWei on 2018/1/13.
 */
@Component
public class SsoUserDetailsService implements UserDetailsService {

    @Autowired
    private PasswordEncoder passwordEncoder;

    @Override
    public UserDetails loadUserByUsername(String username) throws UsernameNotFoundException {

        return new User(username,
                passwordEncoder.encode("123456"),
                AuthorityUtils.commaSeparatedStringToAuthorityList("ROLE_USER"));
    }
}
其中SsoApprovalEndPoint与SsoSpelView目的是去掉登陆之后授权的效果
注解 @FrameworkEndpoint
与@RestController注解相类似
如果声明和@FrameworkEndpoint一模一样的@RequestMapping
Spring框架处理的时候会优先处理@RestController里面的
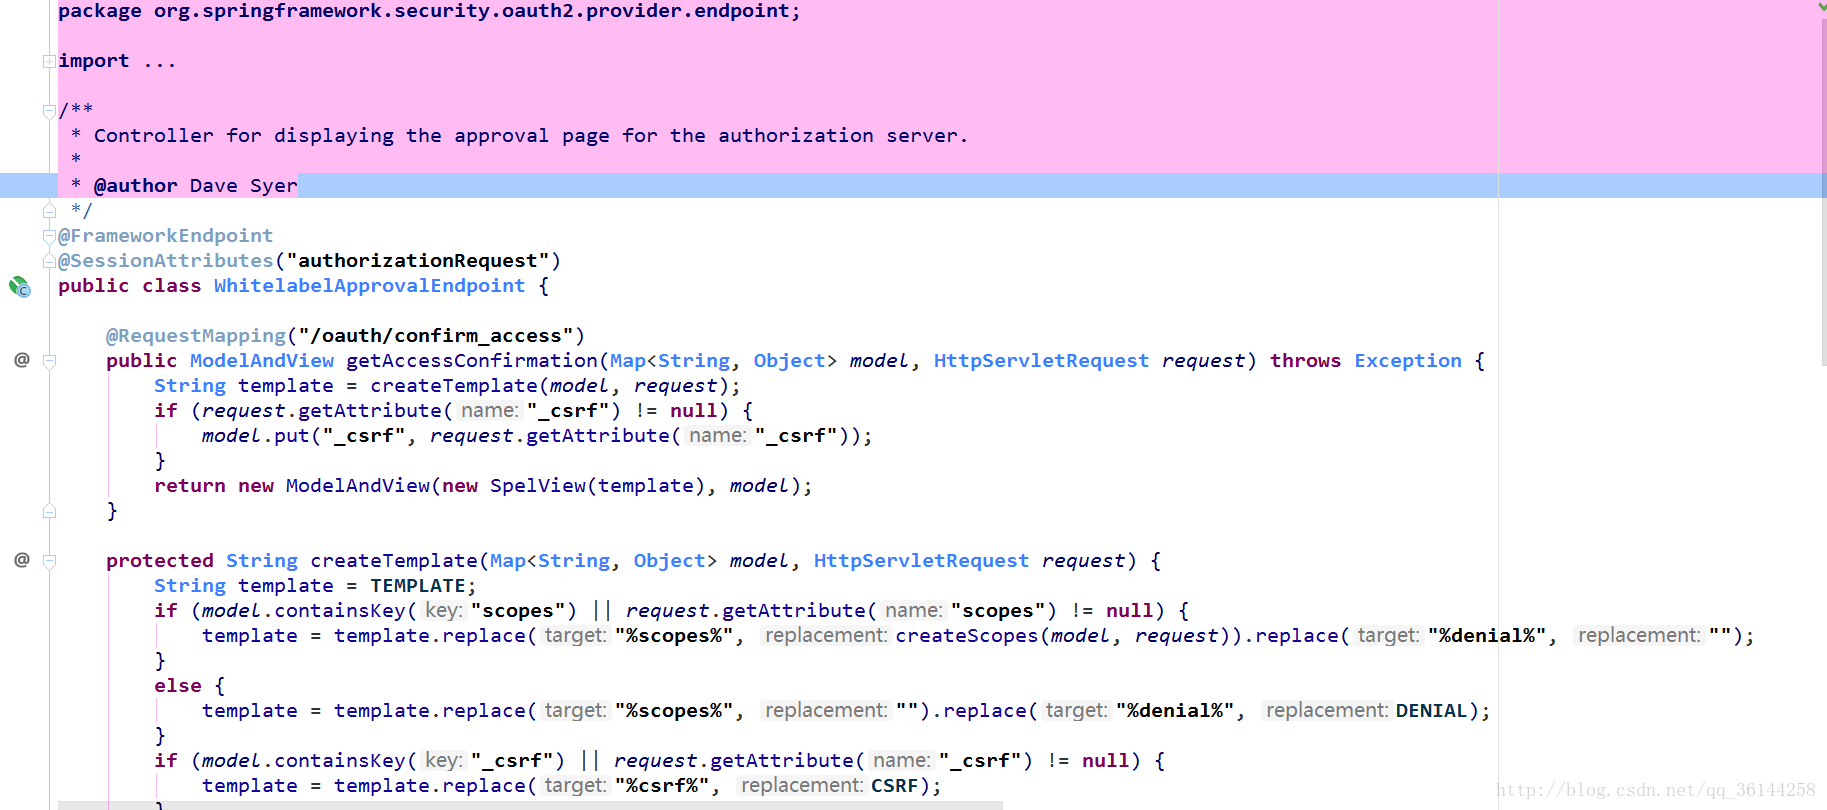
/**
 * 自定义认证逻辑
 * Created by ZhuPengWei on 2018/1/13.
 */
@RestController
@SessionAttributes("authorizationRequest")
public class SsoApprovalEndpoint {

    @RequestMapping("/oauth/confirm_access")
    public ModelAndView getAccessConfirmation(Map<String, Object> model, HttpServletRequest request) throws Exception {
        String template = createTemplate(model, request);
        if (request.getAttribute("_csrf") != null) {
            model.put("_csrf", request.getAttribute("_csrf"));
        }
        return new ModelAndView(new SsoSpelView(template), model);
    }

    protected String createTemplate(Map<String, Object> model, HttpServletRequest request) {
        String template = TEMPLATE;
        if (model.containsKey("scopes") || request.getAttribute("scopes") != null) {
            template = template.replace("%scopes%", createScopes(model, request)).replace("%denial%", "");
        } else {
            template = template.replace("%scopes%", "").replace("%denial%", DENIAL);
        }
        if (model.containsKey("_csrf") || request.getAttribute("_csrf") != null) {
            template = template.replace("%csrf%", CSRF);
        } else {
            template = template.replace("%csrf%", "");
        }
        return template;
    }

    private CharSequence createScopes(Map<String, Object> model, HttpServletRequest request) {
        StringBuilder builder = new StringBuilder("<ul>");
        @SuppressWarnings("unchecked")
        Map<String, String> scopes = (Map<String, String>) (model.containsKey("scopes") ? model.get("scopes") : request
                .getAttribute("scopes"));
        for (String scope : scopes.keySet()) {
            String approved = "true".equals(scopes.get(scope)) ? " checked" : "";
            String denied = !"true".equals(scopes.get(scope)) ? " checked" : "";
            String value = SCOPE.replace("%scope%", scope).replace("%key%", scope).replace("%approved%", approved)
                    .replace("%denied%", denied);
            builder.append(value);
        }
        builder.append("</ul>");
        return builder.toString();
    }

    private static String CSRF = "<input type='hidden' name='${_csrf.parameterName}' value='${_csrf.token}' />";

    private static String DENIAL = "<form id='denialForm' name='denialForm' action='${path}/oauth/authorize' method='post'><input name='user_oauth_approval' value='false' type='hidden'/>%csrf%<label><input name='deny' value='Deny' type='submit'/></label></form>";

    // 对源代码进行处理 隐藏授权页面,并且使他自动提交
    private static String TEMPLATE = "<html><body><div style='display:none;'> <h1>OAuth Approval</h1>"
            + "<p>Do you authorize '${authorizationRequest.clientId}' to access your protected resources?</p>"
            + "<form id='confirmationForm' name='confirmationForm' action='${path}/oauth/authorize' method='post'><input name='user_oauth_approval' value='true' type='hidden'/>%csrf%%scopes%<label><input name='authorize' value='Authorize' type='submit'/></label></form>"
            + "%denial%</div><script>document.getElementById('confirmationForm').submit();</script></body></html>";

    private static String SCOPE = "<li><div class='form-group'>%scope%: <input type='radio' name='%key%'"
            + " value='true'%approved%>Approve</input> <input type='radio' name='%key%' value='false'%denied%>Deny</input></div></li>";

}
SsoSpelView 与 原来SpelView 是一样的 只不过原来SpelView 不是public的类
application.properties
server.port=9999
server.context-path=/server
2.sso-client
相对于认证服务器 资源服务器demo的配置就十分简单了
/**
 * Created by ZhuPengWei on 2018/1/11.
 */
@SpringBootApplication
@RestController
@EnableOAuth2Sso
public class SsoClient1Application {

    @GetMapping("/user")
    public Authentication user(Authentication user) {
        return user;
    }

    public static void main(String[] args) {
        SpringApplication.run(SsoClient1Application.class, args);
    }
}
<!DOCTYPE html>
<html lang="en">
<head>
    <meta charset="UTF-8">
    <title>SSO Client1</title>
</head>
<body>
<h1>SSO Demo Client1</h1>
<a href="http://127.0.0.1:8060/client2/index.html">访问client2</a>

</body>
</html>
application.properties
security.oauth2.client.client-id=client1
security.oauth2.client.client-secret=client1
#需要认证时候跳转的地址
security.oauth2.client.user-authorization-uri=http://127.0.0.1:9999/server/oauth/authorize
#请求令牌地址
security.oauth2.client.access-token-uri=http://127.0.0.1:9999/server/oauth/token
#解析
security.oauth2.resource.jwt.key-uri=http://127.0.0.1:9999/server/oauth/token_key


#sso
server.port=8080
server.context-path=/client1
3.sso-client2
资源服务器1和资源服务器2的目录结构是一样的,改了相关的参数
/**
 * Created by ZhuPengWei on 2018/1/11.
 */
@SpringBootApplication
@RestController
@EnableOAuth2Sso
public class SsoClient2Application {

    @GetMapping("/user")
    public Authentication user(Authentication user) {
        return user;
    }

    public static void main(String[] args) {
        SpringApplication.run(SsoClient2Application.class, args);
    }
}
<!DOCTYPE html>
<html lang="en">
<head>
<meta charset="UTF-8">
<title>SSO Client2</title>
</head>
<body>
<h1>SSO Demo Client2</h1>
<a href="http://127.0.0.1:8080/client1/index.html">访问client1</a>
</body>
</html>security.oauth2.client.client-id=client2
security.oauth2.client.client-secret=client2
#需要认证时候跳转的地址
security.oauth2.client.user-authorization-uri=http://127.0.0.1:9999/server/oauth/authorize
#请求令牌地址
security.oauth2.client.access-token-uri=http://127.0.0.1:9999/server/oauth/token
#解析
security.oauth2.resource.jwt.key-uri=http://127.0.0.1:9999/server/oauth/token_key
#sso
server.port=8060
server.context-path=/client2好了 基于JWT实现SSO单点登录的DEMO以及搭建完成了 下面来看看页面的效果
在初次访问的时候
图1

登陆成功之后
图2

图3

注意
写SsoApprovalEndPoint与SsoSpelView目的是去掉登陆之后授权的效果如果不写这2个类
在初次访问的登陆成功之后是有一步授权的操作的
比如说图1操作成功之后
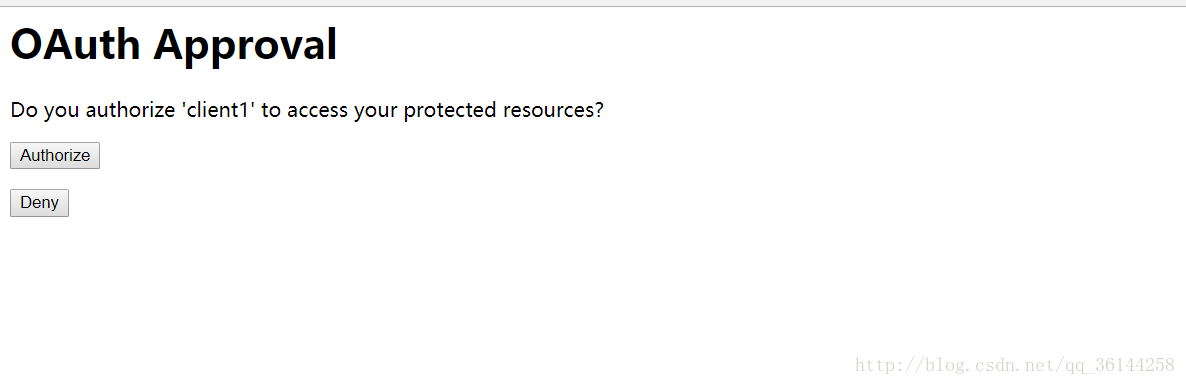
点击Authorize才会跳转到图2