1. Theories
What is SSO?
单点登录(Single Sign On),简称为 SSO,是目前比较流行的企业业务整合的解决方案之一。SSO的定义是在多个应用系统中,用户只需要登录一次就可以访问所有相互信任的应用系统。
What is Spring Security?
What is OAuth2?
首先简单了解一下用于验证及授权的OAuth协议,
OAuth(开放授权)是一个开放标准,允许用户让第三方应用访问该用户在某一网站上存储的私密的资源(如照片,视频,联系人列表),而无需将用户名和密码提供给第三方应用。
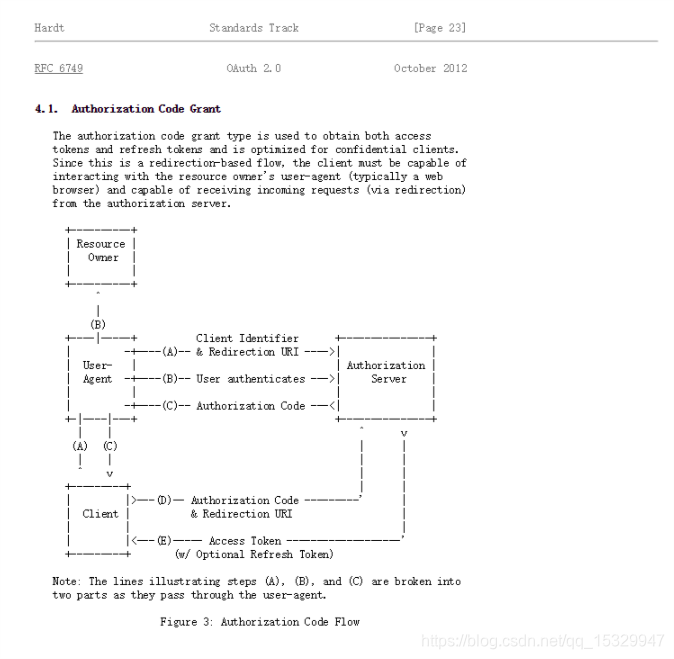
OAuth 2.0是该协议的2.0版本,2012年10月,OAuth 2.0协议正式发布为RFC 6749。下图是OAuth标准授权流程,即 Authorization Code Grant模式的示意图。
该方式的优缺点:
- 优点:将登录逻辑从各应用处抽取出来,统一了登录入口。
- 缺点:登录授权过程需要重定向多次,实现起来比较复杂。
SSO OAuth2.0登录授权流程梳理,如下图所示:
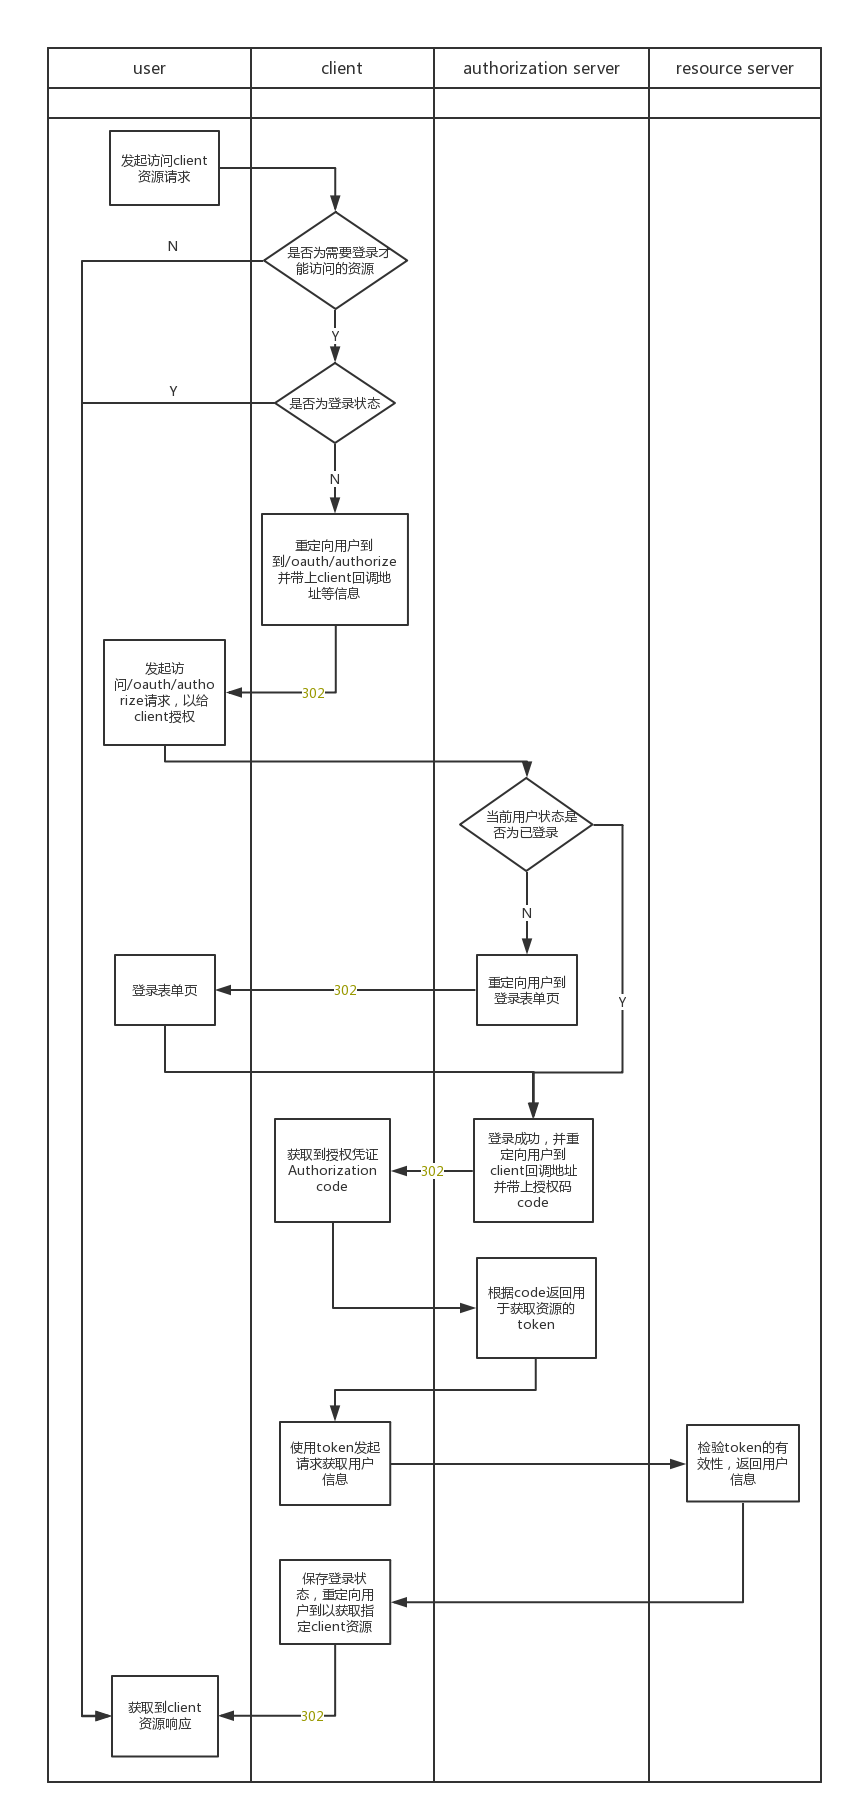
在选用OAuth2.0协议作为SSO的实现方式后,需要选定一个实现了该协议流程的框架来简化开发。经过比较后,最终选定Spring Security SSO。
由流程图可以得出,主要需要配置开发有三部分,分别为client、authorizetion server及resource server,由于resource server本身需要实现功能比较简单,所以authorizetion server和resource server本身可以是一个应用。
2. Coding
2.1 OverView
In this tutorial, we will discuss how to implement SSO – Single Sign On – using Spring Security OAuth and Spring Boot.
We will use three separate applications:
An Authorization Server – which is the central authentication mechanism
Two Client Applications: the applications using SSO
Very simply put, when a user tries to access a secured page in the client app, they will be redirected to authenticate first, via the Authentication Server.
And we are going to use the Authorization Code grant type out of OAuth2 to drive the delegation of authentication.
2.2 The Client App
Maven Dependencies
Let us start with our Client Application; we will, of course, use Spring Boot to minimize the configuration:
<dependencies>
    <dependency>
        <groupId>org.springframework.security.oauth.boot</groupId>
        <artifactId>spring-security-oauth2-autoconfigure</artifactId>
        <version>2.1.6.RELEASE</version>
    </dependency>
    <dependency>
        <groupId>org.springframework.boot</groupId>
        <artifactId>spring-boot-starter-thymeleaf</artifactId>
    </dependency>
    <dependency>
        <groupId>org.thymeleaf.extras</groupId>
        <artifactId>thymeleaf-extras-springsecurity5</artifactId>
    </dependency>
</dependencies>
Note that we should depend on thymeleaf-extras-springsecurity5 instead of thymeleaf-extras-springsecurity4, because only the version 5 matches the latest springboot and spring security version.
Boot Application
@SpringBootApplication
public class SsoApp1Application extends SpringBootServletInitializer {

    @Bean
    public RequestContextListener requestContextListener() {
        return new RequestContextListener();
    }

    public static void main(String[] args) {
        SpringApplication.run(SsoApp1Application.class, args);
    }

}
Security Configuration
Next, the most important part, the security configuration of our client application:
@Configuration
@EnableOAuth2Sso
public class AppSecurityConfig extends WebSecurityConfigurerAdapter {

    @Override
    public void configure(HttpSecurity http) throws Exception {
        http.antMatcher("/**")
                .authorizeRequests()
                .antMatchers("/login**")
                .permitAll()
                .anyRequest()
                .authenticated();
    }
}
The core part of this configuration is, of course, the @EnableOAuth2Sso annotation we are using to enable Single Sign On.
Note that we need to extend the WebSecurityConfigurerAdapter – without it, all the paths will be secured – so the users will be redirected to log in when they try to access any page. In our case here, the index and login pages are the only pages that can be accessed without authentication.
Finally, we also defined a RequestContextListener bean to handle requests scopes.
Further reading:
When to use Spring Security`s antMatcher()?
Spring security application of antMatcher() vs. antMatchers()
WebMVC Configuration
@Configuration
@EnableWebMvc
public class AppWebConfig implements WebMvcConfigurer {

    @Override
    public void addViewControllers(final ViewControllerRegistry registry) {
        registry.addViewController("/").setViewName("index");
    }
}
The method addViewController is overrided to map the root path “/” to the view “index”, here are some related links to explain it:
Java Spring Boot: How to map my app root (“/”) to index.html?
More details can be found at the source code of spring-webmvc.
application.yml
server:
  port: 8081
  servlet:
    session:
      cookie:
        name: APP1SESSION
security:
  oauth2:
    client:
      clientId: ssoId
      clientSecret: ssoSecret
      accessTokenUri: http://localhost:8080/oauth/token
      userAuthorizationUri: http://localhost:8080/oauth/authorize
    resource:
      userInfoUri: http://localhost:8080/user/me
spring:
  thymeleaf:
    cache: false
For app1 client, the port should be 8081, the session.cookie.name=APP1SESSION; app2 port: 8082, cookie name: APP2SESSION.
You may wonder why we must add cookies for each app, here is an answer from stackoverflow:
Centinul as you have figured out this happens due to a cookie conflict, unfortunately cookies don’t respect the port numbers. And so both Apps interfere with each other since both are setting JSESSIONID.
There are two easy workarounds:
- use server.context-path to move each App to different paths, note that you need to do this for both
- set the server.session.cookie.name for one App to something different, e.g., APPSESSIONID
I would suggest to put this workaround in a profile that you activate for localhost only.
Further reading:
Are HTTP cookies port specific?
Front End
resources/template/index.html
<!DOCTYPE html>
<html xmlns:th="http://www.w3.org/1999/xhtml">
<head>
    <meta http-equiv="Content-Type" content="text/html; charset=utf-8" />
    <title>Spring Security SSO 1</title>
    <link rel="stylesheet"
          href="https://maxcdn.bootstrapcdn.com/bootstrap/3.3.2/css/bootstrap.min.css" />
</head>

<body>
<div class="container">
    <div class="col-sm-12">
        <h1>APP1</h1>
        Welcome, <span th:text="${#authentication.name}">Name</span>
    </div>
</div>
</body>
</html>
2.3 The Auth Server
Maven Dependencies
<dependency>
    <groupId>org.springframework.security.oauth</groupId>
    <artifactId>spring-security-oauth2</artifactId>
    <version>2.3.6.RELEASE</version>
</dependency>
OAuth Configuration
It is important to understand that we are going to run the Authorization Server and the Resource Server together here, as a single deployable unit.
Let us start with the configuration of our Resource Server – which doubles as our primary Boot application:
@SpringBootApplication
@EnableResourceServer
public class SsoServerApplication extends SpringBootServletInitializer {

    public static void main(String[] args) {
        SpringApplication.run(SsoServerApplication.class, args);
    }

}
Then, we will configure our Authorization server:
@Configuration
@EnableAuthorizationServer
public class AuthorizationConfig extends AuthorizationServerConfigurerAdapter {

    @Autowired
    private BCryptPasswordEncoder passwordEncoder;

    @Override
    public void configure(AuthorizationServerSecurityConfigurer oauthServer) {
        oauthServer.tokenKeyAccess("permitAll()")
                .checkTokenAccess("isAuthenticated()");
    }

    @Override
    public void configure(ClientDetailsServiceConfigurer clients) throws Exception {
        clients.inMemory()
                .withClient("ssoId")
                .secret(passwordEncoder.encode("ssoSecret"))
                .authorizedGrantTypes("authorization_code")
                .scopes("user_info")
                .autoApprove(true)
                .redirectUris("http://localhost:8081/login", "http://localhost:8082/login");
    }
}
Note how we are only enabling a simple client using the authorization_code grant type.
Also, note how autoApprove is set to true so that we’re not redirected and promoted to manually approve any scopes.
Security Configuration
Now, let us move to the configuration and define a simple form login mechanism:
@Configuration
@Order(1)
public class ServerSecurityConfig extends WebSecurityConfigurerAdapter {

    @Override
    protected void configure(HttpSecurity http) throws Exception {
        http.requestMatchers()
                .antMatchers("/login", "/oauth/authorize")
                .and()
                .authorizeRequests()
                .anyRequest().authenticated()
                .and()
                .formLogin().permitAll();
    }

    @Override
    protected void configure(AuthenticationManagerBuilder auth) throws Exception {
        auth.inMemoryAuthentication()
                .withUser("jake")
                .password(passwordEncoder().encode("123"))
                .roles("USER");
    }

    @Bean
    public BCryptPasswordEncoder passwordEncoder(){
        return new BCryptPasswordEncoder();
    }
}
The @Order(1) annotation grants ServerSecurityConfig the highest priority among all Security Configurations.
Note that we used simple in-memory authentication, but we can simply replace it with a custom userDetailsService.
User Endpoint
Finally, we will create our user endpoint we used earlier in our configuration:
@RestController
public class UserController {
    @GetMapping("/user/me")
    public Principal user(Principal principal) {
        return principal;
    }
}
3. Conclusion
The SSO system sometimes meets the unauthorized problem that when visiting app1 index(http://localhost:8081), obviously it will redirects to server login page(http://localhost:8080/login), and then successfully login; then the page will redirects to the app1 index again. All the steps are under control till now. But when you visit app2 index(http://localhost:8082), strange thing happens, the prompt error messages(e.g. statusCode=999) remind you that app2 index is not authorized(statusCode=401) yet.
In this quick tutorial, we focused on implementing Single Sign On using Spring Security Oauth2 and Spring Boot.
The full source code can be downloaded from Gitee.
